Responding to HTTP Session Expiration on the Frontend via WebSockets
Presents a slightly different use of WebSockets — an action is taken at the front-end level when the HTTP session expires, and the back-end signals it.
Join the DZone community and get the full member experience.
Join For FreeThere is no doubt that nowadays software applications and products that have a significant contribution to our well-being are real-time. Real-time software makes systems responsive, reliable, and safe, especially in cases where timing is important — from healthcare and defense to entertainment and transportation. Such applications are helpful as they process and respond to data almost instantly or within a guaranteed time frame, which is critical when timing and accuracy directly affect performance, safety, or even user experience.
As a protocol that enables real-time, two-way (full-duplex) communication between a client and a server over a single, long-lived TCP connection, WebSockets are among the technologies used by such applications.
The purpose of this article isn’t to describe in detail what WebSockets are. It’s assumed the reader is familiar with these concepts. Nevertheless, it briefly highlights the general workflow, then it focuses on presenting a concrete use-case and exemplifies how WebSockets are used to address a real concern.
As part of a simple web application, it is considered that the HTTP user session expires, and yet an action at the front-end level is expected. In this direction, the client (browser) is let know by the server (back-end) about the event by leveraging WebSockets.
WebSockets: The Workflow
Normally, communication in web or REST applications happens via HTTP, in a request-response manner — the client asks, the server replies, then the connection closes. With WebSockets, there is a slightly different architecture. Once the connection is established, both the client and the server can send data to each other, at any time. There’s no need to repeatedly open new requests, as the same connection is used.
The workflow is the following:
- As part of the communication handshake, the client sends an HTTP request with an
Upgrade: websocketheader. - The server responds with an HTTP 101 (Switching Protocols) status whether it supports
WebSocketsand basically it agrees and upgrades to theWebSocketprotocol - A persistent TCP connection is then established, which remains open (port 80 or 443)
- Both ends can push messages instantly in either direction, data is transmitted via small “frames” with minimal overhead, instead of full HTTP messages
In general, when to use or if to use WebSockets is a trade-off each team shall analyze. In many cases, AJAX and HTTP streaming or long polling can be simpler and more effective. As clearly outlined in the Spring WebSocket Documentation — “It is a combination of low latency, high frequency, and high volume that makes the best case for the use of WebSocket.”
Nevertheless, this article presents a slightly different use of them, one that proves to successfully solve the particular outlined challenge – to act at the front-end level when the HTTP session expires.
The Initial Implementation
To put the use case into practice, a simple web application running on a web container and holding an HTTP session is first created.
The set-up is the following:
- Java 21
- Maven 3.9.9
- Spring Boot – v.3.5.5
- Spring Security – for application authentication, authorization and user session management
- Spring WebSocket – for the WebSockets server-side implementation
- Stomp v.2.3.3 and SockJS Client v.1.6.1 JavaScript libraries – for the WebSockets client-side implementation
- Thymeleaf – for implementing the front-end (for simplicity, as part of the same application)
Once the dependencies are selected, they are added into the pom.xml file.
<dependency>
    <groupId>org.springframework.boot</groupId>
    <artifactId>spring-boot-starter-web</artifactId>
</dependency>
<dependency>
    <groupId>org.springframework.boot</groupId>
    <artifactId>spring-boot-starter-security</artifactId>
</dependency>
<dependency>
    <groupId>org.springframework.boot</groupId>
    <artifactId>spring-boot-starter-thymeleaf</artifactId>
</dependency>
<dependency>
    <groupId>org.thymeleaf.extras</groupId>
    <artifactId>thymeleaf-extras-springsecurity6</artifactId>
</dependency>
<dependency>
    <groupId>org.springframework.boot</groupId>
    <artifactId>spring-boot-starter-websocket</artifactId>
</dependency>
Next, the application is sketched up.
In terms of front-end and user experience, the application is reduced to the minimum, so that this experiment can be fulfilled. It is consisted of three pages:
index.html– the starting point, it can be accessed without needing to authenticatelogin.html– the place the user can sign in, also accessible without authenticationhome.html– the landing-page the user is brought to once signing in successfully
To be able to access these pages, the next minimal configuration class is added, together with three view controllers, respectively.
@Configuration
public class WebConfig implements WebMvcConfigurer {

    @Override
    public void addViewControllers(ViewControllerRegistry registry) {
        registry.addViewController("/")
                .setViewName("index");
        registry.addViewController("/login")
                .setViewName("login");
        registry.addViewController("/home")
                .setViewName("home");
    }
}
The context path of the application is set in the application.properties file as /app.
server.servlet.context-path = /appWith what we have so far, as spring-boot-starter-security is discovered in class path, if the application is launched, Spring Boot generates a default security password that is displayed in the logs upon start-up and can be used to sign into the application (default username is user).
In order to better control the behavior, the default security configuration is overwritten.
@Configuration
@EnableWebSecurity
public class SecurityConfig {

    @Bean
    public SecurityFilterChain securityFilterChain(HttpSecurity http) throws Exception {
        http
                .headers(AbstractHttpConfigurer::disable)
                .authorizeHttpRequests(authorizeHttpRequestsCustomizer ->
                        authorizeHttpRequestsCustomizer.requestMatchers("/").permitAll()
                                .anyRequest().authenticated())
                .formLogin(formLoginCustomizer ->
                        formLoginCustomizer.loginPage("/login")
                                .permitAll()
                                .defaultSuccessUrl("/home"))
                .logout(logoutCustomizer ->
                        logoutCustomizer.invalidateHttpSession(true)
                                .deleteCookies("JSESSIONID")
                                .logoutSuccessUrl("/"))
                .sessionManagement(sessionManagementConfigurer ->
                        sessionManagementConfigurer.maximumSessions(1)
                                .expiredUrl("/home"));
        return http.build();
    }

    @Bean
    public PasswordEncoder passwordEncoder() {
        return PasswordEncoderFactories.createDelegatingPasswordEncoder();
    }

    @Bean
    public UserDetailsService userDetailsService(PasswordEncoder passwordEncoder) {
        UserDetails user = User.builder()
                .username("horatiucd")
                .password(passwordEncoder.encode("a"))
                .roles("USER")
                .build();

        return new InMemoryUserDetailsManager(user);
    }
}
Very briefly, the simplistic UserDetailsService is configured to have only one in-memory user, whose password is encrypted using a DelegatingPasswordEncoder with the default mappings.
The security filter chain capable of being matched against an HttpServletRequest is built and the restrictions on the pages are the ones specified above. The login page is accessible without authentication. Once signed in successfully, the user is taken to the home page. When signing out, the HttpSession is invalidated, the JSESSIONID cookie deleted and the user redirected to the root application path.
Regarding session management, as this is an aspect of interest in this article, the application is configured to have just one session per each user. In addition, the duration of the session is customized in the application.properties file to last 1 minute. Such a value is not recommended in real applications, but it’s fine for the sake of this experiment.
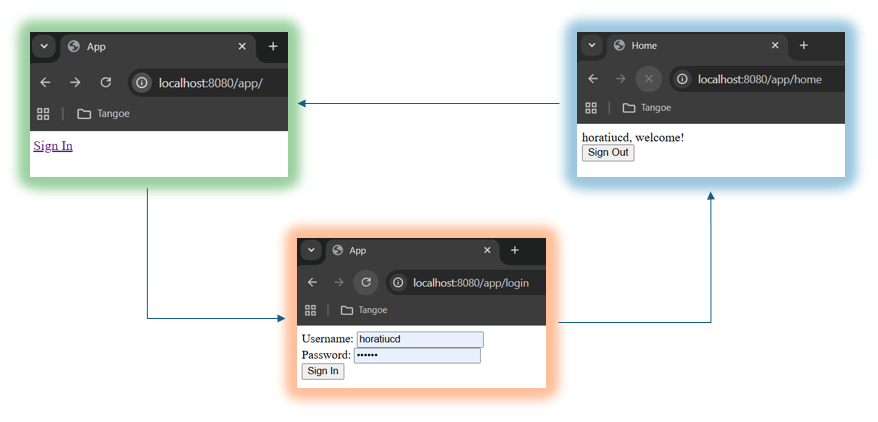
server.servlet.session.timeout = 1mWith these pieces of configuration in place, the application is re-run. If accessed at http://localhost:8080/app/, it displays the index.html view. From here, a user can go to login.html page, provide the credentials, and sign in. To log out, the user can press the Sign Out button and then return to the application root.
As of now, as soon as a user session expires due to inactivity, a redirect to the home page is done at the very next action. In some use cases, this behavior is acceptable and perfectly fine, while in others, it is not. Let’s assume in this case it’s not.
The Improved Implementation
With the statement in the last sentence in mind, we will further exemplify how the interaction between the client and the server can be enhanced in case of session expiration. WebSockets are used to help the back-end communicate with the front-end when the user session has just expired and allow the client to decide how to further act to this event. Here, just a reload of the current page is done, basically forcing the redirect to the login page.
At server-side level, in order to be aware when sessions are created and / or terminated, a custom HttpSessionListener is added. According to the Java documentation, implementers “are notified of changes to the list of active sessions in a web application” and that’s exactly what’s needed here.
@Component
public record CustomHttpSessionListener() implements HttpSessionListener {

    private static final Logger log = LoggerFactory.getLogger(CustomHttpSessionListener.class);

    @Override
    public void sessionCreated(HttpSessionEvent event) {
        log.info("Session (ID: {}) created.", event.getSession().getId());
    }

    @Override
    public void sessionDestroyed(HttpSessionEvent event) {
        log.info("Session (ID: {}) destroyed.", event.getSession().getId());
    }
}
Additionally, the below HttpSessionEventPublisher bean instance is added so that HttpSessionApplicationEvents are published into the Spring WebApplicationContext.
@Bean
public HttpSessionEventPublisher httpSessionEventPublisher() {
    return new HttpSessionEventPublisher();
}
With this configuration in place, we are now able to depict lines as the ones below upon session creation or termination, respectively.
INFO 34104 --- [spring-security-app] [nio-8080-exec-8] c.h.s.l.CustomHttpSessionListener: Session (ID: 85891C66D081D6D24DFF6224FE54D21E) created.
...
INFO 34104 --- [spring-security-app] [alina-utility-2] c.h.s.l.CustomHttpSessionListener: Session (ID: 85891C66D081D6D24DFF6224FE54D21E) destroyed.
At this point, at least at server-side level, we could act further when such events are published.
In order to notify the front-end, a STOMP message will be sent from the above CustomHttpSessionListener, from the sessionDestroyed() method. To be able to do this, STOMP messaging is enabled at Spring configuration level.
@Configuration
@EnableWebSocketMessageBroker
public class WebSocketConfig implements WebSocketMessageBrokerConfigurer {

    @Override
    public void configureMessageBroker(MessageBrokerRegistry registry) {
        registry.enableSimpleBroker("/topic");
        registry.setApplicationDestinationPrefixes("/ws");
    }

    @Override
    public void registerStompEndpoints(StompEndpointRegistry registry) {
        registry.addEndpoint("/session-websocket")
                .setHandshakeHandler(new UserHandshakeHandler())
                .withSockJS();
    }
}
Adding the @EnableWebSocketMessageBroker annotation enables broker-back-end messaging over WebSocket using a higher-level messaging sub-protocol, here STOMP. Further customization is done by implementing WebSocketMessageBrokerConfigurer. While the former method is self-explanatory, the latter registers the mapping of each STOMP endpoint to a specific URL. In this experiment, one endpoint is enough – /session-websocket.
One last observation is worth making here. In the brief WebSocket introduction, it was mentioned that during the connection handshake, the client sends an HTTP request with an Upgrade header. When applications are integrated over the Internet, the messages’ exchange via WebSockets might be impacted by possible proxies’ or firewalls’ configurations that don’t permit passing the Upgrade headers. One possible and handy solution is to attempt to primarily use WebSocket and then, if that doesn’t work, to fall back on HTTP implementations that emulate the WebSocket interaction and expose the same application-level API, here SockJS. Fortunately, Spring Framework provides support for the SockJS protocol.
Coming back to the configuration above, the endpoint is configured with SockJS fallback. Moreover, the used HandshakeHandler is set to the a custom one.
public class UserHandshakeHandler extends DefaultHandshakeHandler {

    private static final Logger log = LoggerFactory.getLogger(UserHandshakeHandler.class);

    @Override
    protected Principal determineUser(ServerHttpRequest request,
                                      WebSocketHandler wsHandler,
                                      Map<String, Object> attributes) {
        ServletServerHttpRequest servletRequest = (ServletServerHttpRequest) request;
        SecurityContext securityContext = (SecurityContext) WebUtils.getSessionAttribute(servletRequest.getServletRequest(),
                HttpSessionSecurityContextRepository.SPRING_SECURITY_CONTEXT_KEY);

        String user = "anonymousUser";
        if (securityContext != null && securityContext.getAuthentication() != null) {
            user = securityContext.getAuthentication().getName();
            log.info("User connected via web socket: {}.", user);
        }
        return new UserPrincipal(user);
    }
}
The default contract for processing the WebSocket handshake request is modified by overriding the determineUser() method. Specifically, the currently logged in user is read from the SecurityContext session attribute, if any. This identification is needed so that each user (session) has its own private WebSocket channel and thus, when messages are sent from the server towards the client, only the designated ones are sent and received respectively.
With this configuration in place, the service for sending messages can be created.
@Service
public class WebSocketService {

    private final SimpMessagingTemplate template;

    public WebSocketService(SimpMessagingTemplate template) {
        this.template = template;
    }

    public void notifyUser(String user, String message) {
        template.convertAndSendToUser(user, "/topic/user-messages",
                new WebSocketMessage(message));
    }
}
The method is straightforward and uses the SimpMessagingTemplate to send messages to the particular user that’s identified when the WebSocket connection is established, as previously described.
Since the messages in this example are only used to signal an event, they include as content just a string value.
public record WebSocketMessage(String content) {}To finish the server implementation, the WebSocketService is injected into the CustomHttpSessionListener and the sessionDestroyed() method enhanced to use it.
@Override
public void sessionDestroyed(HttpSessionEvent event) {
    SecurityContext securityContext = (SecurityContext) event.getSession()
            .getAttribute(HttpSessionSecurityContextRepository.SPRING_SECURITY_CONTEXT_KEY);
    if (securityContext != null && securityContext.getAuthentication() != null) {
        Authentication auth = securityContext.getAuthentication();
        String user = auth.getName();
        if (auth.isAuthenticated() && !"anonymousUser".equals(user)) {
            log.info("User's {} session expired.", user);
            webSocketService.notifyUser(user, "Session expired");
        }
    }
    log.info("Session (ID: {}) destroyed.", event.getSession().getId());
}
At the client-side level, a few configurations need to be done as well. First, the two JavaScript libraries are imported into the home.html page, together with jquery.
<html xmlns="http://www.w3.org/1999/xhtml" xmlns:th="https://www.thymeleaf.org"
      xmlns:sec="https://www.thymeleaf.org/thymeleaf-extras-springsecurity6" lang="en">
    <head>
        <title>Home</title>
        <meta data-fr-http-equiv="Content-Type" content="text/html; charset=UTF-8"/>

        <script src="https://code.jquery.com/jquery-3.7.1.min.js"></script>
        <script src="https://cdn.jsdelivr.net/npm/[email protected]/dist/sockjs.min.js"></script>
        <script src="https://cdnjs.cloudflare.com/ajax/libs/stomp.js/2.3.3/stomp.min.js"></script>
        <script th:src="@{/app.js}"></script>
    </head>
    <body>
        <div th:inline="text"><span th:remove="tag" sec:authentication="name"></span>, welcome!</div>
        <div>
            <form th:action="@{/logout}" method="post">
                <div>
                    <button type="submit">Sign Out</button>
                </div>
            </form>
        </div>
    </body>
</html>
Additionally, a local script — app.js — is added, which contains the client WebSocket initialization. The significant part is below. When the page loads, the connection is initialized and upon connection the client subscribes to the designated topic, through which it receives private user messages transmitted by the server.
$(document).ready(function () {
connect();
});
function connect() {
let socket = new SockJS('/app/session-websocket');
let stompClient = Stomp.over(socket);
stompClient.connect({}, function (frame) {
stompClient.subscribe('/user/topic/user-messages', function (message) {
console.log("Received message " + JSON.parse(message.body).content);
window.location.reload();
});
});
socket.onclose = function(event) {
onSocketClose();
};
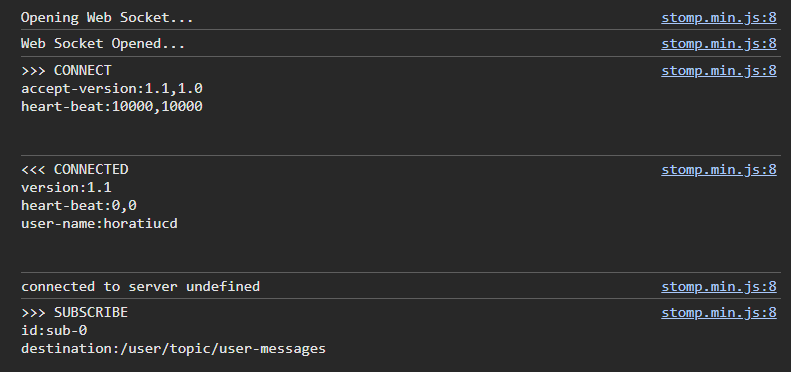
}If the application is restarted and the user signs in successfully, if the client console is examined, it’s observed the WebSocket connection has been established successfully.
From a user experience point of view, the behavior of the application is different. If the session expires, the user is automatically brought to the sign in page, where before, the next user interaction would have determined that.
Conclusion
There is no doubt WebSockets play a very important role in real time applications nowadays as they provide them with the capability of being dynamic and interactive. With their lightweight layer on top of TCP, WebSockets are really suitable when needing to exchange messages between clients and servers. Yet, in addition to these, there are numerous other possible use cases in which this technology can be applied, not necessarily for enhancing the responsiveness and user experience, but to outcoming potential technical challenges, just as the simple one exemplified in this article.
Resources
- Application source code is here.
- Spring WebSockets Documentation
- The picture was taken in Sinaia, Romania.
Published at DZone with permission of Horatiu Dan. See the original article here.
Opinions expressed by DZone contributors are their own.
Comments