Generate Server Code Using OpenAPI Generator
Join the DZone community and get the full member experience.
Join For FreeIn this blog, you will learn how to generate server code using the OpenAPI Generator based on an OpenAPI specification. The code will be generated for a Spring Boot Application, but OpenAPI supports many other languages which can be used.
1. Introduction
In November I attended JFall, the largest one day Java conference in the Netherlands organized by NLJUG. You can read here my impressions of that day. One of the talks I attended described how to design your API first and how to generate code by using the OpenAPI Generator. The talk is ‘API-First: from design to development’ from Vasco Veloso. You can watch it on YouTube.
The talk inspired me to take a closer look to the OpenAPI generator and how it can be used during development.
OpenAPI Generator can generate code based on an OpenAPI yaml specification. Many languages are supported and the complete documentation of the library can be found here. In this blog, you will create a basic OpenAPI yaml specification and you will use it to generate your server side code for a Spring Boot application. The code used in this blog is available at GitHub.
2. Create OpenAPI spec
First thing to do is to design the OpenAPI specification for your application. You are going to design a Customer API. The API allows you to create a Customer and to retrieve the Customer based on its ID. A real life API will be more elaborate, but let’s keep it simple.
An easy way to design the API is by using the Swagger Editor. This will give you immediate feedback whether your specification has errors and it generates the Swagger documentation on the fly. More information about the OpenAPI specification itself, is available in the official documentation.

The header of the OpenAPI specification contains some metadata about the API, like title, version, the server the API is running. Tags can be used to group the resources, which will give you more overview.
openapi: "3.0.2"
info:
  title: API Customer
  version: "1.0"
servers:
  - url: https://localhost:8080
tags:
  - name: Customer
    description: Customer specific data.
The paths section contains the specification for the resources. The first resource you define is the one to create a Customer which will be done by means of a POST containing a JSON body. The operationId will be used by the generator to create the method name for this resource. For simplicity, only a successful response is considered. The schemas refer to the JSON body, they will be covered later in this section.
/customer:
    post:
      tags:
        - Customer
      summary: Create Customer
      operationId: createCustomer
      requestBody:
        content:
          application/json:
            schema:
              $ref: '#/components/schemas/Customer'
      responses:
        '200':
          description: OK
          content:
            'application/json':
              schema:
                $ref: '#/components/schemas/CustomerFullData'
The second resource will allow you to retrieve a Customer. This resource also takes a path parameter containing the customerId to be retrieved. When the ID does not exist, a NOT FOUND response will be returned.
/customer/{customerId}:
    get:
      tags:
        - Customer
      summary: Retrieve Customer
      operationId: getCustomer
      parameters:
        - name: customerId
          in: path
          required: true
          schema:
            type: integer
            format: int64
      responses:
        '200':
          description: OK
          content:
            'application/json':
              schema:
                $ref: '#/components/schemas/CustomerFullData'
        '404':
          description: NOT FOUND
And finally, in the components section, the used schemas are defined. The Customer schema and the CustomerFullData schemas share all properties, except for the ID. For better maintainability, the allOf property can be used.
components:
  schemas:
    Customer:
      type: object
      properties:
        firstName:
          type: string
          description: First name of the customer
        lastName:
          type: string
          description: Last name of the customer
    CustomerFullData:
      allOf:
        - $ref: '#/components/schemas/Customer'
        - type: object
          properties:
            customerId:
              type: integer
              description: The ID of the customer
              format: int64
      description: Full data of the customer.
The OpenAPI specification for the application is now complete.
3. Create Spring Boot Application
For creating the Spring Boot application, you navigate to start.spring.io, choose the latest stable Spring Boot version, Java 17 and add the Spring Web dependency. Download the generated project and open it into your favourite IDE. Add the OpenAPI specification to the src/main/resources directory with name customer.yml.
You will be using the Open API Generator Maven plugin, so add the plugin to the build section of the pom file. Use spring as generatorName since you are using a Spring Boot application and set the path to the customer.yml file with the inputSpec property.
<plugin>
    <groupId>org.openapitools</groupId>
    <artifactId>openapi-generator-maven-plugin</artifactId>
    <version>5.3.0</version>
    <executions>
        <execution>
            <goals>
                <goal>generate</goal>
            </goals>
            <configuration>
                <inputSpec>${project.basedir}/src/main/resources/customer.yml</inputSpec>
                <generatorName>spring</generatorName>
            </configuration>
        </execution>
    </executions>
</plugin>
Execute the following command in order to generate the code:
$ mvn clean compileThe compilation fails with the following errors:
package io.swagger.annotations does not exist
package io.swagger.annotations does not exist
package org.openapitools.jackson.nullable does not exist
cannot find symbol
In order to solve these problems, you add the following dependencies to the pom file:
<dependency>
    <groupId>io.swagger</groupId>
    <artifactId>swagger-annotations</artifactId>
    <version>1.6.3</version>
</dependency>
<dependency>
    <groupId>javax.validation</groupId>
    <artifactId>validation-api</artifactId>
    <version>2.0.1.Final</version>
</dependency>
<dependency>
    <groupId>org.openapitools</groupId>
    <artifactId>jackson-databind-nullable</artifactId>
    <version>0.2.1</version>
</dependency>
Running the compilation again, results in the following errors:
package springfox.documentation.builders does not exist
package springfox.documentation.builders does not exist
package springfox.documentation.service does not exist
package springfox.documentation.service does not exist
package springfox.documentation.spi does not exist
package springfox.documentation.spring.web.paths does not exist
package springfox.documentation.spring.web.paths does not exist
package springfox.documentation.spring.web.plugins does not exist
package springfox.documentation.swagger2.annotations does not exist
Adding the following dependencies to the pom file solves these errors:
<dependency>
    <groupId>io.springfox</groupId>
    <artifactId>springfox-swagger-ui</artifactId>
    <version>2.6.0</version>
</dependency>
<dependency>
    <groupId>io.springfox</groupId>
    <artifactId>springfox-swagger2</artifactId>
    <version>2.6.0</version>
</dependency>
Take a closer look to what has been generated. Navigate to the directory target/generated-sources/open-api where the generated files can be found. The following directories contain the generated files:
src/main/org/openapitools/api: an interface for a Spring Controller but also an implementation;src/main/org/openapitools/configuration: a Controller for the Swagger documentation;src/main/org/openapitools/model: The model for the API based on the API specification;src/main/org/openapitools: aOpenAPI2SpringBootclass which is a SpringBootApplication.
When you want to run the Spring Boot application, you will run into an error since Spring Boot can not determine which SpringBootApplication it needs to run:
$ mvn spring-boot:runThe resulting error is:
Unable to find a single main class from the following candidates [org.openapitools.OpenAPI2SpringBoot, com.mydeveloperplanet.myopenapiplanet.MyOpenApiPlanetApplication]By default a lot of code is generated, maybe more than you will need. How to tweak the configuration will be covered in the next paragraph.
4. Configure OpenAPI plugin
Besides all the options documented in the Maven section of the OpenAPI plugin, many extra options are available which can be configured in the configOptions section of the configuration section of the OpenAPI plugin. The available options can be revealed by adding the configHelp property to the configuration section.
<configuration>
    <inputSpec>${project.basedir}/src/main/resources/customer.yml</inputSpec>
    <generatorName>spring</generatorName>
    <configHelp>true</configHelp>
</configuration>
From this list, you will use the interfaceOnly property, which will only generate the interface for the Controller and the API model.
<configuration>
    ...
    <configOptions>
        <interfaceOnly>true</interfaceOnly>
    </configOptions>
</configuration>
At this point, you can also remove the springfox dependencies which were added earlier. These are not needed anymore.
Another thing what can be seen from the generated code, is that the code is generated in the package org.openapitools. You probably want this to be your own package name and this can be configured with some basic properties. With property packageName you can set the default package name. It is however also necessary to set the properties apiPackage and modelPackage, otherwise these will still be generated in the org.openapitools package. Add the following to the configuration section.
<configuration>
    ....
    <packageName>com.mydeveloperplanet.myopenapiplanet</packageName>
    <apiPackage>com.mydeveloperplanet.myopenapiplanet.api</apiPackage>
    <modelPackage>com.mydeveloperplanet.myopenapiplanet.model</modelPackage>
    ....
</configuration>
The generated interface for the Controller looks as follows:
@javax.annotation.Generated(value = "org.openapitools.codegen.languages.SpringCodegen", date = "2022-01-15T12:51:43.809971036+01:00[Europe/Amsterdam]")
@Validated
@Api(value = "customer", description = "the customer API")
public interface CustomerApi {

    default Optional<NativeWebRequest> getRequest() {
        return Optional.empty();
    }

    /**
     * POST /customer : Create Customer
     *
     * @param customer  (optional)
     * @return OK (status code 200)
     */
    @ApiOperation(value = "Create Customer", nickname = "createCustomer", notes = "", response = CustomerFullData.class, tags={ "Customer", })
    @ApiResponses(value = {
        @ApiResponse(code = 200, message = "OK", response = CustomerFullData.class) })
    @RequestMapping(
        method = RequestMethod.POST,
        value = "/customer",
        produces = { "application/json" },
        consumes = { "application/json" }
    )
    default ResponseEntity<CustomerFullData> createCustomer(@ApiParam(value = "") @Valid @RequestBody(required = false) Customer customer) {
        getRequest().ifPresent(request -> {
            for (MediaType mediaType: MediaType.parseMediaTypes(request.getHeader("Accept"))) {
                if (mediaType.isCompatibleWith(MediaType.valueOf("application/json"))) {
                    String exampleString = "null";
                    ApiUtil.setExampleResponse(request, "application/json", exampleString);
                    break;
                }
            }
        });
        return new ResponseEntity<>(HttpStatus.NOT_IMPLEMENTED);

    }
    ...
During the generation, a warning is raised because of the usage of the allOf property. However, the generated code looks ok.
[WARNING] allOf with multiple schemas defined. Using only the first one: Customer5. Use Generated Code
For the application, you first create a Customer domain class in package domain.
public class Customer {
    private Long customerId;
    private String firstName;
    private String lastName;
    // Getters and setters
}
Create a CustomerController which implements the generated CustomerApi interface.
Creating the customer is a basic implementation where you add the customer to a HashMap: a calculated index is the key, the domain Customer object is the value. In a real application you will save the Customer to a database.
Retrieving the Customer first checks whether the requested ID exists in the HashMap. When the ID is found, the Customer domain object is converted to the Customer API model object and returned to the requester. When the ID is not found, a NOT FOUND response is returned.
@RestController
public class CustomerController implements CustomerApi {

    private final HashMap<Long, com.mydeveloperplanet.myopenapiplanet.domain.Customer> customers = new HashMap<>();
    private Long index = 0L;

    @Override
    public ResponseEntity<CustomerFullData> createCustomer(Customer apiCustomer) {
        com.mydeveloperplanet.myopenapiplanet.domain.Customer customer = new com.mydeveloperplanet.myopenapiplanet.domain.Customer();
        customer.setCustomerId(index);
        customer.setFirstName(apiCustomer.getFirstName());
        customer.setLastName(apiCustomer.getLastName());

        customers.put(index, customer);
        index++;

        return ResponseEntity.ok(domainToApi(customer));
    }

    @Override
    public ResponseEntity<CustomerFullData> getCustomer(Long customerId) {
        if (customers.containsKey(customerId)) {
            return ResponseEntity.ok(domainToApi(customers.get(customerId)));
        } else {
            return new ResponseEntity<>(HttpStatus.NOT_FOUND);
        }
    }

    private CustomerFullData domainToApi(com.mydeveloperplanet.myopenapiplanet.domain.Customer customer) {
        CustomerFullData cfd = new CustomerFullData();
        cfd.setCustomerId(customer.getCustomerId());
        cfd.setFirstName(customer.getFirstName());
        cfd.setLastName(customer.getLastName());
        return cfd;
    }
}
Run the Spring Boot application:
$ mvn spring-boot:runAdd a Customer Foo Bar:
$ curl -i -X 'POST' \
>   'http://localhost:8080/customer' \
>   -H 'accept: application/json' \
>   -H 'Content-Type: application/json' \
>   -d '{
>   "firstName": "Foo",
>   "lastName": "Bar"
> }'
HTTP/1.1 200
Content-Type: application/json
Transfer-Encoding: chunked
Date: Sat, 15 Jan 2022 11:42:47 GMT

{"firstName":"Foo","lastName":"Bar","customerId":0}
Add a Customer John Doe:
$ curl -i -X 'POST' \
>   'http://localhost:8080/customer' \
>   -H 'accept: application/json' \
>   -H 'Content-Type: application/json' \
>   -d '{
>   "firstName": "John",
>   "lastName": "Doe"
> }'
HTTP/1.1 200
Content-Type: application/json
Transfer-Encoding: chunked
Date: Sat, 15 Jan 2022 11:43:11 GMT

{"firstName":"John","lastName":"Doe","customerId":1}
Verify whether a Customer can be retrieved by ID:
$ curl -i http://localhost:8080/customer/1
HTTP/1.1 200
Content-Type: application/json
Transfer-Encoding: chunked
Date: Sat, 15 Jan 2022 11:45:21 GMT

{"firstName":"John","lastName":"Doe","customerId":1}
Verify whether a NOT FOUND is returned for a non-existing Customer:
$ curl -i http://localhost:8080/customer/2
HTTP/1.1 404
Content-Length: 0
Date: Sat, 15 Jan 2022 11:46:18 GMT
6. Add OpenAPI Documentation
Adding the dependency springdoc-openapi-ui will publish the OpenAPI documentation to an endpoint. For more information see the springdoc documentation.
<dependency>
    <groupId>org.springdoc</groupId>
    <artifactId>springdoc-openapi-ui</artifactId>
    <version>1.5.12</version>
</dependency>
Navigate into your browser to http://localhost:8080/swagger-ui.html and the OpenAPI documentation is displayed and the OpenAPI yaml specification can be downloaded here.
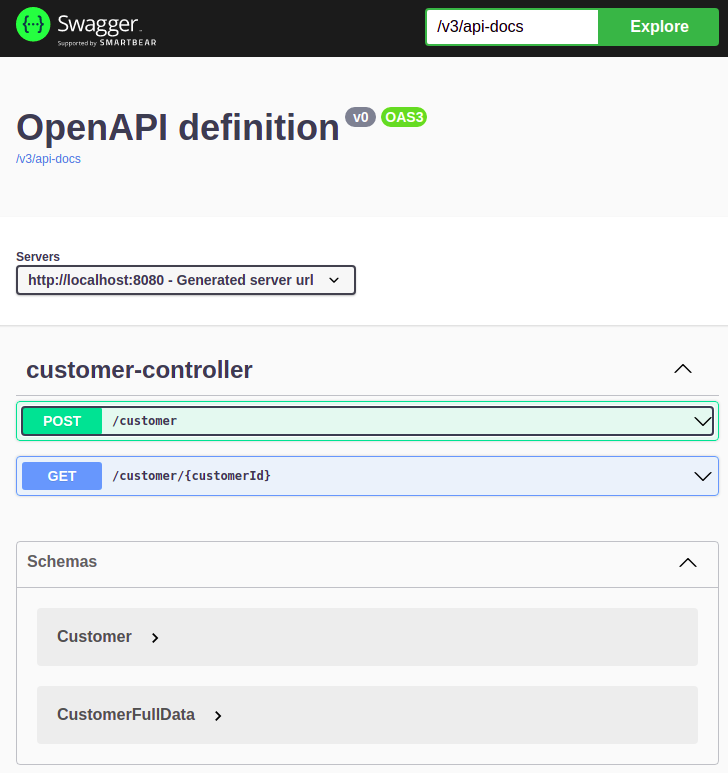
When you take a close look at the documentation, you will notice that it differs from the documentation shown in the Swagger Editor. The springdoc dependency will by default generate the documentation from the source code and will use this generated documentation. How to configure springdoc in order that it uses the customer.yml file?
First, you need to move the customer.yml file to directory src/main/resources/static/customer.yml. This also means that you need to change the Open API generator configuration in the pom.
<configuration>
    <inputSpec>${project.basedir}/src/main/resources/static/customer.yml</inputSpec>
    ...
</configuration>
Add the following property to the application.properties file.
springdoc.swagger-ui.url=/customer.ymlThe URL now shows the API as defined in the customer.yml you created.
7. Conclusion
First designing your API is a good approach and forces you to think more deeply about your API design on beforehand. The OpenAPI Generator plugin generates an interface and model for your Controller and this way, code will be in line with the OpenAPI specification you created.
Published at DZone with permission of Gunter Rotsaert. See the original article here.
Opinions expressed by DZone contributors are their own.
Comments