Getting Started With Nose in Python
In this Python Nose tutorial, we deep-dive into the Nose framework, a test automation framework that extends unittest and further leverage Nose to perform Selenium test automation.
Join the DZone community and get the full member experience.
Join For FreeA challenge that many developers face in Selenium test automation is choosing the right test framework that can help them come up with automated tests with minimal (or no) requirement of boilerplate code. Like me, most of you would have come across test code where a huge chunk of code is written to perform a simple test.
The selection of the right test automation framework can greatly simplify the job of the developer working on the test code. The framework features can be exploited to write tests that perform the job with minimal implementation. As far as Selenium Python testing is concerned, there are several test automation frameworks such as PyUnit, Pytest, Robot, Cucumber, etc. to choose from.
Python’s standard unittest module loses ground to other Python test automation frameworks, as it requires a lot of boilerplate code, and tests have to be included in large test classes. Nose is a popular alternative if you still want to use the default Python unit testing framework. It has a powerful set of features that extends unittest to make testing easier. In this Python Nose tutorial, we deep-dive into the Nose framework and how Nose can be leveraged to perform Selenium test automation (using unittest) more efficiently.
Introduction to Nose Framework
The Nose is a popular test automation framework in Python that extends unittest to make testing easier. The other advantages of using the Nose framework are the enablement of auto-discovery of test cases and documentation collection.
The Nose framework has a rich set of plugins that aid in test execution, parallel (or multi-process) testing, logging & reporting, and more. It can also run doctests, unittests, as well as, no boilerplate tests. The plugins also add support for decorators, fixtures, parameterized testing, classes, and modules.

The latest version of Nose is Nose2, however, we have observed that a significant percentage in the developer & test ecosystem is still making use of the older version of Nose i.e. version 1.3.7.
Hence, the Python Nose tutorial series for Selenium test automation is divided into two sets, with this set focusing on the usage of Nose 1.3.7 for Selenium Python testing.
How To Install the Nose Framework
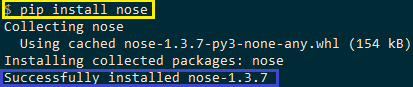
The Nose framework can be installed by executing the following command on the terminal:
pip install nose
As seen in the installation screenshot below, the version that is installed is 1.3.7. As nose and nose2 are two separate projects, the command for installation is not the same.
The Nose package can be imported by using import nose in the code, however, this step is optional. If you are making use of specific modules in Nose, the same has to be imported using import Nose.<module_name> in the code.
How To Execute Nose Tests
As the Nose module is installed for the existing Python distribution as well as nosetests.exe, tests using the Nose framework can be executed by triggering either of the following commands:
Option 1
nosetests <file_name.py>Option 2
python -m nose <file_name.py>Test Discovery Using Nose Framework
Here are some of the simple rules for test discovery:
- Like other Python automation frameworks, Nose also automatically executes all the tests that are present in the parent folder (and its sub-folders)
- The modules (or files) that are picked up by the framework should start with ‘test_’
- The test methods have to start with ‘test_’
- The test classes enclosing the test methods should start with ‘Test’
These are some of the naming conventions that we will use for Selenium python testing with Nose. This set of rules suffice the purpose of Test Automation, however, you could have a look at the complete set of rules in the finding tests section on the Nose website.
Example Usage of Nose Framework
The nomenclature followed in the unittest framework also applies to the Nose framework.
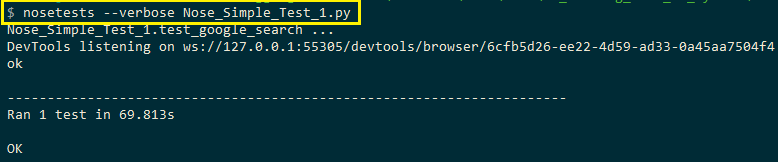
To demonstrate the Nose framework usage in this Python Nose tutorial, we use a simple Selenium test automation example where a Google search for ‘LambdaTest’ is performed and a click action is performed on the first result.
from selenium import webdriver
import time
from time import sleep
from selenium.webdriver.common.by import By

def test_google_search():
    driver = webdriver.Chrome()
    driver.get('https://www.google.com')
    driver.maximize_window()
    title = "Google"
    assert title == driver.title

    search_text = "LambdaTest"
    # search_box = driver.find_element_by_xpath("//input[@name='q']")
    search_box = driver.find_element(By.XPATH, "//input[@name='q']")
    search_box.send_keys(search_text)

    # Using Sleep is not a good programming practice
    # Only used here for demonstration purpose
    time.sleep(5)
    search_box.submit()

    time.sleep(5)

    # Click on the LambdaTest HomePage Link
    # This test will fail as the titles will not match
    title = "Most Powerful Cross Browser Testing Tool Online | LambdaTest"
    # lt_link = driver.find_element_by_xpath("//h3[.='LambdaTest: Most Powerful Cross Browser Testing Tool Online']")
    lt_link = driver.find_element(By.XPATH, "//h3[.='LambdaTest: Most Powerful Cross Browser Testing Tool Online']")
    lt_link.click()

    time.sleep(10)
    assert title == driver.title
    time.sleep(2)

    # Release the resources in the teardown function
    print("TearDown initiated")
    driver.quit()
As seen in the implementation, we have not imported the Nose module. The implementation is more or less the same as the one being used with other Python automation frameworks. Hence, we would not go deeper into the implementation aspects of the test. Shown below is the execution screenshot:
The major advantage of using Nose (over standard unittest module) is that it automatically collects tests. There is flexibility to write simple test functions and/or test classes that are not a subclass of unittest.TestCase.
Fixtures in Nose Framework
The Nose framework supports fixtures (setup and teardown methods) at test, package, class, and module levels. This helps eliminate the unnecessary initializations that can hamper the performance of the tests if done frequently.
Like py.test or unittest fixtures, the setup method always runs before any test (or collection of tests) and the teardown method runs if the setup method has successfully executed. This is irrespective of the status of the test run. Nose extends the unittest fixture model of setup (and teardown).
Fixtures can be achieved at the following levels:
1. Test Packages
Tests can be grouped into test packages. Hence, the setup and teardown methods for the package are run once per test run, rather than creating setup and teardown methods that are run once per module or test case.
For creating setup and teardown for a package-level execution, the respective methods should be defined in the __init__.py of the test package. The nomenclature is as below:
Setup - setup, setup_package, setUp, or setUpPackage
TearDown -  teardown, teardown_package, tearDown or tearDownPackage
2. Test Modules
This lets us define setup and teardown methods at a module level. The respective methods will be executed at the beginning and end of the module. The nomenclature is as below:
Setup - setup, setup_module, setUp or setUpModule
TearDown -  teardown, teardown_module, or tearDownModule
3. Test Functions
This lets you define setup and teardown at a function level. As the name indicates, the setup_function & teardown_function are executed before & after a test function call.
There is no specific naming convention, except that you have to apply the setup method with the @with_setup decorator, which is imported from Nose. It is a widely used decorator and we would demonstrate its usage in the upcoming examples.
4. Test Classes
A test class is a class defined in a test module that matches test_Match or is a subclass of unittest.TestCase. The respective setup and teardown functions are run at the beginning and the end of the class of test methods. Here is the nomenclature for the class-level setup fixtures:
Setup - setup_class, setupClass, setUpClass, setupAll (or setUpAll)
TearDown -  teardown_class, teardownClass, tearDownClass, teardownAll (or tearDownAll)
Apart from following the right naming convention, the setup method should be applied with the @classmethod decorator.
To demonstrate the usage of fixtures, we use Nose fixtures in different levels – class, module, and method.
import nose
from nose.tools import with_setup
# Can also be setup, setup_module, setUp or setUpModule
def setUpModule(module):
print ("")
print ("%s" % (setUpModule.__name__,))
# Can also be teardown, teardown_module, or tearDownModule
def tearDownModule(module):
print ("%s" % (tearDownModule.__name__,))
def setup_func():
print ("%s" % (setup_func.__name__,))
def teardown_func():
print ("%s" % (teardown_func.__name__,))
@with_setup(setup_func, teardown_func)
def test_case_1():
print ("%s" % (test_case_1.__name__,))
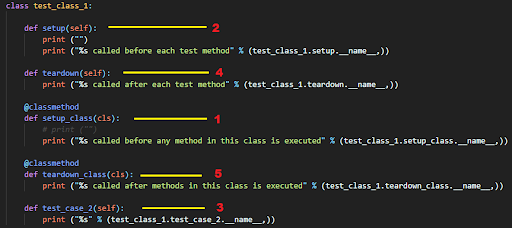
class test_class_1:
def setup(self):
print ("%s called before each test method" % (test_class_1.setup.__name__,))
def teardown(self):
print ("%s called after each test method" % (test_class_1.teardown.__name__,))
@classmethod
def setup_class(cls):
print ("%s called before any method in this class is executed" % (test_class_1.setup_class.__name__,))
@classmethod
def teardown_class(cls):
print ("%s called after methods in this class is executed" % (test_class_1.teardown_class.__name__,))
def test_case_2(self):
print ("%s" % (test_class_1.test_case_2.__name__,))The -s (or –nocapture) option in nosetests.exe is used so that any stdout output is captured immediately. The following command is used to trigger the execution:
nosetests --verbose --nocapture Nose_Fixture_Example.pyHere is the output screenshot:
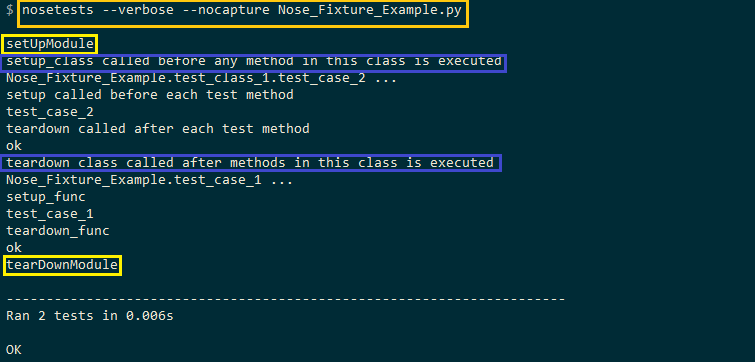
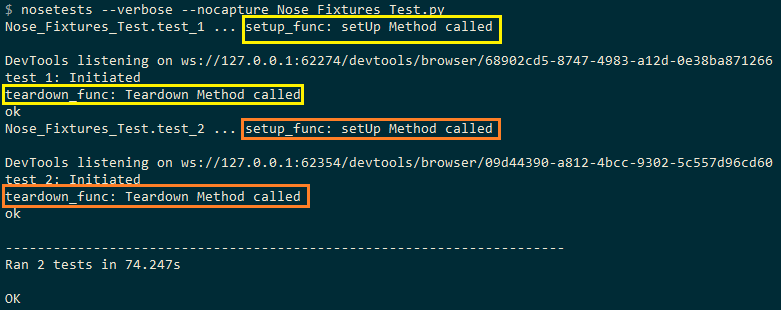
As seen in the execution screenshot, the module-level setup method is run at the start of the execution, and the module-level teardown method is run at the end of the execution. For the test method test_case_2 (which is a part of test_class_1), the setup_class() method is called before the test method is triggered.
Post this, the method-level setup method (that is a part of test_class_1) is executed. The corresponding teardown methods are called in a similar order (i.e. first method-level teardown method is executed, then the class-level teardown method is executed).
Demonstration of Fixtures in Nose
For demonstrating the usage of fixtures in this Python Nose tutorial, we use a cross-browser testing example that comprises two test cases:
Test Case – 1
- Navigate to the URL: Google.com
- Search for ‘LambdaTest’
- Click on the search result with the title – LambdaTest: Most Powerful Cross Browser Testing Tool Online
- Assert if the title of the newly opened window does not match the expected title
Test Case – 2
- Navigate to the URL; Lambdatest GitHub
- Select the first two checkboxes
- Send ‘Happy Testing at LambdaTest’ to the textbox with id = sampletodotext
- Click the Add Button and verify whether the text has been added or not
Implementation
from nose.tools import with_setup
from selenium import webdriver
import time
from time import sleep
from selenium.webdriver.common.by import By

def setup_func():
    global driver
    print("setup_func: setUp Method called")
    driver = webdriver.Chrome()
    driver.maximize_window()

def teardown_func():
    global driver
    print("teardown_func: Teardown Method called")
    driver.quit()

@with_setup(setup_func, teardown_func)
def test_1():
    global driver
    print("test_1: Initiated")
    driver.get('https://www.google.com')
    title = "Google"
    assert title == driver.title

    search_text = "LambdaTest"
    search_box = driver.find_element(By.XPATH,"//input[@name='q']")
    search_box.send_keys(search_text)

    # Using Sleep is not a good programming practice
    # Only used here for demonstration purpose
    time.sleep(5)
    search_box.submit()

    time.sleep(5)

    # Click on the LambdaTest HomePage Link
    # This test will fail as the titles will not match
    title = "Most Powerful Cross Browser Testing Tool Online | LambdaTest"
    lt_link = driver.find_element(By.XPATH,"//h3[.='LambdaTest: Most Powerful Cross Browser Testing Tool Online']")
    lt_link.click()

    time.sleep(10)
    assert title == driver.title
    time.sleep(2)

@with_setup(setup_func, teardown_func)
def test_2():
    global driver
    print("test_2: Initiated")
    driver.get('https://lambdatest.github.io/sample-todo-app/')

    driver.find_element(By.NAME,"li1").click()
    driver.find_element(By.NAME,"li2").click()

    title = "Sample page - lambdatest.com"
    assert title ==  driver.title

    sample_text = "Happy Testing at LambdaTest"
    email_text_field =  driver.find_element(By.ID, "sampletodotext")
    email_text_field.send_keys(sample_text)
    time.sleep(5)

    driver.find_element(By.ID, "addbutton").click()
    time.sleep(5)

    assert driver.find_element(By.XPATH, "//span[.='Happy Testing at LambdaTest']").text == sample_text
Code Walkthrough
To get started, the with_setup method is imported from the nose.tools module. The setup_func() and teardown_func() methods are used as fixture functions that are implemented at the function level.
from nose.tools import with_setup
.................................

def setup_func():
    global driver
    print("setup_func: setUp Method called")
    driver = webdriver.Chrome()
    driver.maximize_window()

def teardown_func():
    global driver
    print("teardown_func: Teardown Method called")
    driver.quit()
The Chrome WebDriver instance is initiated in the setup_func() method and its resources are freed in the teardown_func() method. The @with_setup decorator is used for adding the setup (i.e. setup_func) and teardown (teardown_func) methods to the respective test functions.
@with_setup(setup_func, teardown_func)
def test_1():
    ..........................
    ..........................
    ..........................

@with_setup(setup_func, teardown_func)
def test_2():
    ..........................
    ..........................
    ..........................
The Inspect Tool in Chrome is used for finding the details of the necessary web elements.
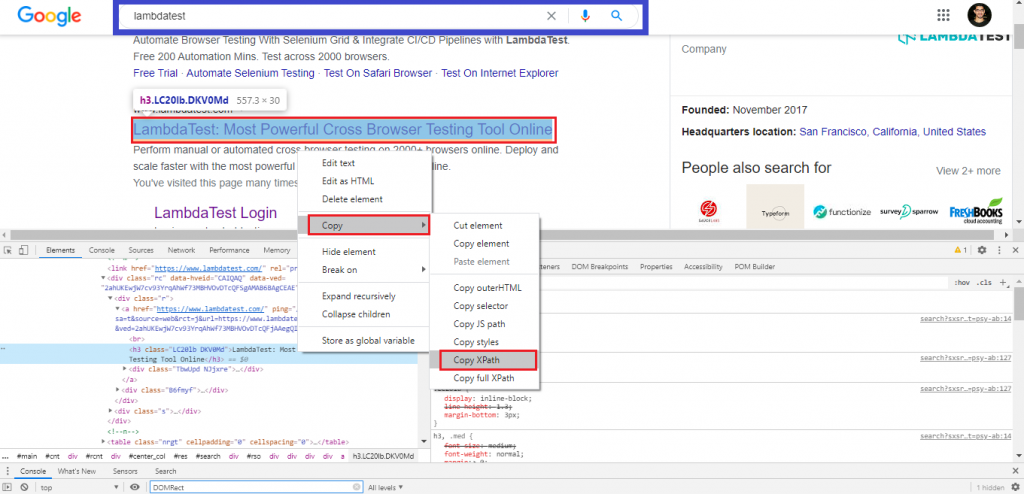
Selenium Webdriver APIs such as find_element, send_keys, etc. are used to locate the required web elements and perform required actions on those elements. In the Python Nose Tutorial, we would not go deeper into the implementation since that is independent of the test framework being used for Selenium Python testing.
Execution
The following command is used for triggering the test execution:
nosetests --verbose --nocapture <file-name.py>Shown below is the execution screenshot:
Before executing the test cases, the corresponding method for setup (i.e. setup_func) is called. Once the test function’s execution is complete, the corresponding method for teardown (i.e. teardown_func) is called.
Parameterized Testing with Nose Framework
The Nose framework (version 1.3.7) does not have direct support for parameterized testing. The parameterized (earlier known as nose-parameterized) package is used for performing parameterized testing with Nose. Apart from Nose, the package also supports all the popular test automation frameworks in Python.
The parameterized package is installed by issuing the following on the terminal:
pip install parameterizedThe latest version of the parameterized package is 0.7.4.

Parameterized Testing in Nose on a Local Selenium Grid
I’ll test the ToDo app on LambdaTest for this Python Nose Tutorial, which will be tested against three different browsers: Firefox, Microsoft Edge, and Chrome. Here is the overview of the test scenario:
- Navigate to the URL https://lambdatest.github.io/sample-todo-app/
- Select the first two checkboxes
- Send ‘Happy Testing at LambdaTest’ to the textbox with id = sampletodotext
- Click the Add Button and verify whether the text has been added or not
Implementation
# test_math.py
from nose.tools import assert_equal
from parameterized import parameterized, parameterized_class
import unittest
from nose.tools import with_setup
from selenium import webdriver
import time
from time import sleep
from selenium.webdriver.common.by import By

def teardown_func():
    global driver
    print("teardown_func: Teardown Method called")
    driver.quit()

@parameterized([
    ("Firefox"),
    ("Chrome"),
    ("MicrosoftEdge"),
])

@with_setup(None, teardown_func)
def test_to_do_app(browserName):
   global driver

   if (browserName == "Chrome"):
        print("Test on Chrome Browser initiated")
        driver = webdriver.Chrome()
   elif (browserName == "MicrosoftEdge"):
        print("Test on Edge Browser initiated")
        # Set the Path accordingly
        driver = webdriver.Edge("C:\\EdgeDriver\\MicrosoftWebDriver.exe")
   elif (browserName == "Firefox"):
        print("Test on Firefox initiated")
        driver = webdriver.Firefox()
   driver.get('https://lambdatest.github.io/sample-todo-app/')
   driver.maximize_window()

   driver.find_element(By.NAME, "li1").click()
   driver.find_element(By.NAME, "li2").click()

   title = "Sample page - lambdatest.com"
   assert title ==  driver.title

   sample_text = "Happy Testing at LambdaTest"
   email_text_field =  driver.find_element(By.ID, "sampletodotext")
   email_text_field.send_keys(sample_text)
   time.sleep(5)

   driver.find_element(By.ID, "addbutton").click()
   time.sleep(5)

   assert driver.find_element(By.XPATH, "//span[.='Happy Testing at LambdaTest']").text == sample_text
Code WalkThrough
The parameterized and parameterized_class modules are imported from the parameterized package.
from parameterized import parameterized, parameterized_classA fixture at the function level is used, the major difference is that the @with_setup decorator will only have the teardown method, as different test browsers are passed to the test function using the @parameterized decorator.
def teardown_func():
    global driver
    print("teardown_func: Teardown Method called")
    driver.quit()

@parameterized([
    ("Firefox"),
    ("Chrome"),
    ("MicrosoftEdge"),
])
The name of the test browser is passed an argument to the test function (i.e. test_to_do_app). The test function is executed once against every browser combination and the resources used during setup are freed in the teardown method (i.e. teardown_func).
Depending on the browser against which Selenium test automation, the corresponding WebDriver instance is initiated.
@with_setup(None, teardown_func)
def test_to_do_app(browserName):
global driver
if (browserName == "Chrome"):
print("Test on Chrome Browser initiated")
driver = webdriver.Chrome()
elif (browserName == "MicrosoftEdge"):
print("Test on Edge Browser initiated")
# Set the Path accordingly
driver = webdriver.Edge("C:\\EdgeDriver\\MicrosoftWebDriver.exe")
elif (browserName == "Firefox"):
print("Test on Firefox initiated")
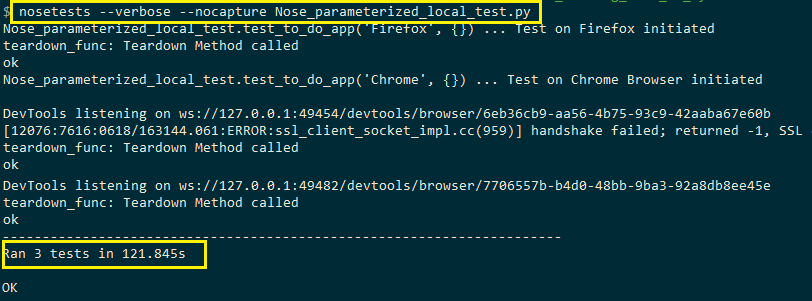
driver = webdriver.Firefox()The remaining implementation is the same as it is only related to Selenium automation testing. Here is the output snapshot:
Parameterized Testing in Nose on a Cloud-based Selenium Grid
Selenium test automation on a local Selenium Grid infrastructure can hit a roadblock, as scaling the in-house infrastructure requires a huge investment. This is because the infrastructure has to be updated timely with umpteen different browsers, browser versions, and devices.
A more scalable approach to extract the full potential of Selenium Python testing is by leveraging parallelization, in conjunction with the features supported by the cloud-based remote Selenium grid. LambdaTest is one such cloud-based cross-browser testing platform that lets you perform Selenium test automation across 3,000+ different combinations of browsers, operating systems, and devices.
The effort involved in porting a working test implementation that is tested on a local Selenium grid to a cloud-based remote Selenium grid is minimal, as the code changes are majorly related to the infrastructure.
In order to get started with testing on LambdaTest, you have to create a profile on LambdaTest and make a note of the user name & access key from the Profile Section. The combination of access key and password is used for accessing the Selenium Grid on LambdaTest. The LambdaTest Dashboard gives out all the details related to the tests performed on the Selenium grid. The LambdaTest capabilities generator is used for generating the desired browser and platform capabilities required for selenium automation testing.
In this Python Nose tutorial, I’ll demonstrate parameterized testing on LambdaTest. To get started we execute the test cases used in the earlier section on these browsers + OS combinations:
@parameterized([
    ("Chrome", "83.0", "Windows 10"),
    ("MicrosoftEdge", "81.0", "macOS High Sierra"),
    ("Safari", "12.0", "macOS Mojave"),
    ("Firefox", "76.0", "Windows 10"),
])
Implementation
# test_math.py
from nose.tools import assert_equal
from parameterized import parameterized, parameterized_class
from nose.tools import with_setup
from selenium import webdriver
import time
from time import sleep
import urllib3
import warnings
from selenium.webdriver.common.by import By

def setup_func():
    global driver
    global remote_url
    print("setup_func: SetUp Method called")
    # Details can be sourced from https://automation.lambdatest.com/
    user_name = "user-name"
    app_key = "pass-key"
    remote_url = "https://" + user_name + ":" + app_key + "@hub.lambdatest.com/wd/hub"
    urllib3.disable_warnings(urllib3.exceptions.InsecureRequestWarning)

def teardown_func():
    global driver
    print("teardown_func: Teardown Method called")
    driver.quit()

@parameterized([
    ("Firefox", "76.0", "Windows 10"),
    ("Chrome", "83.0", "Windows 10"),
    ("MicrosoftEdge", "81.0", "macOS High Sierra"),
    ("Safari", "12.0", "macOS Mojave"),
])

@with_setup(setup_func, teardown_func)
def test_to_do_app(browserName, version, platform):
   global driver
   global remote_url

   capabilities = {}
   # Set the desired capabilities from the supplied parameters
   capabilities["browserName"] = browserName
   capabilities["version"] = version
   capabilities["platform"] = platform

   driver = webdriver.Remote(command_executor = remote_url, desired_capabilities = capabilities)
   driver.get('https://lambdatest.github.io/sample-todo-app/')
   driver.maximize_window()

   driver.find_element(By.NAME, "li1").click()
   driver.find_element(By.NAME, "li2").click()

   title = "Sample page - lambdatest.com"
   assert title ==  driver.title

   sample_text = "Happy Testing at LambdaTest"
   email_text_field =  driver.find_element(By.ID, "sampletodotext")
   email_text_field.send_keys(sample_text)
   time.sleep(5)

   driver.find_element(By.ID, "addbutton").click()
   time.sleep(5)

   assert driver.find_element(By.XPATH, "//span[.='Happy Testing at LambdaTest']").text == sample_text
Code Walkthrough
As the tests are executed on a cloud-based Selenium Grid, the credentials consisting of the combination of user-name and pass-key are used for accessing the LambdaTest grid URL – @hub.lambdatest.com/wd/hub
remote_url = "https://" + user_name + ":" + app_key + "@hub.lambdatest.com/wd/hub"The remote WebDriver Ausese of remote URL and browser capabilities generated using the capabilities generator.
driver = webdriver.Remote(command_executor = remote_url, desired_capabilities = capabilities)The test case takes three input arguments – browser name, browser version, and platform name. These entries make up the desired capabilities which are passed as arguments to the WebDriver API.
@with_setup(setup_func, teardown_func)
def test_to_do_app(browserName, version, platform):
   .........................
   .........................
   capabilities = {}
   # Set the desired capabilities from the supplied parameters
   capabilities["browserName"] = browserName
   capabilities["version"] = version
   capabilities["platform"] = platform

   driver = webdriver.Remote(command_executor = remote_url, desired_capabilities = capabilities)
   driver.get('https://lambdatest.github.io/sample-todo-app/')
   .........................
   .........................
The rest of the implementation is self-explanatory as it uses relevant Selenium WebDriver APIs to locate the required web elements and perform relevant actions on the same.
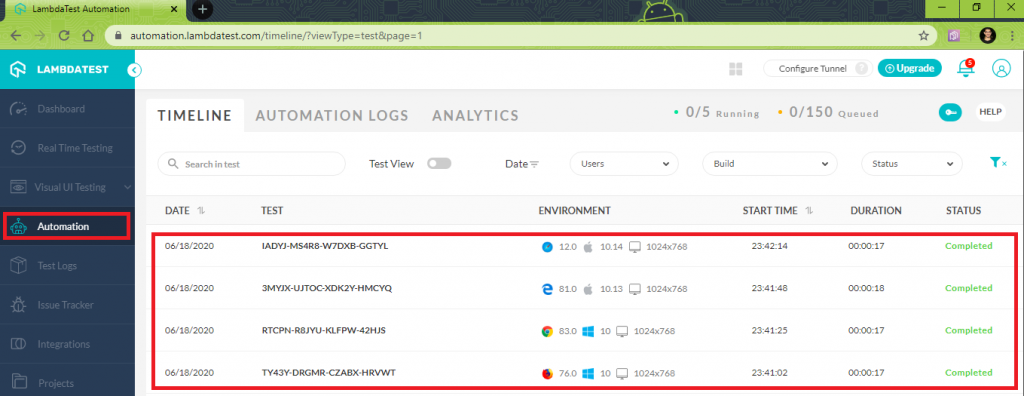
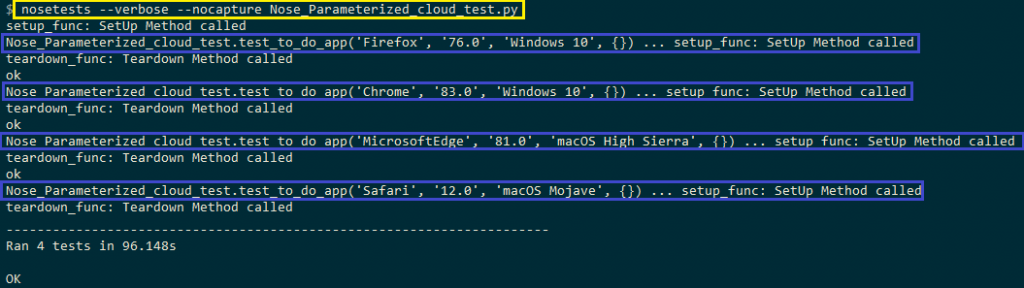
The execution screenshot is below:
Parallel Testing on a Cloud-based Selenium Grid
Like other popular test frameworks like Python, Nose also supports parallel testing. The nose.plugins and multiprocess plugin can be used to parallelize the test run across a configurable number of worker processes.
Though parallelization in execution expedites CPU-bound test runs, it greatly benefits IO-bound tests where most of the time is spent on waiting for the arrival of data. The official documentation on the nose has in-depth information related to parallel testing.
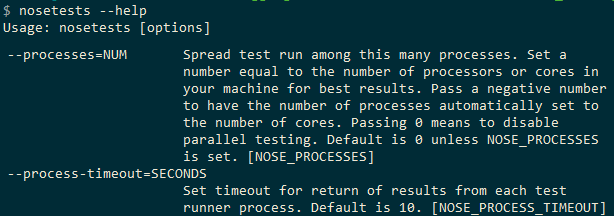
In this particular Python Nose tutorial, we would focus on parallel testing on a Cloud-based Selenium Grid. For use cases related to selenium grid for cross-browser testing, the command-line option (–processes) in nosetests can be used to spread the test execution across multiple cores.
The following command is useful for achieving parallelization when using Nose for Selenium test automation:
nosetests --process-timeout=<optional-process-timeout> --processes=<num-processes> file-name.pyHere is the detailed description of the –processes = NUM option that can be used to parallelize tests that use the Nose framework.
Though parallel testing can reap significant benefits when used on a local Selenium Grid, it will be multiplied if used on a cloud-based Selenium grid. Hence, we decided to demonstrate parallel testing in Nose on a cloud-based Selenium grid for this Python Nose tutorial, as code changes are self-explanatory.
Users on the popular website StackOverflow have been looking to leverage parallel testing in Nose (here and here) and this section of Python Nose Tutorial will help you get started with parallel testing in Nose.
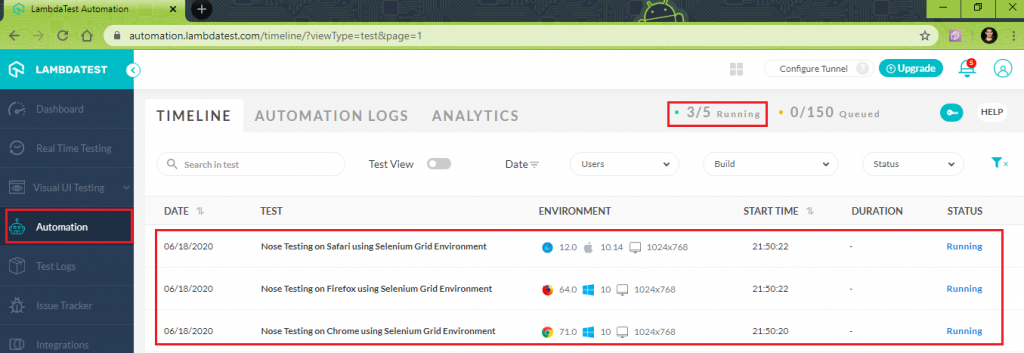
Here are the three tests that have to be executed in parallel on LambdaTest’s Selenium grid.
Test Case – 1 (Browser – Chrome, Version – 71.0, Platform – Windows 10)
- Navigate to the URL https://lambdatest.github.io/sample-todo-app/
- Select the first two checkboxes
- Send ‘Happy Testing at LambdaTest’ to the textbox with id = sampletodotext
- Click the Add Button and verify whether the text has been added or not
Test Case – 2 (Browser – Firefox, Version – 64.0, Platform – Windows 10)
- Navigate to the URL https://www.lambdatest.com/blog/
- The expected title is LambdaTest | A Cross Browser Testing Blog
- Assert if the title of the opened window does not match the expected title
Test Case – 3 (Browser – Safari, Version – 12.0, Platform – macOS Mojave)
- Navigate to the URL https://www.google.com
- Search for “Lambdatest”
- Locate the first search result and click on the same
- Assert if the title of the opened window does not match the expected title
To get started, the desired browser and platform capabilities are generated using the LambdaTest capabilities generator. For example, shown below are the desired capabilities for Test Case 1
ch_caps = {
    "build" : "Nose Testing using Chrome on Windows Environment",
    "name" : "Nose Testing on Chrome using Selenium Grid Environment",
    "platform" : "Windows 10",
    "browserName" : "Chrome",
    "version" : "71.0",
    "selenium_version" : "3.13.0",
    "chrome.driver" : 2.42
}
The same sequence is repeated for the remaining two browser and OS combinations. Three separate test cases are created and the corresponding browser capabilities are used for the test scenarios.
Implementation
# test_math.py
import nose
from nose.tools import <some p
from nose.tools import assert_equal
from parameterized import parameterized, parameterized_class
import unittest
import math
from nose.tools import with_setup
from selenium import webdriver
import time
from time import sleep
import urllib3
import warnings

user_name = "user-name"
app_key = "pass-key"

# @parameterized([
#    ("Chrome", "83.0", "Windows 10"),
#    ("MicrosoftEdge", "81.0", "macOS High Sierra"),
#    ("Safari", "12.0", "macOS Mojave"),
#    ("Firefox", "76.0", "Windows 7"),
#])

#Set capabilities for testing on Chrome
ch_caps = {
    "build" : "Nose Testing using Chrome on Windows Environment",
    "name" : "Nose Testing on Chrome using Selenium Grid Environment",
    "platform" : "Windows 10",
    "browserName" : "Chrome",
    "version" : "71.0",
    "selenium_version" : "3.13.0",
    "chrome.driver" : 2.42
}

#Set capabilities for testing on Firefox
ff_caps = {
    "build" : "Nose Testing using Firefox on Windows Environment",
    "name" : "Nose Testing on Firefox using Selenium Grid Environment",
    "platform" : "Windows 10",
    "browserName" : "Firefox",
    "version" : "64.0",
}

#Set capabilities for testing on Safari
saf_caps = {
    "build" : "Nose Testing using Safari on macOS Mojave Environment",
    "name" : "Nose Testing on Safari using Selenium Grid Environment",
    "platform" : "macOS Mojave",
    "browserName" : "Safari",
    "version" : "12.0",
}

# _multiprocess_can_split_ = True

def teardown_func():
    global driver
    print("Inside TearDown")
    driver.quit()

@with_setup(None, teardown_func)
def test_verify_todo_app():
    global driver
    urllib3.disable_warnings(urllib3.exceptions.InsecureRequestWarning)
    # Details can be sourced from https://automation.lambdatest.com/
    remote_url = "https://" + user_name + ":" + app_key + "@hub.lambdatest.com/wd/hub"

    driver = webdriver.Remote(command_executor = remote_url, desired_capabilities = ch_caps)
    driver.get('https://lambdatest.github.io/sample-todo-app/')
    driver.maximize_window()

    driver.find_element_by_name("li1").click()
    driver.find_element_by_name("li2").click()

    title = "Sample page - lambdatest.com"
    assert title ==  driver.title

    sample_text = "Happy Testing at LambdaTest"
    email_text_field =  driver.find_element_by_id("sampletodotext")
    email_text_field.send_keys(sample_text)
    time.sleep(5)

    driver.find_element_by_id("addbutton").click()
    time.sleep(5)

    assert driver.find_element_by_xpath("//span[.='Happy Testing at LambdaTest']").text == sample_text

@with_setup(None, teardown_func)
def test_lt_blog():
    global driver
    urllib3.disable_warnings(urllib3.exceptions.InsecureRequestWarning)
    # Details can be sourced from https://automation.lambdatest.com/
    remote_url = "https://" + user_name + ":" + app_key + "@hub.lambdatest.com/wd/hub"

    driver = webdriver.Remote(command_executor = remote_url, desired_capabilities = ff_caps)
    driver.get('https://www.lambdatest.com/blog/')
    driver.maximize_window()

    expected_title = "LambdaTest | A Cross Browser Testing Blog"
    assert expected_title ==  driver.title
    time.sleep(5)

@with_setup(None, teardown_func)
def test_verify_google():
    global driver
    urllib3.disable_warnings(urllib3.exceptions.InsecureRequestWarning)
    # Details can be sourced from https://automation.lambdatest.com/
    remote_url = "https://" + user_name + ":" + app_key + "@hub.lambdatest.com/wd/hub"

    driver = webdriver.Remote(command_executor = remote_url, desired_capabilities = saf_caps)
    driver.get('https://www.google.com/')
    driver.maximize_window()
    title = "Google"
    assert title == driver.title

    search_text = "LambdaTest"
    search_box = driver.find_element_by_xpath("//input[@name='q']")
    search_box.send_keys(search_text)

    time.sleep(5)
    search_box.submit()

    time.sleep(5)

    # Click on the LambdaTest HomePage Link
    # This test will fail as the titles will not match
    title = "Most Powerful Cross Browser Testing Tool Online | LambdaTest"
    lt_link = driver.find_element_by_xpath("//h3[.='LambdaTest: Most Powerful Cross Browser Testing Tool Online']")
    lt_link.click()

    time.sleep(10)
    assert title == driver.title
    time.sleep(2)
Code Walkthrough
As the required browser capabilities are used in the individual test cases, there is no requirement for the setup function. The teardown function terminates the WebDriver instance.
# _multiprocess_can_split_ = True
def teardown_func():
    global driver
    print("Inside TearDown")
    driver.quit()
The @with_setup decorator is used for adding the teardown (teardown_func) method to the respective test functions.
@with_setup(None, teardown_func)
def test_verify_todo_app():
    ............
    ............
    ............
@with_setup(None, teardown_func)
def test_lt_blog():
    ............
    ............
    ............
@with_setup(None, teardown_func)
def test_verify_google():
    ............
    ............
    ............
There are no changes required in the core implementation as the changes are only related to the infrastructure.
Execution
The following command is used for executing the three test cases in parallel on the cloud-based Selenium Grid:
nosetests --process-timeout=60 --processes=3 Nose_Parallel_Test.pyThe reason for selecting 3 is that my current billing plan enables the execution of 5 tests in parallel. Hence, all the 3 test cases were simultaneously executed on the platform.
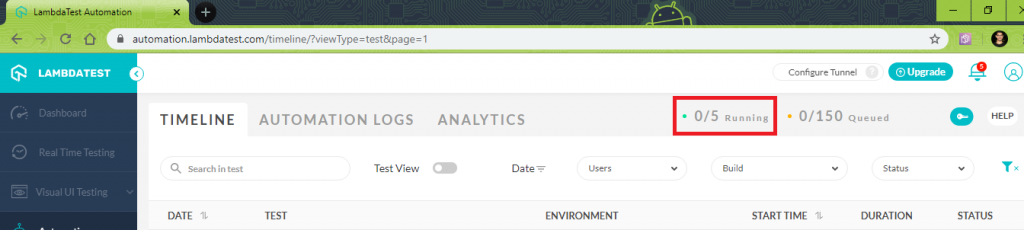
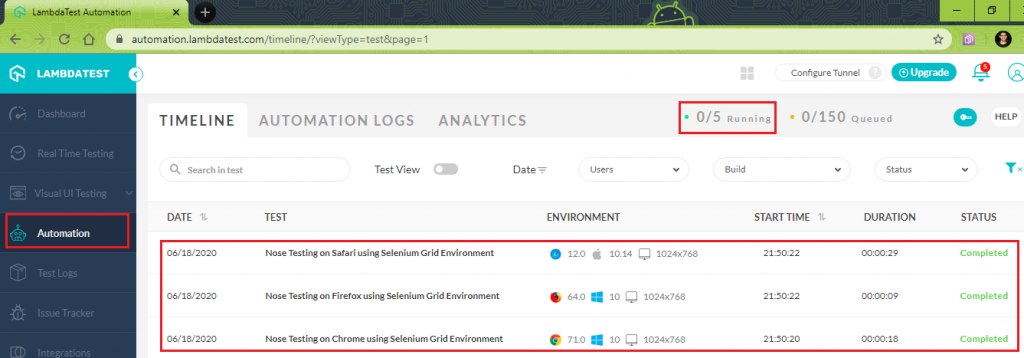
Here is the screenshot of the execution which indicates that the three tests are running in parallel on the cloud-based Selenium Grid:
The tests were successfully executed on the Selenium Grid:
Wrapping It Up
In this Python Nose tutorial series, I gave you a brief look at the Nose (version 1.3.7), a test framework for Selenium Python testing. The framework is an extension to unittest that makes testing easier. The main advantage of choosing Nose over unittest is that it eliminates the requirement of boilerplate code.
It also has an extensive set of plugins that adds support for decorators, fixtures, parameterized testing, and more. These features enhance the usability of the framework. The latest version of Nose is Nose2 and we would have an in-depth look in our next blog on the Python Nose tutorial series.
I hope this tutorial has helped you understand and perform selenium python testing with Nose. In case you have any questions, please feel free to reach out to us and would love to have your feedback.
Published at DZone with permission of Himanshu Sheth. See the original article here.
Opinions expressed by DZone contributors are their own.
Comments