Hands-on With Istio Service Mesh: Implementing Canary Deployment
We'll build a Kubernetes cluster, install Istio, build two simple dockerized microservices, deploy to the cluster, and configure canary deployment.
Join the DZone community and get the full member experience.
Join For FreeIn this hands-on exercise, we will build a Kubernetes cluster, install Istio on the cluster, build two simple dockerized microservices using Spring Boot, deploy to the cluster, and configure canary deployment using the Istio Service Mesh Virtual Service and Destination Rules.
The exercise assumes a basic knowledge of Kubernetes, Istio, Spring Boot, and Docker. We will use Google Cloud Engine for building Kubernetes cluster.
All the source code used in this exercise is available here: https://github.com/pmusale/Istio-Tutorials
Docker images are available here: https://cloud.docker.com/repository/list
Pre-Requisites
- You have Google Cloud Platform account.
- You have installed GCP SDK and configured to your GCP account.
- You have installed and configured kubectl using GCP SDK.
- You have installed Docker Quick Start. In case you are using windows 10 home edition, please follow the instructions here.
Microservices Application:
We will use a simple Spring Boot microservices application consisting of two microservices.
The Hello-Kube microservice is the first one. This service makes a call to a second microservice, called the Hello Message microservice. The second microservice just returns a hello message with its version. At the end of this exercise, you will be able to control the routing of the traffic to both the versions of the Hello Message microservice to implement canary deployment.
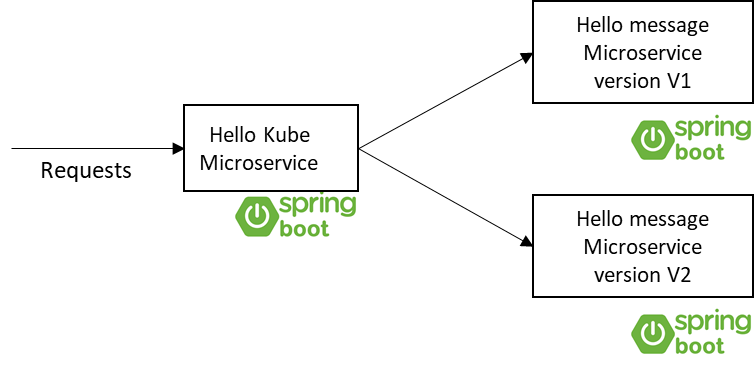 Hello Kube and Hello Message microservice on Kubernetes without Istio
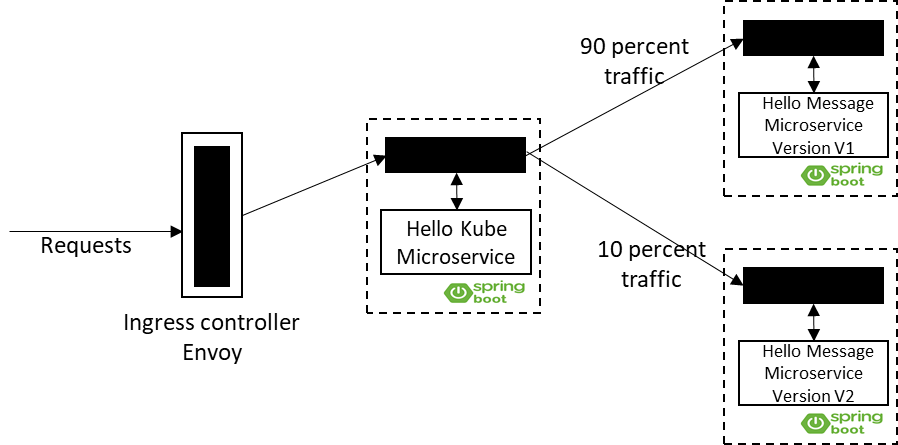 Hello Kube and Hello Message microservice with Istio Service Mesh – Canary Deployment
Building and Dockerizing Microservice Using Maven
You can build a Spring Boot-based microservice using the Spring Boot Initializer at https://start.spring.io/. Please make sure you choose 'web' as one of the dependencies while creating the app.
Let's take a look at the Hello Kube microservice's RestController:
@RestController

public class HelloKube {
       @Autowired
        RestTemplate restTemplate;
        @RequestMapping("/welcome")
           public String welcome() {
               String message ="";
               try {
                      message = restTemplate.getForObject("http://hello-message-app:8888/hello", String.class);
               }catch(Exception e){
                      System.out.println("Exception " + e.getMessage());
               }
                 return message;
           }
        @Bean
        public RestTemplate rest() {
        	return new RestTemplate();
        }
}
This is a very simple RestController. The only thing it is doing is making a call to a second microservice – the Hello Message microservice. It is using RestTemplate for making this call. The request mapping for this service is /welcome.
Let’s see the Hello Message microservice's RestController now.
@RestController
public class HelloService {
               @RequestMapping("/hello")
           public String hello() {
                    return String.format("This is hello from version 1");
           }
}
The request mapping for this service is /hello. The controller just returns a message with a version of the microservice. In this case, it's version 1. You can rebuild the application with version 2 by changing the version string in the hello() method to 2. You also need to update pom.xml with version 2 to make sure the Docker image that gets built will have the right tag for version 2. This is very important, as Kubernetes will directly pull the application's Docker image from the Docker hub using this tag. We will explain this in a minute.
Here is the section of pom.xml:
<?xml version="1.0" encoding="UTF-8"?>
<project xmlns="http://maven.apache.org/POM/4.0.0" xmlns:xsi="http://www.w3.org/2001/XMLSchema-instance"

       xsi:schemaLocation="http://maven.apache.org/POM/4.0.0 http://maven.apache.org/xsd/maven-4.0.0.xsd">
       <modelVersion>4.0.0</modelVersion>
       <parent>
              <groupId>org.springframework.boot</groupId>
              <artifactId>spring-boot-starter-parent</artifactId>
              <version>2.1.2.RELEASE</version>
              <relativePath/> <!-- lookup parent from repository -->
       </parent>
       <groupId>com.pnm.kube</groupId>
       <artifactId>kubecanary</artifactId>
       <version>0.0.1-SNAPSHOT</version>
       <name>kube</name>
       <description>Demo project for Spring Boot</description>
       <properties>
              <java.version>1.8</java.version>
              <docker.image.prefix>pmusale</docker.image.prefix>
       </properties>
       <dependencies>
              <dependency>
                     <groupId>org.springframework.boot</groupId>
                     <artifactId>spring-boot-starter-web</artifactId>
              </dependency>
              <dependency>
                     <groupId>org.springframework.boot</groupId>
                     <artifactId>spring-boot-starter-test</artifactId>
                     <scope>test</scope>
              </dependency>
       </dependencies>
       <build>
              <plugins>
                     <plugin>
                           <groupId>org.springframework.boot</groupId>
                           <artifactId>spring-boot-maven-plugin</artifactId>
                     </plugin>
                     <plugin>
            <groupId>com.spotify</groupId>
            <artifactId>dockerfile-maven-plugin</artifactId>
            <version>1.4.9</version>
            <configuration>
                    <repository>${docker.image.prefix}/${project.artifactId}</repository>
                    <tag>2.0</tag>
            </configuration>
             </plugin>
             <plugin>
                         <groupId>org.apache.maven.plugins</groupId>
                         <artifactId>maven-dependency-plugin</artifactId>
                         <executions>
                             <execution>
                                 <id>unpack</id>
                                 <phase>package</phase>
                                 <goals>
                                     <goal>unpack</goal>
                                 </goals>
                                 <configuration>
                                     <artifactItems>
                                         <artifactItem>
                                             <groupId>${project.groupId}</groupId>
                                             <artifactId>${project.artifactId}</artifactId>
                                             <version>${project.version}</version>
                                         </artifactItem>
                                     </artifactItems>
                                 </configuration>
                             </execution>
                         </executions>
                     </plugin>
              </plugins>
       </build>
</project>
Both microservice have a very similar pom.xml file. Please pay attention to the build->plugins section. We are using the spotify maven plug-in for building the Docker image of the Spring Boot microservice. The section also has a tag attribute.
For building each microservice you can either pull the code from the git repository or use pre-built Docker images uploaded to Docker Hub.
If you decide to build it from the code, you can go to the root folder of the project and run following command:
mvnw install dockerfile:build
This will build the image for the microservice and push it to the local Docker repository. Please make sure you are running Docker on the machine before you begin building the application.
You can list Docker images in the local repository using the docker images command. Please see the tag information. This tag will be used for building containers with the properly versioned image.

Push the images to Docker Hub using the docker push command as shown below:
docker push <Docker repository name>/<image name>
#for example:
docker push pmusale/kubecanary
This image is for the Hello Message microservice.
This will push both versions of the image tagged as 1.0 and 2.0.
Similarly, we'll push the Istio canary image. This image is for the Hello Kube microservice. Please go to Docker Hub and make sure your images are successfully uploaded.


Building the Kubernetes Cluster
We will use Google Cloud Platform to build the Kubernetes cluster. You can use the cloud of your choice but make sure the cloud provider supports Istio. The steps may vary slightly for other cloud providers.
We will use Google Cloud's SDK for connecting and creating a Kubernetes cluster.
gcloud container clusters create istio-tutorial -standard-2 --no-enable-legacy-authorizationThis will create a cluster with four nodes.
Installing Istio
To install Istio on your cluster follow these steps:
Download the latest Istio from the Istio page for your OS and extract to a folder.
You need to get admin role bindings for the user to setup Istio. Use the following commands to set the role bindings.
kubectl create clusterrolebinding cluster-admin-binding -admin --user="<Your GCP user>"You can validate role binding using the following command:
kubectl get clusterrolebinding cluster-admin-binding -o yaml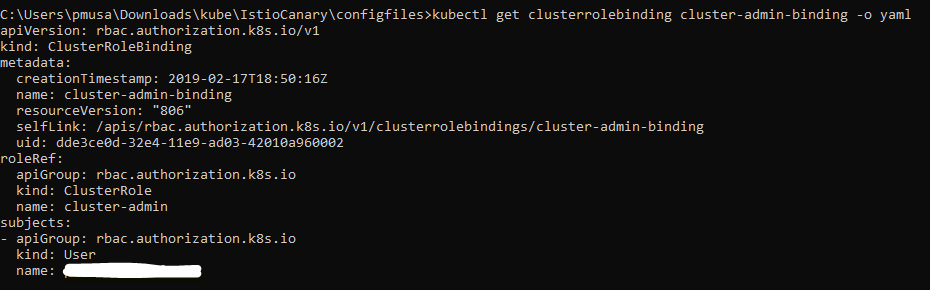
Now go to the root of the extracted Istio folder and run the following command to install Istio on your Kubernetes cluster in GCP.
kubectl apply -f install/kubernetes/istio-demo-auth.yamlValidate your installation using the following commands:
kubectl get service -n istio-system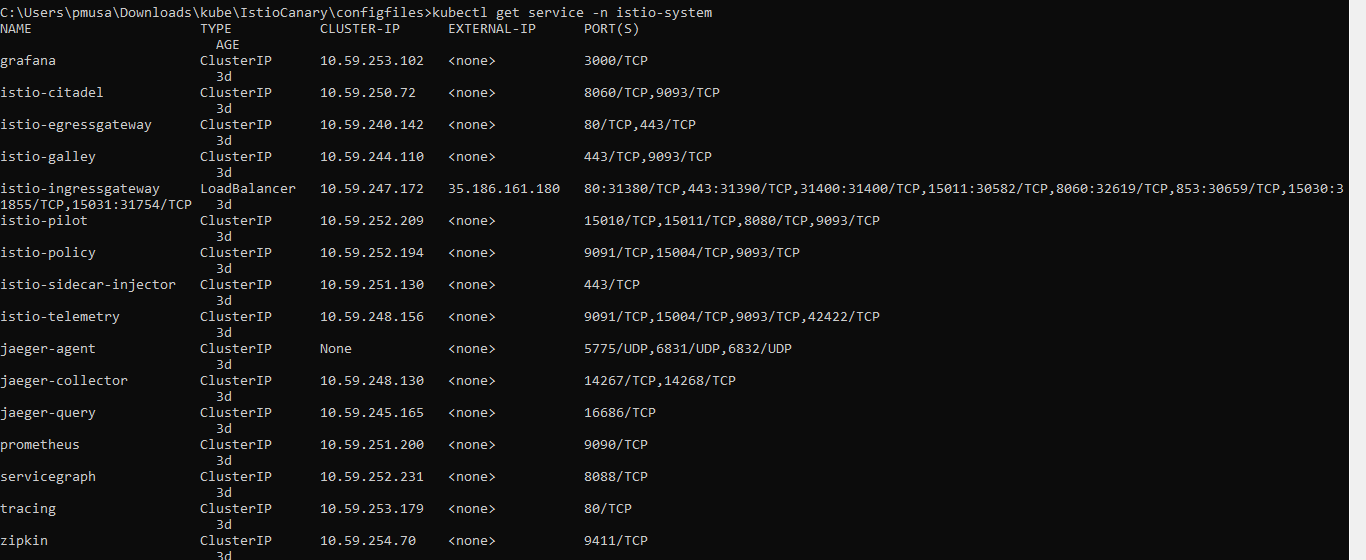
This will list all the Istio services installed under the istio-system namespace. Please pay attention to the Istio ingress gateway. Only the ingress gateway has an external IP. All other services are listed as ClusterIP. This means that, except for ingress, services are accessible only within the cluster.
Validate that all the Istio pods are running by using the following command and making sure that no pod is in an error state:
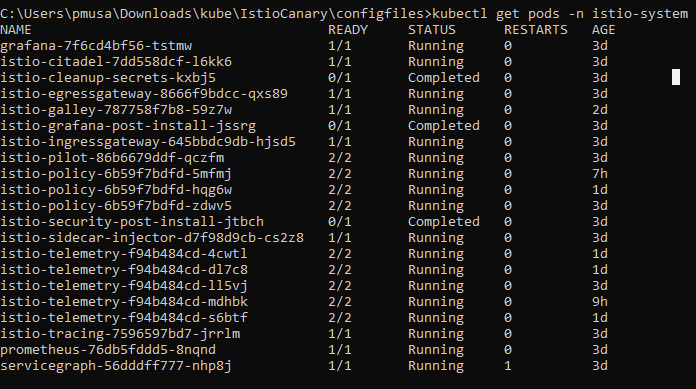
Deploying a Microservice Application to Kubernetes Cluster
Now, let’s deploy our microservice into a Kubernetes cluster and inject an Istio control into each microservice. To achieve this, we need to run the istioctl kube-inject command on our Kubernetes workload deployment file.
I have named the workload file workloadv2.yaml. This file defines the Kubernetes services, and deployment for both microservices. The file is available under the ConfigFiles folder of the Hello Kube service code repository.
##################################################################################################

# Main  service receiving response from ingress

##################################################################################################

apiVersion: v1

kind: Service

metadata:

  name: kube-canary-app

  labels:

    app: kube-canary-app

spec:

  ports:

  - port: 8080

    name: http

  selector:

    app: kube-canary-app

---

apiVersion: extensions/v1beta1

kind: Deployment

metadata:

  name: kube-canary-app-deployment-v1

spec:

  replicas: 1

  template: # template for the pods

    metadata:

      labels:

        app: kube-canary-app

        version: v1

    spec:

      containers:

      - name: kube-canary-app

        image: pmusale/istiocanary:1.0

        imagePullPolicy: Always

        ports:

        - containerPort: 8080

---

##################################################################################################

# Hello message services being called by main service

##################################################################################################

apiVersion: v1

kind: Service

metadata:

  name: hello-message-app

  labels:

    app: hello-message-app

spec:

  ports:

  - port: 8888

    name: http

  selector:

    app: hello-message-app

  type: ClusterIP

---

apiVersion: extensions/v1beta1

kind: Deployment

metadata:

  name: hello-message-app-deployment-v1

spec:

  replicas: 1

  template: # template for the pods

    metadata:

      labels:

        app: hello-message-app

        version: v1

    spec:

      containers:

      - name: hello-message-app

        image: pmusale/kubecanary:1.0

        imagePullPolicy: Always

        ports:

        - containerPort: 8888

---

apiVersion: extensions/v1beta1

kind: Deployment

metadata:

  name: hello-message-app-deployment-v2

spec:

  replicas: 1

  template: # template for the pods

    metadata:

      labels:

        app: hello-message-app

        version: v2

    spec:

      containers:

      - name: hello-message-app

        image: pmusale/kubecanary:2.0

        imagePullPolicy: Always

        ports:

        - containerPort: 8888

---
Please pay attention to the deployment section of the Hello Message service. We are defining two deployments for this service, one with version v1 and second with version v2. Please note the different versioned images listed under the containers section.
Now run istioctl kube-inject on the workload file:
istioctl kube-inject -f C:\Users\pmusa\Downloads\kube\IstioCanary\configfiles\workloadv2.yaml > workloadv2-inject.yamlThis will create the workloadv2-inject.yaml file with all the configurations needed by Istio.
Execute the following command on the file to deploy your application to Kubernetes with Istio enabled:
kubectl apply -f workloadv2-inject.yamlValidate your deployment using the following commands:
kubectl get services

Please note these are all ClusterIP services which are not accessible outside of the cluster. The only way to access them is to configure the ingress gateway to point to the service.
Now let’s configure the ingress gateway.
kubectl apply -f istio-gateway.yaml
Here is the istio-gateway.yaml file:
apiVersion: networking.istio.io/v1alpha3

kind: Gateway

metadata:

  name: istio-canary-gateway

spec:

  selector:

    istio: ingressgateway # use istio default controller

  servers:

  - port:

      number: 80

      name: http

      protocol: HTTP

    hosts:

    - "*"

---

apiVersion: networking.istio.io/v1alpha3

kind: VirtualService

metadata:

  name: kube-canary-app

spec:

  hosts:

  - "*"

  gateways:

  - istio-canary-gateway

  http:

  - route:

    - destination:

        host: kube-canary-app

        port:

          number: 8080

---
Please note that the ingress controller is routing all the traffic to the Hello Kube service named in the file as kube-canary-app. We have used Istio's VirtualService to achieve this. Now let’s test the service without canary configured.
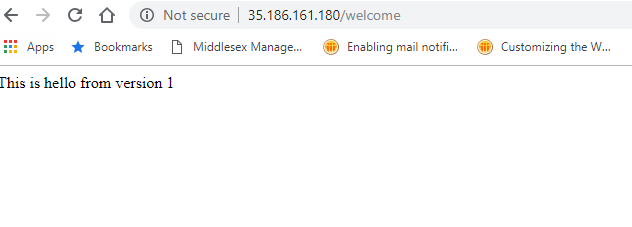
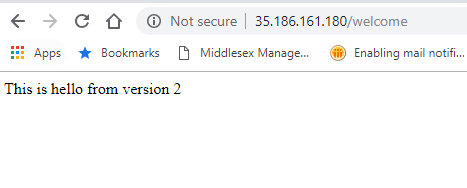
Check your ingress controller's external IP using the following command:
kubectl get svc -n istio-system

Now go to the browser and type following. You will see that version 1 and version 2 will be displayed 50 percent of the time as you keep refreshing the browser. What’s happening here is that as one pod is deployed for each version of Hello Message, each pod is getting called approximately 50 percent of the time.
Configuring Canary Deployment and Testing
Now let's setup a canary deployment for the Hello Message microservice. We will do this using VirtualService and DestinationRule.
We will use the virtual-service-CanaryTest.yml file for implementing canary.
apiVersion: networking.istio.io/v1alpha3

kind: VirtualService

metadata:

  name: "hello-message-app"

spec:

  hosts:

    - "hello-message-app"

  http:

  - route:

    - destination:

        host: "hello-message-app"

        port:

          number: 8888

        subset: v1

      weight: 90

    - destination:

        host: "hello-message-app"

        port:

          number: 8888

        subset: v2

      weight: 10

---

apiVersion: networking.istio.io/v1alpha3

kind: DestinationRule

metadata:

  name: hello-message-app

spec:

  host: hello-message-app

  trafficPolicy:

    tls:

      mode: ISTIO_MUTUAL

  subsets:

  - name: v1

    labels:

      version: v1

  - name: v2

    labels:

      version: v2

---
Please pay attention to the weight attribute under the VirtualService spec section. There are two subsets defined: v1 and v2. Subset v1 has a weight of 90 and v2 has a weight of 10. Subsets are defined in DestinationRule for the host. Apply this file using the following command:
kubectl apply -f virtual-service-CanaryTest.yml
Now refresh the browser again. You will see that you are getting version 1 message approximately 90 percent of the time. The canary version, v2, is getting called roughly 10 percent of the time.
You can play with the weights to adjust the traffic ration routed to each pod.
Opinions expressed by DZone contributors are their own.
Comments