Hardware-Accelerated OpenGL Rendering in a Linux Container
How to solve the problem with the remote display on Windows when rendering with hardware OpenGL acceleration in a Linux container.
Join the DZone community and get the full member experience.
Join For FreeThis article will show you how to solve the problem with remote display on Windows when rendering with hardware OpenGL acceleration in a Linux container. The problem occurred in a real project that I had the opportunity to implement with my team for one of our clients. As you will see in a moment, we have successfully resolved it. Today, you can learn from our experience.
What You Will Find Here
This document is intended to give a deeper understanding of the underlying technologies to set up a Linux server with an X window system to display the graphical user interface of applications running in Docker containers. A remote display on a Windows computer is assumed.
Special attention is paid to 3D applications based on OpenGL applications, which include medical imaging applications, CAD applications, or games.
This post concentrates specifically on hardware-accelerated rendering using NVIDIA hardware and drivers and on rendering image frames on the Linux server, not on the Windows end.
Most discussed are the issues related to the configuration of X11 authorizations, and to the architecture of OpenGL implementation within Linux Direct Rendering Infrastructure (DRI). You will also find a general description of X11 here. The setup of NVIDIA drivers and libraries in Docker containers is also covered.
Business Background and Placement
Market:
Solwit project in the industry of embedded medical devices, medical imaging, 3D computer vision, virtualization
Technologies:
Linux, OpenGL, X11, VNC, Docker containers, SSH, real-time placement of CRT device’s lead electrodes
QMS:
ISO 13485:2016 quality management system
Participants/players:
University Hospital (scientific and clinic expertise), partner for software, integration, and testing, and another one for hardware amplifier development
Problem solved:
Application containerization provides predictable runtime environment configuration and relatively high isolation from the rest of the system. Hardware acceleration for OpenGL applications gives a performance boost. Rendering OpenGL on the server allows using low-performance viewers, for example, low-cost Windows laptops.
Introduction: Remote Display and OpenGL Rendering
Displaying an application GUI remotely may have significant advantages: multiple users can run the application simultaneously, and the application can run on a headless, high-performance server. To display the GUI of the application, every user needs some viewer software on their local computer, where keyboard and mouse controls are also generated.
If both the server and the viewer machines are Windows, RDP can be used to achieve remote display. RDP mainly sends graphical commands over the network, minimizing bandwidth utilization, lowering latency, and providing for remote rendering of OpenGL.
If both the server and the viewer machines are Unix, X11 can be used for remote display. X11 can also be used to send uncompressed bitmaps over the network, resulting in significant bandwidth consumption in some application areas, but modern versions of X11 provide extensions (e.g. MESA) that directly control the video card of the viewer computer, thus allowing full-screen video, rendering 3D applications, etc. In the Unix world, other options can be Wayland or Mir.
OpenGL rendering is the process of generating a 2D video frame from a 2D or 3D model. Rendering takes into account not only the spatial arrangement of the 3D model but also its position angle and position of the viewport (=”camera”), lightning, texture, etc. OpenGL rendering is compute-intensive and profits from specialized GPU hardware.
While OpenGL rendering using viewer computer resources increases the overall scalability of such distributed multi-user systems, it also creates the requirement to equip each viewer computer with appropriate, relatively advanced, and expensive, GPU hardware. Therefore, in distributed multi-user environments, it is still useful to control where OpenGL rendering takes place.
On Both Windows and Unix servers, Virtual Network Computing (VNC) can be used. VNC only sends compressed bitmaps over the network, not graphics commands, therefore OpenGL rendering always takes place at the server. VNC by itself does not employ GPU hardware, which may be a loss if such hardware exists on the server side. But running GUI applications with a VirtualGL wrapper on the server provides OpenGL rendering on the server and only passes rendered 2D video frames to VNC for compression and transmission over the network to the viewer. VNC is platform-independent in the sense that either Windows or Unix can be used on the server, and in any of these cases, either Windows or Unix can control the viewer.
The issues of remote audio or file sharing are out of the scope of this article.
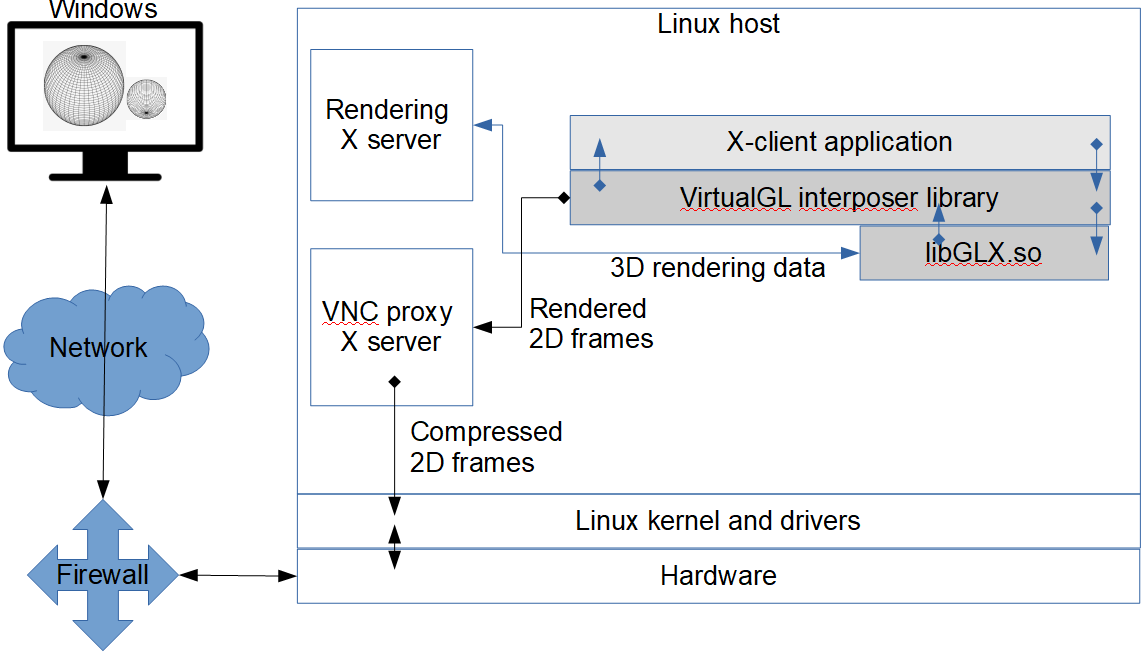
Figure 1: Passing 3D data and 2D frames with VNC and VirtualGL.
Background: X Window System (X11)
The X Window System (often called X11) is a computer graphical window interface system commonly used on Unix-like operating systems. X11 only provides the basic framework for drawing and moving windows on the display device and for interacting through a mouse and a keyboard. It does not determine the interactions with, nor the visual appearance of, the individual windows. Coordination of the input and output of individual windows to and from the rest of the operating system is the responsibility of the display server and is carried out by means of a display server protocol (e.g. X11, Wayland, Mir). X display server runs on the computer providing the display and input devices, i.e. on the computer ‘in front of the user’. Other software in the role of X11 clients connects locally or remotely to the X server to display content.
Of these X clients, the X display manager usually starts first (e.g. XDM, SDDM, GDM, LightDM) to provide a graphical login session from the same or another computer on an X server. If the X display manager runs on the local computer ('in front of the user'), it begins by starting at least one local X server according to the X display manager configuration file (Xservers), then contacts the local X server to present a user login screen, and waits for user authentication to succeed before starting the user’s graphical session.
If the X display manager runs on a remote computer, i.e. on a different computer than that where X server runs, X Display Manager Control Protocol (XDMCP) can be used instead of the X display manager configuration file (Xservers). With XDMCP, the computer with the X server must actively request a display manager connection from the remote computer. It usually happens by running an XDMCP Chooser on the computer with the X server. The XDMCP Chooser offers a list of X display managers the user can choose from. The list can encompass a predefined set of hosts as well as a set of broadcast addresses to detect available X display managers. The XDMCP allows the X display manager to authorize itself to access the X server as a regular X client if needed.
The placement and appearance of windows on a screen are governed by an X client called a window manager (e.g., Mutter/Metacity, KWin, IceWM, dwm, Xfwm). A window manager decides the initial position of a new window and draws a decorative frame around the window. It responds to requests to move, resize, iconify, or de-iconify windows. It usually also handles mouse clicks in its root window to present panes and other visual control elements. It handles specific key combinations (e.g., to close a window), and decides which application to run at start-up. The window manager communicates with a session manager (e.g., xsm, ksmserver) to save and restore a state of a set of applications.
A session is the set of X11 client applications related to their windows and the information to allow these applications to restore their windows on request. A session manager can provide exactly the same windows in the same state, e.g., when logging in after a logout from an interactive session. A number of sessions can also be saved, and any of them be loaded at any time when appropriate.
To restore the content of windows, the applications must be able to save their state of execution upon request from the session manager and load it back when started again. X Session Management Protocol (XSMP) governs the interaction between applications and the session manager.
Background: Multiple X11 Servers, Multiple Display Devices
The X11 server is closely coupled with the notion of a ‘display,’ which in X11 parlance, denotes a collection of one or more monitors (or framebuffers, to be exact) that share a common set of input devices (keyboard, mouse, tablet, etc.), used by a single user. A framebuffer in the X11 sense is a vague term nowadays. A framebuffer is the RAM containing data representing all the pixels in a complete video frame, which get converted by RAM-DAC circuitry into an analog video signal that can be displayed on a computer monitor, or on a set of monitors driven from this framebuffer. So, in this meaning, a framebuffer is used to suggest a single monitor or a set of monitors knowingly driven by a single instance of an X server. An X server can have multiple Screen sections defined in its xorg.conf configuration file to cater to multiple framebuffers used by this server, each with its own resolution.
Today, with graphics accelerators in the form of GPUs and with a range of video display devices beyond the analog monitor, the CPU does not access the framebuffer directly, but rather sends graphics-specific (e.g. OpenGL) commands to the GPU instead, which in turn rapidly manipulates the content of multiple video memory buffers to accelerate the creation of images intended for output to one or more video display devices. So, nowadays, an X server seldom knows about the real number of monitors driven by the hardware accelerator.
On the other hand, a CPU running an X server can use a virtual (software-emulated) framebuffer if the machine is, for example, headless (no graphics card) or in the case of a virtual X server like a VNC server, where the picture frames get sent to a remote software viewer instead of being directly displayed on a local device.
There can be multiple (up to 64) X11 servers running in a single operating system instance, for example, one for each user working at each X display, if a larger, multi-user system supports this (multiseat setup defined in the xorg.conf config file). From the user's perspective, using an X server – and using the right X server – requires indicating the display.
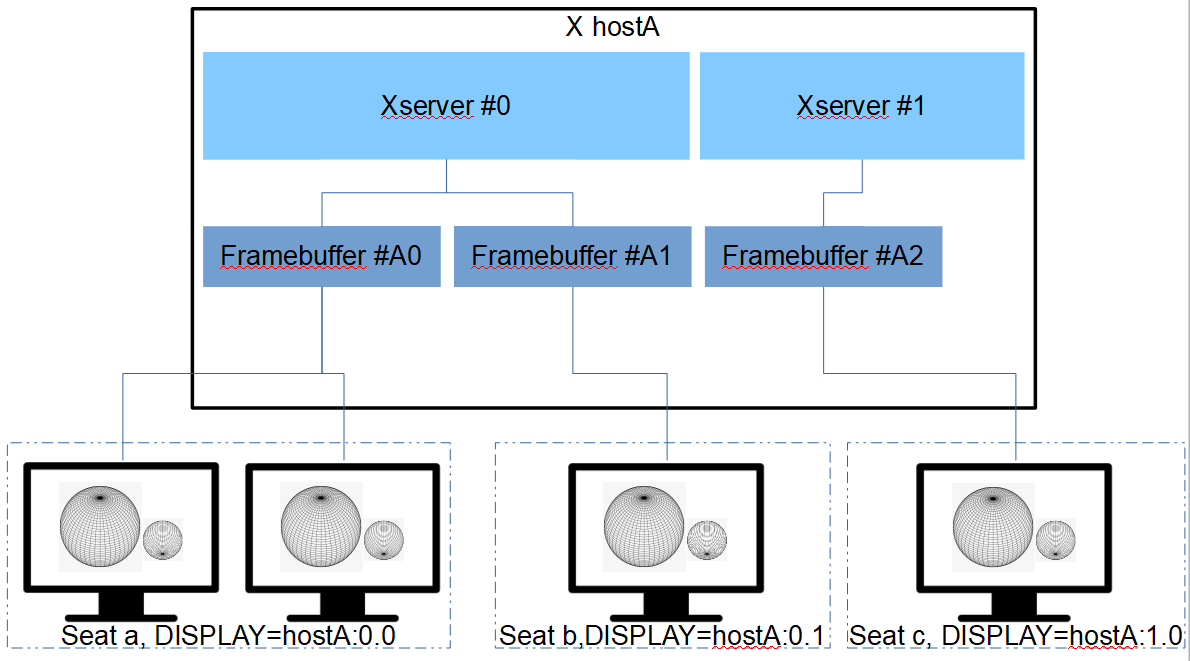 Figure 2: Multiseat setup and display naming.
Every display name includes the number of the associated X server. The display name is of the form:
hostname:displaynumber.screennumber This information is used by applications to determine how to connect to the X server (network byte streams, shared memory, etc.). For example, if the hostname is not given, the most efficient way of communicating to the X server on the same (local) machine is used. The display number is mandatory in a display name and gest assigned (beginning at 0) when the X server for that display is started. Thus, each display can be considered equivalent to a running X server. The screen number pertains to a framebuffer, and nowadays, it is usually 0.
The default display name is stored in the DISPLAY environment variable. For example,
$ DISPLAY=myws:0; export DISPLAY Alternatively, most X programs accept a command line option to override the value of the DISPLAY environment variable.
Background: X Forwarding With SSH
X traffic is unencrypted and uses TCP port 6000 for the first server on a machine. If the machine runs multiple X11 servers, the second server listens at TCP port 6001, and the nth server listens at TCP port 6000+n. Running X servers is considered a security risk, so external traffic to the above ports is usually blocked by network security mechanisms.
To encrypt X traffic, and to connect to an X server when X ports are blocked by the network, SSH can be used. The roles of the SSH client and server are inverted compared to the roles of X: the SSH client must be run on the X server, and the connection must be directed toward the SSH server on the computer where X clients are going to be started. To tunnel X11 by SSH, X11 forwarding must be enabled on both sides — in the SSH server and on the X server side (in the SSH client).
On the X server side, SSH enables X11 forwarding for the current session when invoked with the “-X” (capital X) option:
x-server $ ssh -X username@x-clients-computer 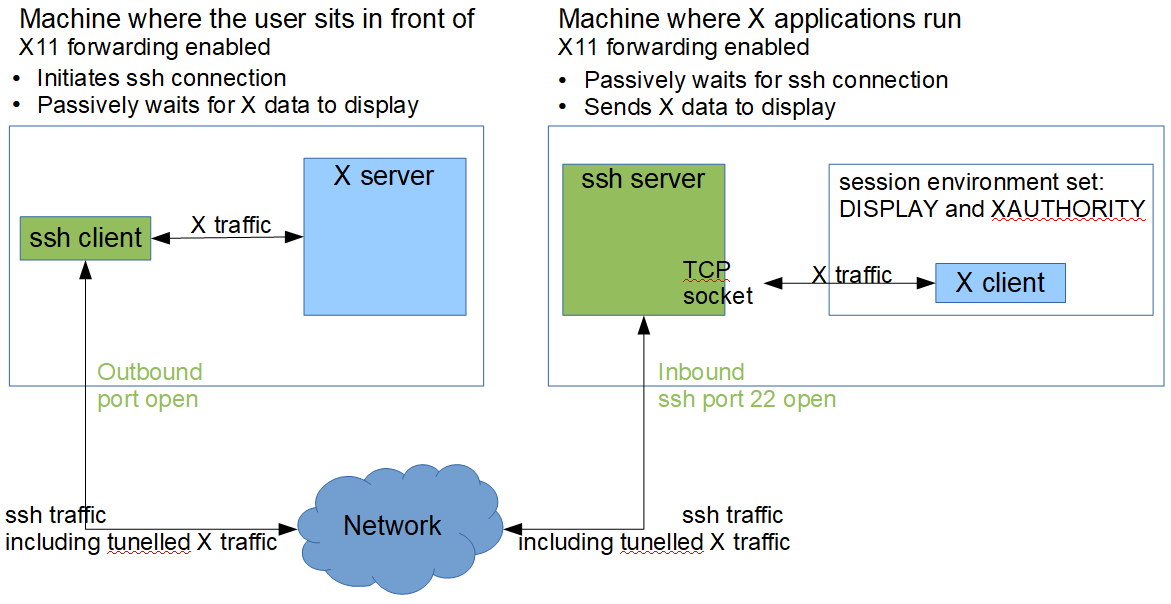 Figure 3: X forwarding with SSH
On the X server side, X11 forwarding can be permanently enabled by default for some or for all connections by setting “ForwardX11 yes” in the SSH client configuration file (${HOME}/.ssh/config).
On the computer where X clients are going to be run, “X11Forwarding yes” must be specified in the ssh-server configuration file (usually: /etc/ssh/sshd_config).
On the computer where X clients are going to be run, the xauth program must be installed, but no environment variables need to be manually set: the variables DISPLAY and XAUTHORITY (for details on XAUTHORITY, see X11 Security, below) are automatically handled by the SSH server. After successful authentication, the SSH server first sets the DISPLAY environment variable for the X clients to point to a local TCP socket opened there by the SSH server, which then tunnels the X11 communication back to the SSH client on the X server. Then, the SSH client generates a proxy MIT-MAGIC-COOKIE-1 and passes it to the SSH server. The SSH server calls xauth to add to the .Xauthority file on the computer where the X clients are going to be run (see X11 Security, below). It is the responsibility of the SSH client to accept this proxy MIT-MAGIC-COOKIE-1 and to swap it to the right MIT-MAGIC-COOKIE-1 of the X server by a technique called authentication spoofing, pictured in Figure 4.
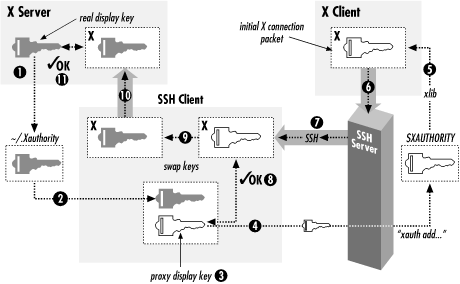
Figure 4: Technique of authentication spoofing during SSH X forwarding. [source: https://docstore.mik.ua/orelly/networking_2ndEd/ssh/ch09_03.htm]
Virtual Network Computing (VNC)
Through this document, Xorg and VNC servers are used as X servers. The VNC splits the role of an X server into a proxy X server and a VNC viewer, which communicate over the network with the Remote Frame Buffer protocol. The VNC viewer provides access to physical input devices (mouse, keyboard) and output devices (monitors). The VNC server is called a proxy X server. It behaves as any X server in many respects. Specifically, everything that has been said to this point about X11 remains true for the VNC server.
The proxy X server only operates on a virtual framebuffer as its output device — it does not communicate to the physical local GPU, nor to the local monitor. Video frames from the virtual framebuffer are sent over the network when there is a remote viewer connected. If no remote viewer is connected, the virtual framebuffer content gets silently overwritten with the next frames.
Howto: Installing and Using Vnc
It is assumed in this article that the VNC server is going to run on a Linux computer and that the VNC viewer is going to be run on a Windows computer.
There are many implementations of VNC: TigerVNC, TightVNC, TurboVNC, UltraVNC, and (non-free) RealVNC. For the sake of this document, TightVNC is used as an X server. Install TightVNC on the machine where X clients are going to be run. To install TightVNC, add the software distribution package turbovnc_2.2.6_amd64.deb [https://sourceforge.net/projects/turbovnc/files/2.2.6/turbovnc_2.2.6_amd64.deb/download]. Package files get installed to /opt/TurboVNC.
Before starting a VNC server, an unused X server number must be found (see Listing X Servers, X Displays, and X Screens below) in the range 0-63, which is denoted by NNN in the below examples. Start TightVNC server by running as any user:
$ /opt/TurboVNC/bin/vncserver -localhost -autokill :NNN # replace NNN with a yet unused display numberOn the first start, the VNC server will update (or create, if it does not exist) the ${HOME}/.Xauthority file with authentication information (see X Security below). On the first start, the TightVNC server will also ask to set an 8-character password. This password will be needed to authenticate to connect to the TightVNC server with a remote viewer in a later step. No other authentication is available – knowing this password and NNN opens access to a graphical session of the user who started the TightVNC server. The password is stored in ${HOME}/.vnc/passwd which is only accessible to its owner.
TightVNC server can be stopped by calling:
$ /opt/TurboVNC/bin/vncserver -kill :NNNVNC server number NNN listens on TCP port XXX = 5900+NNN, e.g., for NNN=2, the server listens on TCP port XXX = 5902. As TCP ports in this range are usually blocked by the network for security reasons, an SSH tunnel can be useful from the Windows computer with the VNC viewer to the Linux computer with the VNC server.
To create an SSH tunnel, two ports must be specified: VNC server port XXX (on Linux) and a free port YYY on the computer with the VNC viewer (on Windows). The port YYY on Windows can be freely chosen among free local ports; for simplicity, TCP port YYY = 5900+NNN might be worth trying.
The general form of the command line SSH call is:
windows> ssh –L YYY:localhost:XXX username@IP where the part "localhost" is resolved at the end of the tunnel, i.e the name “localhost” designates the Linux computer. IP is the Internet Protocol address of the Linux computer.
An example of creating a tunnel with NNN = 2 can be as follows:
windows> ssh –L 5902:localhost:5902 [email protected] With Putty or Kitty, the tunnel can be created by setting as in figure 5.
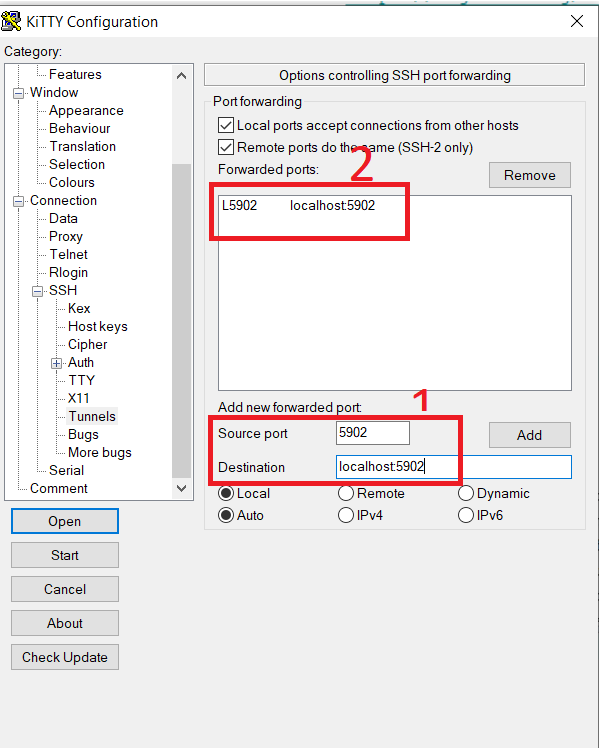
Figure 5: Setting an SSH tunnel in Putty/Kitty.
After successfully authenticating in the SSH login session, the tunnel will be established. The Linux server’s port XXX can be reached by connecting to the Windows system's local port YYY. Thus, the VNC client should open a connection to localhost:YYY (to itself) to actually connect to the server’s port XXX using the SSH tunnel. Directing the VNC client to connect to server:XXX instead would be an attempt to bypass the established tunnel and just connect directly to the server, which would probably fail due to network restrictions.
The last part is to run a VNC viewer on Windows. All implementations of VNC are mostly compatible, so to connect to a TightVNC server, a viewer of a flavor other than TightVNC can be used. Mixing VNC flavors in server and in viewer may result in suboptimal network traffic performance. For the sake of this document, TurboVNC is used as a viewer, which is fully compatible with, among others, TigerVNC, TightVNC, and RealVNC servers.
To install the TightVNC viewer, download and unzip the TightVNC viewer for Windows from https://www.tightvnc.com/download/1.3.10/tightvnc-1.3.10_x86_viewer.zip
Start the vncviewer.exe viewer and set the following field:
VNC Server: localhost:NNN,e.g. localhost:2
You will be asked for the password set during the very first start of the VNC server. After successful authentication, a remote graphical window is displayed by vncviewer.exe, which contains a Linux desktop session for the user who started the VNC server. Contrary to using X servers, for the VNC viewer itself, no DISPLAY and XAUTHORITY need to be set on the Windows side; but they still need to be set on the Unix side to access the VNC server.
Immediately after starting the graphical session, the user should disable automatic screen locking on inactivity in Ubuntu 18.04.1 with Gnome gdm3. Otherwise, due to a well-known bug, the user will soon be unable to unlock the screensaver, except with:
$ loginctl list-sessions # get <your-session-number>
$ loginctl unlock-session <your-session-number> # use <your-session-number> from above
Howto: Listing X Servers, X Displays, and X Screens
There seems to be no reliable way to obtain a list of all X11 displays available to a system. This is understandable, considering that X11 displays do not need to be local if the hostname part of DISPLAY is not empty. If a user is remotely connected, for example via SSH with X forwarding enabled, there is really only his DISPLAY environment variable to find out their remote X server (SSH with X forwarding leaves initial X11DisplayOffset numbers for local servers. The X11DisplayOffset can be set in the sshd configuration file and has a default value of 10, i.e., by default, the numbers 0-9 are reserved for local X servers, and thus DISPLAY starts with 10).
The X11 displays (local, as well as remote) in use, in contrast, can be identified by analyzing the output of the w or who commands. This only works provided that the X windows manager records desktop logins in utmp, which is not always the case. In the example below, only the first X server is associated with a login session:
$ w
01:07:38 up 5 days, 58 min,  4 users,  load average: 0.40, 0.37, 0.41
USER     TTY      FROM             LOGIN@   IDLE   JCPU   PCPU WHAT
oli      tty7     :0               Sat00    5days  4:22m  0.94s gnome-session --session=gnome-fallback
oli      pts/4    :0               Sat00   47:09m  0.77s  0.77s /bin/bash
oli      pts/6    :0               Wed02    0.00s  0.12s  0.00s w
Trying to get a list of only local X11 displays (currently used or unused) boils down to listing X servers, which is also tricky because the X server executable names may not be obvious. To obtain a list of X servers, look for the X server executable file name, e.g., Xorg or Xvnc in the output of the below command. In this example three X servers are running:
$ ps aux | grep X
damian     31430  0.0  0.4 3106148 134768 ?      Sl   lip12   8:06 /opt/TurboVNC/bin/Xvnc :2 -desktop TurboVNC: my-x-server:2 (damian) -httpd /opt/TurboVNC/bin//../java -auth /home/damian/.Xauthority -geometry 1240x900 -depth 24 -rfbwait 120000 -rfbauth /home/damian/.vnc/passwd -x509cert /home/damian/.vnc/x509_cert.pem -x509key /home/damian/.vnc/x509_private.pem -rfbport 5902 -fp /usr/share/fonts/X11/misc,/usr/share/fonts/X11/Type1 -deferupdate 1 -dridir /usr/lib/x86_64-linux-gnu/dri -registrydir /usr/lib/xorg -localhost :2
root      141167  0.0  0.1 172316 48696 tty1     Sl+  15:28   0:00 /usr/lib/xorg/Xorg vt1 -displayfd 3 -auth /run/user/125/gdm/Xauthority -background none -noreset -keeptty -verbose 3
artur     141521  0.0  0.1 2799872 57164 pts/1   Sl   15:29   0:00 /opt/TurboVNC/bin/Xvnc :1 -desktop TurboVNC: my-x-server:1 (artur) -httpd /opt/TurboVNC/bin//../java -auth /home/artur/.Xauthority -geometry 1240x900 -depth 24 -rfbwait 120000 -rfbauth /home/artur/.vnc/passwd -x509cert /home/artur/.vnc/x509_cert.pem -x509key /home/artur/.vnc/x509_private.pem -rfbport 5901 -fp /usr/share/fonts/X11/misc,/usr/share/fonts/X11/Type1 -deferupdate 1 -dridir /usr/lib/x86_64-linux-gnu/dri -registrydir /usr/lib/xorg -localhost :1
Yet another method to identify X servers running on a host is to look at display sockets under /tmp/.X11-unix for hints that indicate that a server has been started. These are hints only, as X servers are free to open sockets in other locations. In the example below, three servers have been started and have placed their display sockets in /tmp/.X11-unix:
$ ls -l /tmp/.X11-unix
total 0
srwxrwxrwx 1 root   root 0 lip 22 15:28 X0
srwxrwxrwx 1 artur  team 0 lip 22 15:29 X1
srwxrwxrwx 1 damian team 0 lip 12 14:51 X2
If display sockets have been opened in another location(s), they can be tracked down by sifting through the list of open Unix domain sockets with the command below, but again, the name of the X server executable makes the search a lot easier:
$ netstat -lp|grep X (Not all processes could be identified, non-owned process info will not be shown, and you would have to be root to see it all.)
tcp        0      0 localhost:5901          0.0.0.0:*               LISTEN      141521/Xvnc
tcp        0      0 localhost:5801          0.0.0.0:*               LISTEN      141521/Xvnc
Active UNIX domain sockets (only servers)
unix  2      [ ACC ]     STREAM     LISTENING     728369   -                    /tmp/.X11-unix/X0
unix  2      [ ACC ]     STREAM     LISTENING     726347   141521/Xvnc          /tmp/.X11-unix/X1
unix  2      [ ACC ]     STREAM     LISTENING     728368   -                    @/tmp/.X11-unix/X0
unix  2      [ ACC ]     STREAM     LISTENING     715845   -                    @/tmp/dbus-XJ7Eroc7
unix  2      [ ACC ]     STREAM     LISTENING     717754   141572/dbus-daemon   @/tmp/dbus-6jG7Er3hXU
unix  2      [ ACC ]     STREAM     LISTENING     195839   -                    /tmp/.X11-unix/X2
unix  2      [ ACC ]     STREAM     LISTENING     741382   141616/dbus-daemon   @/tmp/dbus-dXuX09TlKl
To get more information on the identified (local or remote) X servers, e.g., a list of their screens and their resolutions, it is necessary to connect to them (which requires proper authorization, see below) and either query with Xlib functions: XOpenDisplay(), XScreenCount(), XDisplayWidth(), XDisplayHeight(), XScreenOfDisplay(), XCloseDisplay() or with one of the following commands:
$ xset -q -display :0 or:
$ xdpyinfo -display :1 or:
$ xprop -display :2 Background: X11 Security
Clients connect to the X display server e.g., over a computer network or through domain sockets. Both ways are accessible to all agents in the network or within the same operating system. Access to an X server allows reading and writing all information of the user who is working with this display: logging keystrokes, reading screen content, displaying own applications, etc.
Therefore, access to an X server requires a form of authorization. Available access control mechanisms are as follows:
Host-based access control.
Cookie-based access control: shared plain-text cookies (MIT-MAGIC-COOKIE-1) or DES-based private keys (XDM-AUTHORIZATION-1).
Cookie-based access control: based on Sun's secure rpc system (SUN-DES-1) or Kerberos user-to-user (MIT-KERBEROS-5).
Using host-based access control overrides other forms of authorization.
Host-Based Access Control
The host-based access method consists of specifying a set of agents that are authorized to connect to the X display server. The program xhost can be used to display and change the set. xhost manages the X server indicated by the DISPLAY environment variable. The xhost command line options that alter access control may only run from the "controlling host", i.e., the host where the X display manager runs. Even then, xhost itself needs security access to the X server.
xhost accepts a name as its command line argument. The name can be a hostname, but it can also belong to one of the interesting “server interpreted” or “local” families. The name family of local: (mind the colon at the end) denotes all non-network (i.e. local) connections. The server interpreted value si:localuser:username can specify a single local user named username.
The given name is added to or removed from the list allowed to connect to the X server:
$ xhost local: ### to add all local connections at once to the list; mind the trailing colon
$ xhost - si:localuser:artur ### to remove local user artur from the list
Print whether or not access control is currently enabled, and print the list of names allowed to connect. This is the only option that can be used outside the controlling host:
$ xhost
This one is widely abused on the Internet. Try to avoid it, as it grants access to everyone, i.e., access control is turned off completely:
$ xhost + ### avoid this, especially in production
Turn on access control (= return to the default). Existing connections are not interrupted:
$ xhost -
An example of using xhost:
$ xhost +
xhost: unable to open display ""
$ DISPLAY=:1 xhost
access control enabled, only authorized clients can connect
$ DISPLAY=:1 xhost +
access control disabled, clients can connect from any host
$ DISPLAY=:1 xhost
access control disabled, clients can connect from any host
$ DISPLAY=:1 xhost local:
non-network local connections being added to the access control list
$ DISPLAY=:1 xhost
access control disabled, clients can connect from any host
LOCAL:
Cookie-Based Access Control
The cookie-based methods are based on generating a piece of data ("magic cookie") and passing it to the X display server when it starts, usually indicating cookie file location by a command-line option. Every client that can later prove knowing this cookie is granted authorization to connect to the server. All X clients get exactly the same access to the X server once they get authorization — using (or not using) superuser permissions does not influence this. Even X clients started by users who did not log into the computer with the X server are allowed full access once they get authorization (with minor influence when using trusted/untrusted according to the X Security Extension Specification).
When a user logs in by means of the X display manager, the cookies are also stored by the X display manager in a file accessible to the user at the computer where the user logged in, i.e., where his X clients are going to be started. The file is indicated during the user’s session by the XAUTHORITY environment variable. If XAUTHORITY is not set, ${HOME}/.Xauthority is assumed. File access permissions of .Xauthority are read and written only for the owner of the file. If the user logs into a computer bypassing the mechanism of cookie transfer, e.g., through an SSH character terminal session started without X forwarding enabled, additional steps must be taken to securely copy the cookie to the computer.
As the .Xauthority file is a requirement for running an X server, the file is automatically created and so it should never be necessary to generate it by hand, but the command to do so would be:
$ xauth generate $DISPLAY . trusted
The .Xauthority file can be managed with xauth. To see the information describing the .Xauthority file based on an optionally specified XAUTHORITY file location:
$ xauth info [ -f ${XAUTHORITY} ]
Authority file:       /home/artur/.Xauthority
File new:             no
File locked:          no
Number of entries:    6
Changes honored:      yes
Changes made:         no
Current input:        (argv):1
To see authorization entries, including cookies, for all displays, based on an optionally specified XAUTHORITY file location. Note display numbers start at 0. Below, all displays can be accessed both locally (e.g.m my-x-server/unix:1) and over the network (e.g., my-x-server:1):
$ xauth list [ -f ${XAUTHORITY} ]
my-x-server:1  MIT-MAGIC-COOKIE-1  504bc2122ba41de0e9e8b8c72af9553f
my-x-server/unix:1  MIT-MAGIC-COOKIE-1  504bc2122ba41de0e9e8b8c72af9553f
my-x-server:2  MIT-MAGIC-COOKIE-1  c3db197572e1faf37049473f9f207db4
my-x-server/unix:2  MIT-MAGIC-COOKIE-1  c3db197572e1faf37049473f9f207db4
my-x-server:3  MIT-MAGIC-COOKIE-1  71939bddd1039944b1e627554c015ce7
my-x-server/unix:3  MIT-MAGIC-COOKIE-1  71939bddd1039944b1e627554c015ce7
To copy local Unix domain socket authorization entries for display :2 on server my-x-server between .Xauthority files belonging to different users (superuser permissions needed):
# xauth -f /home/damian/.Xauthority list my-x-server/unix:2
my-x-server/unix:2  MIT-MAGIC-COOKIE-1  c3db197572e1faf37049473f9f207db4
# xauth -f /home/artur/.Xauthority add my-x-server/unix:2 MIT-MAGIC-COOKIE-1  c3db197572e1faf37049473f9f207db4
To copy cookies by merging the contents of `${XAUTHORITY}` into ~/.Xauthority: XAUTHORITY=~/.Xauthority xauth merge "${XAUTHORITY}"
Howto: Displaying X Client GUI
After a successful SSH login without X forwarding from an X server to into a computer where X clients are to be started, neither DISPLAY nor XAUTHORITY variables are initially set. Thus, trying to start an X client fails:
$ xeyes
Error: Can't open display:
After finding the right X server display number (See: Listing X Servers, Displays, and Screens above), starting the X client still fails – this time due to insufficient authorization:
$ DISPLAY=:1 xeyes ### alternatively: xeyes -display :1
No protocol specified
Cannot open display::1
The coarse and grossly overused method of granting authorization is to use host-based access control. But as xhost itself needs authorization in the first place, it must usually be run from within an xterm, i.e., from the graphics session, not from the character terminal SSH session:
xterm$ DISPLAY=:1 xhost si:localuser:artur
ssh$ DISPLAY=:1 xeyes
Another approach is to get the content of (or just the single cookie from) an .Xauthority file related to the X server in question. The following options exist:
Open any X client on the X server in question, possibly by means of a graphical login session. Use the
.Xauthorityfile created on the machine where X client has been started.Get the content of
.Xauthorityfrom another user. Beware:.Xauthoritywill contain cookies for the X server in question only if the user previously ever worked with the X server using cookie-based access control.Get values of
DISPLAYandXAUTHORITYfrom a running X client. Beware: the.Xauthoritywill contain cookies for the X server in question only if the user of this X client previously ever worked with the X server using cookie-based access control.Get the path of
.Xauthorityfile from the command line options of the running X server process.
The first two options above should be clear from previous parts of this article. To get values of DISPLAY and XAUTHORITY from a running X client, the PID of a process that's connected to the X server in question must be figured out, then:
$ cat /proc/${PID}/environ | tr '\0' '\n' | grep -E '^(DISPLAY|XAUTHORITY)='
To get the path of .Xauthority file from the command line options of a running X server process, look for Xauthority in the output of the ps command. In the following example, X server :0 uses /run/user/125/gdm/Xauthority, X server :1 uses /home/artur/.Xauthority, and X server :2 uses /home/damian/.Xauthority:
$ ps aux | grep X
damian     31430  0.0  0.4 3106148 134768 ?      Sl   lip12   8:06 /opt/TurboVNC/bin/Xvnc :2 -desktop TurboVNC: my-x-server:2 (damian) -httpd /opt/TurboVNC/bin//../java -auth /home/damian/.Xauthority -geometry 1240x900 -depth 24 -rfbwait 120000 -rfbauth /home/damian/.vnc/passwd -x509cert /home/damian/.vnc/x509_cert.pem -x509key /home/damian/.vnc/x509_private.pem -rfbport 5902 -fp /usr/share/fonts/X11/misc,/usr/share/fonts/X11/Type1 -deferupdate 1 -dridir /usr/lib/x86_64-linux-gnu/dri -registrydir /usr/lib/xorg -localhost :2
root      141167  0.0  0.1 172316 48696 tty1     Sl+  15:28   0:00 /usr/lib/xorg/Xorg vt1 -displayfd 3 -auth /run/user/125/gdm/Xauthority -background none -noreset -keeptty -verbose 3
artur     141521  0.0  0.1 2799872 57164 pts/1   Sl   15:29   0:00 /opt/TurboVNC/bin/Xvnc :1 -desktop TurboVNC: my-x-server:1 (artur) -httpd /opt/TurboVNC/bin//../java -auth /home/artur/.Xauthority -geometry 1240x900 -depth 24 -rfbwait 120000 -rfbauth /home/artur/.vnc/passwd -x509cert /home/artur/.vnc/x509_cert.pem -x509key /home/artur/.vnc/x509_private.pem -rfbport 5901 -fp /usr/share/fonts/X11/misc,/usr/share/fonts/X11/Type1 -deferupdate 1 -dridir /usr/lib/x86_64-linux-gnu/dri -registrydir /usr/lib/xorg -localhost :1
As X server :1 in the example above uses /home/artur/.Xauthority, any user with read access to that file can start an X client on the server:
$ XAUTHORITY=/home/artur/.Xauthority DISPLAY=:1 xeyes
Rendering Opengl at the Right End
OpenGL Libraries and Drivers
Mesa
OpenGL, being a language specification, needs software implementation. The open-source implementation of OpenGL has been done within the Mesa project, which also implements other graphics APIs, including OpenGL ES, OpenCL, OpenMAX, VDPAU, VA-API, XvMC, Vulkan, and EGL. A variety of device drivers allows the Mesa libraries to offer software emulation as well as complete hardware acceleration for some GPUs.
Mesa libraries offer OpenGL rendering in software with the LLVMPipe, or swrast, or softpipe drivers. Implementations can also be coupled with a driver specific to a GPU, providing hardware-accelerated rendering: Mesa libraries use AMD, Broadcom, Intel i965, Intel ANV, and Intel Iris drivers, among others.
Mesa and the hardware drivers adhere to the Direct Rendering Infrastructure (DRI) architecture. The original assumption of the X11 was that the X server has exclusive access to the graphics hardware, and, therefore, the X server is the only process able to actually render on the framebuffer. As such indirect rendering introduces latency in the OpenGL pipeline for a large amount of 3D data, DRI introduces direct rendering by X clients. DRI architecture coordinates the Linux kernel, X window system, GPU hardware, and an OpenGL-based rendering engine like Mesa. Direct Rendering Manager (DRM) in the Linux kernel treats 3D graphics hardware as a shared resource in order to support multiple, simultaneous 3D applications.
Indirect rendering is limited to the set of features with a defined protocol encoding in libGLX.so. This library provides an extension to the X protocol which binds OpenGL to the X11 window system, enabling 3D drawing on X windows.
OpenGL Dispatch Tables
OpenGL requires loading its API functions explicitly at runtime via a platform-specific API call to get pointers to the core as well as to extensions (e.g., GLX). This is usually done with an OpenGL Loading Library specific to the platform (e.g., GLEW, GL3W, glad). The function glXGetProcAddress() is used internally to retrieve function pointers by function name on X11-based systems. This function operates without an OpenGL context, i.e., the functions returned are not associated with any context and may not be supported by a particular context.
The main library OpenGL applications need to use is libGL.so. libGL.so is a wrapper around libGLX.so, so it implements the GLX interface as well as the main OpenGL API entry points. When using indirect rendering, libGL.so creates GLX protocol messages and sends them to the X server via a socket.
GL Vendor-Neutral Dispatch Library
Until NVIDIA provided GL Vendor-Neutral Dispatch library as proposed at XDC 2013, libGL.so was vendor-specific in the sense that it contained an OpenGL implementation coupled with a specific driver. Therefore, it was not easy to use different OpenGL renderers on a single computer, and broken dependencies of the software distribution package could result in leaving or installing the wrong version or build of libGL.so.
The proliferation of vendor-specific drivers and libraries aiming at providing hardware acceleration to OpenGL rendering resulted in the GL Vendor-Neutral Dispatch library (libglvnd). The goal for libglvnd is to allow multiple OpenGL implementations from different vendors to coexist on the same system, without interfering with each other or requiring manual configuration. With libglvnd, libGL.so becomes a vendor-independent dispatch library, not part of any driver. Each vendor provides its OpenGL implementation in a separate library. An application still links to libGL.so, but libGL.so loads the appropriate 3D DRI driver automatically.
Most GLX entry points specify an X screen, either explicitly, or implicitly. In such cases, the first time libGLX.so gets called with a unique combination of X display and screen, it queries the X server for the GLX vendor of that X screen to load the corresponding libGLX_VENDOR.so from the search patch defined by the LIBGL_DRIVERS_PATH environment variable. The GLX dispatch table of libGLX_VENDOR.so is read, and this mapping gets cached for use in subsequent dispatching of OpenGL library calls directly to that driver. In this way, libGL.so also has the ability to support heterogeneous, multi-head configurations. If there are multiple graphics cards of different types in one system, an application can use all of them simultaneously.
In a system with libglvnd installed, applications can use libGL.so as usual or can use libGLX.so instead. The libGLX.so only exports GLX entry points, so to get OpenGL functions linking against one of the entry point libraries, typically, libOpenGL.so may be needed – if not using an OpenGL Load Library. As there is just one common dispatch table for all GL entry points, every function name exists only once there independent from the lookup library: libOpenGL.so, libGL.so, libGLES*.so, glXGetProcAddress, or eglGetProcAddress.
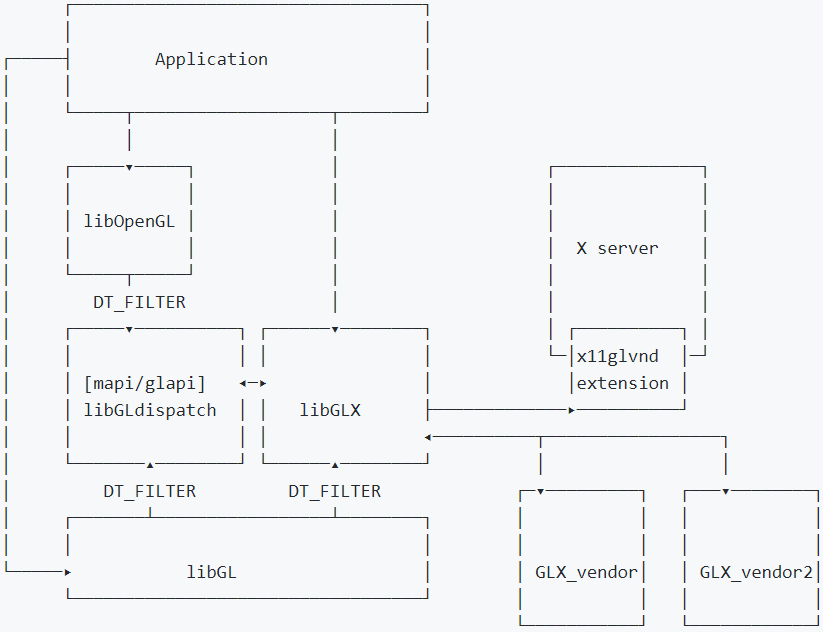 Figure 6: GL Vendor-Neutral Dispatch library. [Source: https://github.com/freedesktop/glvnd]
Howto: Renderer Selection Through X Server
An OpenGL application should be linked with GL libraries:
$ ldd /tmp/app/bin/App | fgrep GL
        libQt5OpenGL.so.5 => /opt/qt/lib/libQt5OpenGL.so.5 (0x00007f4d8f095000)
        libGL.so.1 => /usr/lib/x86_64-linux-gnu/libGL.so.1 (0x00007f4d8a447000)
        libGLX.so.0 => /usr/lib/x86_64-linux-gnu/libGLX.so.0 (0x00007f4d846f3000)
        libGLdispatch.so.0 => /usr/lib/x86_64-linux-gnu/libGLdispatch.so.0 (0x00007f4d8443d000)
The above libraries are associated with some software distribution packages. On Ubuntu 18.04.1 LTS (bionic) with amd64 architecture, the packages are as follows:
$ dpkg -S /usr/lib/x86_64-linux-gnu/libGL.so\* /usr/lib/x86_64-linux-gnu/libGLX.so\* /usr/lib/x86_64-linux-gnu/libGLdispatch.so\*
libgl1:amd64: /usr/lib/x86_64-linux-gnu/libGL.so.1
libglvnd-dev:amd64: /usr/lib/x86_64-linux-gnu/libGL.so
libgl1:amd64: /usr/lib/x86_64-linux-gnu/libGL.so.1.0.0
libglx0:amd64: /usr/lib/x86_64-linux-gnu/libGLX.so.0
libglvnd-dev:amd64: /usr/lib/x86_64-linux-gnu/libGLX.so
libglx0:amd64: /usr/lib/x86_64-linux-gnu/libGLX.so.0.0.0
libglvnd0:amd64: /usr/lib/x86_64-linux-gnu/libGLdispatch.so.0
libglvnd-dev:amd64: /usr/lib/x86_64-linux-gnu/libGLdispatch.so
libglvnd0:amd64: /usr/lib/x86_64-linux-gnu/libGLdispatch.so.0.0.0
On Ubuntu 18.04.1 LTS (bionic) with amd64 architecture, the files come from libglvnd:
$ dpkg -l libgl1 libglvnd-dev  libglvnd0 libglx0
Desired=Unknown/Install/Remove/Purge/Hold
| Status=Not/Inst/Conf-files/Unpacked/halF-conf/Half-inst/trig-aWait/Trig-pend
|/ Err?=(none)/Reinst-required (Status,Err: uppercase=bad)
||/ Name                                      Version                   Architecture              Description
+++-=========================================-=========================-=========================-=======================================================================================
ii  libgl1:amd64                              1.0.0-2ubuntu2.3          amd64                     Vendor neutral GL dispatch library -- legacy GL support
ii  libglvnd-dev:amd64                        1.0.0-2ubuntu2.3          amd64                     Vendor neutral GL dispatch library -- development files
ii  libglvnd0:amd64                           1.0.0-2ubuntu2.3          amd64                     Vendor neutral GL dispatch library
ii  libglx0:amd64                             1.0.0-2ubuntu2.3          amd64                     Vendor neutral GL dispatch library -- GLX support
But there are also other GL libraries available for a total of 38 files and links:
$ ls /usr/lib/x86_64-linux-gnu/*GL* | wc -l
38
Among the libraries there are Mesa ones:
$ dpkg -S  /usr/lib/x86_64-linux-gnu/*GL*.so* | fgrep mesa
libegl-mesa0:amd64: /usr/lib/x86_64-linux-gnu/libEGL_mesa.so.0
libegl-mesa0:amd64: /usr/lib/x86_64-linux-gnu/libEGL_mesa.so.0.0.0
libglu1-mesa-dev:amd64: /usr/lib/x86_64-linux-gnu/libGLU.so
libglu1-mesa:amd64: /usr/lib/x86_64-linux-gnu/libGLU.so.1
libglu1-mesa:amd64: /usr/lib/x86_64-linux-gnu/libGLU.so.1.3.1
libglx-mesa0:amd64: /usr/lib/x86_64-linux-gnu/libGLX_indirect.so.0
libglx-mesa0:amd64: /usr/lib/x86_64-linux-gnu/libGLX_mesa.so.0
libglx-mesa0:amd64: /usr/lib/x86_64-linux-gnu/libGLX_mesa.so.0.0.0
There are also vendor-provided libraries that are part of the 3D driver. In this case, this is the NVIDIA driver v.450 suitable for the NVIDIA GFX 1080 graphics card:
$ dpkg -S  /usr/lib/x86_64-linux-gnu/*GL*.so* | fgrep -i NVIDIA
libNVIDIA-gl-450-server:amd64: /usr/lib/x86_64-linux-gnu/libEGL_NVIDIA.so.0
libNVIDIA-gl-450-server:amd64: /usr/lib/x86_64-linux-gnu/libEGL_NVIDIA.so.450.119.04
libNVIDIA-gl-450-server:amd64: /usr/lib/x86_64-linux-gnu/libGLESv1_CM_NVIDIA.so.1
libNVIDIA-gl-450-server:amd64: /usr/lib/x86_64-linux-gnu/libGLESv1_CM_NVIDIA.so.450.119.04
libNVIDIA-gl-450-server:amd64: /usr/lib/x86_64-linux-gnu/libGLESv2_NVIDIA.so.2
libNVIDIA-gl-450-server:amd64: /usr/lib/x86_64-linux-gnu/libGLESv2_NVIDIA.so.450.119.04
libNVIDIA-gl-450-server:amd64: /usr/lib/x86_64-linux-gnu/libGLX_NVIDIA.so.0
libNVIDIA-gl-450-server:amd64: /usr/lib/x86_64-linux-gnu/libGLX_NVIDIA.so.450.119.04
The example computer is equipped with a single GPU, an NVIDIA GeForce GTX 1080:
$ sudo lshw -C display
  *-display
       description: VGA compatible controller
       product: GP104 [GeForce GTX 1080]
       vendor: NVIDIA Corporation
       physical id: 0
       bus info: pci@0000:05:00.0
       version: a1
       width: 64 bits
       clock: 33MHz
       capabilities: pm msi pciexpress vga_controller bus_master cap_list rom
       configuration: driver=NVIDIA latency=0
       resources: irq:53 memory:ee000000-eeffffff memory:d0000000-dfffffff memory:e0000000-e1ffffff ioport:c000(size=128) memory:c0000-dffff
One can also check which X server uses the NVIDIA GeForce GTX 1080 by querying all existing X servers with the glxinfo program from the mesa-utils software distribution package. For proper authorization, the correct .Xauthority is used in each example below; the program is called with superuser permissions to get read access to the .Xauthority file of other users (of displays :0 and :2). As can be seen, display :0 (related to the Xorg server) is driven by NVIDIA graphics card and offers OpenGL 4.6.0, while the two remaining displays (related to VNC X servers) use Mesa with the llvmpipe software renderer and offer OpenGL 3.1:
$ sudo XAUTHORITY=/run/user/125/gdm/Xauthority glxinfo -display :0 | grep -E "vendor|OpenGL version string"
server glx vendor string: NVIDIA Corporation
client glx vendor string: NVIDIA Corporation
OpenGL vendor string: NVIDIA Corporation
OpenGL version string: 4.6.0 NVIDIA 450.119.04
$ glxinfo -display :1 | grep -E "Vendor|Device:|OpenGL version string"
    Vendor: Mesa/X.org (0xffffffff)
    Device: llvmpipe (LLVM 11.0.0, 256 bits) (0xffffffff)
OpenGL version string: 3.1 Mesa 20.2.6
$ sudo XAUTHORITY=/home/damian/.Xauthority glxinfo -display :2 | grep -E "Vendor|Device:|OpenGL version string"
    Vendor: Mesa/X.org (0xffffffff)
    Device: llvmpipe (LLVM 11.0.0, 256 bits) (0xffffffff)
OpenGL version string: 3.1 Mesa 20.2.6
The above indicates that this is a system with Mesa, an NVIDIA driver, and libglvnd installed and is equipped with an NVIDIA GeForce GTX 1080, which is driving display :0. Thus, an OpenGL application with a properly defined DISPLAY should first call libglvnd. libglvnd will then contact the X server associated with this DISPLAY to get the related driver. Then the proper library (either the NVIDIA for hardware-accelerated rendering or Mesa for software rendering) will be used. This behavior can be checked with any OpenGL X client, but the program glxspheres64 from the amd64 virtualgl software distribution package [https://sourceforge.net/projects/virtualgl/files/2.6.5/] gives valuable information on the character terminal SSH session, in addition to rendering moving spheres on the respective display (which will remain invisible if only an SSH login session is opened). As can be seen below, rendering on X server :0 is done with GeForce GTX 1080 and exceeds 3,100 frames per second; rendering on X servers :1 and :2 is done with software renderer llvmpipe and achieves approximately 30 frames per second:
$ sudo DISPLAY=:0 XAUTHORITY=/run/user/125/gdm/Xauthority /opt/VirtualGL/bin/ glxspheres64
Polygons in scene: 62464 (61 spheres * 1024 polys/spheres)
GLX FB config ID of window: 0xad (8/8/8/0)
Visual ID of window: 0x27
Context is Direct
OpenGL Renderer: GeForce GTX 1080/PCIe/SSE2
3161.386940 frames/sec - 3528.107825 Mpixels/sec
3108.203579 frames/sec - 3468.755194 Mpixels/sec
$ DISPLAY=:1 /opt/VirtualGL/bin/glxspheres64
Polygons in scene: 62464 (61 spheres * 1024 polys/spheres)
GLX FB config ID of window: 0x164 (8/8/8/0)
Visual ID of window: 0x3f7
Context is Direct
OpenGL Renderer: llvmpipe (LLVM 11.0.0, 256 bits)
30.220802 frames/sec - 29.509042 Mpixels/sec
29.964094 frames/sec - 29.258380 Mpixels/sec
^C
$ sudo DISPLAY=:2 XAUTHORITY=/home/damian/.Xauthority /opt/VirtualGL/bin/glxspheres64
Polygons in scene: 62464 (61 spheres * 1024 polys/spheres)
GLX FB config ID of window: 0x164 (8/8/8/0)
Visual ID of window: 0x3f7
Context is Direct
OpenGL Renderer: llvmpipe (LLVM 11.0.0, 256 bits)
30.791668 frames/sec - 35.626699 Mpixels/sec
28.124818 frames/sec - 32.541090 Mpixels/sec
^C
Howto: Controlling Rendering X Server With VirtualGL
In the above example, the X client used just one X server at each call, as is natural for X11. Thus, the same X server was used for both rendering and displaying moving spheres. VirtualGL allows one application to use two X servers at once: one for rendering, and the other for display. This opens the opportunity to control if VNC sessions use hardware-accelerated OpenGL rendering or not.
VirtualGL can be installed from the amd64 virtualgl software distribution package [https://sourceforge.net/projects/virtualgl/files/2.6.5/].
The two main parts of the VirtualGL software are the interposer libraries and the /opt/VirtualGL/bin/vglrun shell script. The role of the shell script is to set the LD_PRELOAD environment variable. The interposer libraries are as follows:
$ dpkg -L virtualgl | fgrep faker
/usr/lib/libvglfaker-nodl.so
/usr/lib/libgefaker.so
/usr/lib/libvglfaker-opencl.so
/usr/lib/libvglfaker.so
/usr/lib/libdlfaker.so
Most applications use shared libraries and thus rely on dynamic linking, especially for such system libraries as the standard C library (libc), or the X Window or OpenGL libraries. Shared libraries provide advantages for software management, and allow to save space, both on disk and in operational memory.
With shared libraries, the runtime linker searches for a symbol first in the dynamic executable and then in each dependency by default. The first symbol satisfying the search is accepted. In other words, if more than one instance of the same symbol exists, the first instance overshadows all others. This is used as the basic concept for interposer libraries, which provide redundant symbols (e.g., functions) exactly for the sake of interposing on other libraries. An interposer library usually eventually calls the original interposed function but retains the option to do additional processing before and after the call to the interposed function.
To allow the interposition, the default search order of the runtime linker must be changed. This is achieved by providing full paths to libraries in the LD_PRELOAD environmental variable, and this is what the /opt/VirtualGL/bin/vglrun shell script does in the environment of the specified application. It adds the libraries that provide the VirtualGL functionality to LD_PRELOAD. If the LD_PRELOAD variable is set, the libraries mentioned in it are searched first by the runtime linker, in the order in which they are listed, and before any other dependencies.
The intended VirtualGL functionality is to send libGLX requests (the application’s X11 commands and X11 events) to the “rendering X server”, i.e., to the X server managing the GPU, for rendering on a physical device, faking display on a local monitor. The libGL renders frames with the renderer related to the rendering X server. It is usually desirable to do hardware-accelerated rendering, but the same mechanisms can be used to get rendering in a rendering X server only providing software renderers.
The resulting rendered, uncompressed 2D frames are then passed by VirtualGL interposer libraries to the display X server (usually: VNC proxy) as X11 Transport. The display X server receives X11 commands from applications and from VirtualGL and renders the X11 commands into frames.
If the display X server is connected to a monitor, it displays the results on it. If the display X server is a VNC proxy with an active connection to a VNC viewer, the VNC proxy sends a compressed image stream over the network to the viewer and also accepts keyboard and mouse events from it.
The display X server is indicated by the DISPLAY environment variable. The rendering X display is indicated as a parameter to the /opt/VirtualGL/bin/vglrun shell script.
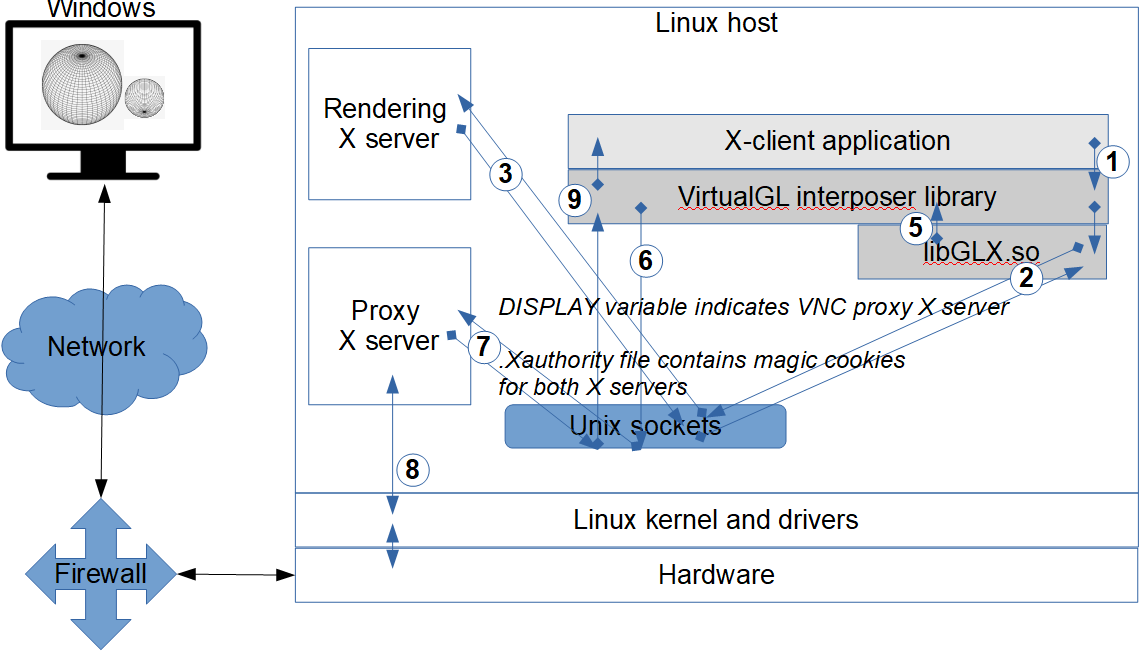
Figure 7: VirtualGL interposed library for using separate X servers for rendering and for display.
To use two X servers at once requires specifying the X servers and ensuring open access to both of them. The latter is most elegantly done by merging the .Xauthority files of both X servers in question into a new file and using the new file for the X client call:
$ export XAUTHORITY=/tmp/Xauthority
$ cat /dev/null > $XAUTHORITY
$ xauth -f  /home/artur/.Xauthority list
$ xauth -f  /home/artur/.Xauthority list
pacer:1  MIT-MAGIC-COOKIE-1  88175224b412cda4f5317e76ac322a77
pacer/unix:1  MIT-MAGIC-COOKIE-1  88175224b412cda4f5317e76ac322a77
$ sudo xauth -f /run/user/125/gdm/Xauthority list
pacer/unix:  MIT-MAGIC-COOKIE-1  d3bc373d24669f18e2b41b9d1047bdad
#ffff#7061636572#:  MIT-MAGIC-COOKIE-1  d3bc373d24669f18e2b41b9d1047bdad
$ xauth add pacer/unix:0  MIT-MAGIC-COOKIE-1  d3bc373d24669f18e2b41b9d1047bdad
$ xauth add pacer/unix:1  MIT-MAGIC-COOKIE-1  88175224b412cda4f5317e76ac322a77
$ xauth list
pacer/unix:0  MIT-MAGIC-COOKIE-1  d3bc373d24669f18e2b41b9d1047bdad
pacer/unix:1  MIT-MAGIC-COOKIE-1  88175224b412cda4f5317e76ac322a77
In the examples below, rendering is done on the X server indicated by command line option ‘-d’ to vglrun. Displaying is done on the X server indicated by the DISPLAY environment variable. As can be seen, software rendering with llvmpipe (on display :1) achieves 26-28 frames per second, while hardware-accelerated rendering with GeForce GTX 1080 (on display :0) achieves approximately 154-224 frames per second. The hardware acceleration gives a significant performance boost independent from what X server is used for display but is nonetheless much lower than the 3,100 frames per second achieved without virtualgl, when rendering and display happened on a single X server:
$ DISPLAY=:0 /opt/VirtualGL/bin/vglrun -d :0 /opt/VirtualGL/bin/glxspheres64
Polygons in scene: 62464 (61 spheres * 1024 polys/spheres)
GLX FB config ID of window: 0xad (8/8/8/0)
Visual ID of window: 0x21
Context is Direct
OpenGL Renderer: GeForce GTX 1080/PCIe/SSE2
189.055882 frames/sec - 210.986364 Mpixels/sec
158.437785 frames/sec - 176.816568 Mpixels/sec
154.759115 frames/sec - 172.711172 Mpixels/sec
^C
$ DISPLAY=:1 /opt/VirtualGL/bin/vglrun -d :0 /opt/VirtualGL/bin/glxspheres64
Polygons in scene: 62464 (61 spheres * 1024 polys/spheres)
GLX FB config ID of window: 0xad (8/8/8/0)
Visual ID of window: 0x21
Context is Direct
OpenGL Renderer: GeForce GTX 1080/PCIe/SSE2
219.400586 frames/sec - 214.233264 Mpixels/sec
222.099017 frames/sec - 216.868141 Mpixels/sec
224.862969 frames/sec - 219.566996 Mpixels/sec
^C
DISPLAY=:0 /opt/VirtualGL/bin/vglrun -d :1 /opt/VirtualGL/bin/glxspheres64
Polygons in scene: 62464 (61 spheres * 1024 polys/spheres)
GLX FB config ID of window: 0x164 (8/8/8/0)
Visual ID of window: 0x21
Context is Direct
OpenGL Renderer: llvmpipe (LLVM 11.0.0, 256 bits)
26.675161 frames/sec - 29.769480 Mpixels/sec
26.894907 frames/sec - 30.014716 Mpixels/sec
26.374685 frames/sec - 29.434149 Mpixels/sec
26.840482 frames/sec - 29.953978 Mpixels/sec
^C
$ DISPLAY=:1 /opt/VirtualGL/bin/vglrun -d :1 /opt/VirtualGL/bin/glxspheres64
Polygons in scene: 62464 (61 spheres * 1024 polys/spheres)
GLX FB config ID of window: 0x164 (8/8/8/0)
Visual ID of window: 0x21
Context is Direct
OpenGL Renderer: llvmpipe (LLVM 11.0.0, 256 bits)
27.606186 frames/sec - 26.956005 Mpixels/sec
28.523979 frames/sec - 27.852182 Mpixels/sec
28.083525 frames/sec - 27.422102 Mpixels/sec
^C
Hardware-Accelerated OpenGL Rendering in a Linux Docker Container
From what has been already said above, it should be obvious that a Linux container needs to access an X server for OpenGL rendering. There seem to be three options here: access a remote X server over the network, access an X server running on the host, or run an X server within the container.
Accessing an X server over the network may incur communication delays and bandwidth limitations, but it could be a viable option to consider, especially if there is no X server on the host. Running an X server (e.g., x11vnc) within the container has not been thoroughly researched by the author. The most straightforward option seems to use an X server already running on the host, if any, and to use host GPU drivers, which must be installed on the host anyway, since the Linux kernel is not part of a container. This does not provide a secure sandboxing of the container, though: it grants the container full access to the X server on the host, so it assumes mutual trust between these two.
Accessing X Servers From a Docker Container
To access host X servers from a Docker container, Unix domain sockets must be made available to the container. This can be achieved by binding the mounting host’s /tmp/.X11-unix directory as a container volume. The remaining two pieces of information are the same as when using an X server in any configuration: the display must be defined (e.g., by means of the DISPLAY environmental variable) and access to the X server must be opened (e.g., the .Xauthority cookies should be passed to the container).
It is possible to bind mount host’s .Xauthority file to make it available in the container, assuming that the filesystem permissions allow access for the userid used in the container. It has the slight disadvantage that, while the file can then be freely edited in the container (subject to write permissions in the host filesystem, and mounting the file in read-write mode), it cannot be removed from the container filesystem (i.e. /bin/rm .Xauthority is not permitted).
As the host’s .Xauthority file refers to the host’s hostname, it may be useful to name the container the same as the host (see the option "--hostname" below); otherwise, .Xauthority in the container must be tweaked to change the display name to the current name of the container to use Unix domain sockets.
Yet another option is to re-write the .Xauthority file to disable the use of hostnames altogether. To achieve this, the Authentication Family in .Xauthority must be set to "FamilyWild", which is 0xffff in hexadecimal. The following example does this, saving the re-written file under the name specified in the XAUTH environmental variable:
$ xauth nlist :0 | sed -e 's/^..../ffff/' | xauth -f $XAUTH nmerge -
As the example computer is equipped with a GPU, the parameter "--gpus all" is used below despite not being necessary at this moment. This parameter is required for the subsequent examples involving hardware-accelerated rendering.
Finally, starting a Docker container can have the form:
host$ docker run -ti  \
--hostname `hostname` \
-v /home/artur/.Xauthority:/tmp/.Xauthority \
-v /tmp/.X11-unix:/tmp/.X11-unix \
--env DISPLAY=:1 \
--gpus all \
...rest of parameters omitted...
Assuming that the /tmp/.Xauthority contains correct cookies for DISPLAY=:1, X clients from the container can be displayed on the host's X server in exactly the same way, as it is done on the host:
container$ XAUTHORITY=/tmp/.Xauthority xeyes ### the value of DISPLAY has already been passed when starting the container. Figure 8: Displaying GUI of an X client running in a container using an X server from a Linux host.
NVIDIA Drivers and Libraries in a Docker Container
NVIDIA delivers the NVIDIA Container Toolkit to build and run GPU accelerated containers. The toolkit includes a container runtime library and utilities to automatically configure containers to leverage NVIDIA GPUs. To install all dependent software distribution packages, it is sufficient to install the main nvidia-Docker2 software distribution package.
The NVIDIA software stack communicates to the NVIDIA driver through a number of userland libraries from /usr/lib/x86_64-linux-gnu/. These libraries are shipped and installed on the host by the NVIDIA driver because the driver API is not stable, so every NVIDIA driver needs its own version of these libraries. These libraries are also needed on a container, though they cannot be installed there not to tie the container to a specific kernel driver version, as moving such a container to another machine with different kernel drivers would lead to compatibility issues. Therefore, at container creation, the libnvidia-container component bind mounts these libraries into the container by calling nvidia-container-cli. The files are mounted read-only with the same paths as in the current host filesystem. Some of these files are:
container$ mount | fgrep /usr/lib/x86_64-linux-gnu
/dev/sdb4 on /usr/lib/x86_64-linux-gnu/libnvidia-ml.so.450.119.04 type ext4 (ro,nosuid,nodev,relatime,errors=remount-ro)
/dev/sdb4 on /usr/lib/x86_64-linux-gnu/libnvidia-cfg.so.450.119.04 type ext4 (ro,nosuid,nodev,relatime,errors=remount-ro)
/dev/sdb4 on /usr/lib/x86_64-linux-gnu/libnvidia-eglcore.so.450.119.04 type ext4 (ro,nosuid,nodev,relatime,errors=remount-ro)
/dev/sdb4 on /usr/lib/x86_64-linux-gnu/libnvidia-glcore.so.450.119.04 type ext4 (ro,nosuid,nodev,relatime,errors=remount-ro)
/dev/sdb4 on /usr/lib/x86_64-linux-gnu/libnvidia-tls.so.450.119.04 type ext4 (ro,nosuid,nodev,relatime,errors=remount-ro)
/dev/sdb4 on /usr/lib/x86_64-linux-gnu/libnvidia-glsi.so.450.119.04 type ext4 (ro,nosuid,nodev,relatime,errors=remount-ro)
/dev/sdb4 on /usr/lib/x86_64-linux-gnu/libnvidia-fbc.so.450.119.04 type ext4 (ro,nosuid,nodev,relatime,errors=remount-ro)
/dev/sdb4 on /usr/lib/x86_64-linux-gnu/libnvidia-ifr.so.450.119.04 type ext4 (ro,nosuid,nodev,relatime,errors=remount-ro)
/dev/sdb4 on /usr/lib/x86_64-linux-gnu/libnvidia-rtcore.so.450.119.04 type ext4 (ro,nosuid,nodev,relatime,errors=remount-ro)
/dev/sdb4 on /usr/lib/x86_64-linux-gnu/libnvoptix.so.450.119.04 type ext4 (ro,nosuid,nodev,relatime,errors=remount-ro)
/dev/sdb4 on /usr/lib/x86_64-linux-gnu/libGLX_nvidia.so.450.119.04 type ext4 (ro,nosuid,nodev,relatime,errors=remount-ro)
/dev/sdb4 on /usr/lib/x86_64-linux-gnu/libEGL_nvidia.so.450.119.04 type ext4 (ro,nosuid,nodev,relatime,errors=remount-ro)
/dev/sdb4 on /usr/lib/x86_64-linux-gnu/libGLESv2_nvidia.so.450.119.04 type ext4 (ro,nosuid,nodev,relatime,errors=remount-ro)
/dev/sdb4 on /usr/lib/x86_64-linux-gnu/libGLESv1_CM_nvidia.so.450.119.04 type ext4 (ro,nosuid,nodev,relatime,errors=remount-ro)
/dev/sdb4 on /usr/lib/x86_64-linux-gnu/libnvidia-glvkspirv.so.450.119.04 type ext4 (ro,nosuid,nodev,relatime,errors=remount-ro)
/dev/sdb4 on /usr/lib/x86_64-linux-gnu/libnvidia-cbl.so.450.119.04 type ext4 (ro,nosuid,nodev,relatime,errors=remount-ro)
These files provide the container with libraries and userland-part of the DRI to use DRM in the Linux kernel. Thus, the container has access to the full capabilities of the GPU. The X clients running in the container can execute the code from these libraries to communicate with an X server.
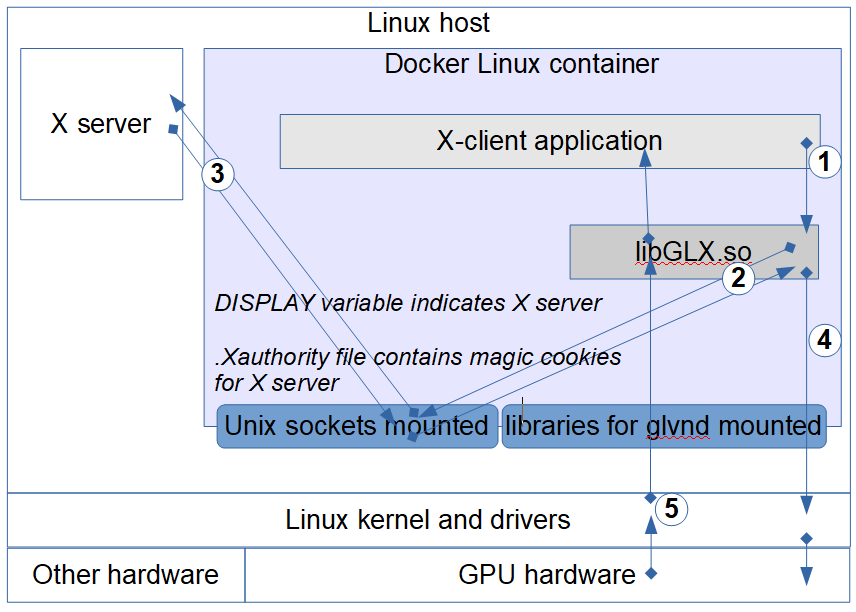
Figure 9: Accessing NVIDIA device from within the container.
The container NVIDIA setup can be verified by running the NVIDIA tool nvidia-smi from within the container. The tool confirms proper setup by returning a table as below. Otherwise, an error message is returned:
container$ nvidia-smi
Tue Jul  6 16:45:26 2021
+-----------------------------------------------------------------------------+
| NVIDIA-SMI 450.119.04   Driver Version: 450.119.04   CUDA Version: N/A      |
|-------------------------------+----------------------+----------------------+
| GPU  Name        Persistence-M| Bus-Id        Disp.A | Volatile Uncorr. ECC |
| Fan  Temp  Perf  Pwr:Usage/Cap|         Memory-Usage | GPU-Util  Compute M. |
|                               |                      |               MIG M. |
|===============================+======================+======================|
|   0  GeForce GTX 1080    Off  | 00000000:05:00.0 Off |                  N/A |
| 33%   34C    P8     8W / 180W |     97MiB /  8117MiB |      0%      Default |
|                               |                      |                  N/A |
+-------------------------------+----------------------+----------------------+

+-----------------------------------------------------------------------------+
| Processes:                                                                  |
|  GPU   GI   CI        PID   Type   Process name                  GPU Memory |
|        ID   ID                                                   Usage      |
|=============================================================================|
+-----------------------------------------------------------------------------+

The device permissions should generally allow read and write access to all users, but tighter permissions can be crafted for increased security of rendered data:
container$ ls -la /dev/nvidia*
crw-rw-rw- 1 root root 195, 254 Jul  9 13:56 /dev/nvidia-modeset
crw-rw-rw- 1 root root 234,   0 Jul  9 13:56 /dev/nvidia-uvm
crw-rw-rw- 1 root root 234,   1 Jul  9 13:56 /dev/nvidia-uvm-tools
crw-rw-rw- 1 root root 195,   0 Jul  9 13:56 /dev/nvidia0
crw-rw-rw- 1 root root 195, 255 Jul  9 13:56 /dev/nvidiactl

/dev/nvidia-caps:
total 0
drwxr-xr-x  2 root root     80 Jul  9 14:40 .
drwxr-xr-x 21 root root   4620 Jul 24 13:12 ..
cr--------  1 root root 237, 1 Jul  9 14:40 nvidia-cap1
cr--r--r--  1 root root 237, 2 Jul  9 14:40 nvidia-cap2
Howto: Controlling Rendering in a Docker Container
Having access to all of a host’s X servers in the container by mounting Unix domain sockets, having X server security authorizations by mounting the .Xauthority file, and having the OpenGL libraries allow to run OpenGL X clients easily in the container.
VirtualGL can be installed in the container from the amd64 virtualgl software distribution package [https://sourceforge.net/projects/virtualgl/files/2.6.5/].
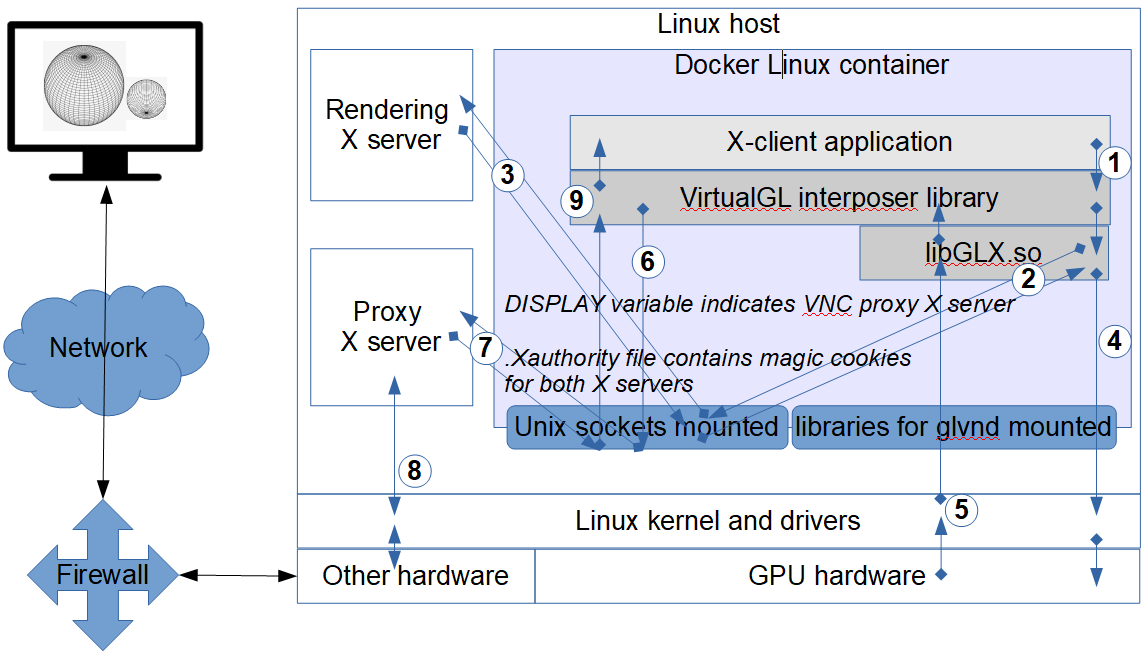
Figure 10: Rendering and display on two different external X servers from within a Docker container.
Assuming VirtualGL is installed in the container, the following demonstrations can be done. To render and display on X server host:0 (assuming host and container have the same name):
container$ DISPLAY=:0 XAUTHORITY=/tmp/.Xauthority  /opt/VirtualGL/bin/glxspheres64
Polygons in scene: 62464 (61 spheres * 1024 polys/spheres)
GLX FB config ID of window: 0xad (8/8/8/0)
Visual ID of window: 0x27
Context is Direct
OpenGL Renderer: GeForce GTX 1080/PCIe/SSE2
2571.232719 frames/sec - 2869.495714 Mpixels/sec
2681.292557 frames/sec - 2992.322493 Mpixels/sec
2692.696660 frames/sec - 3005.049473 Mpixels/sec
^C
To render and display on X server host:1 (assuming host and container have the same name) for remote display:
container$ DISPLAY=:1 XAUTHORITY=/tmp/.Xauthority  /opt/VirtualGL/bin/glxspheres64
Polygons in scene: 62464 (61 spheres * 1024 polys/spheres)
GLX FB config ID of window: 0x164 (8/8/8/0)
Visual ID of window: 0x3f7
Context is Direct
OpenGL Renderer: llvmpipe (LLVM 10.0.0, 256 bits)
28.178620 frames/sec - 27.514957 Mpixels/sec
28.541789 frames/sec - 27.869573 Mpixels/sec
27.822042 frames/sec - 27.166777 Mpixels/sec
^C
To render and display with VirtualGL on X server host:0 (assuming host and container have the same name):
container$ DISPLAY=:0 XAUTHORITY=/tmp/.Xauthority  /opt/VirtualGL/bin/vglrun -d :0 /opt/VirtualGL/bin/glxspheres64
Polygons in scene: 62464 (61 spheres * 1024 polys/spheres)
GLX FB config ID of window: 0xad (8/8/8/0)
Visual ID of window: 0x21
Context is Direct
OpenGL Renderer: GeForce GTX 1080/PCIe/SSE2
203.614670 frames/sec - 227.233972 Mpixels/sec
204.642317 frames/sec - 228.380825 Mpixels/sec
^C
To render on X server host:0 and display on X server host:1 (assuming host and container have the same name) for remote display:
container$ DISPLAY=:1 XAUTHORITY=/tmp/.Xauthority  /opt/VirtualGL/bin/vglrun -d :0 /opt/VirtualGL/bin/glxspheres64
Polygons in scene: 62464 (61 spheres * 1024 polys/spheres)
GLX FB config ID of window: 0xad (8/8/8/0)
Visual ID of window: 0x21
Context is Direct
OpenGL Renderer: GeForce GTX 1080/PCIe/SSE2
225.676333 frames/sec - 220.361204 Mpixels/sec
230.135755 frames/sec - 224.715597 Mpixels/sec
228.637145 frames/sec - 223.252283 Mpixels/sec
^C
Summary
While X11 has been specifically designed for remote display, the issues of non-X11-based viewers, container isolation, and OpenGL access to rendering hardware make the remote display significantly more complex.
This document explains the workings of X11 and its authorization. It describes Docker container access to hosts’ X servers and access to hosts’ NVIDIA hardware from within Docker containers.
The approach presented does not assume tight isolation of Docker containers from the Linux host. In fact, opening access to an X server may be considered a very broad trust, as X servers have a long history of security abuses. More secure ways of remote display with hardware-based OpenGL rendering can surely be researched.
Nevertheless, the inherent trust and relatively low X security don’t prevent its broad spread and use in medical imaging, or CAD applications, so the presented approach can prove adequate for many organizations.
Opinions expressed by DZone contributors are their own.
Comments