HashiCorp Is Becoming an Important Part of Spring Cloud (Part 1)
Spring Cloud Config is the basic part of every distributed and Cloud-based architecture. Actually, it provides client-side and server-side configuration for that systems.
Join the DZone community and get the full member experience.
Join For FreeAs we all know the Cloud-based systems are becoming the most popular architecture in the software engineering world, and the most famous and beloved Cloud platform among developers is Spring Cloud.
Spring Cloud has some important features which are given in the following parts and the feature part does a specific job:
- Distributed/Versioned Configuration
- Service Registration and Discovery
- Routing
- Service-To-Service Calls
- Load Balancing
- Circuit Breakers
- Global Locks
- Leadership Election and Cluster State
- Distributed Messaging
- Spring Cloud Config
I absolutely don't want to deep into every feature of Spring Cloud. Actually, I want to explain two of the base features at glance, in two articles. In the first article, I try to explain Spring Cloud Config as a basic part of the Spring Cloud Config concept, and in the second part, I will focus on the service register and discovery. And of course, in both articles, HashiCorp has been considered as a part of the solution.
Spring Cloud Config
Is the basic part of every distributed and Cloud-based architecture. Actually, it provides client-side and server-side configuration for that systems. For a better understanding of Config Server let's look at a simple example: suppose that you have multiple Microservice for example and each one has its own database credential. So what happens if you want to change one or multiple of these microservices database credentials?! It's obvious you should spend a lot of effort on it and it is absolutely not a safe and optimum approach, Spring Cloud Config comes to help us to solve this problem it provides configuration for microservices in the easiest way.

HashiCorp Vault Is a Secret Box of Spring Cloud Config
As I mentioned in the previous part config server provides a basic configuration for the MicroServices, but it has not had its own repository to hold this data, so we need a place to store these secret values. There are so many options like Git, but I personally prefer HashiCorp Vault, because of some technical factors like security and its great performance.
So, what is Vault? Vault allows you to secure, store, and tightly control access to tokens, passwords, certificates, encryption keys for protecting secrets and other sensitive data using a UI, CLI, or HTTP API.
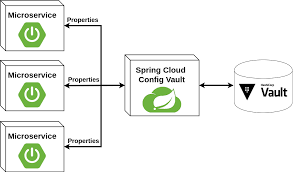
Actually, Spring Cloud Config Server ID is connected to Vault and provides basic configuration for MicroServices and clients.
Install Vault
- Download HashiCorp Vault from here: https://www.vaultproject.io/downloads.
- In the Windows environment just copy the vault.exe in the desired path, then add this path to PATH in the Windows environment parameter now vault is ready to use.
- Start Vault with the following command:
vault server --dev --dev-root-token-id="00000000-0000-0000-0000-000000000000"
This command runs the vault in dev mode with the token "00000000-0000-0000-0000-000000000000" you can find more information about detailed options and tokens here.
Now Vault is up:

4. Suppose that we have one microservice named CustomerService and just needs user/pass for its database connection from the vault, by this assumption we need to define to secret variable in the vault, "vault kv put secret1,secret2,..." command. Look at the following shell script:
set VAULT_ADDR=http://127.0.0.1:8200
vault kv put secret/CustomerServuce username=myUsername password=MyPassword
Now, we have a running vault on port 8200 and two credentials for our microservice.
Setting Up Spring Cloud Config Server
Time To setting up server-side and connection between Vault and Spring Cloud. Fortunately, Spring makes this Integration easy for us. First of all, we need to create a Spring Boot-based project with the following dependencies:
	<groupId>org.springframework.boot</groupId>
		<artifactId>spring-boot-starter-parent</artifactId>
		<version>2.5.0</version>
		<relativePath/> <!-- lookup parent from repository -->
	</parent>
	<groupId>com.tosan.cloud.config</groupId>
	<artifactId>spring-cloud-vault-server</artifactId>
	<version>0.0.1-SNAPSHOT</version>
	<name>spring-cloud-vault</name>
	<properties>
		<java.version>8</java.version>
		<spring-cloud.version>2020.0.3</spring-cloud.version>
	</properties>
	<dependencies>

	<dependency>
      <groupId>org.springframework.cloud</groupId>
      <artifactId>spring-cloud-starter</artifactId>
    </dependency>
	<dependency>
			<groupId>org.springframework.cloud</groupId>
			<artifactId>spring-cloud-config-server</artifactId>
		</dependency>

		<dependency>
			<groupId>org.springframework.cloud</groupId>
			<artifactId>spring-cloud-starter-vault-config</artifactId>
		</dependency>


<dependency>
    <groupId>org.springframework.cloud</groupId>
    <artifactId>spring-cloud-starter-bootstrap</artifactId>
</dependency>

		<dependency>
			<groupId>org.springframework.boot</groupId>
			<artifactId>spring-boot-starter-test</artifactId>
			<scope>test</scope>
		</dependency>
		<dependency>
			<groupId>org.springframework.boot</groupId>
			<artifactId>spring-boot-configuration-processor</artifactId>
			<optional>true</optional>
		</dependency>

		<dependency>
			<groupId>io.pivotal.cfenv</groupId>
			<artifactId>java-cfenv-boot</artifactId>
			<version>2.3.0</version>
		</dependency>
	</dependencies>
	<dependencyManagement>
		<dependencies>
			<dependency>
				<groupId>org.springframework.cloud</groupId>
				<artifactId>spring-cloud-dependencies</artifactId>
				<version>${spring-cloud.version}</version>
				<type>pom</type>
				<scope>import</scope>
			</dependency>
		</dependencies>
	</dependencyManagement>

	<build>
		<plugins>
			<plugin>
				<groupId>org.springframework.boot</groupId>
				<artifactId>spring-boot-maven-plugin</artifactId>
			</plugin>
		</plugins>
	</build>
The second step is YML configuration to connect Vault, we need to simply add two YML files: bootstrap.yml and application.yml with the following content. Remember that the vault service port is 8200 and the token is 00000000-0000-0000-0000-000000000000:
bootstrap.yml:
spring.application.name: config
spring.cloud.vault:
    host: localhost
    port: 8200
    scheme: http
    authentication: TOKEN
    token: 00000000-0000-0000-0000-000000000000
application.yml:
server:
   port: 8888
spring:
  profiles:
    active: vault
  cloud.config.server.vault.kvVersion: 2
In this file, we have port: 8888. This means that our Spring Boot config server serves at port 8888.
The final step is creating an ApplicationClass, create an application class with the following annotations: @SpringBootApplication, @EnableConfigServer:
/*
author Reza Ganji
 */

import org.springframework.boot.SpringApplication;
import org.springframework.boot.autoconfigure.SpringBootApplication;
import org.springframework.cloud.config.server.EnableConfigServer;
@SpringBootApplication
@EnableConfigServer
public class SpringCloudConfigVaultApplication {
    public static void main(String[] args) {
        SpringApplication.run(SpringCloudConfigVaultApplication.class, args);
    }
}
Now, we are going to run our Spring Boot application:
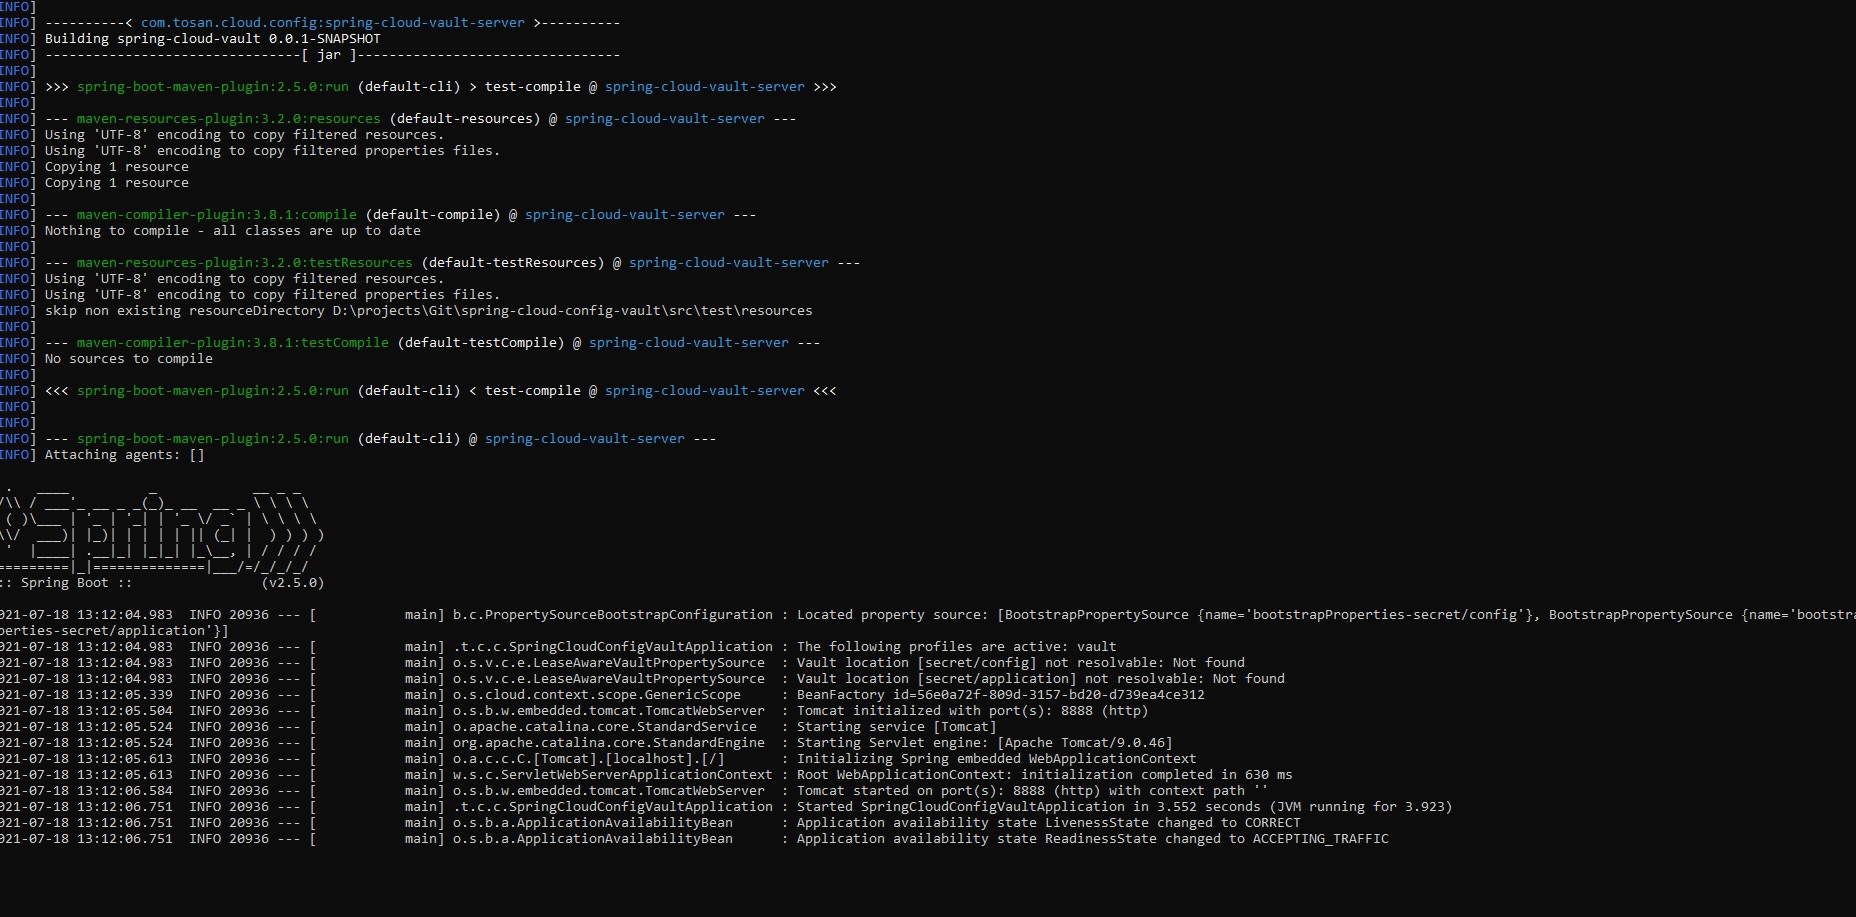
Remember that we configured port 8888. For a test you can use PostMan or CURL, I prefer curl with the following script:
curl -X "GET" "http://localhost:8888/CustomerService/default" -H "X-Config-Token: 00000000-0000-0000-0000-000000000000"The result is:
D:\>curl -X "GET" "http://localhost:8888/CustomerService/default" -H "X-Config-Token: 00000000-0000-0000-0000-000000000000"
{"name":"CustomerService","profiles":["default"],"label":null,"version":null,"state":null,"propertySources":[{"name":"vault:CustomerService","source":{"password":"myPassword","username":"myUserName"}}]}
Cloud Client Configuration
Consider an important point, conceptually, any microservice can not be a just Cloud client, actually, all microservices are Cloud clients besides its own business. For example, in our sample we have CustomerService System as a microservice that plays two roles; Cloud client and CustomerService.
For creating a Client we just need to create a Spring Boot project as well as other projects, but there is a need to add the following dependency to the project in addition to the project's own dependency:
<dependencies>
		<dependency>
			<groupId>org.springframework.cloud</groupId>
			<artifactId>spring-cloud-starter-config</artifactId>
		</dependency>
        <dependency>
            <groupId>org.springframework.cloud</groupId>
            <artifactId>spring-cloud-starter-bootstrap</artifactId>
        </dependency>
		<dependency>
			<groupId>org.springframework.boot</groupId>
			<artifactId>spring-boot-starter-test</artifactId>
			<scope>test</scope>
		</dependency>
	</dependencies>
	<dependencyManagement>
		<dependencies>
			<dependency>
				<groupId>org.springframework.cloud</groupId>
				<artifactId>spring-cloud-dependencies</artifactId>
				<version>${spring-cloud.version}</version>
				<type>pom</type>
				<scope>import</scope>
			</dependency>
		</dependencies>
	</dependencyManagement>
The most important part of configuring a microservice as a cloud client is an integration with the Cloud Config server, by considering a config server in the same server (localhost) and port 8888, it can be done by simply adding bootstrap.yml with the following config to your project :
spring.application.name: config
spring.cloud.vault:
    host: localhost
    port: 8200
    scheme: http
    authentication: TOKEN
    token: 00000000-0000-0000-0000-000000000000
Now, the configuration comes to our configuration context, simply by adding the following Credential class we have parameters in our projects:
import org.springframework.beans.factory.annotation.Value;
import org.springframework.boot.context.properties.ConfigurationProperties;


@ConfigurationProperties
public class Credential {
	@Value("${username}")
	String username;

	@Value("${password}")
	String password;

	public String getUsername() {
		return username;
	}

	public void setUsername(String username) {
		this.username = username;
	}

	public String getPassword() {
		return password;
	}

	public void setPassword(String password) {
		this.password = password;
	}


}
"${username}" and "${password}" are exactly the keys that we already defined in the vault.
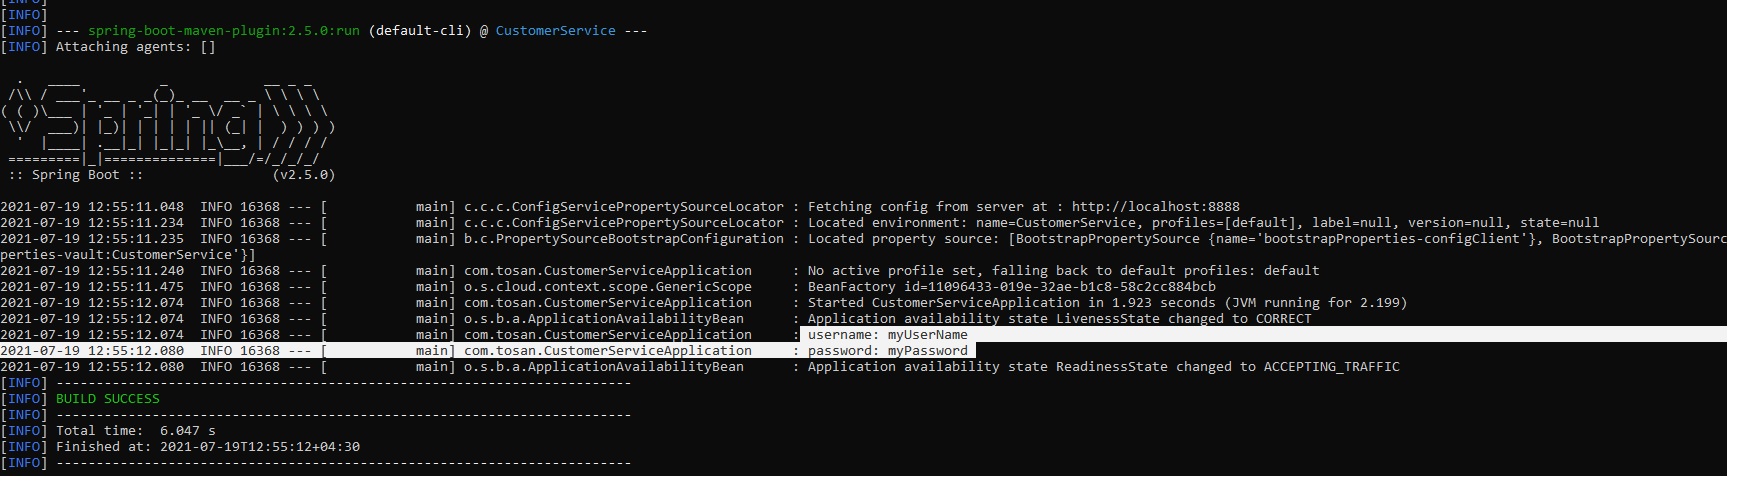
Now we can use this class anywhere in our project in this step. username and password simply printed in application class:
@SpringBootApplication
@EnableConfigurationProperties(Credential.class)

public class CustomerServiceApplication implements CommandLineRunner {
	Logger LOG = LoggerFactory.getLogger(CustomerServiceApplication.class);

	@Autowired
	private  Credential credential;

	public static void main(String[] args) {
		SpringApplication.run(CustomerServiceApplication.class, args);
	}


	@Override
	public void run(String... args) throws Exception {
		LOG.info("username: " + credential.getUsername());
		LOG.info("password: " + credential.getPassword());
	}
}
My sample project exists in the following link.
Opinions expressed by DZone contributors are their own.
Comments