How to Set Up a Multi-Node Hadoop Cluster on Amazon EC2, Part 1
Learn how to set up a four node Hadoop cluster using AWS EC2, PuTTy(gen), and WinSCP.
Join the DZone community and get the full member experience.
Join For Freeafter spending some time playing around on single-node pseudo-distributed cluster, it's time to get into real world hadoop. depending on what works best – its important to note that there are multiple ways to achieve this and i am going to cover how to setup multi-node hadoop cluster on amazon ec2. we are going to setup 4 node hadoop cluster as below.
- namenode (master)
- secondarynamenode
- datanode (slave1)
- datanode (slave2)
here’s what you will need
- amazon aws account
- putty windows client (to connect to amazon ec2 instance)
- puttygen (to generate private key – this will be used in putty to connect to ec2 instance)
- winscp (secury copy)
this will be a two part series
in part-1 i will cover infrastructure side as below
- setting up amazon ec2 instances
- setting up client access to amazon instances (using putty.)
- setup winscp access to ec2 instances
in part-2 i will cover the hadoop multi node cluster installation
- hadoop multi-node installation and setup
1. setting up amazon ec2 instances
with 4 node clusters and minimum volume size of 8gb there would be an average $2 of charge per day with all 4 running instances. you can stop the instance anytime to avoid the charge, but you will loose the public ip and host and restarting the instance will create new ones,. you can also terminate your amazon ec2 instance anytime and by default it will delete your instance upon termination, so just be careful what you are doing.
1.1 get amazon aws account
if you do not already have a account, please create a new one. i already have aws account and going to skip the sign-up process. amazon ec2 comes with eligible free-tier instances.

1.2 launch instance
once you have signed up for amazon account. login to amazon web services, click on my account and navigate to amazon ec2 console

1.3 select ami
i am picking ubuntu server 12.04.3 server 64-bit os
 1.4 select instance type

select the micro instance

1.5 configure number of instances
as mentioned we are setting up 4 node hadoop cluster, so please enter 4 as number of instances. please check amazon ec2 free-tier requirements, you may setup 3 node cluster with < 30gb storage size to avoid any charges. in production environment you want to have secondaynamenode as separate machine

1.6 add storage
minimum volume size is 8gb

1.7 instance description
give your instance name and description

1.8 define a security group
create a new security group, later on we are going to modify the security group with security rules.

1.9 launch instance and create security pair
review and launch instance.
amazon ec2 uses public–key cryptography to encrypt and decrypt login information. public–key cryptography uses a public key to encrypt a piece of data, such as a password, then the recipient uses the private key to decrypt the data. the public and private keys are known as a key pair .
create a new keypair and give it a name “hadoopec2cluster” and download the keypair (.pem) file to your local machine. click launch instance

1.10 launching instances
once you click “launch instance” 4 instance should be launched with “pending” state

once in “running” state we are now going to rename the instance name as below.
- hadoopnamenode (master)
- hadoopsecondarynamenode
- hadoopslave1 (data node will reside here)
- haddopslave2 (data node will reside here)

please note down the instance id, public dns/url (ec2-54-209-221-112.compute-1.amazonaws.com) and public ip for each instance for your reference.. we will need it later on to connect from putty client. also notice we are using “hadoopec2securitygroup”.

you can use the existing group or create a new one. when you create a group with default options it add a rule for ssh at port 22.in order to have tcp and icmp access we need to add 2 additional security rules. add ‘all tcp’, ‘all icmp’ and ‘ssh (22)’ under the inbound rules to “hadoopec2securitygroup”. this will allow ping, ssh, and other similar commands among servers and from any other machine on internet. make sure to “apply rule changes” to save your changes.
these protocols and ports are also required to enable communication among cluster servers. as this is a test setup we are allowing access to all for tcp, icmp and ssh and not bothering about the details of individual server port and security.

2. setting up client access to amazon instances
now, lets make sure we can connect to all 4 instances.for that we are going to use putty client we are going setup password-less ssh access among servers to setup the cluster. this allows remote access from master server to slave servers so master server can remotely start the data node and task tracker services on slave servers.
we are going to use downloaded hadoopec2cluster.pem file to generate the private key (.ppk). in order to generate the private key we need puttygen client. you can download the putty and puttygen and various utilities in zip from here .
2.1 generating private key
let’s launch puttygen client and import the key pair we created during launch instance step – “hadoopec2cluster.pem”
navigate to conversions and “import key”

 once you import the key you can enter passphrase to protect your private key or leave the passphrase fields blank to use the private key without any passphrase. passphrase protects the private key from any unauthorized access to servers using your machine and your private key.
any access to server using passphrase protected private key will require the user to enter the passphrase to enable the private key enabled access to aws ec2 server.
2.2 save private key
now save the private key by clicking on “save private key” and click “yes” as we are going to leave passphrase empty.

save the .ppk file and give it a meaningful name

now we are ready to connect to our amazon instance machine for the first time.
2.3 connect to amazon instance
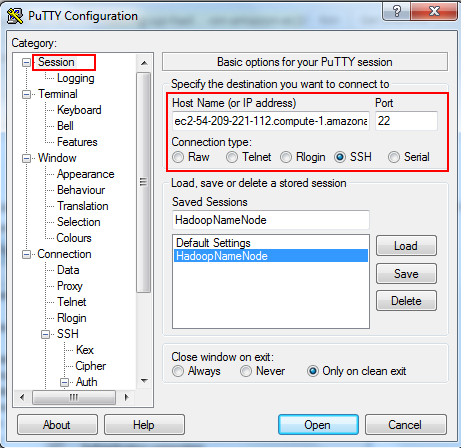
let’s connect to hadoopnamenode first. launch putty client, grab the public url , import the .ppk private key that we just created for password-less ssh access. as per amazon documentation , for ubuntu machines username is “ubuntu”
2.3.1 provide private key for authentication

2.3.2 hostname and port and connection type
and “open” to launch putty session
when you launch the session first time, you will see below message, click “yes”

and will prompt you for the username, enter ubuntu, if everything goes well you will be presented welcome message with unix shell at the end.

if there is a problem with your key, you may receive below error message

similarly connect to remaining 3 machines hadoopsecondarynamenode, haddopslave1,hadoopslave2 respectively to make sure you can connect successfully.

2.4 enable public access
issue ifconfig command and note down the ip address. next, we are going to update the hostname with ec2 public url and finally we are going to update /etc/hosts file to map the ec2 public url with ip address. this will help us to configure master ans slaves nodes with hostname instead of ip address.
following is the output on hadoopnamenode ifconfig


now, issue the hostname command, it will display the ip address same as inet address from ifconfig command.

we need to modify the hostname to ec2 public url with below command
prebuffer_0nbsp;sudo hostname ec2-54-209-221-112.compute-1.amazonaws.com

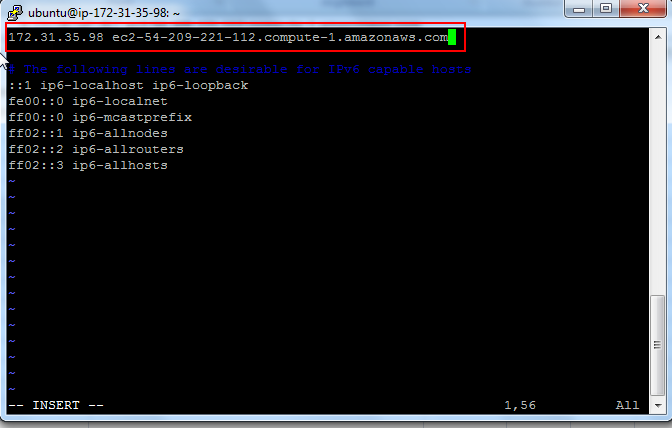
2.5 modify /etc/hosts
lets change the host to ec2 public ip and hostname.
open the /etc/hosts in vi, in a very first line it will show 127.0.0.1 localhost, we need to replace that with amazon ec2 hostname and ip address we just collected.

modify the file and save your changes
repeat 2.3 and 2.4 sections for remaining 3 machines.
3. setup winscp access to ec2 instances
in order to securely transfer files from your windows machine to amazon ec2 winscp is a handy utility.
provide hostname, username and private key file and save your configuration and login


if you see above error, just ignore and you upon successful login you will see unix file system of a logged in user /home/ubuntu your amazon ec2 ubuntu machine.

upload the .pem file to master machine (hadoopnamenode). it will be used while connecting to slave nodes during hadoop startup daemons.
if you have made this far, good work! things will start to get more interesting in part-2 .
Published at DZone with permission of Hardik Pandya. See the original article here.
Opinions expressed by DZone contributors are their own.
Comments