

How to Build an MCP Server
Learn what Model Context Protocol (MCP) is and isn’t, how MCP clients and servers work, and how to build and test an MCP server locally using Python.
 ·
·
Join the DZone community and get the full member experience.
Join For FreeModel Context Protocol has been playing a crucial role in integrating various tools with agents in a very streamlined manner. You can expose your tools via APIs and connect to the MCP clients. At the same time, there has been lots of confusion about MCP. Below clarifies the doubt:
What MCP Server Is Not
- MCP is not a framework for building agents.
- MCP is not a Python library.
- MCP is not a container.
- MCP is not a way to code agents.
How Model Context Protocol (MCP) Works
Ultimately,
- Model Context Protocol (MCP) is a protocol — it’s a standard.
- It is a simple way to integrate tools, resources, and prompts.
The diagram below shows how the ecosystem works.
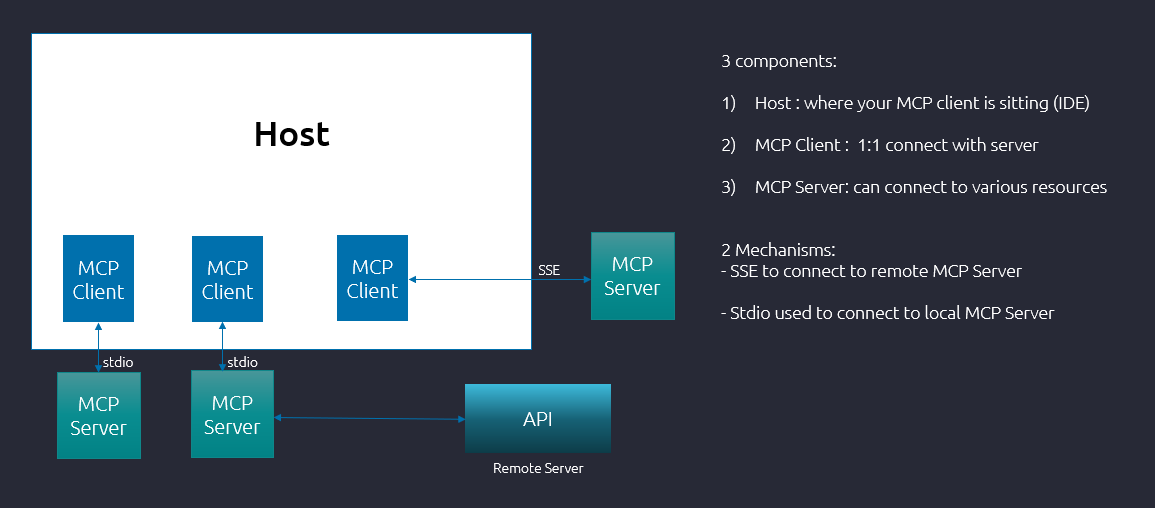
The host represents the IDE where your MCP client is residing. The MCP client connects with the MCP Server in a 1:1 way. This means that one MCP client will connect to one MCP server only. It might be the case that you have multiple tools exposed on one MCP server.
The MCP server can connect to the resources in two ways:
- STDIO
- Server-Sent Event (SSE)
STDIO is the mechanism for connecting any MCP client to the MCP server when the client and server are on the same network. In a certain scenario, when you are using a tool exposed on an MCP server built by a third-party open-source provider. In this case, you will need to use SSE to connect to the MCP server.
In both scenarios, only the MCP client source code differs.
The diagram below shows a typical workflow in which a relevant answer to a chatbot query is obtained using a tool available on any MCP server.
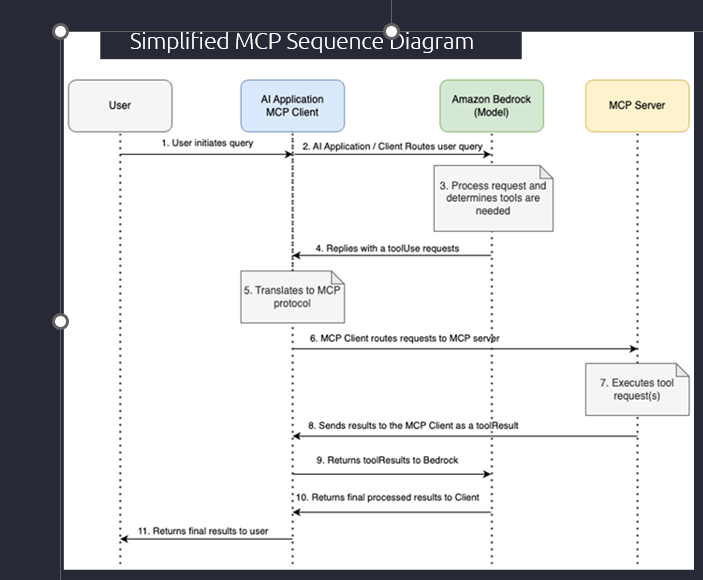
In the above sequence diagram, the flow is like below in a sequential manner:
- User enters a query in the chatbot UI
- Agentic AI application receives the user query and routes the query to the Bedrock LLM Model
- LLM model processes the user query, and with the help of System Prompt, it decides which tool to invoke to process the user’s query
- LLM model sends the tool details to the AI Application
- AI Application has an MCP Client, which translates the Tool Use response as per the MCP Protocol
- MCP Client routes the request to the MCP Server
- MCP Server executes the tool as per the request and sends the result back to the MCP Client
- MCP Client receives the tool result
- MCP Client sends the tool result to the Bedrock LLM model to format the result in a presentable format
- LLM model sends the result to the AI Application
- AI Application sends the result to the end user
If you want to try to build an MCP server on your laptop, you will need to do the following and ultimately validate your local MCP Server tools.
Set up the Python environment. Below are the steps:
1. Create a Python virtual environment:
uv init my-mcp-server
cd my-mcp-server
uv venv
source .venv/bin/activate  # or .venv\Scripts\activate on Windows
2. Add dependencies (Python libraries) for MCP:
uv add mcp
3. Now, you need to instantiate FastMCP in your Python code as below:
from mcp import FastMCP
mcp = FastMCP(name="My_MCP_server")
4. Then you need to write Python functions that you would like to expose as tools using MCP. So, write Python functions and expose them as MCP tools. In the example below, I wrote maths.py, which contains three functions (add, subtract, and multiply).
Below is a glimpse of Python functions written to perform mathematical actions on two numbers:
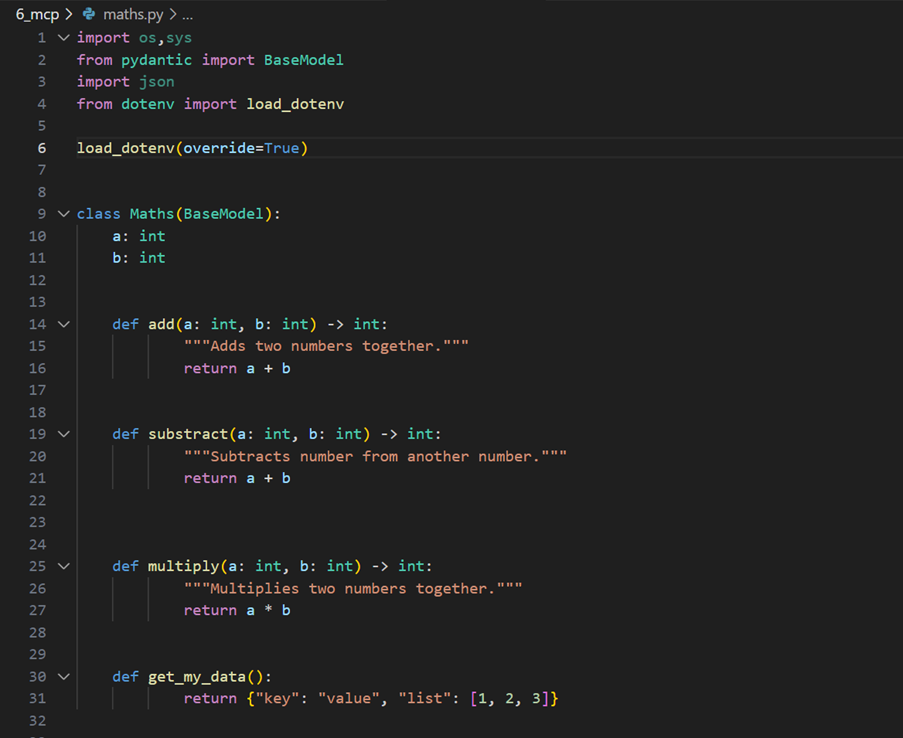
Below is the equivalent MCP Server code for the same mathematical functions above:
Note that all Python functions are bind my annotation @mcp.tool().
- Expose data as an MCP resource. Note the
@mcp.resourceannotation used in theget_my_data()function. - Execute MCP Server script on terminal:
uv run maths_server.py.
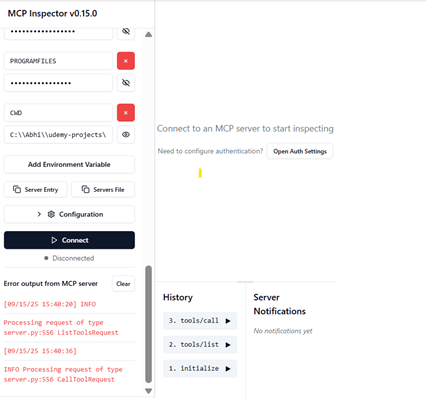
Test the MCP Server using the MCP Inspector. Use the command below to start the MCP Inspector:
npx @modelcontextprotocol uv run <file_path>\\maths_server.pySee the diagram below:
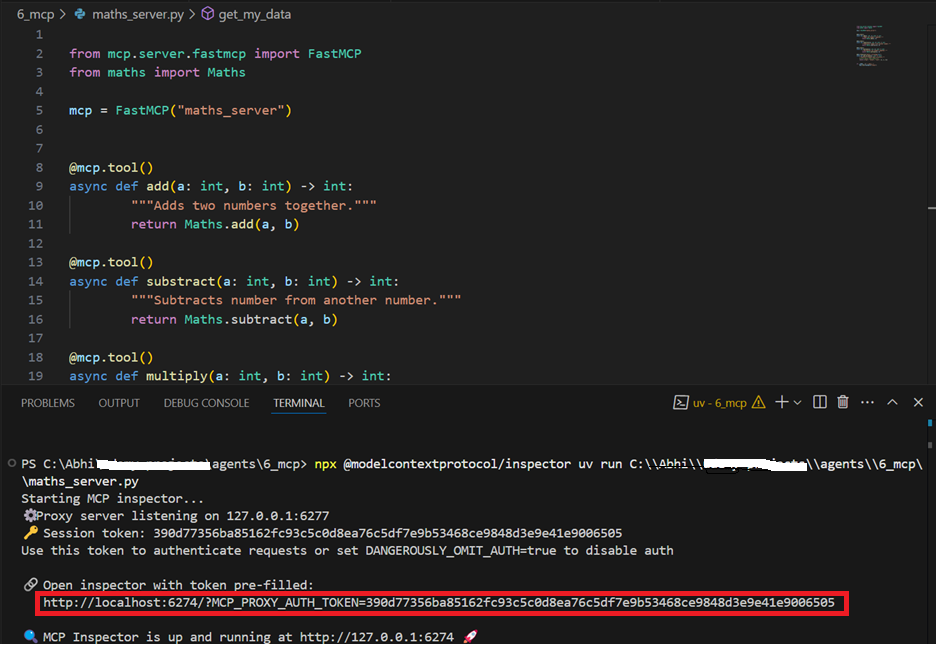
Once you see the above message in the terminal, click on the MCP Inspector link as highlighted in the red block. You can see the Inspector screen in the browser.
Now, you can validate your tool in your MCP Server, built in your local laptop's Python environment.
- First, select STDIO as your connectivity mechanism between the MCP Client and Server. Click on Connect.
- Once connected, navigate to the Tools tab.
- Click on the List Tools. You can view your functions as tools in the MCP server. You can validate the result published by your tool, as done above for the add tool.
Model Context Protocol Inspector is an efficient way to validate tools exposed on your MCP Server. Once validated on your local Python environment on your own laptop, you can push these source code files (maths.py and maths_server.py) to the cloud native Git repository and build the tool on your MCP server in the cloud environment. You can even Dockerize the MCP Server tool and deploy it on Kubernetes.
In my next article, I will mention steps to Dockerize your MCP Server.
Opinions expressed by DZone contributors are their own.
Comments