How To Put Exchange Server in Maintenance Mode
Explore Exchange Maintenance Mode, its importance, the steps to put the Exchange Server into maintenance mode, and the steps to disable maintenance mode.
Join the DZone community and get the full member experience.
Join For FreeAdministrators must put the Exchange Server in maintenance mode while updating and making changes to the server to avoid data loss or other issues. If the changes or any security/cumulative updates are applied to the server without putting the server into maintenance mode, it can lead to database corruption or server failure.
In this article, we discuss the Exchange Maintenance Mode, its importance, and the steps to put the Exchange Server into maintenance mode. We also mention steps to disable maintenance mode once the server update or upgrade is completed.
What Is Exchange Server Maintenance Mode and Why Is It Important?
Exchange Maintenance Mode is the server state where all the server activities are suspended temporarily. All the Exchange services and components are put into the drain or inactive state. The mode is usually enabled when administrators need to apply Security Updates (SUs) or Cumulative Updates (CUs).
Although many admins do not follow this practice and patch their servers without putting them in maintenance mode, sometimes, the updates go through without breaking anything. However, it is not recommended.
You must enable Exchange Server maintenance mode, especially in the Database Availability Group (DAG) environment. If you start patching the server or upgrade CU without putting it in maintenance mode, the DAG may take over and break the server.
Steps To Enable or Put Exchange Server in Maintenance Mode
You can put the Exchange Server in maintenance mode using the PowerShell commands in Exchange Management Shell (EMS).
The steps are as follows:
1. Set HubTransport Service To Drain State
HubTransport service is responsible for the mail flow in your organization and applying transport rules. Thus, it’s important to put the HubTransport to the draining state before placing the server into maintenance mode.
To set HubTransport to drain or inactive state, execute the following PowerShell command in the Exchange Management Shell (EMS).
Set-ServerComponentState -Identity "YourServerName" -Component HubTransport -State Draining -Requester Maintenance
Change YourServerName with the server name.

2. Suspend Cluster Node
If the server is a part of the Database Availability Group, suspend the cluster node using the following command. Otherwise, you can put the server in maintenance mode.
Suspend-ClusterNode "YourServerName-01"
3. Disable Database Copy Auto-Activation
Set-MailboxServer "YourServerName-01" -DatabaseCopyActivationDisabledAndMoveNow $true Set-MailboxServer "YourServerName-01" -DatabaseCopyAutoActivationPolicy Blocked
4. Put Server in Maintenance Mode
Run the following command in EMS to put your Exchange Server in maintenance mode.
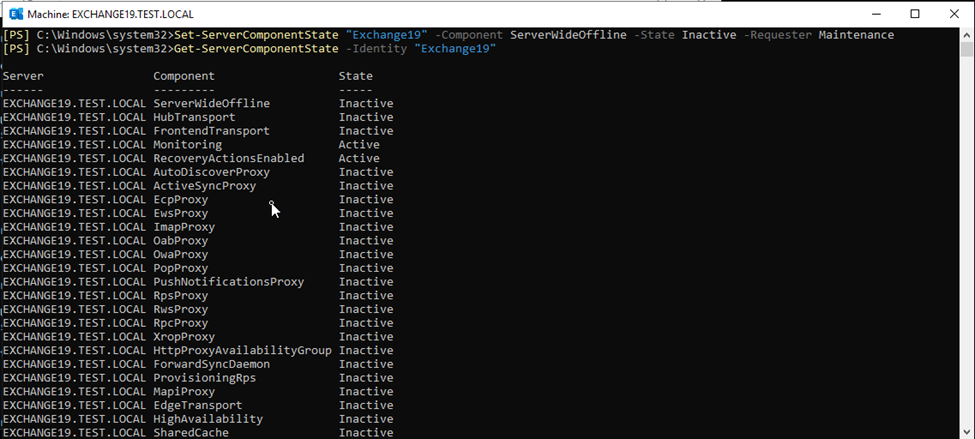
Set-ServerComponentState "YourServerName" -Component ServerWideOffline -State Inactive -Requester Maintenance
5. Verify the Server Is in Maintenance Mode
To check if the server is successfully switched to maintenance mode, run the following command in the EMS.
Get-ServerComponentState -Identity "YourServerName”

You can download and apply the required Security Update or Cumulative Update on your Exchange Server at this stage. Make sure to apply updates through the elevated Command Prompt window.
Note: If you use any load balancer, make sure to redirect it to the other active node or server.
Steps to Turn Off Exchange Server Maintenance Mode
Once the update or upgrade is finished, it’s important to disable the Exchange Server maintenance mode and start the Exchange Services. If you don’t do this, your server will remain inaccessible and users will have a hard time accessing their email accounts or mail items.
The steps are as follows:
1. Resume Cluster Node
To resume the DAG Cluster node, run the following command in EMS.
Resume-ClusterNode "YourServerName-01"
2. Enable Database Copy Auto-Activation
To enable database copy auto-activation, run the following commands:
Set-MailboxServer YourServerName –DatabaseCopyAutoActivationPolicy Unrestricted
Set-MailboxServer YourServerName –DatabaseCopyActivationDisabledAndMoveNow $false
3. Turn Off Maintenance Mode
To turn off maintenance mode and enable Exchange services, run the following command in EMS.
Set-ServerComponentState "YourServerName" -Component ServerWideOffline -State Active -Requester Maintenance
4. Set HubTransport Service To Active State
For this, execute the following command:
Set-ServerComponentState "YourServerName" –Component HubTransport –State Active –Requester Maintenance
5. Verify the Server Is Out of Maintenance Mode
Get-ServerComponentState -Identity "YourServerName”
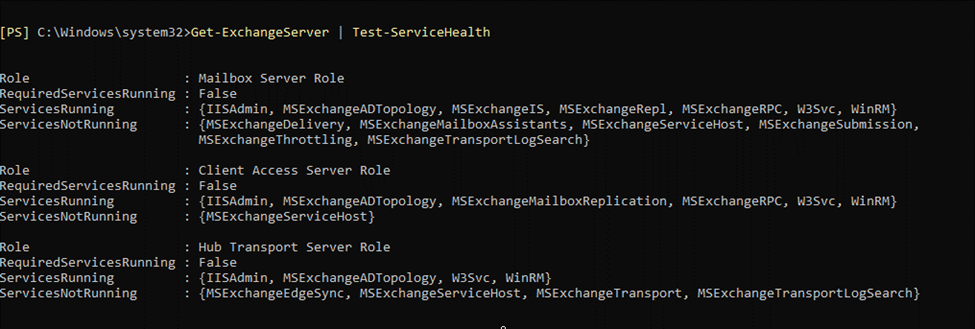
Also, check the cluster node and ensure all services are running by using the following commands in the EMS.
Get-ClusterNode "YourServerName"
Get-ClusterNode
Test-ServiceHealth "YourServerName"
Get-ExchangeServer | Test-ServiceHealth

Conclusion
Exchange Server updates are critical to safeguarding servers from malicious attacks and threat actors. But before you begin applying the Exchange Server Security or Cumulative Updates, put your server in maintenance mode. Follow this article to learn how to put an Exchange Server in maintenance mode. This is a critical step to avoid server failure or database corruption that can lead to disruption, impact productivity, and financial losses.
Opinions expressed by DZone contributors are their own.

Comments