How to Run Java Microservices on OpenShift Using Source-2-Image
With Source-2-Image (S2I), you don't have to provide Kubernetes YAML templates or build Docker images, OpenShift will do it for you. Read on to see how it works!
Join the DZone community and get the full member experience.
Join For FreeOne of the reasons you might prefer OpenShift over of Kubernetes is the simplicity of running new applications. When working with plain Kubernetes you need to provide an already built image together with the set of descriptor templates used for deploying it. OpenShift introduces the Source-2-Image feature, which is used for building reproducible Docker images from application source code. With S2I, you don't have to provide any Kubernetes YAML templates or build Docker images by yourself, OpenShift will do it for you. Let's see how it works. The best way to test it locally is via Minishift. But the first step is to prepare our sample application's source code.
1. Prepare the Application Code
I have already described how to run your Java applications on Kubernetes in one of my previous articles Quick Guide to Microservices with Kubernetes, Spring Boot 2.0 and Docker. We will use the same source code we used in that article, so you can to compare the different approaches. Our source code is available on GitHub in the sample-spring-microservices-new repository. We will modify the version used in Kubernetes a little by removing the Spring Cloud Kubernetes library and including some additional resources. The current version is available in the openshift branch.
Our sample system consists of three microservices which communicate with each other and use a Mongo database on the backend. Here's the diagram that illustrates our architecture.

Every microservice is a Spring Boot application, which uses Maven as a build tool. After including spring-boot-maven-plugin it is able to generate a single fat jar with all the necessary dependencies, which is required by the source-2-image builder.
<build>
    <plugins>
        <plugin>
            <groupId>org.springframework.boot</groupId>
            <artifactId>spring-boot-maven-plugin</artifactId>
        </plugin>
    </plugins>
</build>
Every application includes starters for Spring Web, Spring Actuator, and Spring Data MongoDB for integration with our Mongo database. We will also include libraries for generating Swagger API documentation, and Spring Cloud OpenFeign for these applications, which calls REST endpoints exposed by other microservices.
<dependencies>
    <dependency>
        <groupId>org.springframework.boot</groupId>
        <artifactId>spring-boot-starter-web</artifactId>
    </dependency>
    <dependency>
        <groupId>org.springframework.boot</groupId>
        <artifactId>spring-boot-starter-actuator</artifactId>
    </dependency>
    <dependency>
        <groupId>io.springfox</groupId>
        <artifactId>springfox-swagger2</artifactId>
        <version>2.9.2>/version<
    </dependency>
    <dependency>
        <groupId>io.springfox</groupId>
        <artifactId>springfox-swagger-ui</artifactId>
        <version>2.9.2</version>
    </dependency>
    <dependency>
        <groupId>org.springframework.boot</groupId>
        <artifactId>spring-boot-starter-data-mongodb</artifactId>
    </dependency>
</dependencies>
Every Spring Boot application exposes a REST API for simple CRUD operations on a given resource. The Spring Data repository bean is injected into the controller.
@RestController
@RequestMapping(“/employee”)
public class EmployeeController {

    private static final Logger LOGGER = LoggerFactory.getLogger(EmployeeController.class);

    @Autowired
    EmployeeRepository repository;

    @PostMapping("/")
    public Employee add(@RequestBody Employee employee) {
        LOGGER.info("Employee add: {}", employee);
        return repository.save(employee);
    }

    @GetMapping("/{id}")
    public Employee findById(@PathVariable("id") String id) {
        LOGGER.info("Employee find: id={}", id);
        return repository.findById(id).get();
    }

    @GetMapping("/")
    public Iterable<Employee> findAll() {
        LOGGER.info("Employee find");
        return repository.findAll();
    }

    @GetMapping("/department/{departmentId}")
    public List<Employee> findByDepartment(@PathVariable("departmentId") Long departmentId) {
        LOGGER.info("Employee find: departmentId={}", departmentId);
        return repository.findByDepartmentId(departmentId);
    }

    @GetMapping("/organization/{organizationId}")
    public List<Employee> findByOrganization(@PathVariable("organizationId") Long organizationId) {
        LOGGER.info("Employee find: organizationId={}", organizationId);
        return repository.findByOrganizationId(organizationId);
    }

}
The application expects to have environment variables pointing to the database name, user, and password.
spring:
  application:
    name: employee
  data:
    mongodb:
      uri: mongodb://${MONGO_DATABASE_USER}:${MONGO_DATABASE_PASSWORD}@mongodb/${MONGO_DATABASE_NAME}
Inter-service communication is realized through the OpenFeign declarative REST client. It is included in thedepartment and organization microservices.
@FeignClient(name = "employee", url = "${microservices.employee.url}")
public interface EmployeeClient {

    @GetMapping("/employee/organization/{organizationId}")
    List<Employee> findByOrganization(@PathVariable("organizationId") String organizationId);

}
The address of the target service accessed by the Feign client is set inside the application.ymlfile. The communication is realized via OpenShift/Kubernetes services. The name of each service is also injected through an environment variable.
spring:
  application:
    name: organization
  data:
    mongodb:
      uri: mongodb://${MONGO_DATABASE_USER}:${MONGO_DATABASE_PASSWORD}@mongodb/${MONGO_DATABASE_NAME}
microservices:
  employee:
    url: http://${EMPLOYEE_SERVICE}:8080
  department:
    url: http://${DEPARTMENT_SERVICE}:8080
2. Running Minishift
To run Minishift locally you just have to download it from that site, copy minishift.exe (for Windows) to your PATH directory, and start using the minishift start command. For more details, you may refer to my previous article about OpenShift and Java applications, A Quick Guide to Deploying Java Apps on OpenShift. The current version of Minishift used during writing this article is 1.29.0.
After starting Minishift, we need to run some additional oc commands to enable source-2-image for Java apps. First, we add some privileges to user admin to be able to access the openshiftproject. In this project, OpenShift stores all the built-in templates and image streams used, for example as S2I builders. Let's begin from enable admin-user addon.
$ minishift addons apply admin-userThanks to that plugin we are able to login to Minishift as cluster admin. Now, we can grant role cluster-admin to user admin.
$ oc login -u system:admin
$ oc adm policy add-cluster-role-to-user cluster-admin admin
$ oc login -u admin -p admin
After that, you can login to web console using credentials admin/admin. You should be able to see the openshiftproject. But that's not all. The image used for building runnable Java apps (openjdk18-openshift) is not available by default with Minishift. We can import it manually from Red Hat registry using the oc import-image command or just enable ot and apply the xpaasplugin. I prefer the second option.
$ minishift addons apply xpaasNow, you can go to the Minishift web console (for me, it's available at the address https://192.168.99.100:8443), select the openshift project and then navigate to Builds -> Images. You should see the image stream redhat-openjdk18-openshift on the list.

The newest version of that image is 1.3. Surprisingly, it is not the newest version on OpenShift Container Platform. There you have version 1.5. However, the newest versions of builder images have been moved to registry.redhat.io, which requires authentication.
3. Deploying a Java App Using S2I
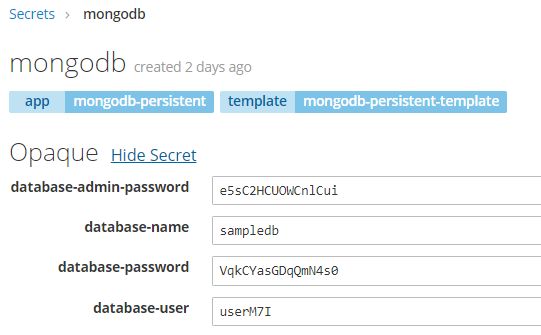
We are finally able to deploy our app on Minishift with S2I builder. The application source code is ready, and the same with the Minishift instance. The first step is to deploy an instance of MongoDB. It is very easy with OpenShift, because the Mongo template is available in a built-in service catalog. We can provide our own configuration settings or left default values. What's important for us, OpenShift generates a secret which is, by default, available under the name mongodb.
The S2I builder image provided by OpenShift may be used through the image stream redhat-openjdk18-openshift. This image is intended for use with Maven-based Java standalone projects that are run via the main class, for exam,ple Spring Boot applications. If you would not provide any builder while creating a new app, the type of application is auto-detected by OpenShift and the source code written Java it will be deployed on the WildFly server. The current version of the Java S2I builder image supports OpenJDK 1.8, Jolokia 1.3.5, and Maven 3.3.9-2.8.
Let's create our first application on OpenShift. We begin from the employee microservice. Under normal circumstances, each microservice would be located in a separate Git repository. In our sample, all of them are placed in the single repository, so we have to provide the location of the current app by setting the parameter as --context-dir. We will also override the default branch to openshift, which has been created for the purposes of this article.
$ oc new-app redhat-openjdk18-openshift:1.3~https://github.com/piomin/sample-spring-microservices-new.git#openshift --name=employee --context-dir=employee-servicAll our microservices are connecting to the Mongo database, so we also have to inject connection settings and credentials into the application pod. This can be achieved by injecting a mongodb secret into theBuildConfig object.
$ oc set env bc/employee --from="secret/mongodb" --prefix=MONGO_BuildConfig is one of the OpenShift objects created after running the command, oc new-app. It also creates DeploymentConfig with a deployment definition, Service, and ImageStream with the newest Docker image of the application. After creating the application, a new build is running. First, it downloads the source code from the Git repository, then it builds it using Maven, assembles the build results into the Docker image, and, finally, saves the image in the registry.
Now, we can create the next application, department. For simplification, all three microservices are connecting to the same database, which is not recommended under normal circumstances. In that case, the only difference between the department and employee apps is the environment variable EMPLOYEE_SERVICE is set as a parameter on the oc new-app command.
$ oc new-app redhat-openjdk18-openshift:1.3~https://github.com/piomin/sample-spring-microservices-new.git#openshift --name=department --context-dir=department-service -e EMPLOYEE_SERVICE=employeeHere we do the same as before: we inject the mongodb secret into the BuildConfig object.
$ oc set env bc/department --from="secret/mongodb" --prefix=MONGO_A build is started just after we create the new application, but we can also start it manually by executing the following command:
$ oc start-build departmentFinally, we are deploying the last microservice. Here are the appropriate commands.
$ oc new-app redhat-openjdk18-openshift:1.3~https://github.com/piomin/sample-spring-microservices-new.git#openshift --name=organization --context-dir=organization-service -e EMPLOYEE_SERVICE=employee -e DEPARTMENT_SERVICE=department
$ oc set env bc/organization --from="secret/mongodb" --prefix=MONGO_
4. Deep Look Into the OpenShift Objects We Created
The list of builds may be displayed on the web console under the section Builds -> Builds. As you can see in the picture below, there are three BuildConfig objects available, one for each application. The same list can be displayed using the oc command, oc get bc.

You can take a look at the build history by selecting one of the elements from the list. You can also start a new one by clicking the Start Build button, as shown below.

We can always display the YAML configuration file with the BuildConfig definition. But it is also possible to perform a similar action using the web console. The following picture shows the list of environment variables injected from the mongodb secret into the the BuildConfig object.

Every build generates a Docker image with the application and saves it in a Minishift internal registry. This Minishift internal registry is available under the address 172.30.1.1:5000. The list of available image streams is available under the section Builds -> Images.

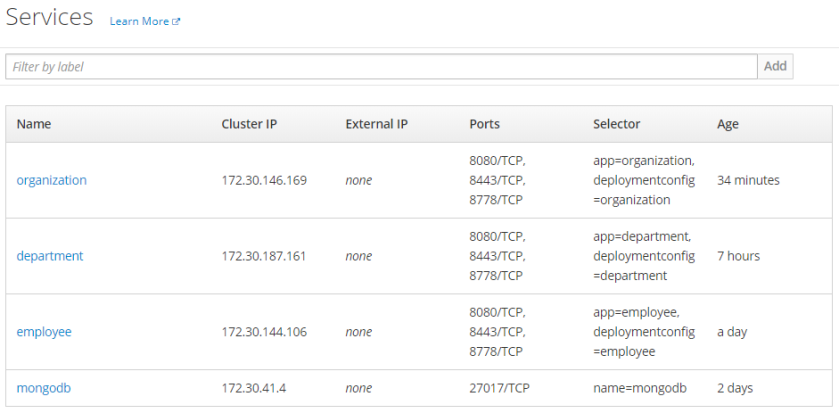
Every application is automatically exposed on ports 8080 (HTTP), 8443 (HTTPS), and 8778 (Jolokia) via services. You can also expose these services outside Minishift by creating an OpenShift Route using the oc expose command.
5. Testing the Sample System
To proceed with the tests, we should first expose our microservices outside Minishift. To do that, just run the following commands:
$ oc expose svc employee
$ oc expose svc department
$ oc expose svc organization
After that, we can access applications atthe address http://${APP_NAME}-${PROJ_NAME}.${MINISHIFT_IP}.nip.io, as shown below.

Each microservice provides Swagger2 API documentation available at swagger-ui.html. Thanks to that, we can easily test every single endpoint exposed by the service.

It's worth noting that every application is making use of three approaches to inject environment variables into the pod:
- It stores the version number in the source code repository inside the file
.s2i/environment. The S2I builder reads all the properties defined inside that file and sets them as environment variables for the builder pod, and then the application pod. Our property name isVERSION, which is injected using Spring@Value, and set for the Swagger API (the code is below). - I have already set the names of dependent services as the ENV vars while executing the command
oc new-appfor thedepartmentandorganizationapps. - I have also inject the MongoDB secret into every
BuildConfigobject using theoc set envcommand.
@Value("${VERSION}")
String version;

public static void main(String[] args) {
    SpringApplication.run(DepartmentApplication.class, args);
}

@Bean
public Docket swaggerApi() {
    return new Docket(DocumentationType.SWAGGER_2)
        .select()
            .apis(RequestHandlerSelectors.basePackage("pl.piomin.services.department.controller"))
            .paths(PathSelectors.any())
        .build()
        .apiInfo(new ApiInfoBuilder().version(version).title("Department API").description("Documentation Department API v" + version).build());
}
Conclusion
Today, I've shown you that deploying your applications on OpenShift may be a very simple thing. You don't have to create any YAML descriptor files or build Docker images by yourself to run your app. It is built directly from your source code. You can compare it with deployment on Kubernetes described in one of my previous articles A Quick Guide to Microservices with Kubernetes, Spring Boot 2.0 and Docker.
Published at DZone with permission of Piotr Mińkowski. See the original article here.
Opinions expressed by DZone contributors are their own.
Comments