How to Run JMeter Test Plan Via Docker
I decided that my journey to learn to run JMeter is interesting and that’s when I decided to write a blog. So here I am, sharing what I learnt.
Join the DZone community and get the full member experience.
Join For FreeWhen I started learning JMeter, I had thought of running it in a traditional way (run the test-plan, observe the csv, analyze and send a report to the client). It seemed very boring but I wanted to have hands-on time on JMeter. So, I started exploring it. Midway through, I decided that my journey to learn to run JMeter is interesting and that’s when I decided to write a blog. So here I am, sharing what I learnt.
In This Blog, You’ll Learn
- What is JMeter?
- To create/Record a JMeter test plan via Blazemeter
- To create a Dockerfile (which will install Java, JMeter), entry.sh and run.sh files
- To create a Jenkins job that runs this shell script and verifies the results using Performance plugin.
What Is JMeter?
Apache JMeter is a leading open-source tool for load and performance testing.
If you wanna kick-off with the basics of Jmeter, you can go through the Youtube tutorials at this link.
After you are done with the theoretical part (which is often boring), let’s start the interesting one.
Create/Record a JMeter Test Plan via Blazemeter
You have two options to create a test-plan. Pro tip: second one is simpler.
- Make it manually (add all API’s one by one) and eventually run the test-plan (which is very cumbersome) so I went for the second option
- Record a test plan using Blazemeter.
- Download chrome extension to record a test-plan. You may visit this website on how to record a test-plan (screenshot shown below): https://guide.blazemeter.com/hc/en-us/articles/206732849-Chrome-Extension-Record
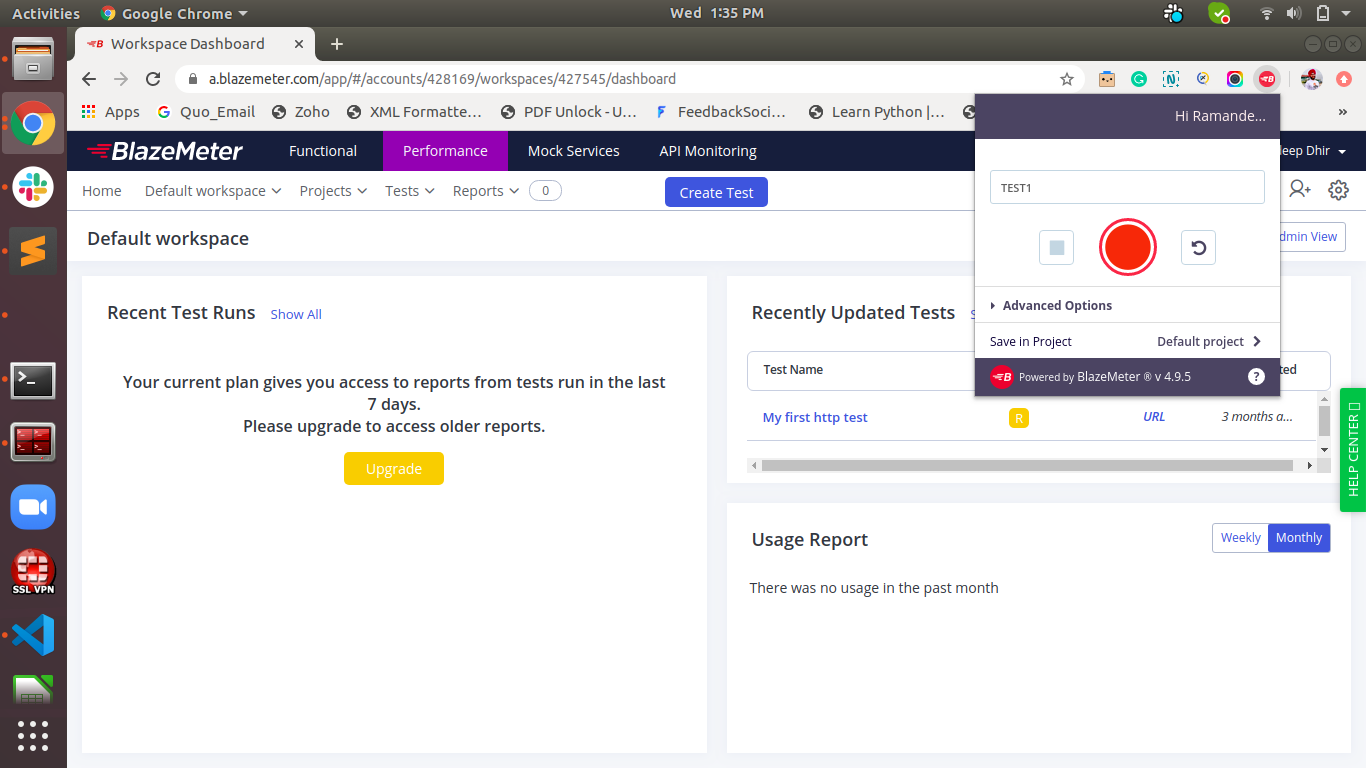
- Make sure you are logged in (through SSO or any other account) else you won’t be able to download the ‘.jmx’ file.
- This will create a ‘.jmx’ file. Download this file.
- Import the ‘.jmx’ file (created in previous step) in JMeter (Open -> Select .jmx file to be imported)
- Make changes in the test-plan as per requirement and save the test-plan.
- I made some changes in the test-plan to make it parametrized as I wanted to pass number_of_thread, ramp_up_period, output_csv_file name, machine_ip via command line.
- I ran the above test-plan using below command:
Command: sh jmeter -n -t <location of test plan>/<test_plan>.jmx -l <output_csv>-JThreadNumber=<number_of_threads_to_run>-JRampUpPeriod=<in secs>-JURL=<public_ip_of_machine>
Till this point, it was like a cake-walk for me. I thought: dude! Is that it??
Nayy. Let’s move ahead and make this run a cool one.
Are you ready?
Create a Docker File (Which Will Install Java, Jmeter), entry.SH and run.SH Files
Docker File:
This file contains all the dependencies required to set-up an environment. As a practise, it is recommended to have only dependencies related commands here (please don’t write a command to copy your JMeter test-plan in Dockerfile, I made this mistake in the first phase).
The dependencies would be:
- Base Image (since I am using a centos system, I am taking centos as a base image)
- Specify Java version to be downloaded
- Specify JMeter version
- A directory (where we want to mount the JMeter test-plan). Mounting means you are copying your local stuff to a Docker container.
- Entry point: from where the execution starts.
xxxxxxxxxx
FROM centos:7.5.1804
ARG JMETER_VERSION="5.2.1"
ENV JMETER_HOME /opt/apache-jmeter-5.2.1
ENV JMETER_BIN /opt/apache-jmeter-5.2.1/bin
ENV JMETER_DOWNLOAD_URL https://archive.apache.org/dist/jmeter/binaries/apache-jmeter-5.2.1.tgz
ENV JAVA_HOME=/usr/lib/jvm/java-1.8.0-openjdk/jre
WORKDIR /opt/apache-jmeter-5.2.1
ARG TZ="Europe/Amsterdam"
RUN yum update -y
RUN yum install java-1.8.0-openjdk java-1.8.0-openjdk-devel -y
RUN yum install wget -y
RUN wget http://apache.stu.edu.tw//jmeter/binaries/apache-jmeter-5.2.1.tgz
RUN tar -xzf apache-jmeter-5.2.1.tgz
RUN mv apache-jmeter-5.2.1/*/opt/apache-jmeter-5.2.1
RUN rm -r /opt/apache-jmeter-5.2.1/apache-jmeter-5.2.1
RUN mkdir code/
ENTRYPOINT ["/opt/apache-jmeter-5.2.1/code/entry.sh"]
Entry.sh:
- This file contains the command to run JMeter test-plan
- Make sure you are running the test-plan in the ‘/bin’ directory as it is mandatory. (I tried running the test-plan millions of times but no luck as I was not running in the ‘/bin’ directory of the JMeter installation package. So, the path where we need to run the test-plan becomes: ~/apache-jmeter-5.2.1/bin. This is very important else you will bang your head (running the test-plan multiple times) if you don’t keep this point in mind.
- I added some print statements to make sure I am in the correct directory (in which I need to run the test-plan).
xxxxxxxxxx
#!/usr/bin/env bash
echo "*************Running entry.sh file**********"
cd code/
pwd
ls
URL=${}
echo "Starting JMeter tests on ${URL}"
#Command
cd ../bin
sh jmeter -n -t /opt/apache-jmeter-5.2.1/code/<test_plan_name>.jmx -l /opt/apache-jmeter-5.2.1/code/test_output.csv -JThreadNumber=<number_of_threads_to_run> -JRampUpPeriod=<ramp_up_period> -JURL=${URL}
echo "********entry.sh file RAN SUCCESSFULLY*******"
Run.sh:
Well well well, I drank too much coffee to make this file run successfully (exhausted face).
- Challenges I faced: When we mount a local directory to Docker container, all the existing contents (of Docker container) are lost. When I mounted a directory, it wiped off the ‘/bin’ folder of JMeter and when I didn’t mount the directory, the test-plan did not run. This process was going on in a loop . Eventually, I was able to fix this after adding some print statements. This gave me some confidence and helped me move forward.
- ‘Run.sh’ contains a command to run a Docker file (which would eventually build an image). Also, a command to run an image (which will create a Docker container). The JMeter test-plan will run in this container.
- We would be mounting our local directory to a container so that we need not copy all files into the container. This is done by giving ‘-v’ parameter in command to run an image.
xxxxxxxxxx
#This file builds and image and runs it
#!/usr/bin/env bash
ROOT_DIR="$( cd "$( dirname "${BASH_SOURCE[0]}" )" >/dev/null && pwd )"
echo ${ROOT_DIR}
echo "**********************Building an IMAGE*******************"
docker build -t <image_name>/<tag_name>.
echo "**********************Running a CONTAINER*****************"
docker run --rm -v "${ROOT_DIR}:/opt/apache-jmeter-5.2.1/code"<image_name>/<tag_name>${}
echo "CONTAINER RAN SUCCESSFULLY"
Ta-da, the test-plan had been Dockerized now
- You can run this test-plan on your local machine (provided, you have Docker installed) by running the ‘run.sh’ file.
Create a Jenkins Job That Runs This Shell Script and Verify the Results Using Performance Plugin
- Create a freestyle job on Jenkins.
- I configured my test-plan in such a way that it takes the IP address of the machine (as a param) on which Jenkins test-plan is supposed to run.
- In the ‘Execute shell’ section, give below commands:
cd ptrx_jmeter
bash run.sh ${IP}
- Once the test-plan runs, it creates a csv file (test_output.csv).
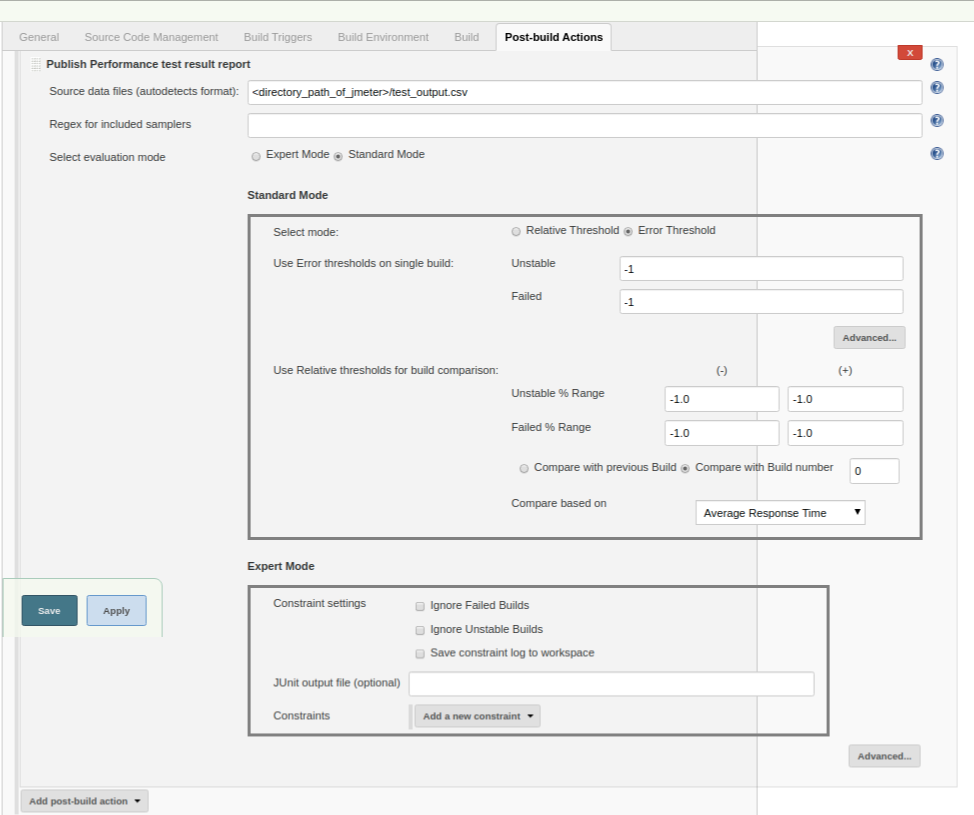
- We can take this csv file as an input to generate reports. Configuration for the same can be done in the ‘Post-build Actions’.
- Once all above steps are done, we can run the job by giving a private IP of the machine on which the test-plan is supposed to run.
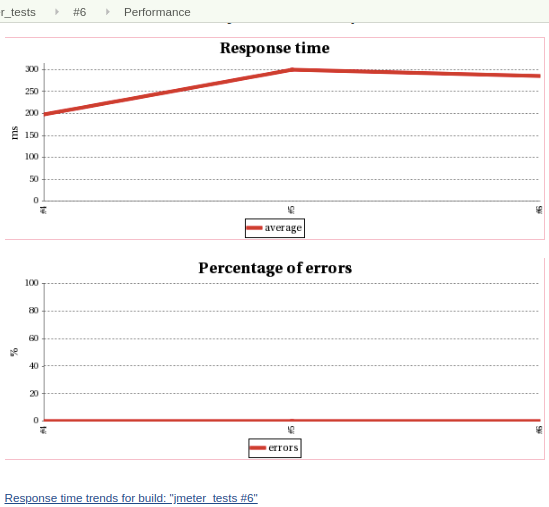
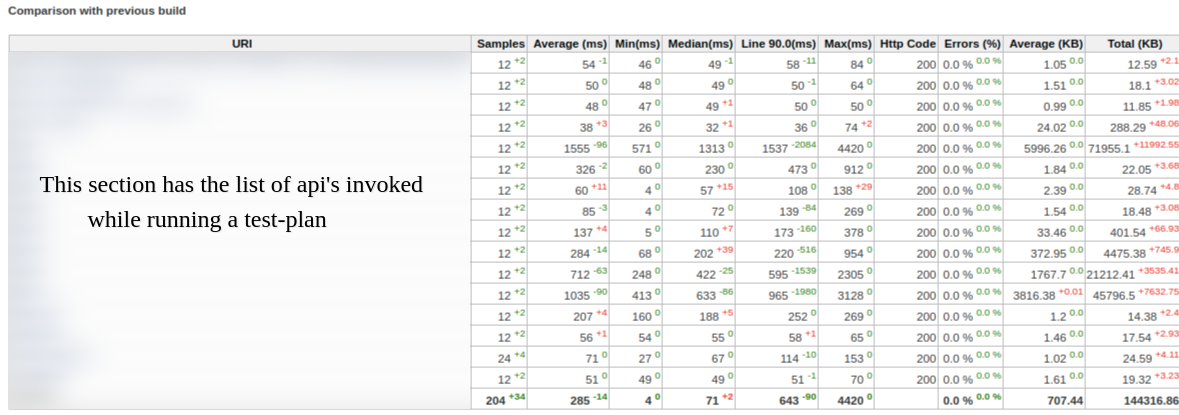
- Once the job is finished successfully, we can see the reports at: job_name -> Performance Trend -> Last report.
In conclusion, running a test-plan via Docker is simpler and easier to maintain. Hope this would be helpful to you as well.
Published at DZone with permission of Ramandeep Dhir. See the original article here.
Opinions expressed by DZone contributors are their own.
Comments