7 Ways of Containerizing Your Node.js Application
This article lists seven ways to containerize your Node.js application, so let’s look at them briefly.
Join the DZone community and get the full member experience.
Join For FreeNode.js has been a favorite among serious programmers for the last five years running. The JavaScript runtime environment for maximum throughput is a free and open-source program that aims to improve the performance of JavaScript across several platforms.
Because of its event-driven, non-blocking I/O approach, Node.js is small in size and quick in processing requests, making it an excellent choice for data-intensive, real-time, and distributed applications.
Developers are increasingly turning to Node.js application optimization services; thus, it's important to streamline the process of designing and releasing cross-platform applications. So, let's get into the context of the article.
Suggestions for Containerizing and Optimizing Node Apps
Here are listed seven ways of containerizing your Node.js application. Let's have a look at them in brief.
1. Use a Specific Base Image Tag Instead of "Version:Latest"
Useful tags that define version information, intended destination (prod or test, for example), stability, or other relevant information for distributing your application across environments should always be included when creating Docker images.
Outside of the development environment, you shouldn't depend on the most recent tag that Docker automatically downloads. The usage of the most recent version of a program might result in strange or even harmful effects.
Suppose you're constantly updating to the most recent version of an image. In that case, eventually, one of those updates is certain to include a brand-new build or untested code that will cause your app to stop functioning as intended.
Take this example Dockerfile that targets that node:
# Create image based on the official Node image from dockerhub

FROM node:lts-buster


# Create app directory

WORKDIR /usr/src/app


# Copy dependency definitions

COPY package.json ./package.json

COPY package-lock.json ./package-lock.json


# Install dependencies

#RUN npm set progress=false \

#    && npm config set depth 0 \

#    && npm i install

RUN npm ci


# Get all the code needed to run the app

COPY . .


# Expose the port the app runs in

EXPOSE 3000


# Serve the app

CMD ["npm", "start"]
Instead of using node:latest, you should use the lts-buster Docker image. Considering that lts-buster is a static picture, this method may be preferable.
2. Use a Multi-Stage Build
One single Docker base image may be used throughout several stages of a build, including compilation, packaging, and unit testing. However, the actual code that executes the program is stored in a different image.
As the finished image won't have any development or debugging tools, it'll be more secure and take up less space. In addition, if you use Docker's multi-stage build process, you can be certain that your builds will be both efficient and repeatable.
You can create multiple stages within a Dockerfile to control how you build that image. You can containerize your Node application using a multi-layer approach.
Different parts of the application, like code, assets, and even snapshot dependencies, may be located in each of the many layers that make up the program. What if we wish to create an independent image of our application?
To see an example Dockerfile of this in action, please check the following:
FROM NODE:LTS-BUSTER-SLIM AS DEVELOPMENT


WORKDIR /USR/SRC/APP


COPY PACKAGE.JSON ./PACKAGE.JSON

COPY PACKAGE-LOCK.JSON ./PACKAGE-LOCK.JSON

RUN NPM CI


COPY . .


EXPOSE 3000


CMD [ "NPM", "RUN", "DEV" ]


FROM DEVELOPMENT AS DEV-ENVS

RUN <<EOF

APT-GET UPDATE

APT-GET INSTALL -Y --NO-INSTALL-RECOMMENDS GIT

EOF


# INSTALL DOCKER TOOLS (CLI, BUILDX, COMPOSE)

COPY --FROM=GLOURSDOCKER/DOCKER / /

CMD [ "NPM", "RUN", "DEV" ]
We first add an AS DEVELOPMENT label to the NODE:LTS-BUSTER-SLIM statement. This lets us refer to this build stage in other build stages. Next, we add a new development stage labeled DEV-ENVS. We'll use this stage to run our development.
Now, let's rebuild our image and run our development. To execute just the development build stage, we'll use the same Docker build command as before, but this time we'll use the --target development parameter.
docker build -t node-docker --target dev-envs3. Fix Security Vulnerabilities in Your Node Image
In order to create modern services, programmers often use preexisting third-party software. However, it's important to be cautious when integrating third-party software into your project since it may present security holes.
Using verified image sources and maintaining vigilant container monitoring are both useful security measures. Docker Desktop will notify you to do security checks on the newly created node:lts-buster-slim Docker image.
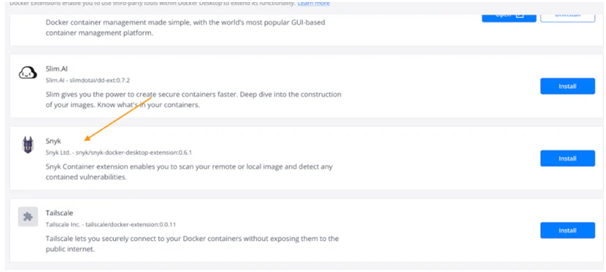
Let's have a look at our Node.js app with the help of the Snyk Plugin for Docker Desktop. Begin by setting up Docker Desktop 4.8.0+ on your Mac, Windows, or Linux PC. Next, choose the Allow Docker Extensions checkbox under Settings > Extensions.
After that, you can search for Snyk in the Extensions Marketplace by selecting the "Add Extensions" option on the left sidebar.
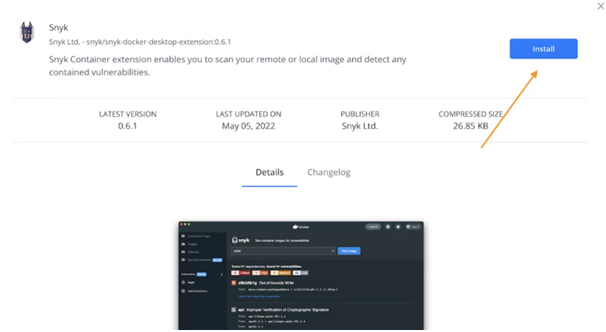
Put in the Snyk and log onto the network:
Type "Node Docker Official Image" into the "Choose image name" box. In order to begin scanning, you will need to log in to Docker Hub. If you don't have an account, don't fret; making one is easy, quick, and completely free.
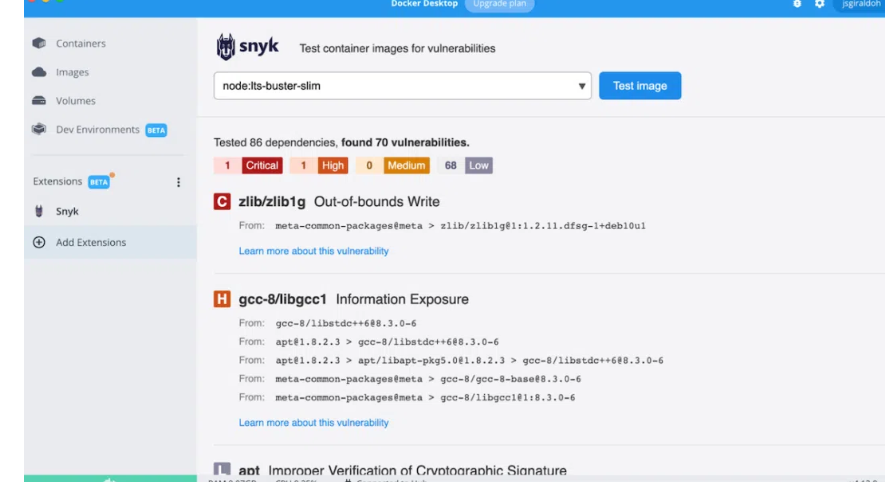
With Docker Desktop, the outcome of a scan looks like this:
During this scan, Snyk discovered 70 vulnerabilities of varied severity. After you've identified them, you may start fixing them to improve your reputation.
Not just that: using the Docker scan command on your Dockerfile will execute a vulnerability scan.
4. Leverage HEALTHCHECK
The HEALTHCHECK directive instructs Docker on how to check the health of a container. For example, this may be used to determine whether or not a web server is in an endless loop and unable to accept new connections, even while the server process is still active.
# syntax=docker/dockerfile:1.4

 FROM node:lts-buster-slim AS development

 # Create app directory

WORKDIR /usr/src/app

 COPY package.json ./package.json

COPY package-lock.json ./package-lock.json

RUN npm ci

 COPY . .

 EXPOSE 3000

 CMD [ "npm", "run", "dev" ]

 FROM development as dev-envs

RUN <<EOF

apt-get update

apt-get install -y --no-install-recommends git

EOF

 RUN <<EOF

useradd -s /bin/bash -m vscode

groupadd docker

usermod -aG docker vscode

EOF

 HEALTHCHECK CMD curl --fail http://localhost:3000 || exit 1

  # install Docker tools (cli, buildx, compose)

COPY --from=gloursdocker/docker / /

CMD [ "npm", "run", "dev" ]
In the production stage, applications are often managed by an orchestrator such as Kubernetes or a service fabric. HEALTHCHECK allows you to inform the orchestrator about the health of your containers, which may be used for configuration-based management.
Here's a case in point:
BACKEND:
CONTAINER_NAME: BACKEND
RESTART: ALWAYS
BUILD: BACKEND
VOLUMES:
- ./BACKEND:/USR/SRC/APP
- /USR/SRC/APP/NODE_MODULES
DEPENDS_ON:
- MONGO
NETWORKS:
- EXPRESS-MONGO
- REACT-EXPRESS
EXPOSE:
- 3000
HEALTHCHECK:
TEST: ["CMD", "CURL", "-F", "HTTP://LOCALHOST:3000"]
INTERVAL: 1M30S
TIMEOUT: 10S
RETRIES: 3
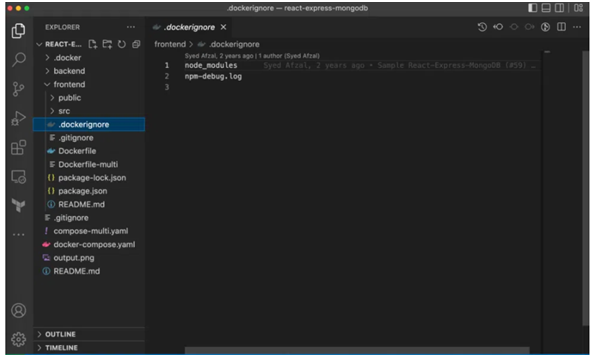
START_PERIOD: 40S5. Use .dockerignore
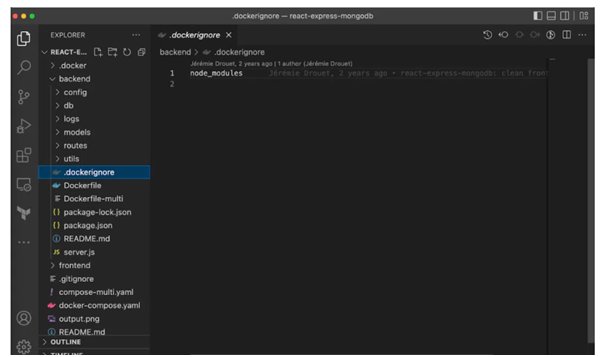
We suggest creating a .dockerignore file in the same folder as your Dockerfile to improve build times. This guide requires a single line in your.dockerignore file:
NODE_MODULESThe node modules directory, which includes Maven's output, is not included in the Docker build context, thanks to this line. There are numerous advantages to having a well-organized .dockerignore file, but for the time being, this simple file will suffice.
Next, I'll describe the built environment and why it's so important. Docker images may be created using the Docker build command by combining a Dockerfile and a "context." In this setting, everything you do applies to the directory structure or URL you just gave me. Any of these files may be used in the construction process.
Meanwhile, the Node developer operates in the compilation context. A directory on Mac, Windows, or Linux. Everything required to run the program may be found in this folder, including the source code, settings, libraries, and plugins.
If you provide a. dockerignore file, we may use it to skip over certain parts of your project while creating your new image: code, configuration files, libraries, plugins, etc. For example, if you want to keep the node modules directory out of your build, you may do so by adding the following to your .dockerignore file.
Backend
Frontend
6. Run as a Non-Root User for Security Purposes
It is safer to run apps with the user's permission since this helps reduce vulnerabilities - even with Docker containers. Docker containers and their contents automatically get root access to the host system. That's why it's recommended to never run Docker containers as the root user.
This may be accomplished by including certain USR directives in your Dockerfile. When executing the image and for any future RUN, CMD, or ENTRYPOINT instructions, the USR command specifies the desired user name (or UID) and, optionally, the user group (or GID):
FROM NODE:LTS-BUSTER AS DEVELOPMENT


WORKDIR /USR/SRC/APP


COPY PACKAGE.JSON ./PACKAGE.JSON

COPY PACKAGE-LOCK.JSON ./PACKAGE-LOCK.JSON


RUN NPM CI


COPY . .


EXPOSE 3000


CMD ["NPM", "START"]


FROM DEVELOPMENT AS DEV-ENVS

RUN <<EOF

APT-GET UPDATE

APT-GET INSTALL -Y --NO-INSTALL-RECOMMENDS GIT

EOF


RUN <<EOF

USERADD -S /BIN/BASH -M VSCODE

GROUPADD DOCKER

USERMOD -AG DOCKER VSCODE

EOF

# INSTALL DOCKER TOOLS (CLI, BUILDX, COMPOSE)

COPY --FROM=GLOURSDOCKER/DOCKER / /

CMD [ "NPM", "START" ]
7. Explore Graceful Shutdown Options for Node
Temporary storage spaces created in Docker for Node. They are easy to prevent, destroy, and then either replace or repurpose. It is possible to kill containers by giving the process the SIGTERM signal.
In order to make the most of this brief window of opportunity, your app must be able to process incoming requests and free up any associated resources without delay.
Node.js, on the other hand, is crucial for a successful shutdown of your app since it takes and passes signals like SIGINT and SIGTERM from the OS. Because of Node.js, your app may select how to respond to the signals it receives.
If you don't program for them or use a module that does, your app won't terminate properly. However, it will continue to operate normally until Docker or Kubernetes terminates it due to a timeout.
If you're unable to modify your application's code, you may still use the docker run —init or tini init option inside your Dockerfile. It is recommended, however, that you provide code to manage appropriate signal handling for graceful shutdowns.
Conclusion
In this tutorial, we covered a wide range of topics related to Docker image optimization, from constructing a solid Dockerfile to using Snyk to check for vulnerabilities. It's not difficult to make better Node.js applications. If you master some basic skills, you'll be in good condition.
Opinions expressed by DZone contributors are their own.
Comments