How To Use ChatGPT With Python
Are you looking forward to knowing how you can empower ChatGPT with Python? Learn step-by-step how to set up an account in the Kommunicate platform using Python.
Join the DZone community and get the full member experience.
Join For FreeAI chatbots are revolutionizing the way businesses engage with customers in the digital age. These intelligent virtual assistants are powered by advanced natural language processing and machine learning algorithms, allowing them to understand and respond to user queries in real-time.
Whether it's providing customer support, guiding users through website navigation, or even offering personalized product recommendations, AI chatbots enhance user experiences and streamline communication. As technology continues to evolve, AI chatbots are poised to become even more sophisticated, making them an invaluable tool for businesses looking to stay competitive in today's fast-paced digital landscape.
In this blog, we will explore how to integrate the ChatGPT Kommunicate platform using Python.
Step 1: Setup an Account in Kommunicate
If you do not have an account in Kommunicate, you can create one here.
Next, log in to your Kommunicate dashboard and navigate to the Bot Integration section. Click on Create a bot with Kompose.
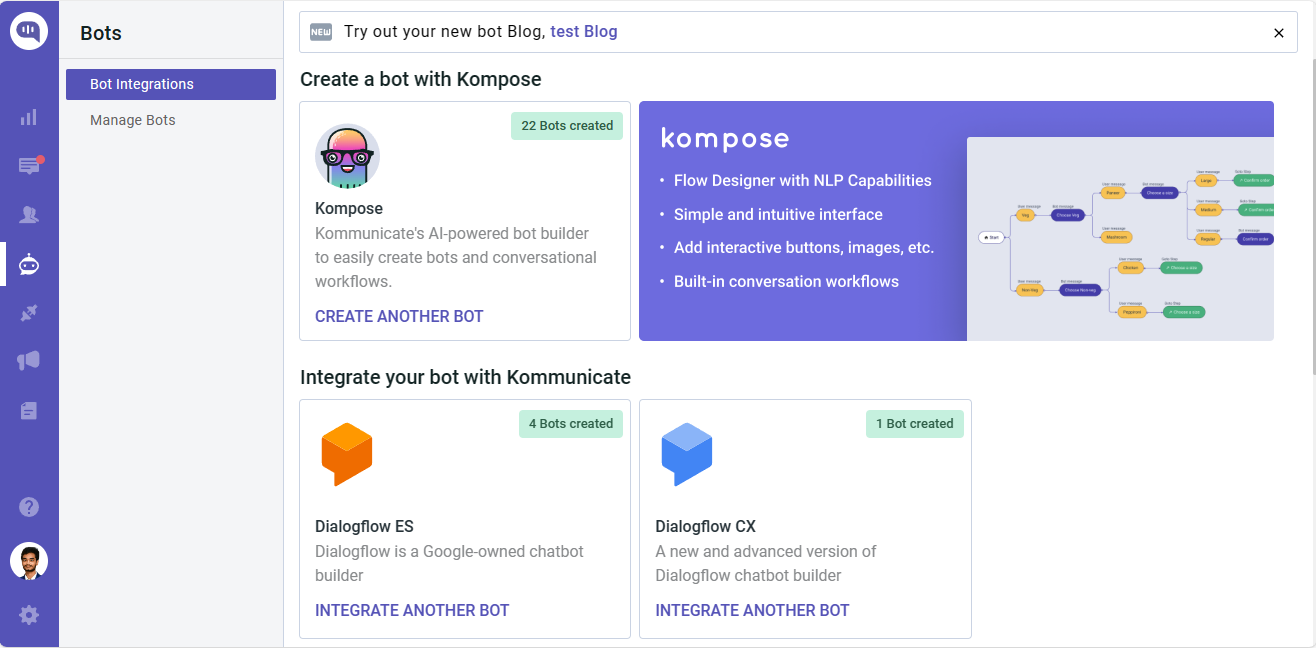
Next, complete the setup of your bot by specifying its name, language, and human handoff setting. Once you configure these, proceed to finalize the bot setup.
Step 2: Create a Welcome Message and Intents for Your Chatbot
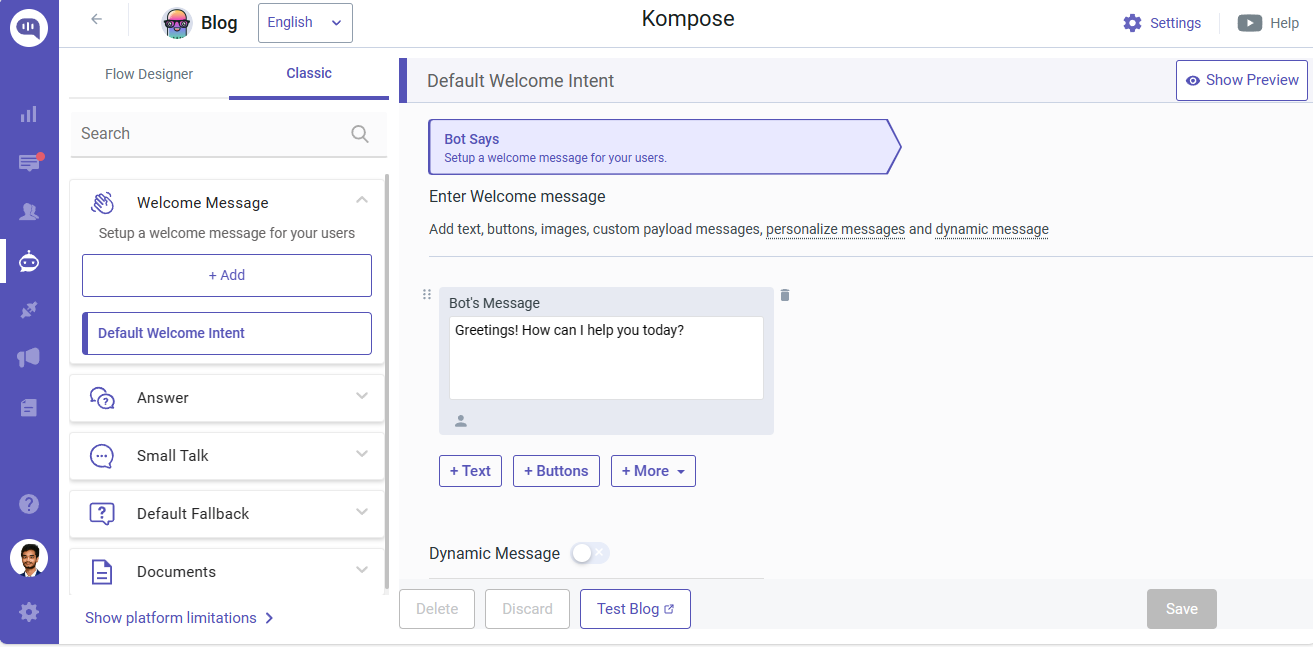
Navigate to the ‘Manage Bots‘ section and choose the bot you have created.
Next, you need to set up the welcome message for your chatbot. The welcome message is the initial message that the chatbot sends to the user who starts a conversation. Click on the “Welcome Message” section, then type the message that your chatbot should show to the users when they open the chatbot and save the welcome intent.
Step 3: Create Webhook URL Using Python With Flask and Enable the Webhook Server Using Ngrok
Creating a simple webhook in Python involves setting up an HTTP server that listens for incoming POST requests, parses the data sent in the request, and takes appropriate actions based on that data. Here's a step-by-step guide on how to create a basic webhook using Python:
Step 4: Choose a Web Framework
You can use a web framework like Flask or Django to create your webhook. For this example, we'll use Flask, which is a lightweight web framework.
Step 5: Install Flask and Ngrok (If Not Already Installed)
To install Flask and ngrok using pip run the following command in the terminal:
pip install flaskpip install pyngrok
Step 6: Create a Python Script

Step 7: Run the Webhook Server
Save the script and run it using the following command:
python app.py, here app.py is the name of the script.
Step 8: Use the ngrok Public URL
Once ngrok is running, you can use the public URL it provides (e.g., http://random.ngrok.io/webhook) as your webhook URL. Copy the URL.
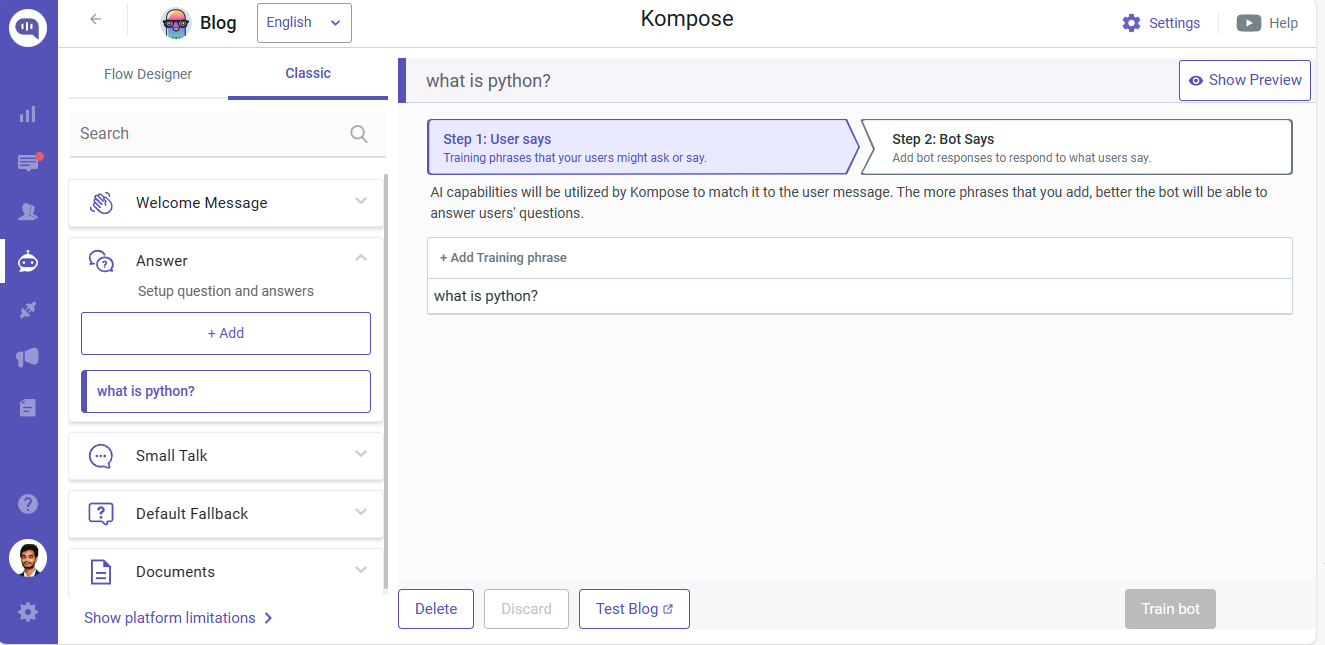
Step 9: Create an Intent
You can create an intent by clicking on the +Add button under the “Answer” section and “Train the Bot.”
Here, I have created Flask intent and added a training phrase as “What is Python?”
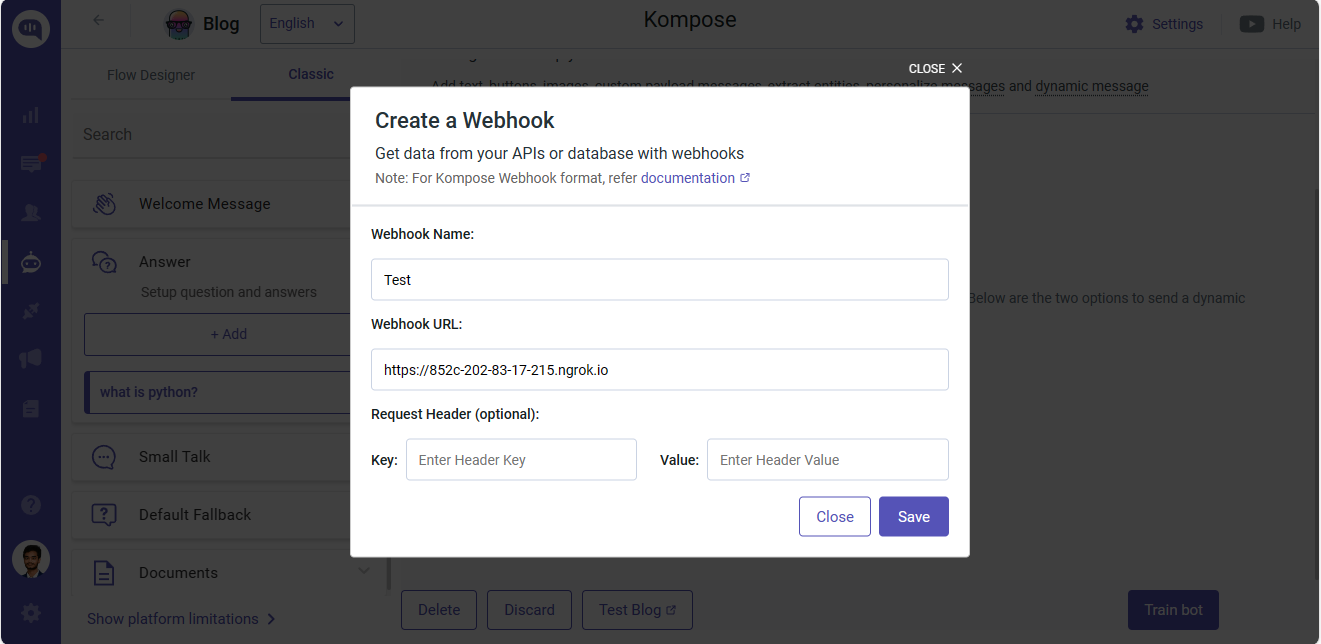
Click on the “Bot Says” option, enable dynamic messaging, and choose Webhook. Now, give your webhook a name, paste the copied URL, and click “save.” Now, click on “Train Bot.”
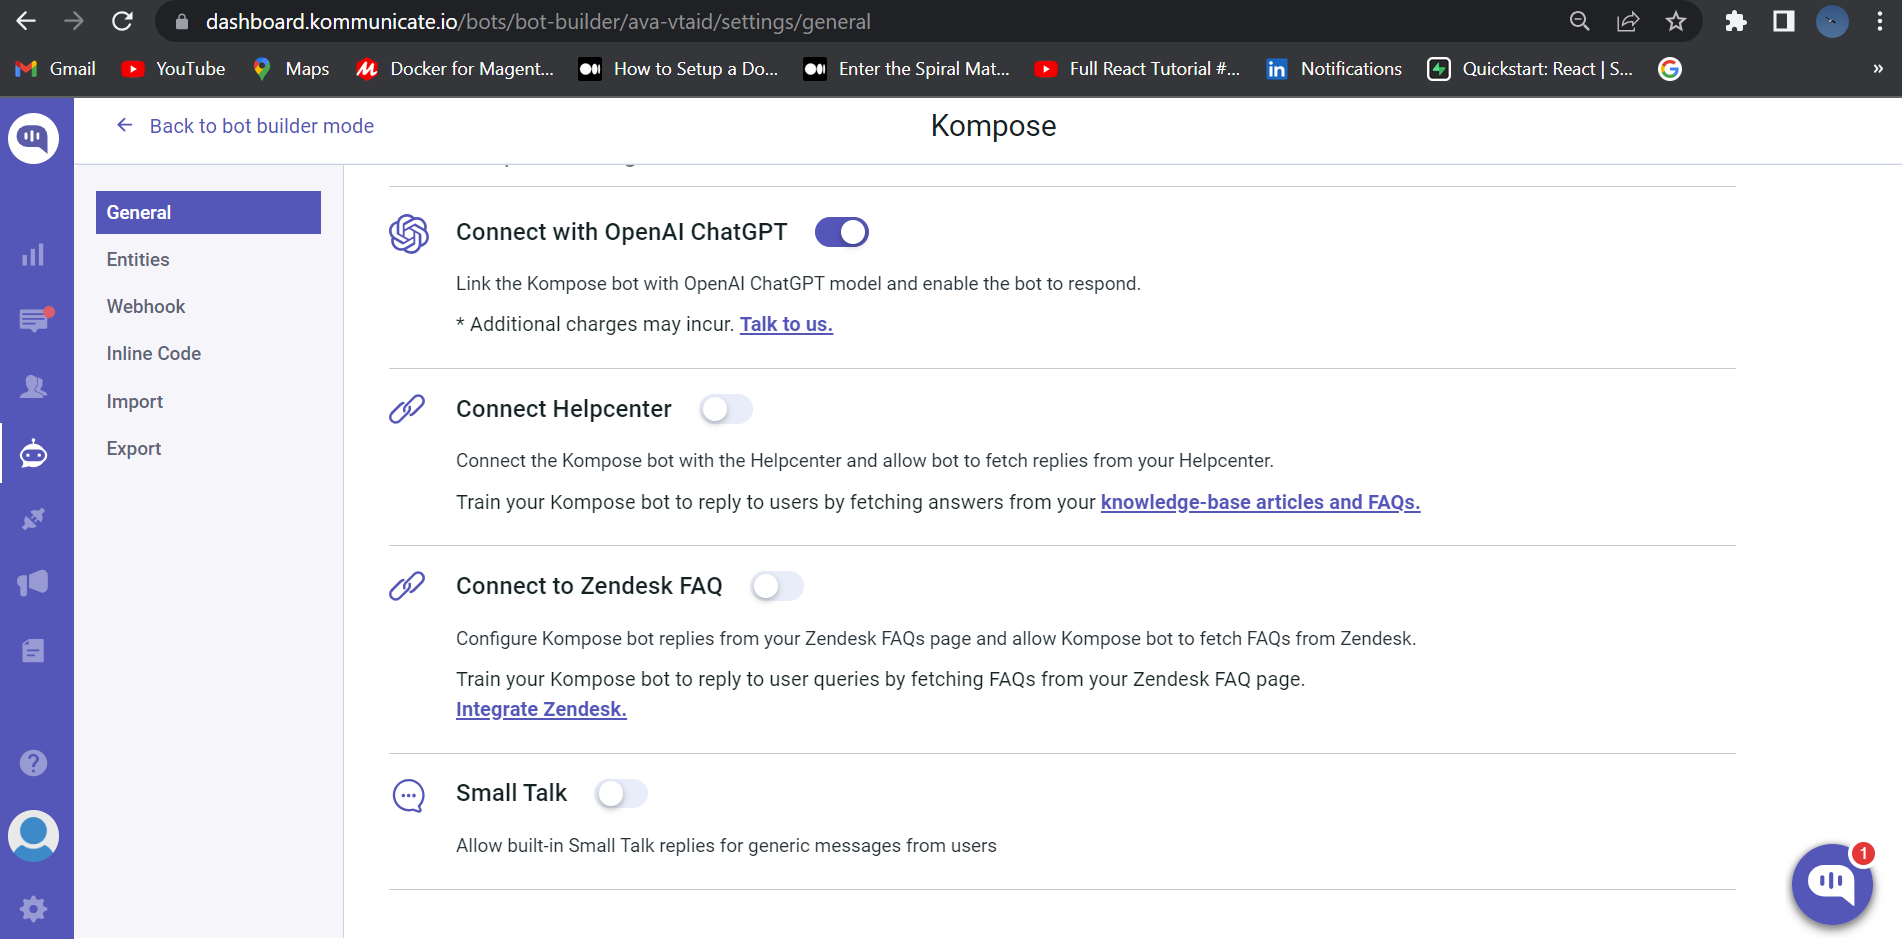
Step 10: Activate ChatGPT
On the same page, you will find ⚙️Settings (top right corner of the page).
Click on Settings. The first option would be “Connect with OpenAI ChatGPT”, and enable it.
And lastly, disable Small Talk (the last option on the same page).
Step 11: Testing
Whenever the user’s question matches the training phrases, the Webhook’s message will be called.
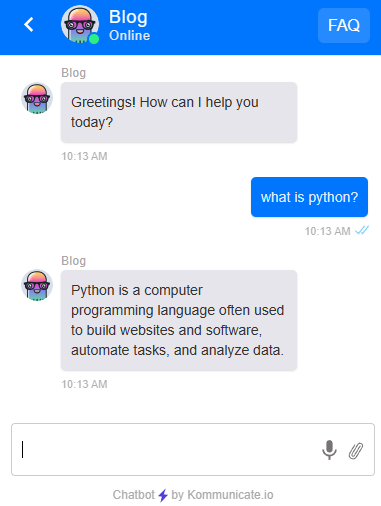
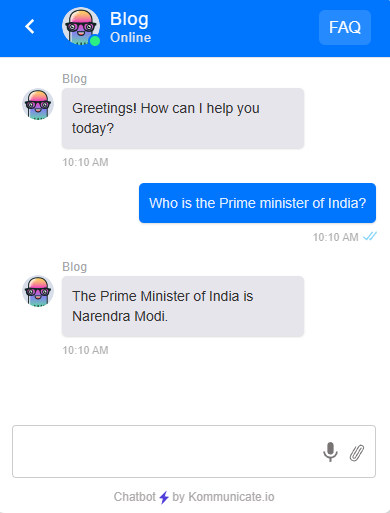
If the user’s question does not match with any of the training, the answer will be fetched from ChatGPT.
Integrating ChatGPT with Python using the Kommunicate platform offers a powerful and straightforward way to enhance your website's user experience with AI-driven chatbots. By combining the capabilities of ChatGPT with the ease of deployment provided by Kommunicate, you can create a more interactive and personalized environment for your users.
Opinions expressed by DZone contributors are their own.
Comments