How to Use HashiCorp Boundary for Secured Remote Access
In this article, we will focus on HashiCorp Boundary as an open-source tool that is easy to use and secure.
Join the DZone community and get the full member experience.
Join For FreeAs companies rely increasingly on multiple applications residing in different regions and networks, security has become a critical concern. The process of accessing these applications can be complex and challenging, particularly when they are running in different data centers and need to be accessed simultaneously or at intervals. Users have to follow multiple steps to access them, such as setting up tunnels, switching contexts, and controlling identity authorization. However, there can be issues such as frequently broken connections and a lack of session monitoring in some cases.
To address these challenges, there are solutions such as VPN tunneling, reverse proxies, and Bastion hosts that can be utilized. However, accessing applications across different networks and data centers can be complex and challenging, requiring users to navigate multiple steps like setting up tunnels and controlling authorization. Unfortunately, such processes are often plagued with issues such as frequent disconnections and inadequate session monitoring. To provide better security and ease of use, newer tools such as HashiCorp Boundary, Teleport, and Strong DM have emerged. These tools offer unique advantages that overcome the limitations of previous solutions, such as providing granular access control without exposing private networks, offering centralized session monitoring, and simplifying the setup process.
To understand what is the strength of these tools, let’s get to know them a little bit more before going further in this post. Boundary is a cloud-native solution for secure remote access and session management. It provides a centralized platform for managing access to the infrastructure and applications, including SSH, RDP, and Kubernetes. Boundary uses a Zero Trust security model, meaning all access requests are authenticated, authorized, and encrypted, even if they come from within your trusted network. Boundary also provides real-time session recording and audit logs to help you meet compliance requirements.
On the other hand, Teleport and StrongDM are unified access management platforms that provide secure access to all your resources, including databases, servers, and Kubernetes clusters. They allow you to centrally manage access controls and audit logs across your entire infrastructure. Teleport and StrongDM also provide end-to-end encryption and multi-factor authentication to help you secure your sensitive data and applications. Ultimately, the choice between Boundary, Teleport, and StrongDM will depend on your specific needs and requirements. If you need a solution that is specifically designed for secure remote access and session management, Boundary may be the better choice. However, if you need a more comprehensive access management solution that can manage access across all your resources, including databases and Kubernetes clusters, then Teleport or StrongDM may be the better option. As each of them has its pros and cons, you can read more about HashiCorp Boundary vs. Teleport vs. strongDM to learn more.
In this blog post, we will focus on HashiCorp Boundary as an open-source tool that is easy to use and secure. We will cover what Boundary is and what it can do, and finally, we will create a hypothetical situation to demonstrate how you can secure your infrastructure.
Introducing HashiCorp Boundary
Boundary is an open-source solution developed by HashiCorp. It is designed to securely connect and manage access to dynamic infrastructure across multi-cloud and on-premises environments.
It provides simple and secure access to dynamic infrastructures by enabling the following:
- Identity-based access controls (e.g., TCP, SSH, RDP) for users and applications.
- Access automation using Terraform provider, REST API, CLI, and SDKs.
- Session visibility with target monitoring and administration control.
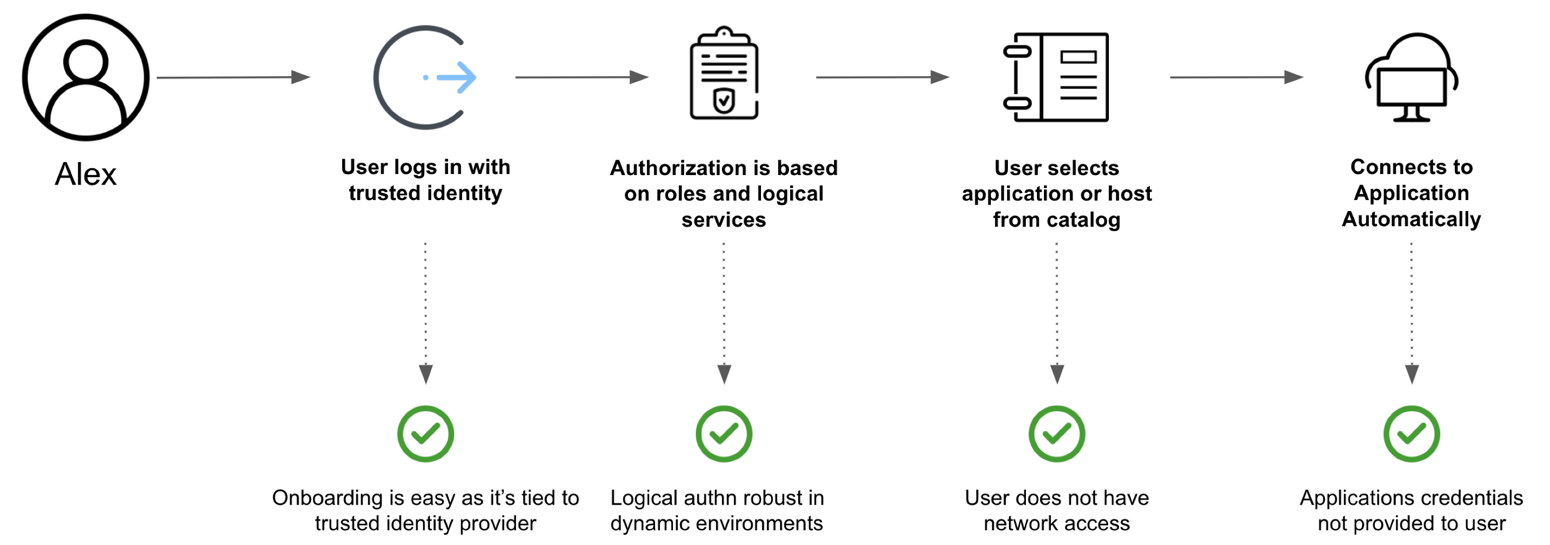
It provides a secure way to access hosts and critical systems without having to manage credentials or expose your network.
Boundary has two variants self-managed and cloud-managed; self-managed is an OSS version of Boundary that is free and community-driven. It is designed to be installed and managed on-premises. It provides all of the core features of Boundary, including secure access control and session recording. The OSS version can be customized and extended by developers to meet their specific needs. However, the cloud-managed version provides additional convenience and features, such as automatic scaling, advanced analytics, and support from HashiCorp’s customer success team. Managed Boundary can be deployed in a few clicks via the HashiCorp Cloud Platform Portal. Once deployed, Boundary administrators can interact with Boundary through the admin console or command line interface (CLI) to manage organizations, users, groups, permissions, and roles to provide fine-grained access to Boundary targets and projects.
Features of Boundary
- Access servers from multiple data centers at the same time.
- Set up multiple targets respective to each data center and connect to servers/applications simultaneously.
- Create multiple sessions to access servers using a proxy.
- Setting up targets will help create as many sessions of a single resource and provide a connection using a target proxy.
- Identity access management and role-based access control for the apps and services.
- Integrating with other tools and systems, such as identity and access management (IAM) solutions, enables a seamless and consistent approach to managing access across an organization.
- Enforcing access policies and controls, such as fine-grained access controls and multi-factor authentication, to protect against unauthorized access.
- Providing secure access to sensitive data and resources in a controlled and auditable manner.
- Monitoring and auditing access to sensitive data and resources to detect and respond to potential security threats and to support compliance with regulatory requirements.
Remote Access With Boundary
In this section, we will delve into a real-world use case of having an application running in a private network and how to configure HashiCorp Boundary to provide secure access to the application. This will include setting up hosts, targets, and other required components and configuring access to the application.
Through this example, you will gain a practical understanding of how HashiCorp Boundary can be used to manage and secure access to multiple cloud applications. Whether you are a security professional or just looking to learn more about this tool, this section will provide valuable insights and guidance on how to effectively use HashiCorp Boundary in your own environment.
To keep this post simple, we are using the HashiCorp Cloud Platform to create a Boundary instance and configure projects and targets. You can also use the OSS version to achieve the same results.
Install and Create a Boundary Instance
Follow the official links for installation, creating instances, and accessing the Boundary cluster to create an org named quick-start-org.
Configure Boundary
Now that we have created the Boundary cluster let’s configure projects, hosts, and targets in the following section.
Setup Project
Log into the HCP Portal.
Click Boundary in the left navigation menu and select your Boundary instance.
Open Admin UI and log in using the username and password you created in the Create a Boundary Instance on HCP tutorial.
Click the quick-start-org that you created as part of creating Boundary instance to load the Projects page. Projects are contained within an orgs and are organizational scopes to contain roles, host catalogs, hosts, and targets.
Now create a new project by clicking on new and putting the name as
quick-start-project. Once it is created, you should copy the project ID.![create a new project by clicking on new]()
Note: A target can be accessed via desktop application or through CLI. Feel free to skip the
exportcommands if you want to use only Desktop application.Switch to the terminal used to setup Boundary and create an environment variable
PROJECT_IDwith the value copied from the previous step.export PROJECT_ID=<actual-project-id>Return to the Boundary UI.
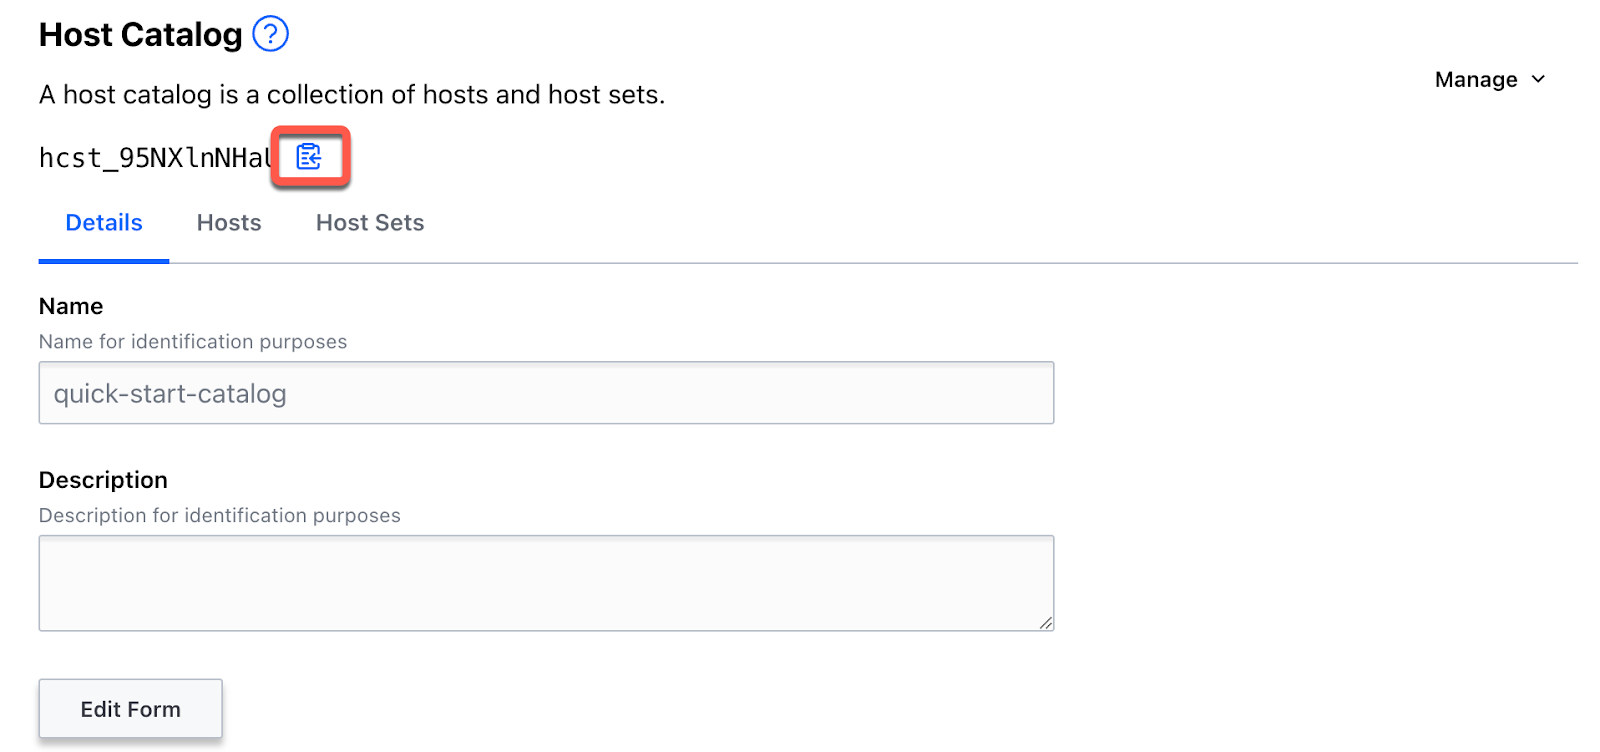
Click Host Catalogs in the left navigation menu.
Host catalogs are defined within a project, which contains hosts and host sets.
Note: A host catalog can be created as a Static host catalog or a Dynamic host catalog to import hosts from a cloud provider, like Amazon Web Services or Microsoft Azure.
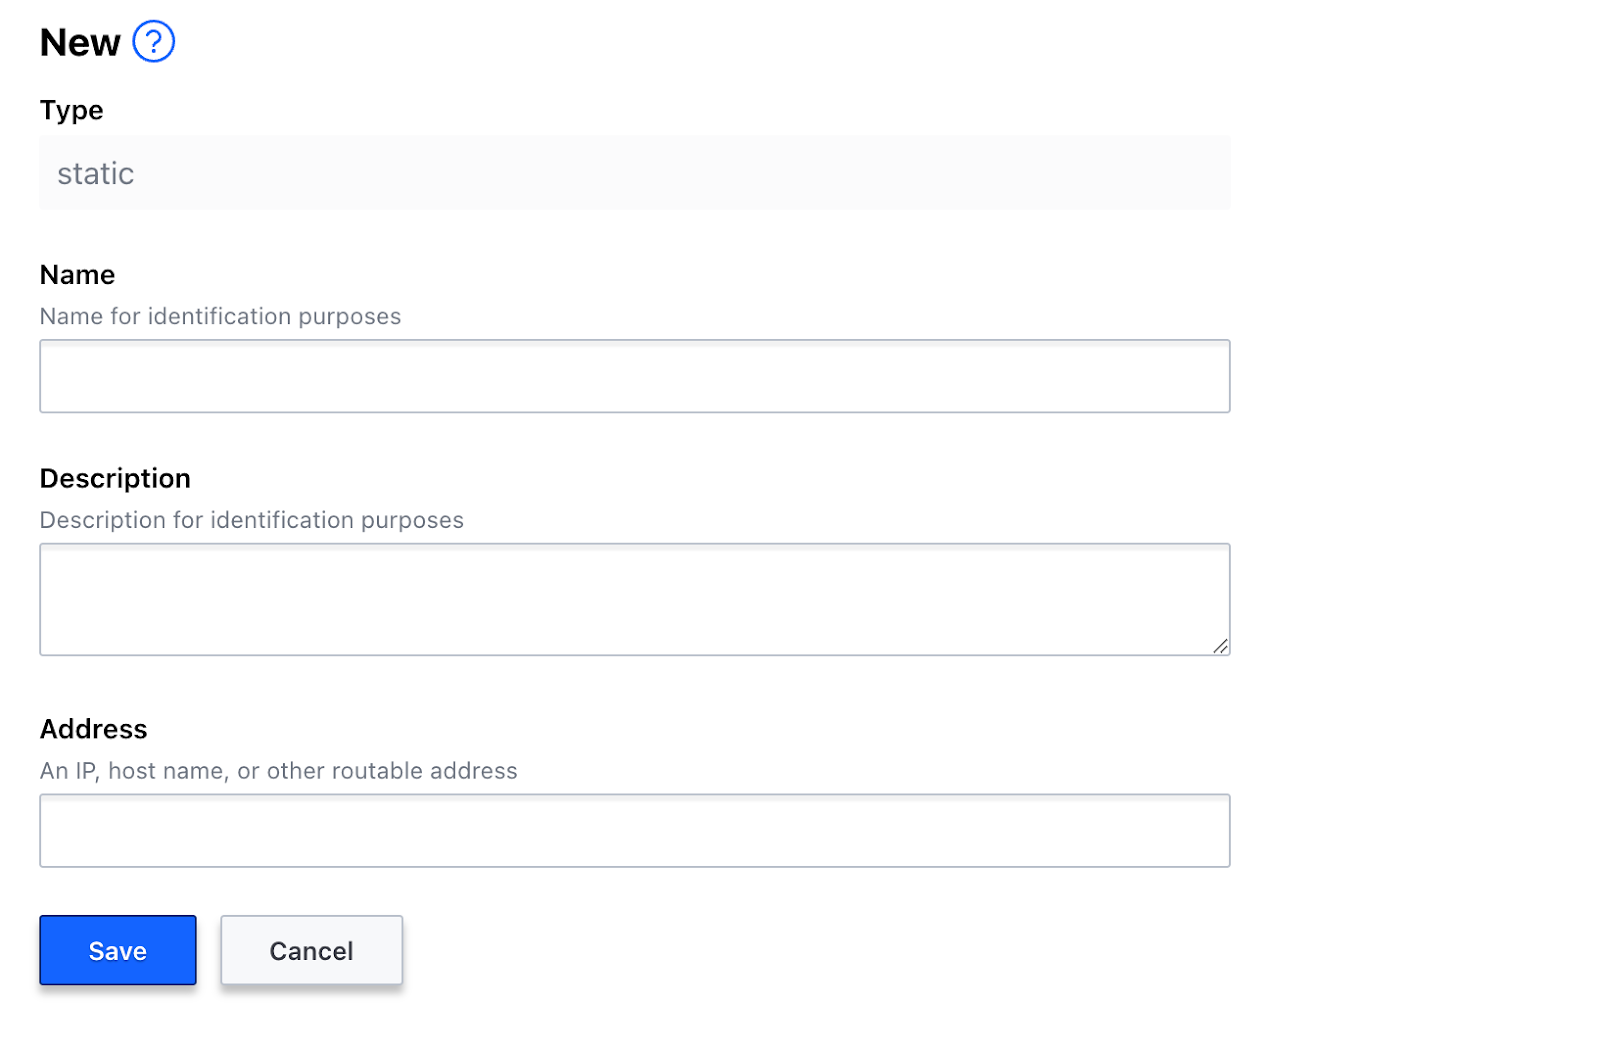
Click New.
Enter
quick-start-catalogin the Name field, select Static for the type, and click Save.![Enter quick-start-catalog in the Name field, select Static for the type, and click Save.]()
Click the copy icon for the host catalog ID.
![Click the copy icon for the host catalog ID.]()
Switch to the terminal used to setup Boundary and create an environment variable named
HOST_CATALOG_IDwith the value copied from the previous step.export HOST_CATALOG_ID=<actual-host-catalog-id>

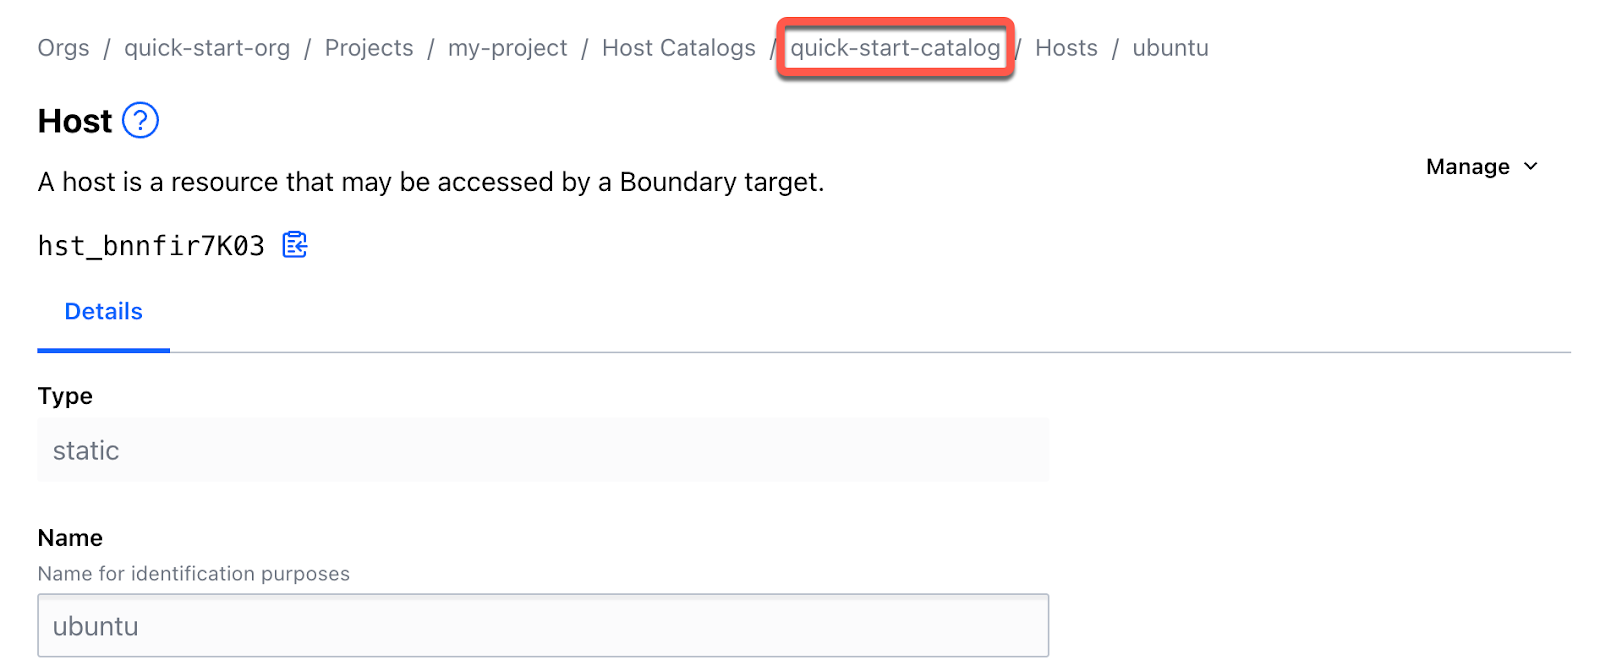
Configure Hosts
A host is a computing machine that is reachable from the Boundary. A host belongs to a host catalog and can only be associated with host sets from the same host catalog as the host.
From the quick-start-catalog page, click the Hosts tab and click New.
Enter
demo-hostin the Name field, the IP address of your private host where the application is running in the Address field, and click Save. Copy the host ID once the new host is created.![Enter demo-host in the Name field, the IP address of your private host where the application is running in the Address field, and click Save.]()
Tip: You can retrieve the IP address of your private host by running
ifconfigorip addresscommand.Switch to the terminal used to setup Boundary and create an environment variable named
HOST_IDwith the value copied from the previous step.export HOST_ID=<actual-host-id>Click quick-start-catalog in the breadcrumb navigation menu.
![Click quick-start-catalog in the breadcrumb navigation menu.]()
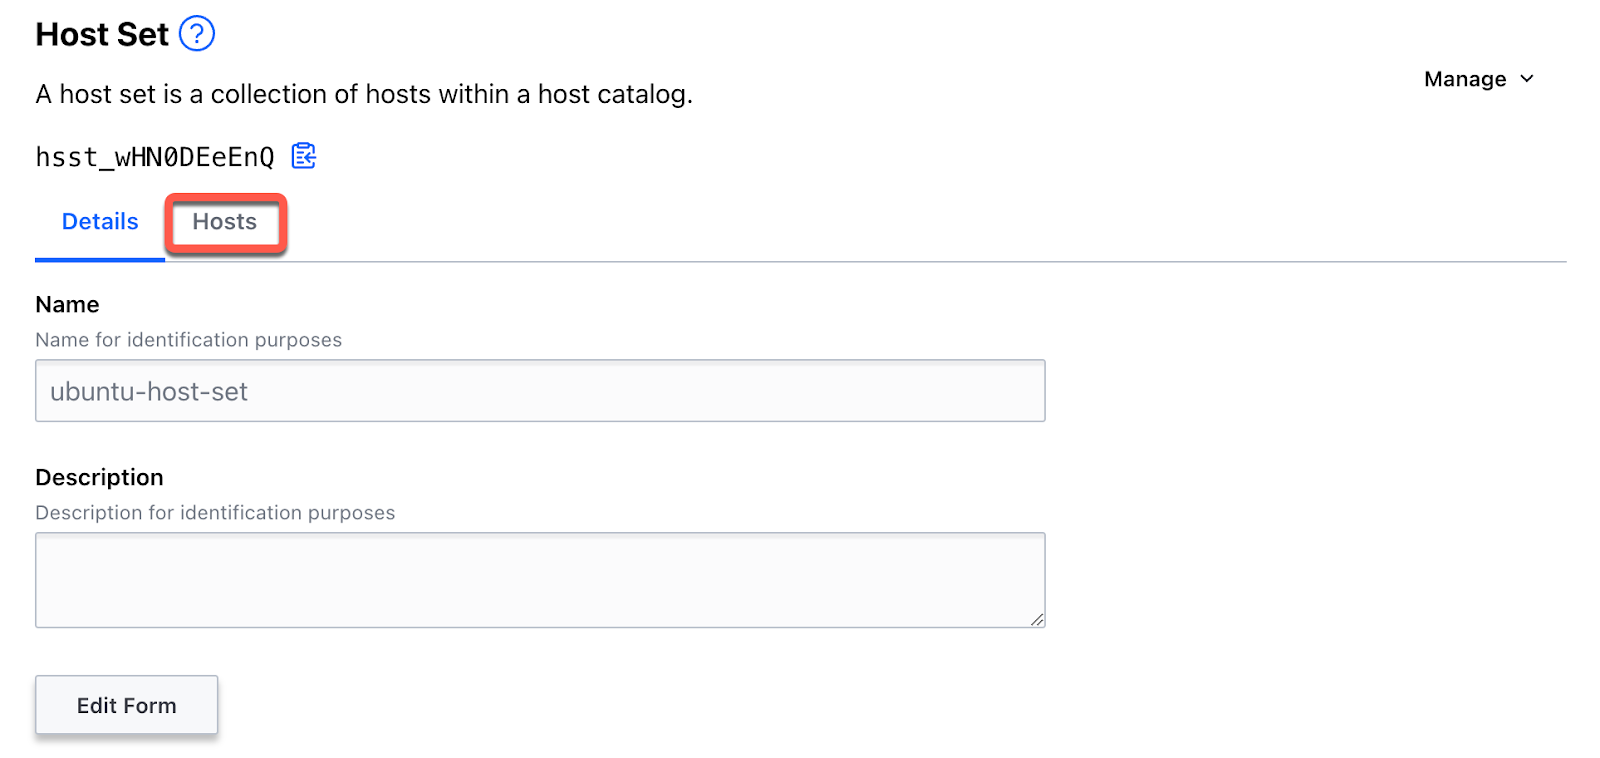
Click the Host Sets tab.
Host sets are defined within a host catalog and are collections of hosts that should be granted the same level of access control.
Click New, enter
ubuntu-host-setin the Name field, and click Save. The host set ID is displayed.Click the copy icon for the host set ID.
Switch to the terminal used to setup Boundary and create an environment variable named
HOST_SET_IDwith the value copied from the previous step.export HOST_SET_ID=<actual-host-set-id>From the ubuntu-host-set page, click the Hosts tab.
![From the ubuntu-host-set page, click the Hosts tab.]()
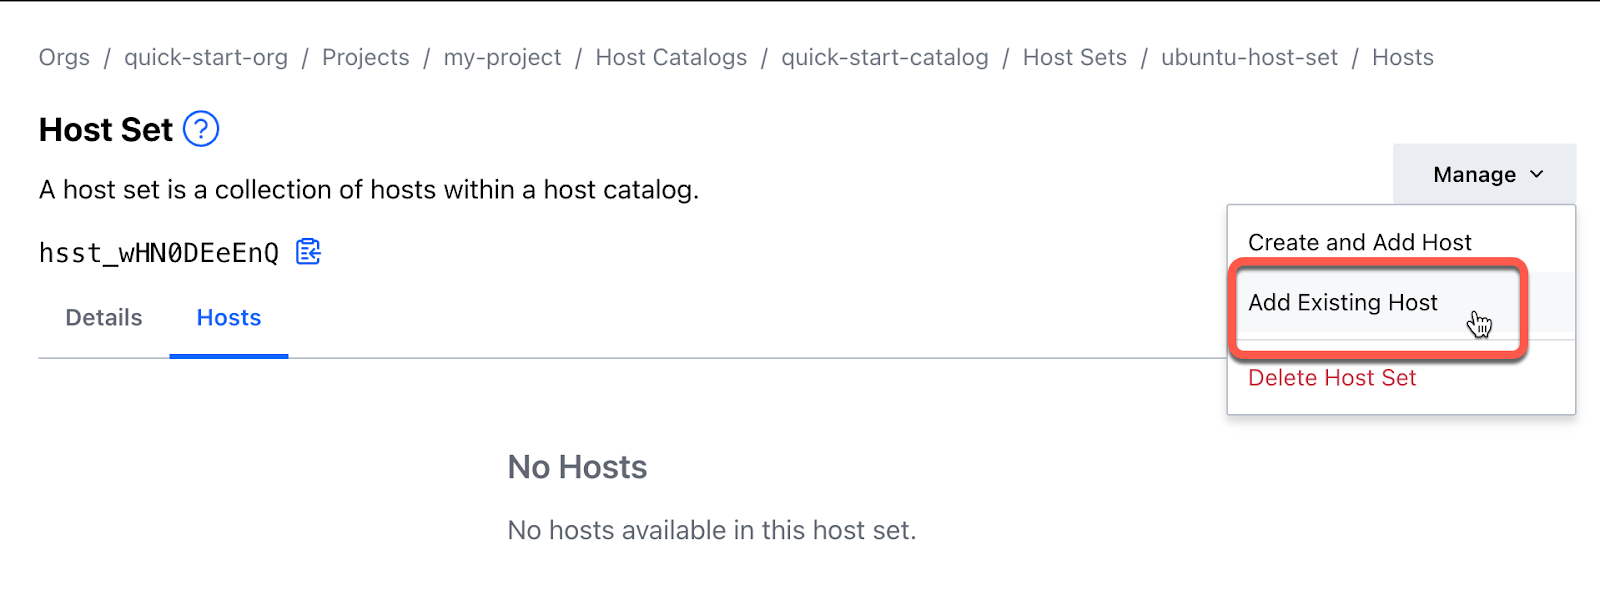
Click the Manage pull-down menu and select Add Existing Host.
![Click the Manage pull-down menu and select Add Existing Host.]()
Click the checkbox for the Ubuntu host and click Add Hosts.
![Click the checkbox for the ubuntu host and click Add Hosts.]()
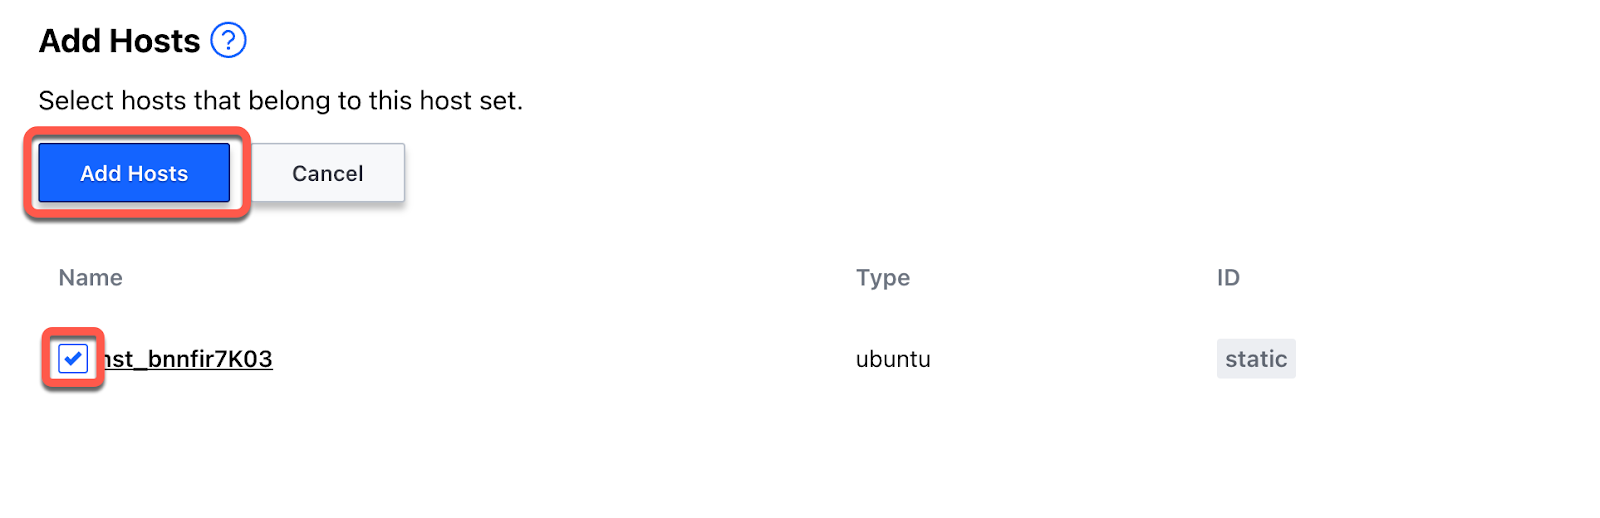
You will be returned to the Host Set page and see the Ubuntu host listed under the Hosts tab.
Configure Targets
Targets are defined within a project and represent hosts and their associated permissions that end users can interact with. Users that have permission to establish sessions with a target through a role can connect to targets through Boundary. A target can contain references to host sets from host catalogs that belong to the same project as the target.
Click Targets in the left navigation menu.
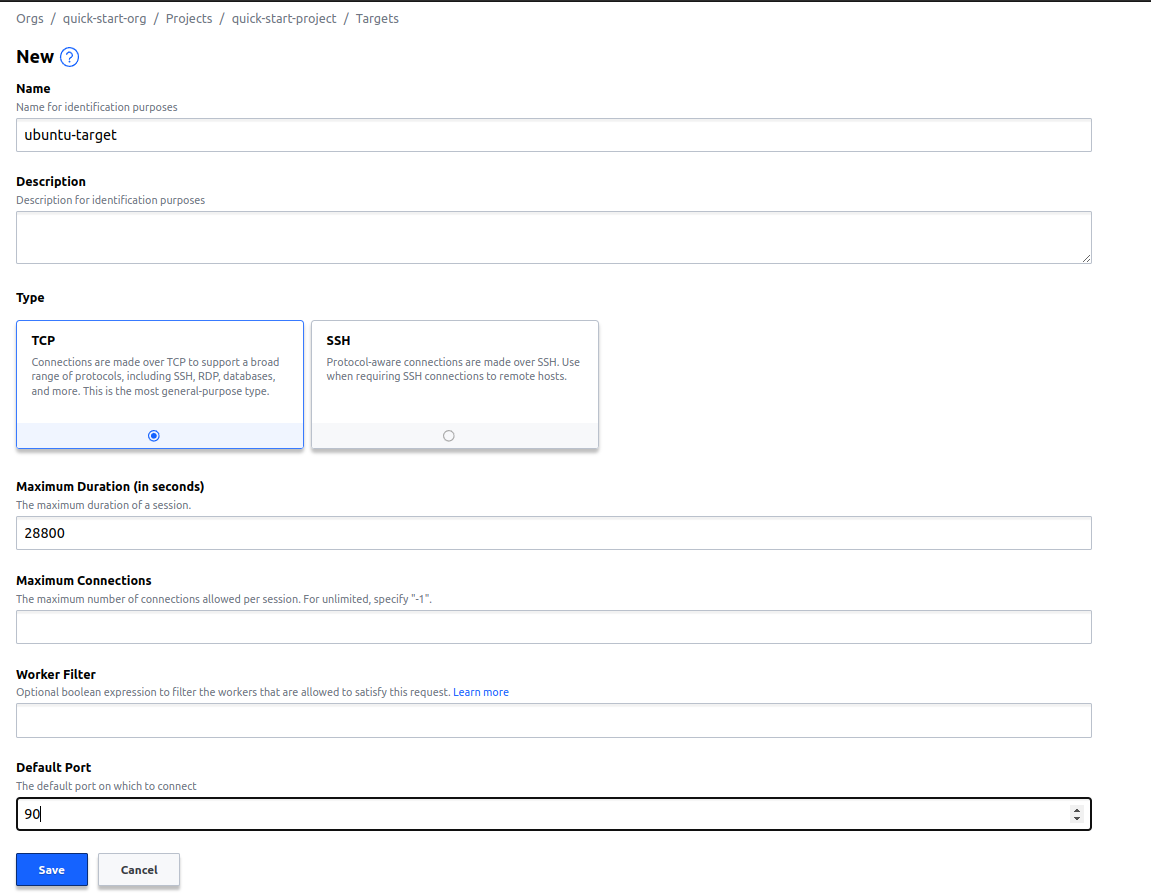
Click New, enter
ubuntu-targetin the Name field, enter<PORT>in the Default Port field where the application is running, and click Save. The target ID is displayed.In this example, we are configuring a sample application running in a private server exposed to port 90.
![Click New, enter ubuntu-target in the Name field, enter <PORT> in the Default Port field where the application is running, and click Save. The target ID is displayed.]()
Click the copy icon for the target ID.
Switch to the terminal used to setup Boundary and create an environment variable named
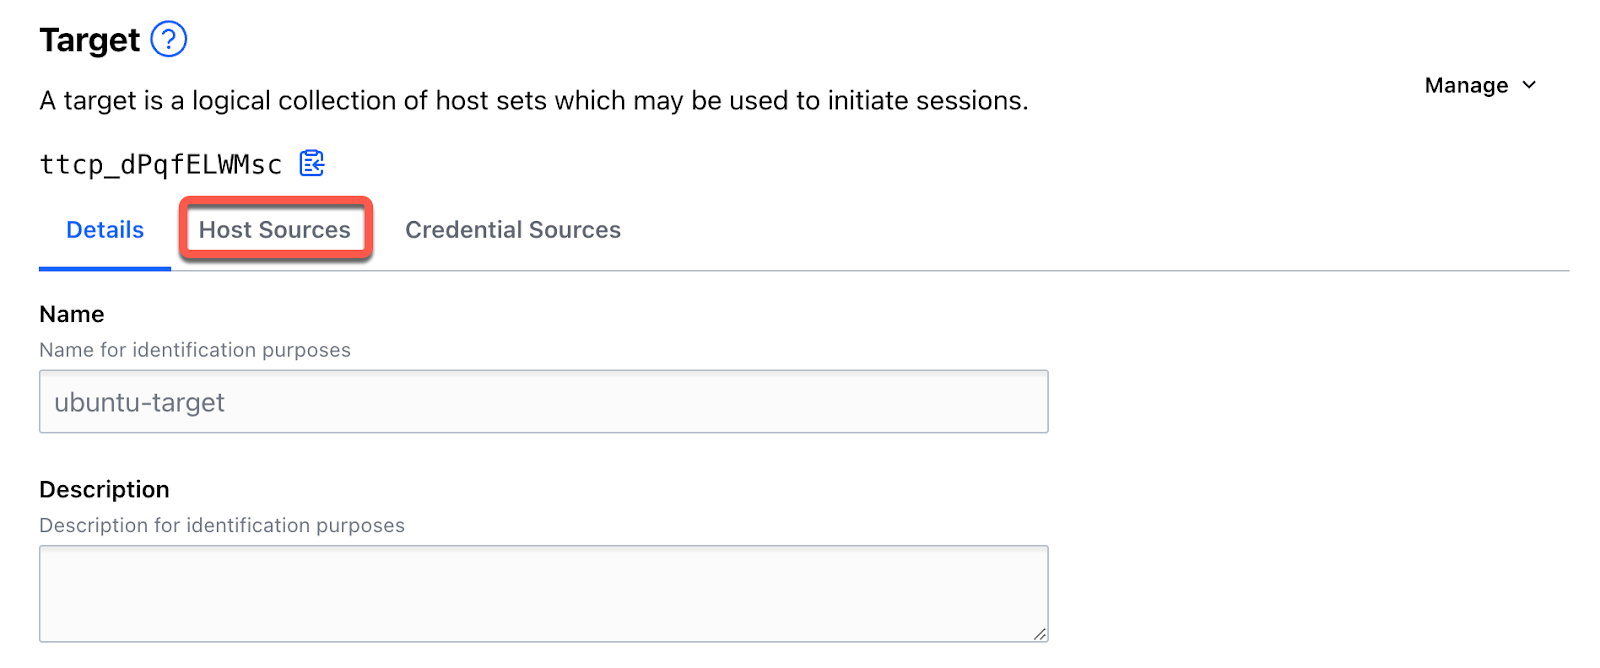
TARGET_IDwith the value copied from the previous step.export TARGET_ID=<actual-target-id>From the Ubuntu-target page, click the tab Hosts Sources.
![From the ubuntu-target page, click the tab Hosts Sources.]()
Click Add Host Sources.
Click the checkbox for the ubuntu-host-set host set and click Add Host Sources.
![Click the checkbox for the ubuntu-host-set host set and click Add Host Sources.]()
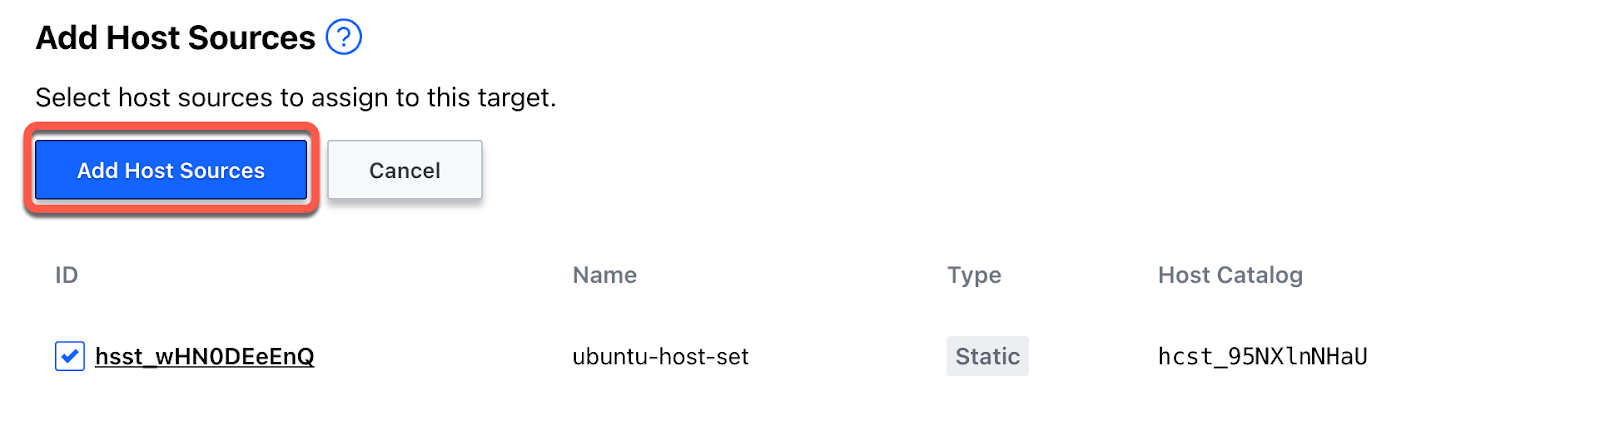
You will be returned to the ubuntu-target page and see the ubuntu-host-set host set listed under the Host Sources tab.
Configure Worker
Once the target is set up, it needs a worker to be configured to start a session and create a connection with the internal network. These workers need to be set up org-wide and should be configured in the respective network where the application is running.
Assume that users have multiple data centers and some applications are running in each data center. In order to connect to those applications securely, the worker has to be configured with the Boundary desktop client/Boundary CLI to define what request goes to which worker. While configuring the worker, users can add tags that match the target.
For example, A target is created for the production environment in X datacenter. While configuring a worker in the same data center, a tag can be defined to match the worker with the target that Boundary understands and serves requests.

Target aware workers.
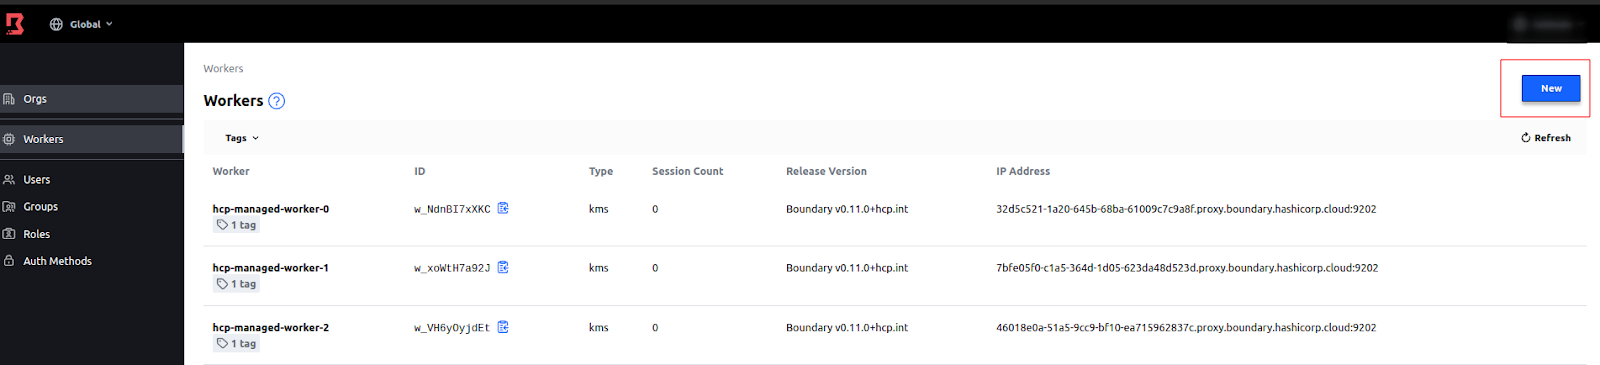
Click org to load the Orgs page and click Workers.
From the Workers page, click New.
![From the Workers page, click New.]()
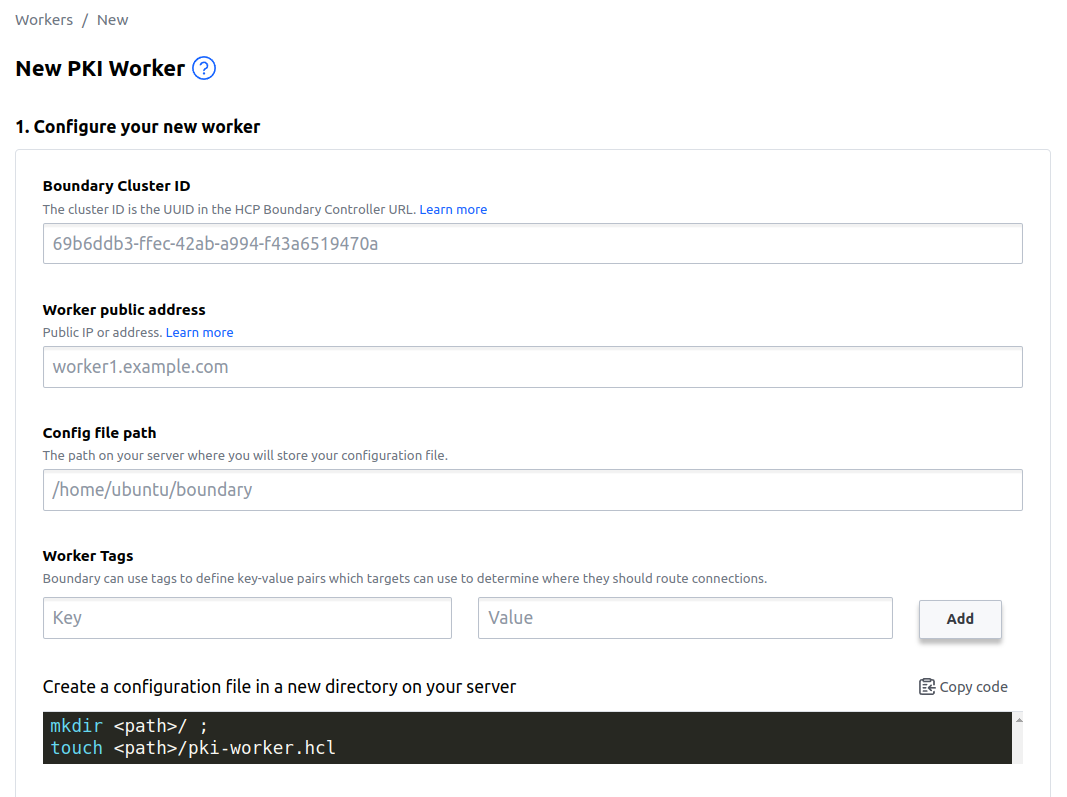
Add details to the new worker.
![]()
![Register Worker]()
a. Boundary Cluster ID: Enter the UUID of the Boundary instance.
Note: You can get this UUID from the cluster URL or Instance ID created on HashiCorp cloud.
b. Worker public address: IP address of the server.
c. Config file path: Worker configuration file path of the server.
d. Worker tags: Key-value pairs that targets can use to determine where they should route connections.
Add the configuration file to the new directory.
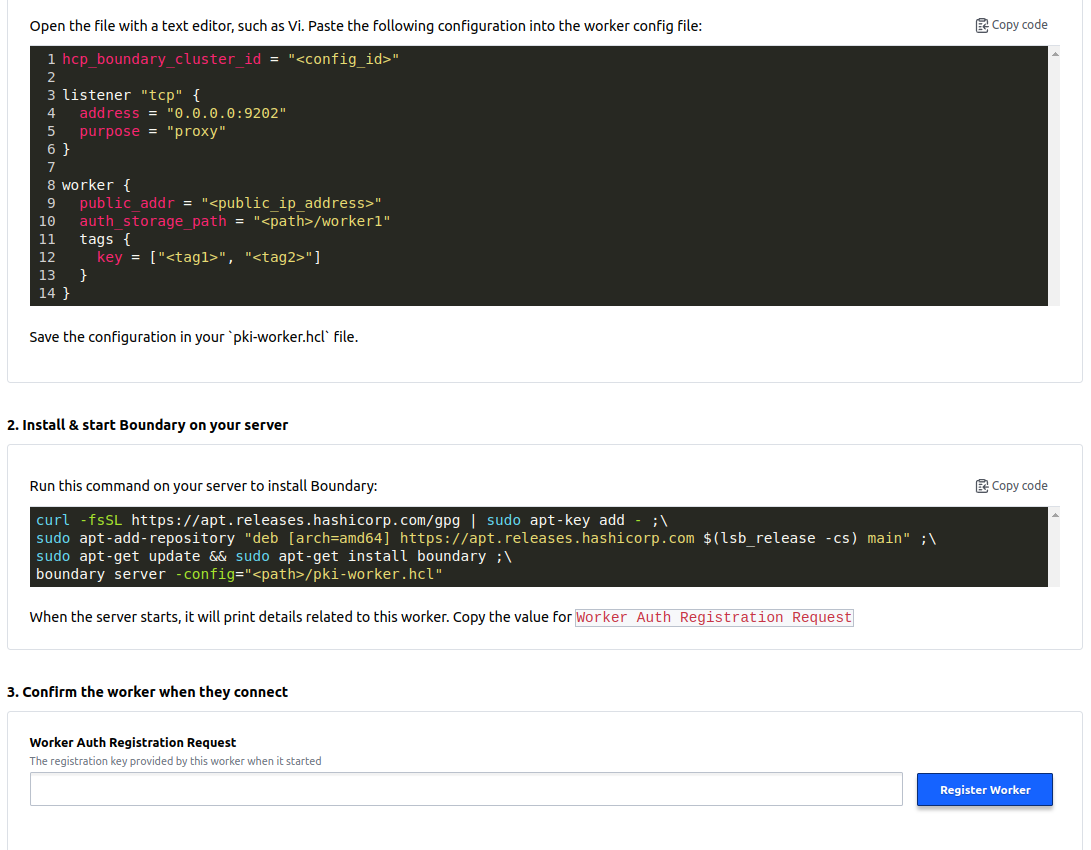
Copy the configuration data that is shown on the create worker page in the above config file.
Install and start the Boundary on the server.
a. Worker Auth Registration Request: Once installation is complete, the auth code can be copied and registered in the Boundary UI to register workers.
![Install and start the Boundary on the server.]()
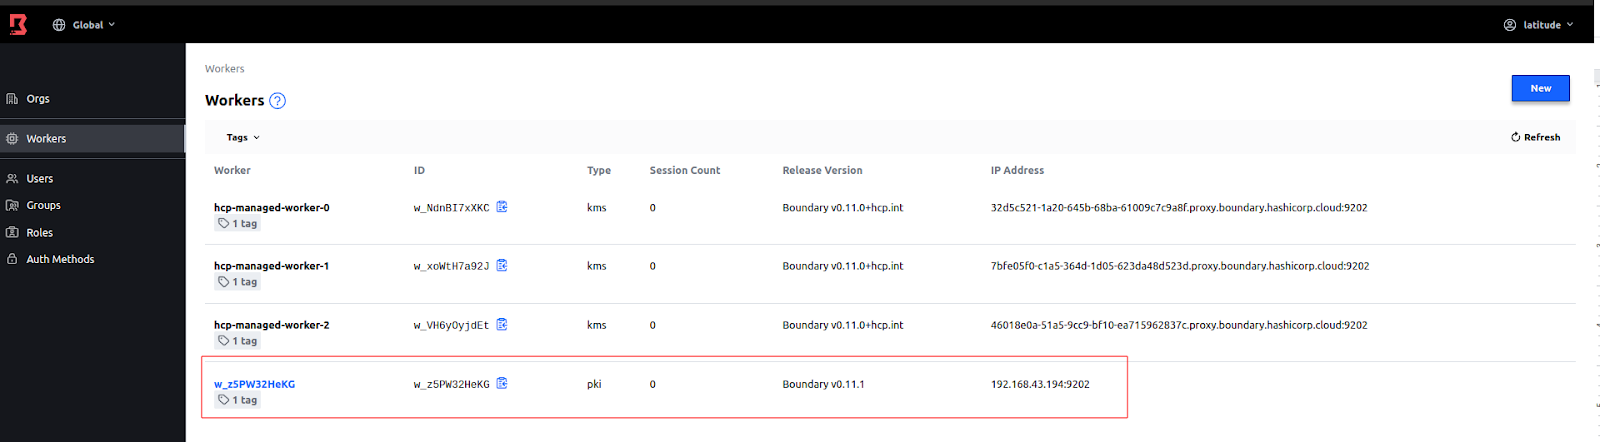
Once the worker is registered, it should start serving the request as per the target configured.
Connect to a Target
You are now ready to connect to the target and establish a session.
Follow the official links to install and authenticate the Boundary desktop application.
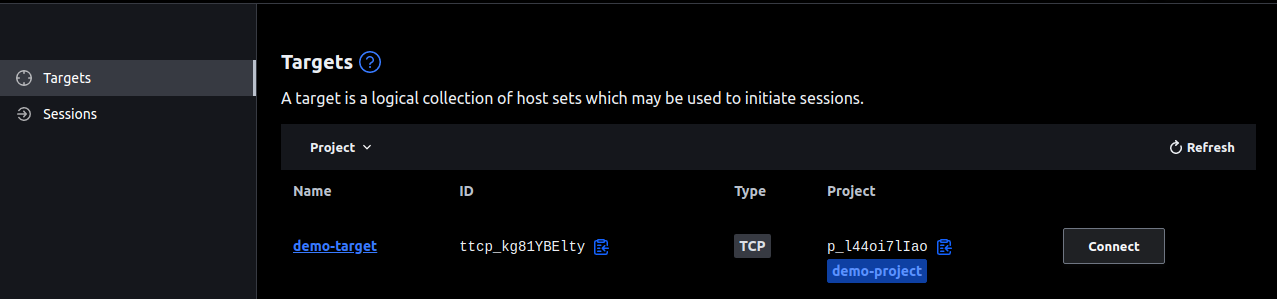
Connect to the Ubuntu target using the Boundary desktop.
![Connect to the Ubuntu-target using the Boundary desktop.]()
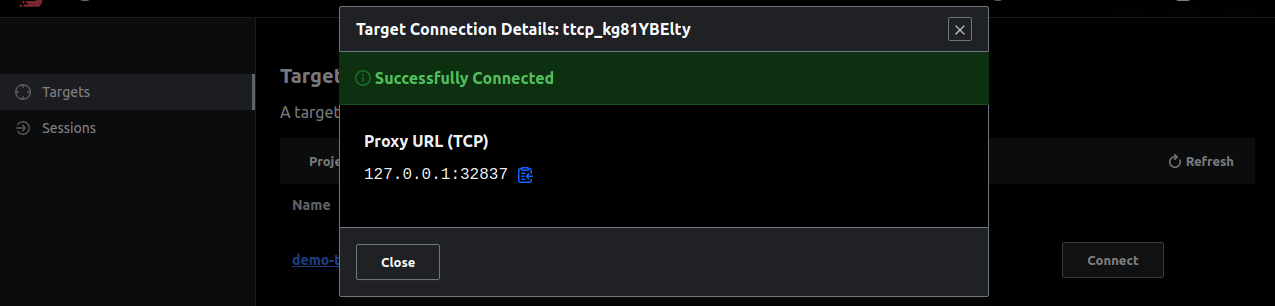
Connect to the target and use a proxy URL to access the application.
![Connect to the target and use a proxy URL to access the application.]()
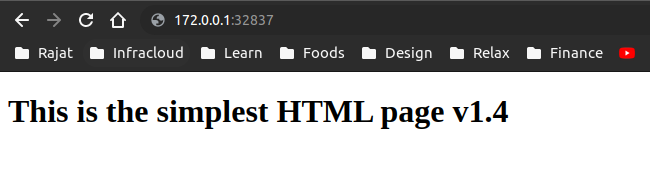
![Simplest HTML page]()
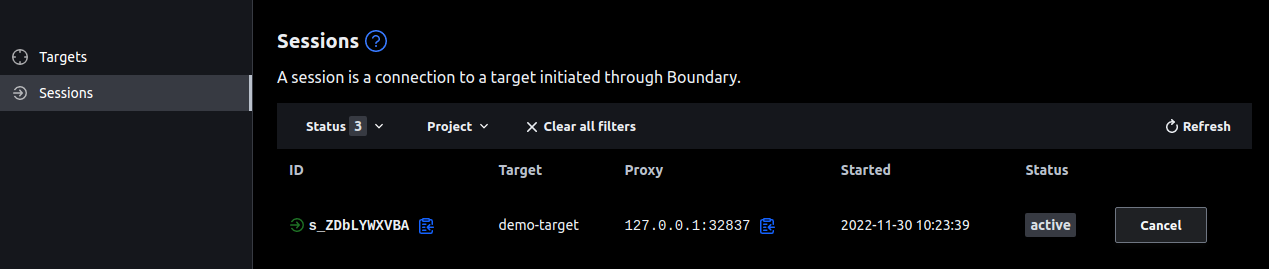
Target connection can be controlled and monitored from the Sessions tab.
![Target connection can be controlled and monitored from the Sessions tab.]()
Connect to the Ubuntu target using Boundary CLI.
boundary connect http -target-id=ttcp_Zs2vwkhbbg -- -
Summary
Since some applications hold critical information and are only meant to share in limited access control, it is very important to make sure that the sensitive data should be handled carefully.
In this article, we’ve learned how to expose privately hosted applications securely using a central and secure platform like HCP Boundary. We also learned about how to create multiple targets and maintain sessions of applications running on different networks.
Published at DZone with permission of Rajat Jain. See the original article here.
Opinions expressed by DZone contributors are their own.
Comments