How to Use IP Geolocation in React
To implement IP geolocation tracking in a React website, follow the steps in this tutorial. You will then be able to fetch geolocation data by IP address.
Join the DZone community and get the full member experience.
Join For FreeMost websites these days leverage the use of IP geolocation to accomplish various goals. It can be used to localize website contents or display the correct translations based on the web visitor’s geolocation. IP geolocation data can be retrieved from geolocation databases or web services just by using the web visitor’s IP address. Commonly used geolocation data includes the country, region, and city of the website visitor.
This tutorial demonstrates how to implement the IP geolocation service, using the service from IP2Location.io, into a website built with React. To accomplish this, you will need to install React, Node.js, Express, and IP2Location.io modules. Below are the brief descriptions of each component.
React will be used for front-end development, or you could call them web pages. It is a popular JavaScript library for building user interfaces that allows developers to build reusable UI components and manage the state of an application effectively.
Node.js is an open-source server environment that allows developers to run JavaScript on the server side. It's built on the V8 JavaScript engine and provides a powerful set of libraries and tools for building scalable and high-performance web applications.
Express is a popular Node.js web application framework that simplifies the process of building robust APIs, web applications, and other types of server-side applications. This is the framework used to communicate between the React and Node.js.
IP2Location.io is a geolocation service that provides real-time IP addresses to location data. It can be used to identify the geographic location, ISP, domain, usage type, proxy and other important information about an IP address, which can be useful for a variety of applications.
Step 1: Install and Set Up Node.js
Create a new project called "my-project". Inside the project folder, run the following command to initialize the Node.js project:
npm init
Step 2: Install Express Module
Next, we will install the Express package. Please run the following command to install it.npm install express
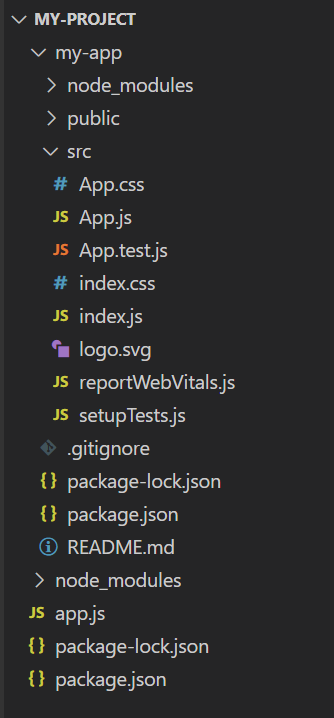
Once completed successfully, please create a new file named as app.js inside my-project folder.
Project directory should look like the below image.
Then, open the App.js file and enter the code below.
const express = require('express');

const app = express();

app.get('/', (req, res)=>{
res.json({description: "Hello My World"});
})

app.listen(9000, ()=>{
console.log("Server started at port 9000");
})
The code above creates a REST API with the endpoint "/". This Node project listens for REST API requests on port 9000. Upon receiving a request, it returns a JSON string containing a single key-value pair: {description: "Hello My World"}.
Run the below command to launch the code for testing.node app.js
Then, open a browser and enter "http://localhost:9000" if you are testing in the localhost environment. You should see the JSON string displayed on the screen.

Step 3: Implement IP Geolocation Using IP2Location.io
Stop the Node.js project with CTRL+C command. Then, execute the below command inside the my-project folder to install the ip2location.io Node.js package.npm install ip2location-io-nodejs
Once the installation has completed successfully, you can modify the app.js codes to add the geolocation features inside the project.
const express = require('express');
const {Configuration, IPGeolocation} = require('ip2location-io-nodejs');

const app = express();

app.get('/', (req, res)=>{
    let mykey = "YOUR_API_KEY";
    let config = new Configuration(mykey);
    let ipl = new IPGeolocation(config);
    let myip = req.query.ip;;

    ipl.lookup(myip)
    .then((data) => {
        // reply the data in json format
        res.json({"Country Name": data.country_name,
                    "Region Name": data.region_name,
                    "City Name": data.city_name})
    })
    .catch((error) => {
        // reply the error
        res.status(500).json({'Error found': data})
    });
})

app.listen(9000, ()=>{
    console.log("Server started at port 9000");
})
The code above will perform the IP geolocation using the visitor’s IP obtained from res.query.ip, when the user invokes the API call. It will then respond with 3 geolocation information, namely the country name, region name and city name back to the caller. Please note you will need an API key for the above code section to function, and you can subscribe with a free account. Also, in this example, I just return the country, region and city information, and you may visit the developer documentation if you wish to get other information, such as ISP, domain, usage type, proxy and more.
Below is the screenshot of the above implementation, assuming your IP address is from US, California, Mountain View:
Step 4: Set Up Front End Using React
Now, it’s time to set up the front. Inside the my-project folder, run the below command to create the react project named as my-app.npx create-react-app my-app
Inside the my-app project, install the axios package. This package is required to fetch the result from Node.js project.
npm install axios
Then, paste the below codes into the App.js file inside my-app folder.
import logo from './logo.svg';
import './App.css';
import React from "react";
import { useEffect, useState } from "react";
import axios from 'axios';

function App() {
    const [data, setData] = useState([]);

    useEffect(() => {
        axios.get('http://127.0.0.1:9000/')
        .then(response => {
            setData(response.data);
        })
        .catch(error => {
            console.error(error);
        });
    }, []);

    return (
        <div>
            <p>This is the result from IP2Location.io</p>
            <p>Country Name: {data.country_name}</p>
            <p>Region Name: {data.region_name}</p>
            <p>City Name: {data.city_name}</p>
         </div>
    );
};

export default App;
Please note that the code above utilizes the useState and useEffect hooks to fetch data from a REST API using the axios library. This data is retrieved from the backend (Node.js + Express) and displayed on the webpage.
Once done, you can run the react project by entering the below command:npm start
You should see the below screen if it works.
If you encounter a network error when running React, you may need to enable the cors package in your Node JS project. To do so, go back to your project and stop the node from running. Then, install cors using the following command:npm install cors
Once done, open the app.js file and add the cors package as below:
const express = require('express');
const {Configuration, IPGeolocation} = require('ip2location-io-nodejs');
const cors = require('cors')

const app = express();
app.use(cors());
Voila! You should now see the geolocation result displayed on the screen.
Conclusion
In conclusion, this tutorial provides an in-depth guide on how to successfully implement IP geolocation using IP2Location.io in a React built website. The tutorial not only covers the installation and setup of Node.js and Express, but also provides detailed instructions on how to install the IP2Location.io module. Furthermore, it includes a comprehensive walkthrough on how to set up the front end using React, including the use of the useEffect and useState hooks to fetch data from the backend.
By following the step-by-step instructions provided in this tutorial, you will not only be able to successfully implement IP geolocation in your React built website, but also gain a deeper understanding of its potential applications and benefits.
Opinions expressed by DZone contributors are their own.
Comments