How to Use Linux File Permissions and Ownership on Alibaba Cloud ECS
Everything ain't for everybody. Take a look at how to manage and set user permissions in Linux here.
Join the DZone community and get the full member experience.
Join For FreeElastic Compute Service (ECS) is an innovative cloud computing product offered by Alibaba Cloud for running web, email and database servers. ECS makes virtual servers affordable and easier to manage than expensive physical machines. This is due to their flexible billing options and a wide array of features available for system administrators.
Alibaba Cloud has an easy-to-use console that allows you to provision an ECS of your choice with the right Operating System (OS), latest CPUs, fast RAM and solid state drives(SSD). To deploy a Virtual Cloud Server with Alibaba Cloud, you can choose Linux because it is the most popular OS that is built with stability and security in mind.
Linux has a robust file system suitable for high-performance servers that support a multi-user environment for running websites and applications.
In this guide, we will take you through the process of understanding Linux file permissions and ownership so that you can regulate the level of interaction that users have with files and directories.
Prerequisites
- A valid Alibaba Cloud Account.
- An active Alibaba Cloud ECS instance running any Linux distribution.
- A non-root user with sudo privileges.
Default Ownership of Files and Directories
Most Linux distributions (e.g. Ubuntu, Centos, and Fedora) create a group with the same name when a new user is provisioned on the system.
By default, files and directories are owned by the user who created them on the Linux system. For instance, if the user 'james' creates a directory named test1, then, the ownership will be assigned to him.
To demonstrate this, SSH to your Alibaba ECS instance and create a directory named test1 using the command below:
$ mkdir test1To list the permissions and ownership of the directory, run the command below:
$ ls -lIn Linux, ls is a command that lists files on the standard output. When used with the -l flag, it lists files and directories in a long format including as many details as shown below:
$ drwxrwxr-x 2 james james 4096 Aug 19 11:50 test1As you can see above, the folder test1 is owned by user 'james' and a group with the same name.
Types of Owner-Based Groups in Linux File System
There are three types of owner-based groups/communities in a Linux system:
User
A user is a person who currently has an account on a Linux machine. Like in our case above, 'james' is a system user who currently owns 'test1' directory.
Group
A group is a collection of users. In Linux, you can create a group to organize users and make administration easier. For instance, if you are working on a project that requires a certain directory to be accessed by multiple users, you can add all the users to a single group for simplicity. Then, you can assign the right permissions to the shared directory.
Others
Apart from users and groups that have access to a file or a directory, all other persons that can access it are regarded as "others." In most cases, this means everybody else.
This is where Linux file permissions come in to prevent unauthorized users from accessing files/directories.
The types of owners/communities we have discussed above are represented with the below characters on a Linux system:
- u: Owner/User
- g : Group
- o: Others
- a : All users
Different Types of Linux Files Permissions
The 3 types of owners we have discussed above have 4 different types of file permissions that are represented with -, r, w and x bits. These permissions may be turned on and off as required.
No permission
With no permission at all, the user/group or outside world won't have any read, write or execute permissions to a file or a directory. This kind of permission is denoted by the - symbol or number 0.
Read Permission
Read permission is represented by letter r or 4. This gives the user or group access to read a file. In case of a directory, this permission allows a user or a group to list its content including sub-folders and files.
Write Permission
It is represented by letter w or numeric code 2. Anyone with write permission can modify the content of a file in a Linux system. Likewise, when the permission is granted to a directory, it allows a user to manage the files and sub-directories in that directory including adding, renaming and deleting files.
You can also modify the attribute of a directory if you have the write permissions (e.g. renaming it). The write permission requires the execute permission to be set as well; otherwise, it won't work.
Execute Permission
This permission is denoted with letter x or numeric code 1. It simply allows a user to enter a directory(cd to a directory) or make it the current working directory to access its contents. In other words, traverse the hierarchy of the directory. This permission is also known as passthrough.
In a file, execute permission means the user is allowed to run the code in a file.
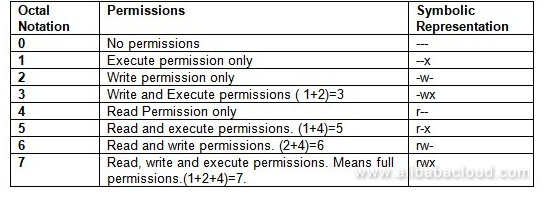
You may add up the numbers representing the file permissions. Similarly, you can use a combination of -, r, w, and x letters to assign multiple permissions to a directory/file to a user or group:
The table below summarizes Linux file permissions in both modes:
Reading File and Directory Permissions in Linux System
The Linux system uses the syntax below to denote permissions and ownership of files and directories:
[file type] [owner permissions] [group permissions] [other's permissions]The first part represents the file type. For instance, d represents a directory, - stands for a file while l denotes a symbolic link.
The second part represents permission for the owner. The third and fourth values take the permissions for the group and the world respectively.
Let us run an example using the test1 directory that we created above. If we list the content of the directory on our system using the ls -l command, we will get the below output:
drwxrwxr-x 2 james james 4096 Aug 19 11:50 test1Since the first character is a d, this means test1 is a directory. Next, the owner permissions are set to rwx (full permissions) and this is the same case for the group. However, permissions for the rest of the world are set to r-x. This means other people on the system have read and execute permissions but they can't modify the contents of the directory because the write permission is disabled.
Modifying File Ownership in Linux
Sometimes, it may be desirable to change the ownership of files and directories in a Linux system. You can do this using the chown (change owner) command.
To change the owner of a file or a directory in Linux, use the syntax below:
$ chown [user] [file|directory]For instance, to assign the ownership of the test1 directory that we created to a user named 'james', use the command below:
$ sudo chown james test1 To assign a new group to a file/directory, use the command below:
$ sudo chown :[group] [file|directory]For instance to assign the directory test1 to test_group, use the commands below;
First, create the group:
$ sudo groupadd test_groupThen assign the directory to that group:
$ sudo chown :test_group test1You may also change the owner and group of a file or directory simultaneously with a single Linux command using the syntax below:
$ sudo chown [user]:[group] [file|directory]Example:
$ sudo chown james:test_group test1Modifying File Permissions in Linux
Apart from changing the ownership of a file or a directory in Linux, you can also use the `chmod` command to assign the appropriate access permissions.
The syntax is shown below:
$ sudo chmod [permissions] [flags] [file|directory]You can either assign permissions with numeric numbers or use the -, r, w and x. The -R flag assigns permissions recursively to a directory and everything else on that directory including files and sub-directories.
You can use the + symbol to add permission or a - sign to take out permission from a file in combination with u (user), g (group), o (others) and an (all users) symbols.
For instance, to assign read permissions to the group that currently owns the test1 directory. Use the command below
$ sudo chmod g+r test1You can run ls -l to confirm the changes
Output:
drwxrwxr-x 2 james test_group 4096 Aug 19 11:50 test1Similarly to remove the permission, use the command below;
$ sudo chmod g-r test1Then:
$ ls -lOutput:
drwx-wxr-x 2 james test_group 4096 Aug 19 11:50 test1To add read, write and execute permissions for both the group and owner, use the syntax below:
$ sudo chmod go+rwx test1Then:
$ sudo ls -lOutput:
drwxrwxrwx 2 james test_group 4096 Aug 19 11:50 test1Apart from using the rwx letters, you can assign permissions using 3 digits (octal representation). The first integer represents the owner's permission. The second signifies permission for the group while the third digit defines permissions for the rest of the world.
Although we have created a table above to represent the permissions, we will repeat them here for clarity.
- r = 4
- w = 2
- x = 1
As we said above, you can add the numbers up to come up with 7 different types of permissions.
So to assign full permissions to the user, group and rest of the world to a file, use the command below:
$ sudo chmod 777 test1To assign full permissions to the owner of a folder and deny access to the group and the rest of the world, use the command below:
$ sudo chmod 700 test1To allow full permissions to the owner and assign read and execute permissions to the group and rest of the world, use the syntax below, this is common with website content;
$ sudo chmod 755 test1Conclusion
In this guide, we have covered the Linux file permissions and ownership. We have gone through the different type of owners in a Linux system and permissions that can be assigned to a user, group or the rest of the world.
You can use the knowledge in this guide to better manage your file system and create an additional layer of security to ensure that you have assigned the right ownership and permissions to your system files hosted on Alibaba Cloud.
Published at DZone with permission of Francis Ndungu. See the original article here.
Opinions expressed by DZone contributors are their own.
Comments