IBM App Connect Enterprise
Migration Use Case: IIB v10 Integration Node with Global Cache Configuration to IBM App Connect Enterprise v11/v12 Integration Node.
Join the DZone community and get the full member experience.
Join For FreeIntroduction
In this article, we discuss a couple of use cases of global cache and the steps required to migrate from IBM Integration Bus v10 (or even IIB v9) to IBM App Connect Enterprise v11 or v12. The demonstration below shows migration from IIB v10 to ACE v12 but the same would apply for ACE v11 too.
Use Case 1: A Global Cache Configured in a Single Integration Node
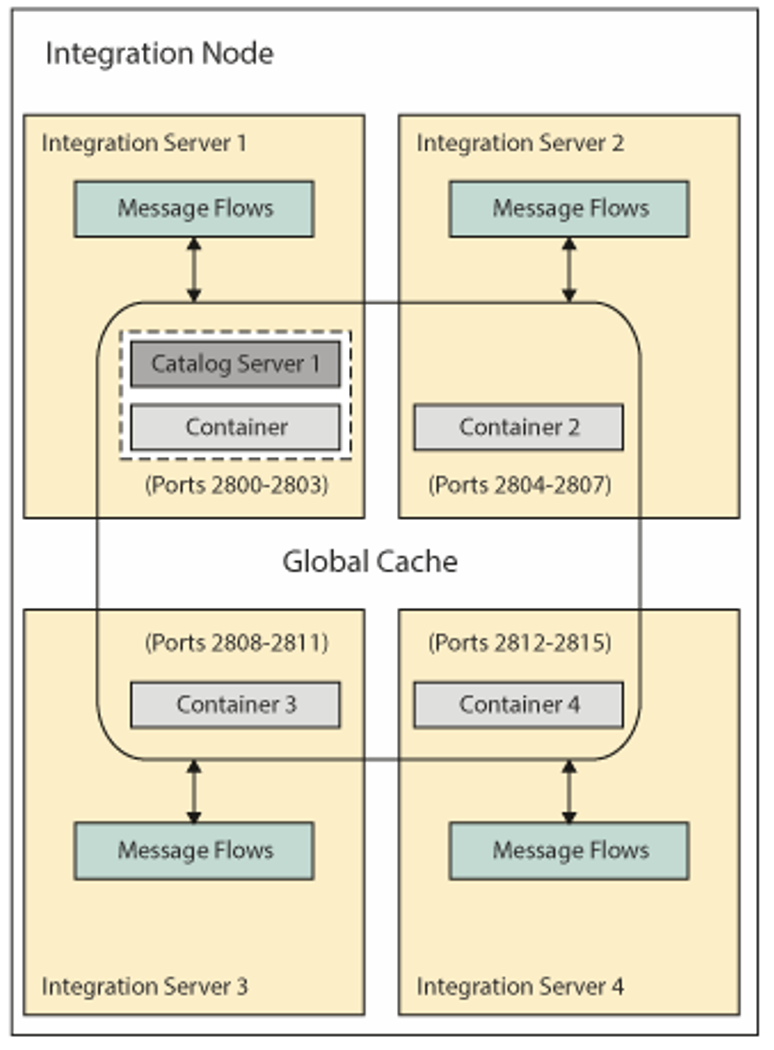
The first use case is a simple scenario where the global cache is used within a single integration node. To demonstrate the migration steps, we take an IIB v10 integration node with four integration servers.
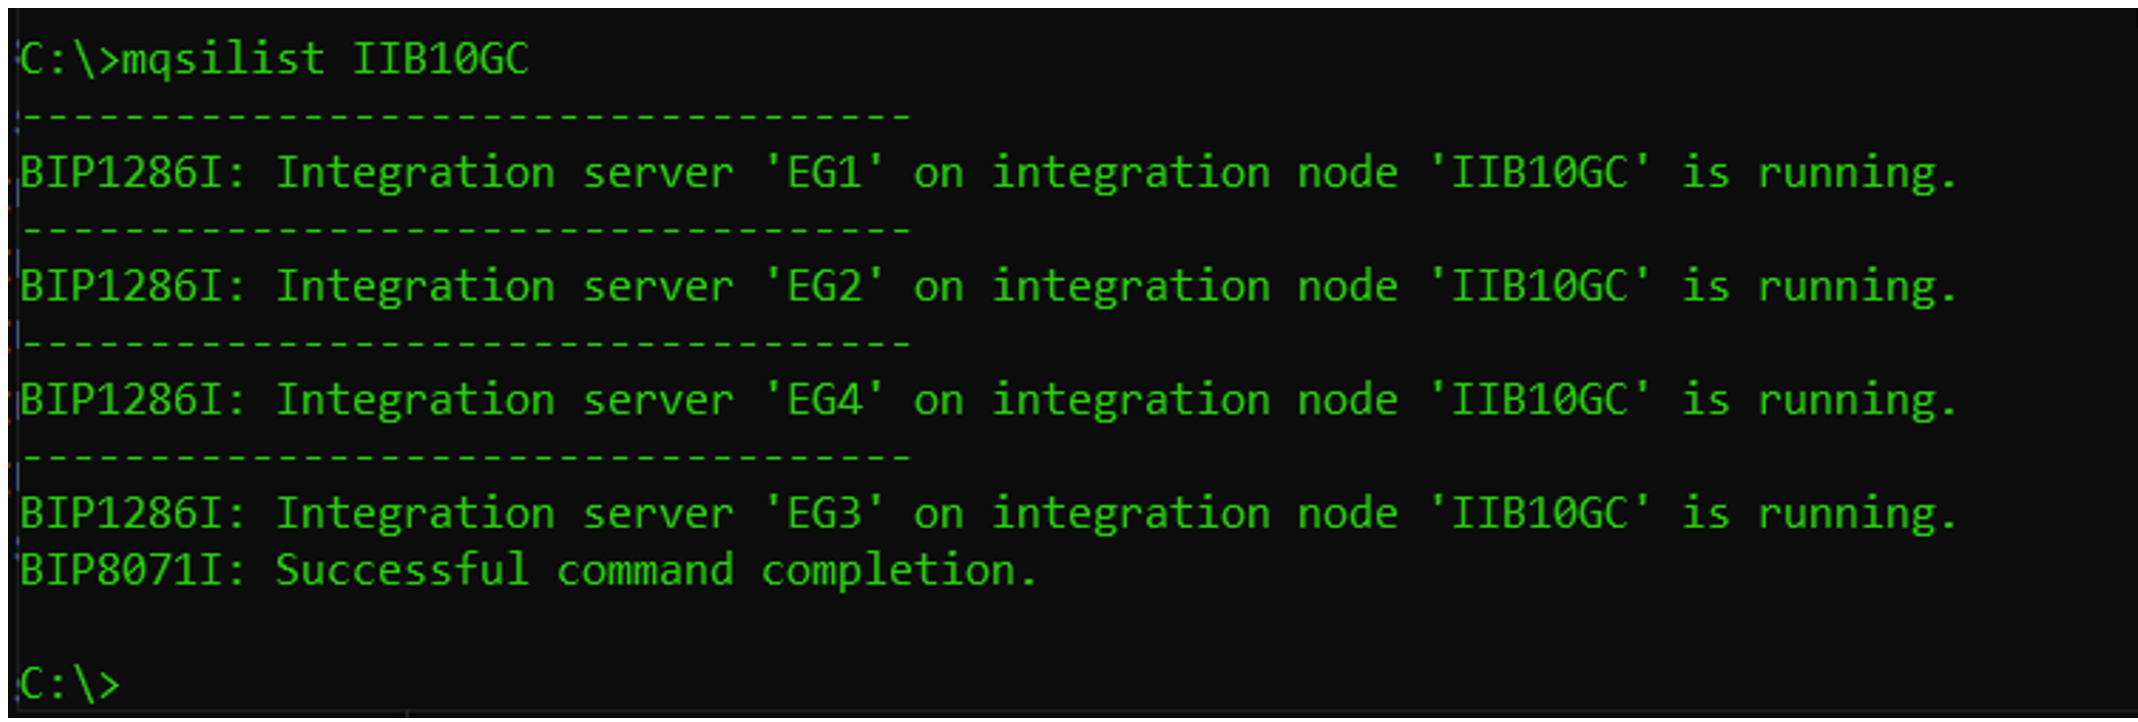
Integration node IIB10GC is configured to use a 'default' global cache policy which creates a topology of 1 catalog server and 4 container servers.
mqsichangebroker IIB10GC -b default
mqsireportbroker IIB10GC

Migration Steps
Stop the IIB v10 integration node.
mqsistop IIB10GC
Take a backup of the IIB v10 integration node.
mqsibackupbroker IIB10GC -d c:\temp
On the ACE v12 system, launch the command console (on Windows) or open a UNIX terminal and run mqsiprofile.
Copy the IIB v10 backup to the system where ACE v12 is running (it could be the same system or a different system).
Run mqsiextractcomponents to migrate the IIB v10 integration node configuration to ACE v12. In the following example, we are migrating the IIB10GC node backup to an ACE v12 integration node called ACE12GC.
mqsiextractcomponents --backup-file C:\temp\IIB10GC_210809_234304.
zip --source-integration-node IIB10GC --target-integration-node ACE12GC
After successful completion of the command, the necessary filesystem directory structure for the integration node gets created in the MQSI_WORKPATH.

In ACE v11/v12, the global cache configuration is held in server.conf.yaml at the integration server level (as against at integration node level in IIB v10 or before).
Post Migration Task
There are certain post-migration tasks that need to be performed to complete the configuration of the global cache after migrating through the mqsiextractcomponent command. For example, in IBM® App Connect Enterprise v11/v12, the global cache configuration involves setting the cacheServerName parameter, which must be unique in your global cache system.
The migrated global cache configuration is held in the overrides/server.conf.yaml of the respective integration server.
The migrated global cache stanza would look like this.
For the integration servers acting as a catalog server (you can identify it by looking at the property enableCatalogService highlighted below).
ResourceManagers:
  GlobalCache:
    cacheOn: true
    catalogClusterEndPoints: 'IIB10GC_172.20.32.1_2840:172.20.32.1:2843:2841'
    catalogDomainName: 'WMB_IIB10GC_172.20.32.1_2840'
    catalogServiceEndPoints: '172.20.32.1:2840'
    enableCatalogService: true
    enableContainerService: true
    enableJMX: true
    haManagerPort: 2841
    jmxServicePort: 2842
    listenerHost: '172.20.32.1'
    listenerPort: 2840
As a post migration task, the above needs to be modified to:
ResourceManagers:
GlobalCache:
cacheOn: true
cacheServerName: 'ACE12CatalogServer'
catalogClusterEndPoints: 'ACE12CatalogServer:172.20.32.1:2843:2841'
catalogDomainName: 'WMB_IIB10GC_172.20.32.1_2840'
catalogServiceEndPoints: '172.20.32.1:2840'
enableCatalogService: true
enableContainerService: true
enableJMX: true
haManagerPort: 2841
jmxServicePort: 2842
listenerHost: '172.20.32.1'
For the integration servers acting as container servers, the migrated stanza would look like below.
ResourceManagers:
  GlobalCache:
    cacheOn: true
    catalogClusterEndPoints: 'IIB10GC_172.20.32.1_2840:172.20.32.1:2843:2841'
    catalogDomainName: 'WMB_IIB10GC_172.20.32.1_2840'
    catalogServiceEndPoints: '172.20.32.1:2840'
    enableContainerService: true
    enableJMX: true
    haManagerPort: 2851
    jmxServicePort: 2852
    listenerHost: '172.20.32.1'
    listenerPort: 2850
As a post migration task, you need to modify this to (as highlighted below).
ResourceManagers:
  GlobalCache:
    cacheOn: true
    cacheServerName: 'ACE12CatalogServer3'
    catalogClusterEndPoints: 'ACE12CatalogServer:172.20.32.1:2843:2841'
    catalogDomainName: 'WMB_IIB10GC_172.20.32.1_2840'
    catalogServiceEndPoints: '172.20.32.1:2840'
    enableContainerService: true
    enableJMX: true
    haManagerPort: 2851
    jmxServicePort: 2852
    listenerHost: '172.20.32.1'
    listenerPort: 2850
Please note that you need to define a unique cacheServerName for the container server too. Note that the value of catalogClusterEndPoints will be the same for all the integration servers participating in the global cache configuration.
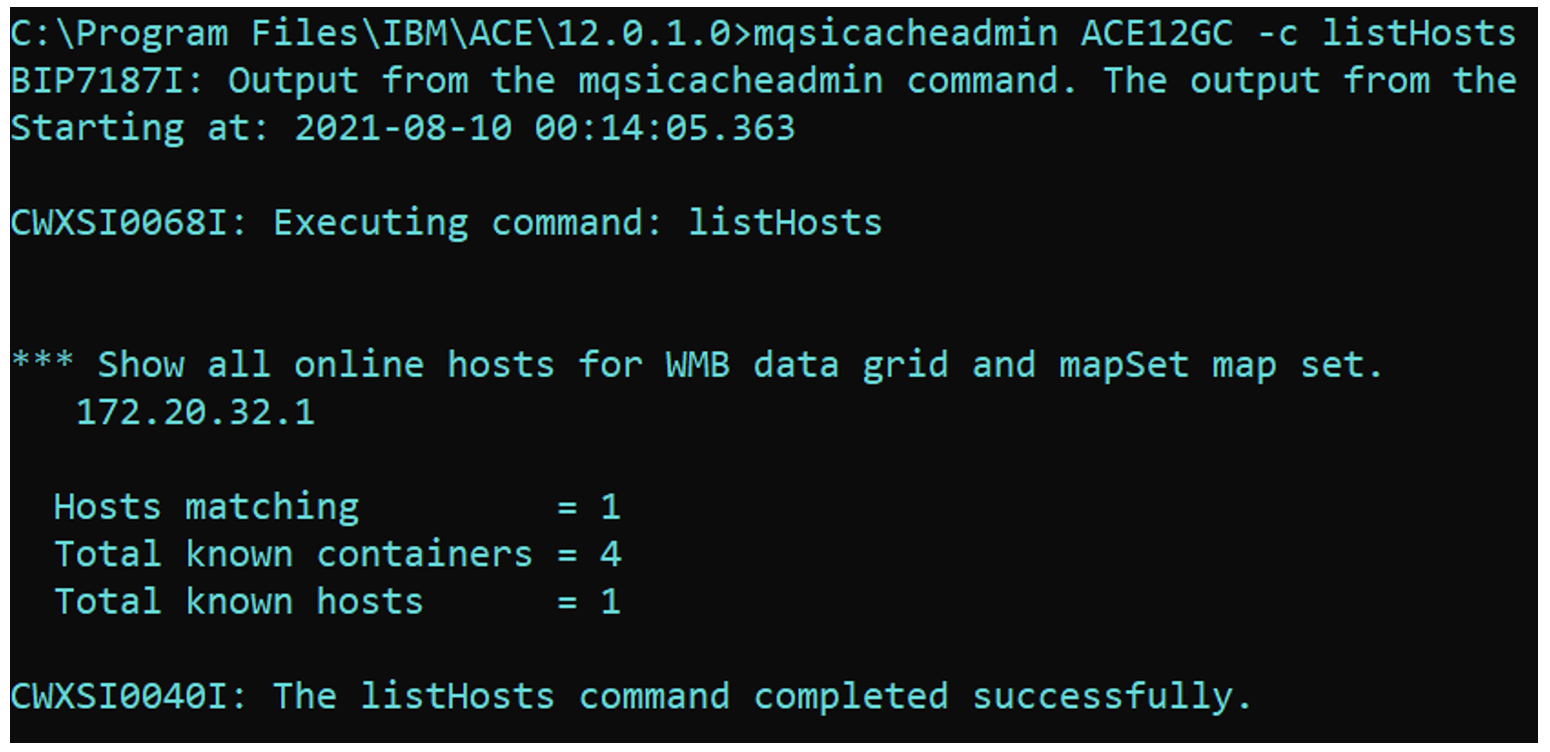
After making changes to all the integration servers, start the ACEV12GC integration node. Monitor the eventlog/syslog for global cache startup messages BIP7162, BIP7163, BIP7155. A successful migration would show the output as below.
Use Case 2: Global Cache Spanning Across Two Integration Nodes Using a Policy File

In this demonstration, we create two integration nodes on an IIB v10 environment.
For simplicity, we are showing only 2 integration servers per integration nodes, but this can be expanded to up to 4 container servers per integration node. It is recommended to have two catalog servers per integration node so that in case of maintenance or shutdown activity, the integration node can start on its own (as it requires at least 2 catalog servers to be available when the cache spans across multiple integration nodes).
Sample Policy at IIB v10. Each Broker hosts one catalog server.


In order to migrate these brokers to ACE v11/v12 and retain the same topology, perform the following steps.
Stop the integration nodes at IIB v10.
Take a backup of both the integration nodes.
C:\temp\migrationTest10to12>mqsibackupbroker IIB10GC1 -d .
BIP1252I: Creating backup file '.\IIB10GC1_210815_231439.zip' for integration node 'IIB10GC1'.
BIP8071I: Successful command completion.

C:\temp\migrationTest10to12>mqsibackupbroker IIB10GC2 -d .
BIP1252I: Creating backup file '.\IIB10GC2_210815_231447.zip' for integration node 'IIB10GC2'.
BIP8071I: Successful command completion.
Now, switch to the machine where you want to host your v11/v12 integration nodes.
Open the v11/v12 command console (or run mqsiprofile on Linux/UNIX platform).
Run the mqsiextractcomponents command to perform extract migration of each of the IIB v10 node backups to v11/v12.

C:\Program Files\IBM\ACE\12.0.1.0>mqsiextractcomponents --backup-file
C:\temp\migrationTest10to12\IIB10GC1_210815_231439.zip --source-integration-node IIB10GC1 --
target-integration-node ACE12GC1
BIP8469I: Version '10.0' backup file supplied.
BIP8471I: Loading configuration for source integration node 'IIB10GC1'.
BIP8389W: Property 'sslProtocol' for the node wide httplistener 'HTTPSConnector' is no longer
available. The property was configured with value 'TLS', which was not the default.
BIP8470I: Loading configuration for integration server 'EG1'.
BIP8470I: Loading configuration for integration server 'EG2'.
BIP8473I: Creating target integration node 'ACE12GC1'.
BIP8071I: Successful command completion.

C:\Program Files\IBM\ACE\12.0.1.0>mqsiextractcomponents --backup-file
C:\temp\migrationTest10to12\IIB10GC2_210815_231447.zip --source-integration-node IIB10GC2 --
target-integration-node ACE12GC2
BIP8469I: Version '10.0' backup file supplied.
BIP8471I: Loading configuration for source integration node 'IIB10GC2'.
BIP8389W: Property 'sslProtocol' for the node wide httplistener 'HTTPSConnector' is no longer
available. The property was configured with value 'TLS', which was not the default.
BIP8470I: Loading configuration for integration server 'EG1'.
BIP8470I: Loading configuration for integration server 'EG2'.
BIP8473I: Creating target integration node 'ACE12GC2'.
BIP8071I: Successful command completion.
Post Migration Task
Perform the post-migration task to configure the global cache.
On ACE12GC1, modify the global cache stanza for the catalog server to look like below.
Note:catalogClusterEndPoints and catalogServiceEndPoints should be updated with both the catalog server's information (comma separated list) so that the two catalog servers know about each other. If there are, for example, 4 catalog servers in the global cache topology, then catalogClusterEndPoints and catalogServiceEndPoints should contain details of all 4 catalogs.
ResourceManagers:
  GlobalCache:
    cacheOn: true
    cacheServerName: 'ACE12GC1CatalogServer'
    catalogClusterEndPoints:
'ACE12GC1CatalogServer:localhost:3003:3001,ACE12GC2CatalogServer:localhost:3023:3021'
    catalogDomainName: 'WMB_IIB10GC1_localhost_3000_IIB10GC2_localhost_3020'
    catalogServiceEndPoints: 'localhost:3000,localhost:3020'
    enableCatalogService: true
    enableContainerService: true
    enableJMX: true
    haManagerPort: 3001
    jmxServicePort: 3002
    listenerHost: 'localhost'
    listenerPort: 3000
On ACE12GC2, the global cache stanza for the catalog server should look like below.
ResourceManagers:
  GlobalCache:
    cacheOn: true
    cacheServerName: 'ACE12GC2CatalogServer'
    catalogClusterEndPoints:
'ACE12GC1CatalogServer:localhost:3003:3001,ACE12GC2CatalogServer:localhost:3023:3021'
    catalogDomainName: 'WMB_IIB10GC1_localhost_3000_IIB10GC2_localhost_3020'
    catalogServiceEndPoints: 'localhost:3000,localhost:3020'
    enableCatalogService: true
    enableContainerService: true
    enableJMX: true
    haManagerPort: 3021
    jmxServicePort: 3022
    listenerHost: 'localhost'
    listenerPort: 3020
Similarly, for container servers, the global cache stanza in server.conf.yaml would be like below for the ACE12GC1 integration node.
ResourceManagers:
  GlobalCache:
    cacheOn: true
    cacheServerName: 'ACE12GC1Container1'
    catalogClusterEndPoints:
 'ACE12GC1CatalogServer:localhost:3003:3001,ACE12GC2CatalogServer:localhost:3023:3021'
    catalogDomainName: 'WMB_IIB10GC1_localhost_3000_IIB10GC2_localhost_3020'
    catalogServiceEndPoints: 'localhost:3000,localhost:3020'
    enableContainerService: true
    enableJMX: true
    haManagerPort: 3005
    jmxServicePort: 3006
    listenerHost: 'localhost'
    listenerPort: 3004
And for the container server on ACE12GC2, the server.conf.yaml should have a stanza as shown below.
ResourceManagers:
  GlobalCache:
    cacheOn: true
    cacheServerName: 'ACE12GC2Container1'
    catalogClusterEndPoints:
 'ACE12GC1CatalogServer:localhost:3003:3001,ACE12GC2CatalogServer:localhost:3023:3021'
    catalogDomainName: 'WMB_IIB10GC1_localhost_3000_IIB10GC2_localhost_3020'
    catalogServiceEndPoints: 'localhost:3000,localhost:3020'
    enableContainerService: true
    enableJMX: true
    haManagerPort: 3025
    jmxServicePort: 3026
    listenerHost: 'localhost'
    listenerPort: 3024
As you may have noticed, catalogClusterEndPoints and catalogServiceEndPoints have the same values across all the catalog and container integration servers. The localhost can be replaced by the actual hostname/IP where each of the integration nodes are running.
Start both the integration nodes (ACEV12GC1 and ACEV12GC2) together and watch the syslog for BIP7162, BIP7163 & BIP7155 that indicates successful start-up of the global cache components.
Published at DZone with permission of Amar Shah. See the original article here.
Opinions expressed by DZone contributors are their own.
Comments