Installing and Debugging an Apereo Cas Application
Installing and debugging an Apereo CAS application: A step-by-step guide to implement a custom authentication handler in Apereo CAS.
Join the DZone community and get the full member experience.
Join For FreeThe Central Authentication Service (CAS) is a single sign-on software application protocol. The duty of the CAS is to permit a user to access multiple applications while providing their credentials only once to a centralized CAS Server. It also allows web applications to authenticate users without gaining access to a user's security credentials, such as a password.
Apereo CAS
Apereo CAS is an open-source implementation of above mentioned CAS protocol by the Yale University laboratory. Apero CAS is not only a simply authentication software but also it has got some versatile features such as:
- Providing support for multiple authenticating protocols such as OAuth2, SAML, OpenID.
- Delegating authentication to external providers such as MS ADFS, Google, and Twitter.
- Support for multifactor authentication.
The purpose of this article and other follow-up articles is to provide a simple and specific step-by-step guide to implement some of the features in Apereo CAS (Hereafter, it will be referred to as CAS), hoping it will help a newbie to quickly familiar with the topic. For more additional details, you can access Aspero CAS official documentation available here.
First, a Bit More Understanding About CAS
The CAS server is a Java-based application built on the Spring Framework whose primary responsibility is to authenticate users and grant access to CAS-enabled services, commonly called CAS clients, by issuing and validating tickets. An SSO session is created when the server issues a ticket-granting ticket (TGT) to the user upon successful login. A service ticket (ST) is issued to a service at the user’s request via browser redirects using the TGT as a token. The ST is subsequently validated at the CAS server via back-channel communication.
Some of the CAS Terminologies
- “Client” refers to the end-user and/or the web browser
- “CAS Client” refers to the software component integrated with a web application and interacts with the CAS server via CAS protocol.
- “Server” refers to the Central Authentication Service server.
- “Service” refers to the application the client is trying to access.
Configuring and Deploying the CAS
In this article, we will see how to configure and get the CAS server up and running in an easy-to-follow step-by-step guideline.
Installation Requirements
Java
CAS at its heart is a Java-based web application. Therefore, before deployment, you will need to have the required JDK version installed. Activities described in the series of these articles were tested using CAS version 6.0.5 and CAS 6.1.7. Both those CAS versions need JDK 11 to be installed.
Build Tools
Maven or Gradle
War Overlay Installation
CAS documentation suggests we use the “WAR overlay installation” method. This means you do not download the CAS codebase and build the WAR file from that source. Instead, you will download provided starter project and configure it to build with the latest CAS version.
Advantages of overlay installation:
- Upgrading will be easy by simply adjusting the build script to download the newer CAS release.
- We host only our own customization code. Not the entire bulky CAS source code.
Steps for the Installation:
- The first step is cloning the war overlay project into your local directory. Go to the following link and clone the starter project: https://github.com/apereo/cas-overlay-template/tree/6.1
- Go to the folder which contains the source of the project. You can see some build files and property files. You can modify the “gradle.properties” file to use desired CAS version by changing the following property of the “gradle.properties” file: cas.version=6.1.7
- Copy the configuration files which are in “{project root folder}/etc” to “/etc/cas/config” folder. For this, use the following command in the project root folder (Open the command prompt, then go to the project root folder and execute the following command): gradlew copyCasConfiguration
![]()

Above Gradle task create “/etc/cas/config” folder and copy those configuration files.
- The next step is to create a keystore file. For this, go to the project root folder on the command prompt and use the following command: gradlew createKeystore
![]()
- If you want to change the CAS server name, you can change it in the “etc\cas\config\cas.properties” file: cas.server.name=https://cas.example.org:8443
- If you want to change the context name, add the following properties in the “etc\cas\config\cas.properties” file. For example, to change it to a context called “auth”:

- cas.server.prefix=${cas.server.name}/auth
- server.servlet.context-path=/auth
- cas.sessionReplication.path=/auth/
- If you want to change the default username/password(casuser/Mellon), add/change following property in the “etc\cas\config\cas.properties” file: cas.authn.accept.users=myusername::mypassword
- Do not forget to add your server name to the “etc\hosts” file: 127.0.0.1 cas.example.org
- Everything needed to start the server is done now. Go to the project root folder in the command prompt console and give the following command: gradlew run
![]()
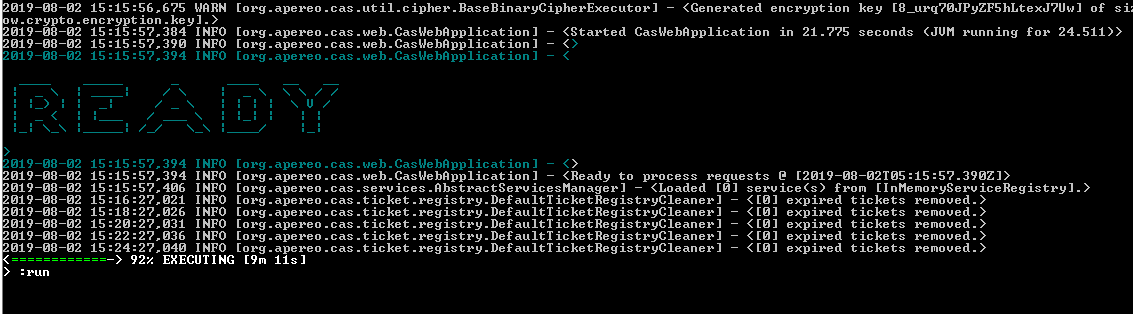
- Just look into the console to make sure everything goes smoothly. Once it comes to ready mode, it is ready to accept requests, as in the following screenshot.
![Example screenshot.]()
- Open your browser and use the URL as you set in your config file above to access the login page: https://cas.example.org:8443/o/login

You should be able to open up the login page. You can try your user name/password you set in the config file, or if you did not change it default username/password pair “casuser/Mellon.” You must be able to log in and log out successfully.
Note: CAS comes up with an embedded tomcat container. That is why we were able to build it and run it directly. If you want to deploy CAS inside a separate servlet container, you can do so by building the war file and deploying it.
Setting up Remote Debugging for a Cas Application in Eclipse IDE
As the next step, we will see how we remotely debug a CAS application on eclipse IDE when running on embedded mode.
Steps for Debugging
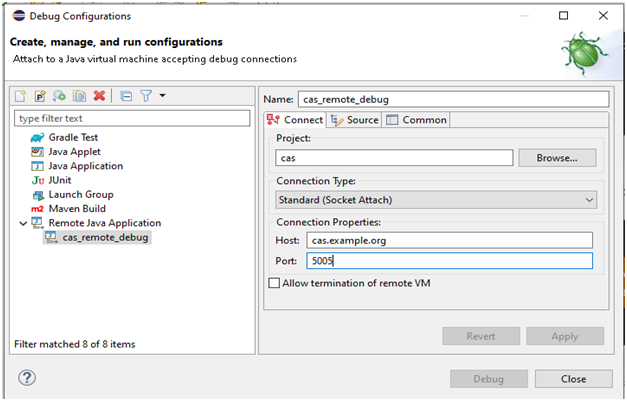
- First, set up remote debug configurations on eclipse. Go through the following eclipse menu:
- Debug --> Debug Configurations --> Remote Java Application
- Enter your hostname and port (CAS debugger listening on port 5005).
- Go to the project root folder on the command prompt console and give the following command: gradlew debug
![]()
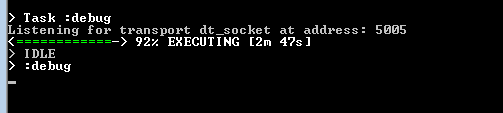
- This command will start the Gradle compilation task first, and after the Gradle compilation task is completed, it will start Gradle debug task. Once it starts to listen at port 5005, it goes for waiting until we start the debugger on eclipse with the following message:
![Message screenshot.]()
- Then, go back to eclipse IDE and go to previously set up debug configurations and run the debugger.
- Now, on the command prompt, you can see the Gradle debugger task starts to continue again and then go to ready mode. You can set up breakpoints on the code where ever the place you want to debug.

We have got our CAS application up and running now. In another article, we'll see how to implement a custom authentication handler with our CAS application.
Opinions expressed by DZone contributors are their own.
Comments