Install Anypoint Flex Gateway on the Kubernetes as an Ingress Controller in Connected Mode - Part 3
In part three of the series learn how to install Anypoint Flex Gateway on the Kubernetes as an Ingress Controller.
Join the DZone community and get the full member experience.
Join For FreeIn my last blog, we have a walkthrough on how to set up Flex Gateway on Minikube as an Ingress controller in the Connected Mode and how to publish the APIs to the Flex Gateway and access those APIs via Ingress on HTTP.
In this blog, we will walk through how to implement TLS on the ingress and enable ingress to receive only HTTPS traffic. Before we start implementing the TLS on the ingress, we will be requiring the private key and public key in base64 format. Either we can use a Self Signed certificate or a CA-signed certificate.
Configure TLS Context for Flex Gateway as a Kubernetes Ingress Controller
To configure the TLS context for Flex Gateway, create a new resource using a YAML configuration file with your TLS context details.
apiVersion: gateway.mulesoft.com/v1alpha1
kind: PolicyBinding
metadata:
  name: ingress-https-tls
spec:
  targetRef:
    kind: Selector
    selector:
      kind: ApiInstance
  policyRef:
    name: tls
  config:
    certificate:
      key: |
        -----BEGIN PRIVATE KEY-----
        MIIEvwIBADANBgkqhkiG9w0BAQEFAASCBKkwggSlAgECCoIBAQCQPQehheyBAToB
        dj+7ylbERO3zfGqvGjlAb3uW1xGx72daH4Ulnr7uThtbRi1jZCy44+eKcsWoDdQ+
        F4iGvOxfNOecekq8xVqARwwltRcLbaRyFkTE85oiiff3JIkomXd5nRgZNUOQH5CG
        Xkc7WLsLqQLNhCLq1LHCxY5ag/SNjmcXopCzJOM2RWYXQSWegrz9TvtFipPdVYMU
        RGZn6ZVokCKQrlvxX0AqsrXcvkegqe0YoRPPLHWzt35KO8REadqn9tyc367xAJ/J
        VPTFYn9rdzOQE4LKSzEuSt2jV6EJFg0atScHNX1+3VIeMMHvVc/m97+MFIcybe48
        CYdejtEdAgMBAAECggEBBIreR0+KugYGIUuxBnGNwHXci1/mRGxrif1wmAPE8uNo
        RBIv0KhEqzySdKIu8ZoEo04rFgxkrco77kENtUNL9yM+s1MjJnuSYqyoOpi/Pf2h
        xTaWHAWnJ5njTZpjUa6F+rYang3/CxpiWWoUsO4BYqw6P1mQw3Fl7/M+8uxQqQ3z
        O5GWOo5P5eNiYFmz65LBkHFwwf6WR2pQjzTEpsn8y0uAjxaz7vfNtG6hRh7QP6rb
        9HV9gM9092zI4vZvqe8f2E0vzPaEFD7b413K3DslXLDLJfWhaZ0BkfUtSisQlQkI
        6u7FR9744iwFvY2UEpKZ2xuKUIUv2d7ZOdOIvhTaGiECgYEA3ee7ltkksonS13sO
        EUI2E/rJnBRkbTEIZK+GeTJRWJ4kpJ6MvBv4MbIMYTLme5Ciee/SD0xc+E8CCCnE
        ueKLopyokl1imNCvSjbtTooLHBi0xuPjXibCmykLRfH2xISBWAl11+AJCZr3OxYc
        nb0QKnT7d/UhAfI7gV3bEkf/klUCgYEApmZnb5czTnocuy7HUWcyWBWL9o3iZiy1
        h6IRV19pC+dcXkQLAKLwm7048LZ98HnX6V/4m3LjAGgrHEL3HCyW1YKA0olmnQFr
        1t6WPAqfpOVWEp1l3Cy5d8VNGQQhhflvDVifGioUYnC+CulJI/yZ4DiQzIf0NcMv
        S104OYeHW6kCgYBQZyCfPbqAPlP444trUXRKtPnM5c+liLij0r2EuGilFVftlc0k
        c3Xwe7Tkmw7MAtH8IJsaE+8zwVzZHFk9iQpTNzQVJHw/po189H3zkS0JVyJZVkUR
        3jVxBuQgydVBy0kaXwMl3vUnV9DwxchElzZ+S7i59EWrcNuCukEgVJoTqQKBgQCT
        9OAqIBZ1xCyB37FI12qzWc1O2JAja8Opq1iiCOsds4W1J+lkkn1A7XqQxqOqzJxS
        yRgEGJ5xgS47/es9eQRRKq4jBhtgpZ/euaJ6FrQm6eijuqKUqIvtTFkmUj8Aom61
        PkSR/jKL6VWB3Da1seicr49I3eYuW7RU3bmdpb2cqQKBgQDHZ7Ygy7i7KHJIjvaf
        Aox5+P5yIDZlPefXYUWZIAsrpKMXYXdL1jYSfezdKsAXUqpBwHxsGiblXeKGy786
        Pp1Lxg2cfz58G++BvXLswmeT1OSwJzPQdjTVs5ALSiXzWaxTNVVO9FKWxjj1Udsi
        nyqTt5P03J8obJd8ZCkRfKfgOg==

        -----END PRIVATE KEY-----

      crt: |

        -----BEGIN CERTIFICATE-----
        MIIDezCCAmOgAwIBAgIES1fTLTANBgkqhkiG9w0BAQsFADBuMRAwDgYDVQQGEwdV
        bmtub3duMRAwDgYDVQQIEwdVbmtub3duMRAwDgYDVQQHEwdVbmtub3duMRAwDgYD
        RRKEwdVbmtub3duMRAwDgYDVQQLEwdVbmtub4duMRIwEAYDVQQDEwlsb2NhbGhv
        d3QwHhcNMjIwNzIzMTYzODMyWhcNMjMwNzE4MTYzODRyWjBuMRAwDgYDVQQGEwdV
        bmtub3duMRAwDgYDVQQIEwdVbmtub3duMRAwDgYDVQQHEwdVbmtub3duMRAwDgYD
        VQQKEwdVbmtub3duMRAwDgYDVQQLEwdVbmtub3duMRIwEAYDVQQDEwlsb2NhbGhv
        c3QwggEiMA0GCSqGSIb3DQEBAQUAA4IBDwAwggEKAoIBAQCQPQehheyBAToBdj+8
        ylbERO3zfGqvGjlAb3uW1xGx72daH5Ulnr7uThtbRi1jZCy44+eKcsWoDdQ+F4iG
        vOxfNOecekq8xVqARwwltRcLbaRyFkTE85oiiff3JIkomXd5nRgZNUOQH5CGXkc7
        WLsLqQLNhCLq1LHCxY5ag/SNjmcXopCzJOM2RWYXQSWegrz8TvtFipPdVYMURGZn
        6ZVokCKQrlvxX0AqsrXcvkegqe0YoRPPLHWzt35KO8REadqn9tyc789xAJ/JVPTF
        Yn9rdzOQE4LKSzEuSt2jV6EJFg0atScHNX1+3VIeMMHvVc/m97+OFIcybe48CYde
        rtEdAgMBAAGjITAfMB0GA1UdDgQWBBQh7LSSk7fGmYUczJFK+OVUgNezDTANBgkq
        hkiG9w0BAQsFAAOCAQEAEIZW9qcubdPpfZchsUx8NF/VnttEmfOuSTmBBTn+THlH
        IRZBx/JcZdX1iippe0VfIh5t3t0ty1KrQApzhvRsZCU22jD4D7eL4NcTMKTj8pFf
        snyu3125YsUnM0ckq7J5afpSMralmA1nVHHqrxS4YbSXJVXoEqFbzWzBDdxC61cO
        wdxHbJHpPWZd6IS6qUhF8PXAW4fCZaFpY10axwhkVffjr/6zSK18//XzByOkxLu+
        6i9SM4W6qQYEx+eN2GVV4FHq/9zKB20iiKSNiN1gFXeuddcglmsW1BOr1BBUKiFw
        rEitEEvTanHDUdl4rL0HaTM1deajqjDGKSq13DVuSp==

        -----END CERTIFICATE-----
    alpn:
      - http/1.1
      - h2
    minversion: "1.1"
    maxversion: "1.3"
    ciphers:
      - TLS_ECDHE_ECDSA_WITH_AES_128_GCM_SHA256
      - TLS_CHACHA20_POLY1305_SHA256
      - TLS_ECDHE_RSA_WITH_AES_128_GCM_SHA256
      - TLS_ECDHE_RSA_WITH_CHACHA20_POLY1305_SHA256
      - TLS_ECDHE_ECDSA_WITH_AES_128_CBC_SHA
      - TLS_ECDHE_RSA_WITH_AES_128_CBC_SHA
      - TLS_RSA_WITH_AES_128_GCM_SHA256
      - TLS_RSA_WITH_AES_128_CBC_SHA
      - TLS_ECDHE_ECDSA_WITH_AES_256_GCM_SHA384
      - TLS_ECDHE_RSA_WITH_AES_256_GCM_SHA384
      - TLS_ECDHE_ECDSA_WITH_AES_256_CBC_SHA
      - TLS_ECDHE_RSA_WITH_AES_256_CBC_SHA
      - TLS_RSA_WITH_AES_256_GCM_SHA384
      - TLS_RSA_WITH_AES_256_CBC_SHA
Note - You need to replace your certificates with your own private key and public certificate.
We need to save the above configuration in YAML (i.e., ingress-tls.yaml) and execute the below command to apply TLS.
kubectl apply -f ingress-tls.yaml --namespace gatewayThis command will give the below output

Now, we have successfully applied TLS on the ingress.
Publish the APIs to the Flex Gateway
In this case, we will be selecting “mule-flex-gw” that has been created during tutorial 1 and click “Next”. Now, we can Select API from Exchange or Create a new API. In this case, we will be selecting Create new API and provide a few details like Name and select Asset types as an HTTP API and clicking Next.

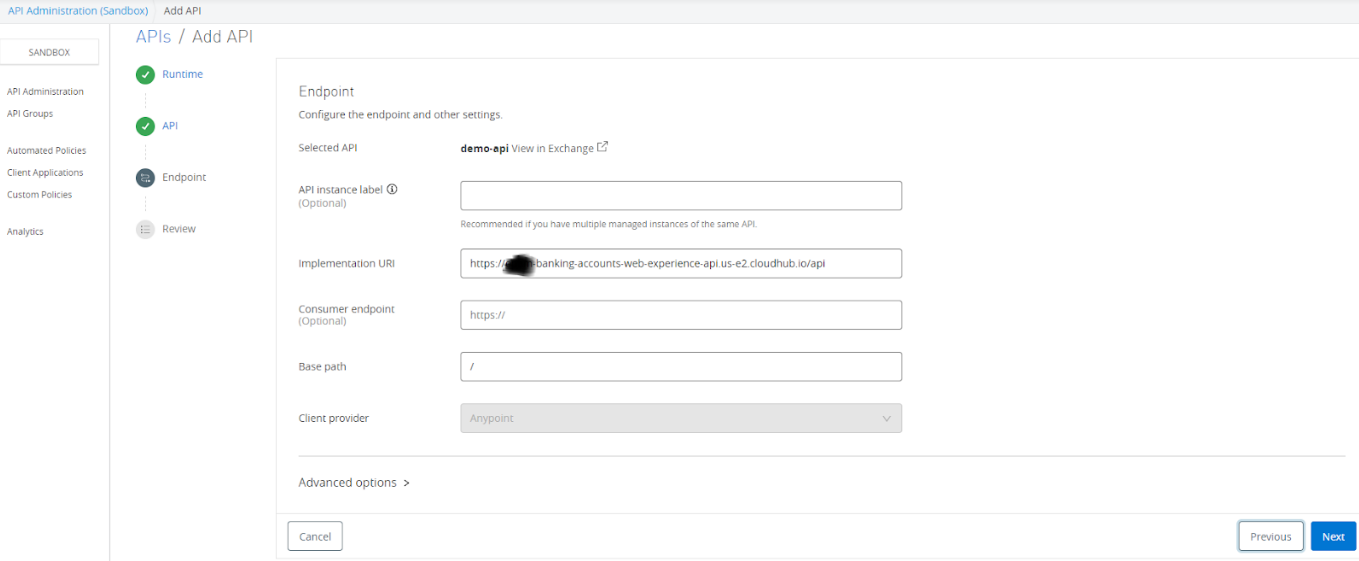
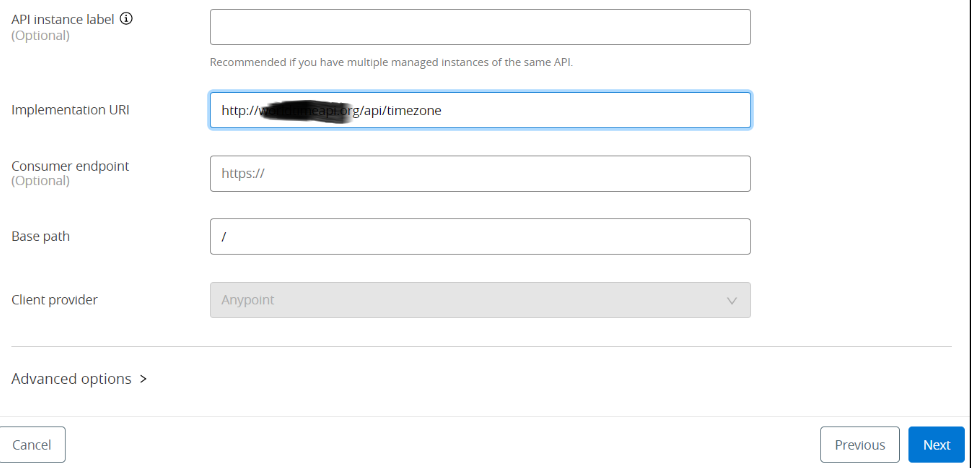
After clicking the Next, it will open a new window, and there few important details that need to provide like Implementation URI (i.e. URL of our API implementation).
Note - Make sure the Implementation URL must be accessible from Minikube where we have installed Flex Gateway. We need to take care of appropriate firewall rules and ensure that there is connectivity to implementation URLs from Minikube.

In the Advanced options, provide the port number 443 and will be using HTTPS protocol.

After clicking Next, it will navigate to the review console. We can review all the information and click on the Save & Deploy button.

After the API is successfully published to Flex Gateway, we can see API status to Active in the API Manager console.

This means API is successfully published to the Flex Gateway.
Accessing APIs Published to Flex Gateway on Minikube on HTTPS
As we have already installed the ingress in the part 1 tutorial and will be using ingress for accessing the API. We can execute the below command for getting the ingress URL.
minikube service list --namespace gatewayThis command will give the below output with HTTP and HTTPS URLs. In our case, we have published an API to port 443 and protocol HTTPS.

So we will be using a URL that is mapped with HTTPS - https://192.168.49.2:30679.
This is a private URL and cannot be accessed outside. In our case, the complete URL will be https://192.168.49.2:30679/Asia/Kolkata
To access the above private URL, we will open the Minikube container CLI. To do so, just go to docker desktop and open CLI for the Minikube container.

We have curled the above URL and we have got some responses back from our API. This means we have sent a request to ingress on HTTPS and ingress has forwarded the request to the implementation and received a successful response.

If we want to access the URL outside the Minikube, we need to execute the below command and that will provide the URL which can be used to access ingress.
minikube service ingress --url --namespace gatewayThis command will generate the below output with multiple URLs for accessing the ingress.

Now, we can use any one of the URLs for accessing the ingress on TLS. So we need to use a second URL from the above output for sending traffic on HTTPS.
https://127.0.0.1:64843/Asia/Kolkata
This URL can be used in the browser for accessing the APIs. We can see responses from our APIs.

Note - This URL and port number will be different for everyone and everyone's url may look different.
Uninstall the Flex Gateway From Minikube
To uninstall the Flex Gateway from Minikube, we need to execute the below list of commands.
Remove the helm release from the Minikube.
helm delete my-releaseThis command will delete the helm release named “my-release”.
Delete the namespace “gateway” that we have created during the setup of Flex Gateway during part 1 of the tutorial.
kubectl delete namespace gatewayThis command will remove the namespace gateway.
Delete the custom resource definition using the below command.
kubectl delete crds \
     apiinstances.gateway.mulesoft.com \
     configurations.gateway.mulesoft.com \
     extensions.gateway.mulesoft.com \
     policybindings.gateway.mulesoft.com \
     services.gateway.mulesoft.com
Note - Currently, we don’t have any options for deleting or unregistering the Flex Gateway replicas. It will be visible in the Runtime Manager UI even when it is in a stopped state. In case Flex Gateway replicas are in a stopped state for 30 days, they will be automatically removed from the Runtime Manager UI.
In this tutorial, we have learned how to implement the TLS on Ingress and start receiving traffic on HTTPS for applications publish to Flex Gateway.
Opinions expressed by DZone contributors are their own.

Comments