Integrating Apex With Lightning Web Components
Integrating your LWC with Apex to enable seamless communication between the frontend and backend, to provide robust data handling and processing.
Join the DZone community and get the full member experience.
Join For FreeSalesforce’s Lightning Web Component (LWC) is a modern UI framework that developers use to create custom pages and functionalities on the Salesforce Lightning platform. While LWC allows developers to build powerful and interactive user interfaces, it often requires back-end integration to fetch or update data from Salesforce. This back-end support is provided by Apex, Salesforce's server-side programming language.
In this article, we will explore three common methods for integrating LWC with Apex:
- Using the Wire Property with an Apex method
- Using the Wire Function with an Apex method
- Calling an Apex method imperatively
To illustrate these concepts, we’ll walk through a simple example: a Lead Search Page, where users input a phone number to search for leads in Salesforce.
Wire Property With Apex
Let us begin by creating an Apex method, as shown below. There are two key requirements for the Apex method to be wired to an LWC:
- The method should have an
@AuraEnabledannotation - The method must be marked as
cacheable = true
The cacheable = true setting indicates that the method is only fetching data and not making any modifications. This improves performance by enabling the client side to use cached data, reducing unnecessary trips to the server trips when data is already available.
public with sharing class LeadsController {
    @AuraEnabled (cacheable=true)
    public static list<Lead> getLeadsByPhone(String phone) {
        try {
            list<Lead> leads = [SELECT id, FirstName, LastName,Phone from Lead where phone =: phone];
            return leads;
        } catch (Exception e) {
            throw new AuraHandledException(e.getMessage());
        }

    }
}
The next step is to import the Apex method to LWC, as shown below.
import getLeadsByPhone from "@salesforce/apex/LeadsController.getLeadsByPhone";Once the method is imported, wire that method to a property, as shown below.
import { LightningElement,wire,track } from 'lwc';
import getLeadsByPhone from "@salesforce/apex/LeadsController.getLeadsByPhone";

export default class Leads_search extends LightningElement {
@track searchPhone;
@wire(getLeadsByPhone,{phone:'$searchPhone'})leads;

handleInputFieldChange(event){
    this.searchPhone = event.target.value;
}
}
In this example, the getLeadsByPhone method is wired to the leads property.
The leads property will now have the following data structure:
{

    data: [/* array of leads */],

    error: {/* error information */}

}
leads.data can then be used in the HTML, as shown below.
<template>
    <lightning-card title="Leads Search">
        <div class="slds-var-p-around_medium">
            <lightning-input type="search" label="Phone Number" onchange={handleInputFieldChange} >
            </lightning-input>

            <template if:true={leads.data}>

                <lightning-datatable data={leads.data} key-field="Id" columns={columns} hide-checkbox-column="true" ></lightning-datatable>
            </template>
        </div>
    </lightning-card>
</template>
Wire Function With Apex
Instead of wiring an Apex method to a property, you can wire it to a function to allow for further processing of the data.
Let us take a look at how this wiring works. Going by the same example, as shown below, the getLeadsByPhone is now wired to a function called leadList where we calculate the size of the array returned by the Apex method along with assigning the array to a defined variable called leads.
import { LightningElement,wire,track } from 'lwc';
import getLeadsByPhone from "@salesforce/apex/LeadsController.getLeadsByPhone";
export default class Leads_search extends LightningElement {
@track searchPhone;
@track leads;
@track screenMessage;
@wire(getLeadsByPhone,{phone:'$searchPhone'})
leadList({data,error}){
if(data){
this.screenMessage = data.length;
this.leads = data;
}else if(error){
console.log(error);
}
}
columns = [
{ label: "FirstName", fieldName: "FirstName"},
{ label: "LastName", fieldName: "LastName" },
{ label: "Phone", fieldName: "Phone" }
];
handleInputFieldChange(event){
this.searchPhone = event.target.value;
}
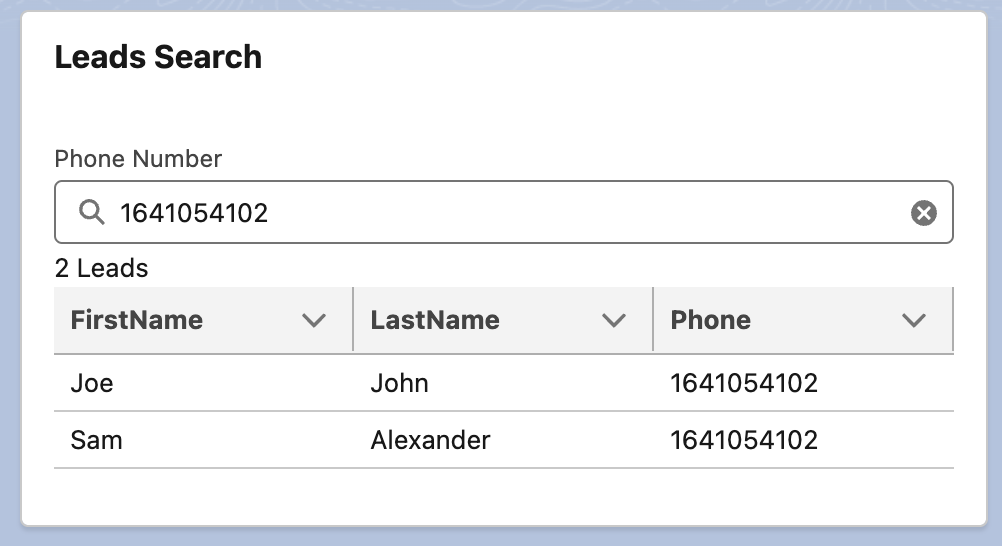
}Now, we will retrieve the lead details from {leads} instead of {leads.data}. The calculated array size will be displayed on the screen.
<template>
    <lightning-card title="Leads Search">
        <div class="slds-var-p-around_medium">
            <lightning-input type="search" label="Phone Number" onchange={handleInputFieldChange} >
            </lightning-input>

            <template if:true={leads}>
               <div>{screenMessage} Leads</div>

                <lightning-datatable data={leads} key-field="Id" columns={columns} hide-checkbox-column="true" ></lightning-datatable>
            </template>
        </div>
    </lightning-card>
</template>
Here’s what the above component looks like in Salesforce.
Imperative Method With Apex
Apex methods can also be called directly from LWC, typically in response to a user action, such as a button click. This approach gives you greater control over when the method is invoked.
The requirement for the Apex method remains the same. You still use the @AuraEnabled annotation. However, in this case, setting cacheable = true is optional.
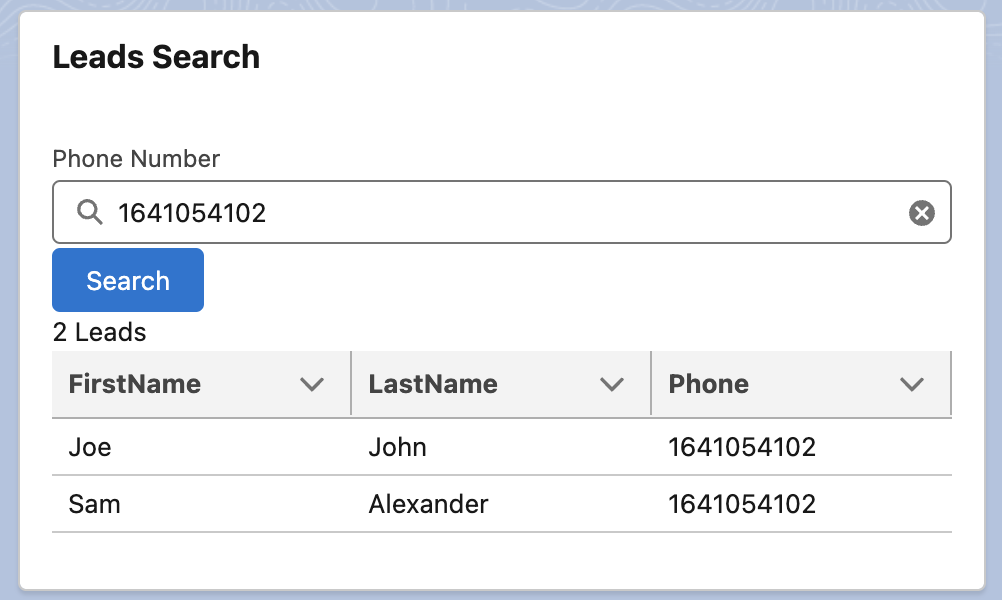
In our example, we will add a 'Search' button, which, when clicked, will display the lead list.
HTML is updated as shown below.
<template>
    <lightning-card title="Leads Search">
        <div class="slds-var-p-around_medium">
            <lightning-input type="search" label="Phone Number" onchange={handleInputFieldChange} >
            </lightning-input>

            <lightning-button label="Search" onclick={handleSearch} variant="brand"></lightning-button>

            <template if:true={leads}>
               <div>{screenMessage} Leads</div>

                <lightning-datatable data={leads} key-field="Id" columns={columns} hide-checkbox-column="true" ></lightning-datatable>
            </template>
        </div>
    </lightning-card>
</template>
The search button is introduced, and when the button is clicked, the handleSearch method is called.
Now, let us take a look at what an imperative call looks like in Javascript. The button method handleSearcch is introduced, which calls the Apex method and the returned result is handled as shown below.
import { LightningElement,wire,track } from 'lwc';
import getLeadsByPhone from "@salesforce/apex/LeadsController.getLeadsByPhone";

export default class Leads_search extends LightningElement {
    @track searchPhone;
    @track leads;
    @track screenMessage;

    columns = [
        { label: "FirstName", fieldName: "FirstName"},
        { label: "LastName", fieldName: "LastName" },
        { label: "Phone", fieldName: "Phone" }
    ];

    handleInputFieldChange(event){
        this.searchPhone = event.target.value;
    }

    handleSearch(){
        getLeadsByPhone({phone: this.searchPhone})
        .then(result => {
            this.leads = result;
            this.screenMessage = result.length;
        })
        .catch(error => {
            this.leads = undefined;
            this.screenMessage = "No Leads Found";
        });
    }
}
Here’s what the updated component looks like in Salesforce.
Wire vs. Imperative Comparison
|
|
Wire Calls
|
Imperative Calls
|
|---|---|---|
|
Reactivity
|
Wire calls have an automatic connection with the server and are triggered automatically when variable changes are tracked.
|
The Apex method is called explicitly in response to events such as a button click.
|
|
Caching
|
Data is stored in a reactive variable, which is automatically refreshed only when the tracked variable changes.
|
They have no in-built caching.
|
|
Direct Control
|
There is no direct control over when the Apex method is invoked.
|
There is full control of when and how the Apex method is invoked.
|
|
Complexity
|
The wired Apex method supports only simple queries.
|
Imperative apex methods support complex queries, making them ideal for complex use cases.
|
|
DML Operations
|
They cannot handle DML operations like insert, update, or delete, as wire calls are ready-only.
|
They are suitable for DML operations such as insert, update, and delete.
|
|
Error Handling
|
Automatic error handling and errors are returned through the wire result.
|
Requires manual error handling and custom logic to handle exceptions and responses.
|
|
Unsupported Objects
|
They cannot be used with objects not supported by the User Interface API, such as Task and Event.
|
They can handle objects not supported by the User Interface API, including Task and Event.
|
Conclusion
This article covers the three ways to integrate Apex with your Lightning components. While the @wire method provides reactivity and in-built caching, imperative calls give you more control over when and how Apex methods are invoked. The best approach depends on your specific use cases. However, if possible, it is recommended to use @wire as it allows you to take advantage of performance benefits like in-built caching and reactivity.
Opinions expressed by DZone contributors are their own.
Comments