Load Balancing of WebSocket Connections
The problem of WebSocket load balancing has always been a hot issue when managing large systems. This article takes a look at some possible solutions to that problem.
Join the DZone community and get the full member experience.
Join For FreeThe problem of load balancing has always been a hot issue when managing large systems. Load balancing aims to optimize resource use, maximize throughput, minimize response time, and avoid overload of any single resource, so solving this problem is crucial for performance. In this article we’ll take a look at the possible solutions to the problem.
For a better understanding of WS load balancing let’s dive a bit deeper into TCP sockets background. By default, a single server can handle 65,536 socket connections just because it’s the max number of TCP ports available. So as WS connections have a TCP nature and each WS client takes one port we can definitely say that number of WebSocket connections is also limited.
Actually, it’s a half-truth. The server can handle 65,536 sockets per single IP address. So the quantity can be easily extended by adding additional network interfaces to a server. Meanwhile, it’s extremely important to track how many connections present on a server. Once the limit is exceeded, you can have a lot of issues with other TCP connections (e.g. it’s not possible to connect to a server via ssh). So it’s a good idea to limit WS connections per node inside your application’s code. We do the same in our apps when we deal with WebSockets.
Once we understand the major limitation and the way to overcome it, let’s proceed to load balancing. Below I will describe 3 ways we’ve tried in one of our projects. Please note that all the system parts were deployed to AWS and some of the tips and hints only apply to Amazon configurations.
ELB Approach
The easiest way to implement load balancing is just to use Elastic Load Balancer AWS provides. It’s possible to switch ELB to TCP mode which enables load balancing of any type of TCP connections including WebSockets. This approach gives:
- Automatic failover of LB
- Autoscaling of load balanced nodes
- Extremely easy setup
Basically, it’s a good solution for most common cases until you have a splash growth of load. In this case, ELB becomes too slow to establish new connections. It’s possible to contact Amazon and ask them to “pre-warm” ELB, but it was not an option for us due to load-testing purposes when we need quick establishment of thousands of WS connections and for our customers due to usability of the system.
Software Load Balancers
We have tried HAProxy as a load balancer. But to make HAProxy works correctly one should keep in mind the port limitation issue we’ve talked about above. To make HAProxy handle more than 65k connections we should pass through the next steps:
- Create a bunch of private IP addresses. To do it choose your Amazon Instance -> Actions -> Networking -> Manage Private IP Addresses. We added 3 IP addresses: 192.168.1.1, 192.168.1.2, 192.168.1.3. Just remember that the IP should be in the same sub-network as your real application server;
- Connect to your HAProxy instance via SSH and run following commands
$> ifconfig eth0:1 192.168.1.1
$> ifconfig eth0:2 192.168.1.2
$> ifconfig eth0:3 192.168.1.3
This will add 3 virtual network interfaces to the instance;
- Configure HAProxy. Here is a section from haproxy.cfg file for 3 Erlang nodes accepting WS connections.
listen erlang_front :8888
    mode        http
    balance     roundrobin
    timeout connect 1s
    timeout queue 5s
    timeout server 3600s
    option httpclose
    option forwardfor
    server      erlang-1 192.168.0.1:8888  source 192.168.1.1
    server      erlang-2 192.168.0.2:8888  source 192.168.1.2
    server      erlang-3 192.168.0.3:8888  source 192.168.1.3
Now HAProxy can handle more than 65,536 WebSocket connections, and the limit of connections can be easily increased by adding virtual network interfaces. Also, it can establish new connections rather fast.
This approach seemed to be viable despite the following drawbacks:
- The failover HAProxy instance should be set up manually using tools like Keepalived;
- Something has to be done to reconfigure HAProxy whenever you add a new Erlang node;
- As the number of connections grows, there is no option to scale HAProxy horizontally. We have only a vertical option available, so when we have more and more active users, we should obtain more and more expensive instance for HAProxy (and HAProxy mirroring node).
We were fine with these drawbacks, but a much more simple solution was implemented. That was possible because we had already some code implemented, and our system design allowed us to use a custom approach.
Custom Approach
To move forward let’s review the following diagram showing our system architecture.
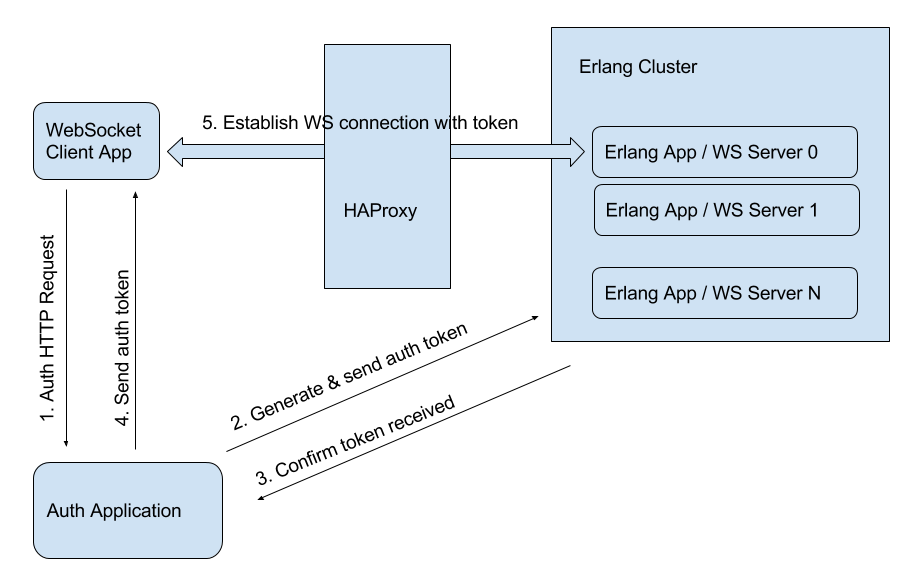
We have a JavaScript client application, an auth application responsible for user authorization, and an Erlang application with main application functionality. And the flow is as follows:
- The client makes an HTTP request with credentials to the Auth Application
- The Auth Application checks creds, generates a token and sends it via HTTP request to the Erlang Cluster
- The Erlang app confirms that the token is received and sends an HTTP response with confirmations to the Auth app
- The Auth App sends an HTTP response to the client application. This response includes the generated token
- The client uses the token to establish a WebSocket connection with the Erlang app through our HAProxy load balancer.
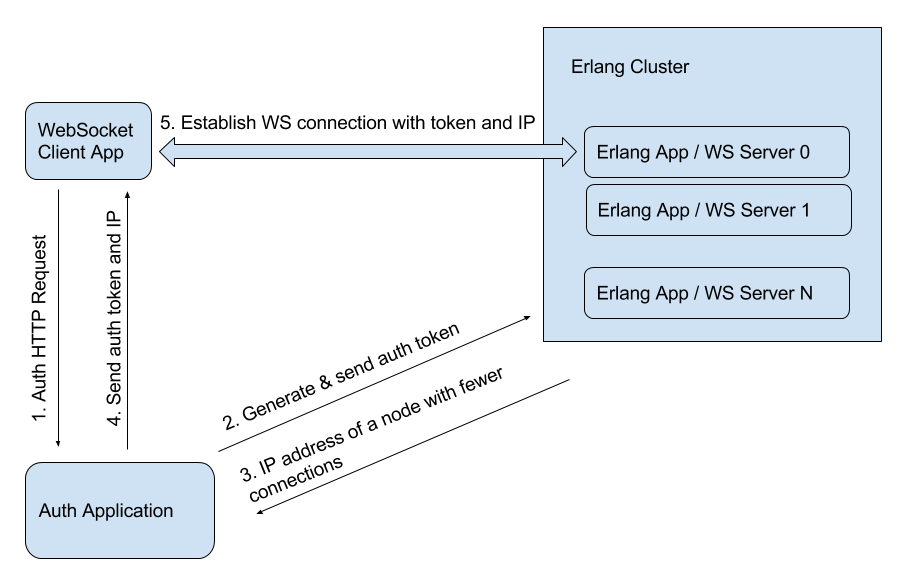
This is our basic flow, which was modified slightly. We added a simple module to our Erlang application to track the number of WebSocket connections on each Erlang node. Due to the “distributed” nature of Erlang, each node knows about other nodes connections. So we can choose a node with fewer connections. We take the public IP address of this node and just send it back to the auth application. Then the auth application sends this IP along with the token back to the client. The client establishs WS connections with the IP address and token received. So the final diagram looks like this:
Now we can:
- Get rid of WS load balancer, which makes our system less complicated
- Add Erlang nodes without any reconfiguration of other parts of the system
In addition:
- WS connections are now distributed evenly between the Erlang nodes
- The system easily scales horizontally
- We don’t have to use Elastic IPs for Erlang nodes
Published at DZone with permission of . See the original article here.
Opinions expressed by DZone contributors are their own.
Comments