MySQL to DynamoDB: Build a Streaming Data Pipeline on AWS Using Kafka
Use change data capture with MSK Connect to sync data between Aurora MySQL and DynamoDB.
Join the DZone community and get the full member experience.
Join For FreeThis is the second part of the blog series which provides a step-by-step walkthrough of data pipelines with Kafka and Kafka Connect. I will be using AWS for demonstration purposes, but the concepts apply to any equivalent options (e.g. running these locally in Docker).
This part will show Change Data Capture in action that lets you track row-level changes in database tables in response to create, update and delete operations. For example, in MySQL, these change data events are exposed via the MySQL binary log (binlog).
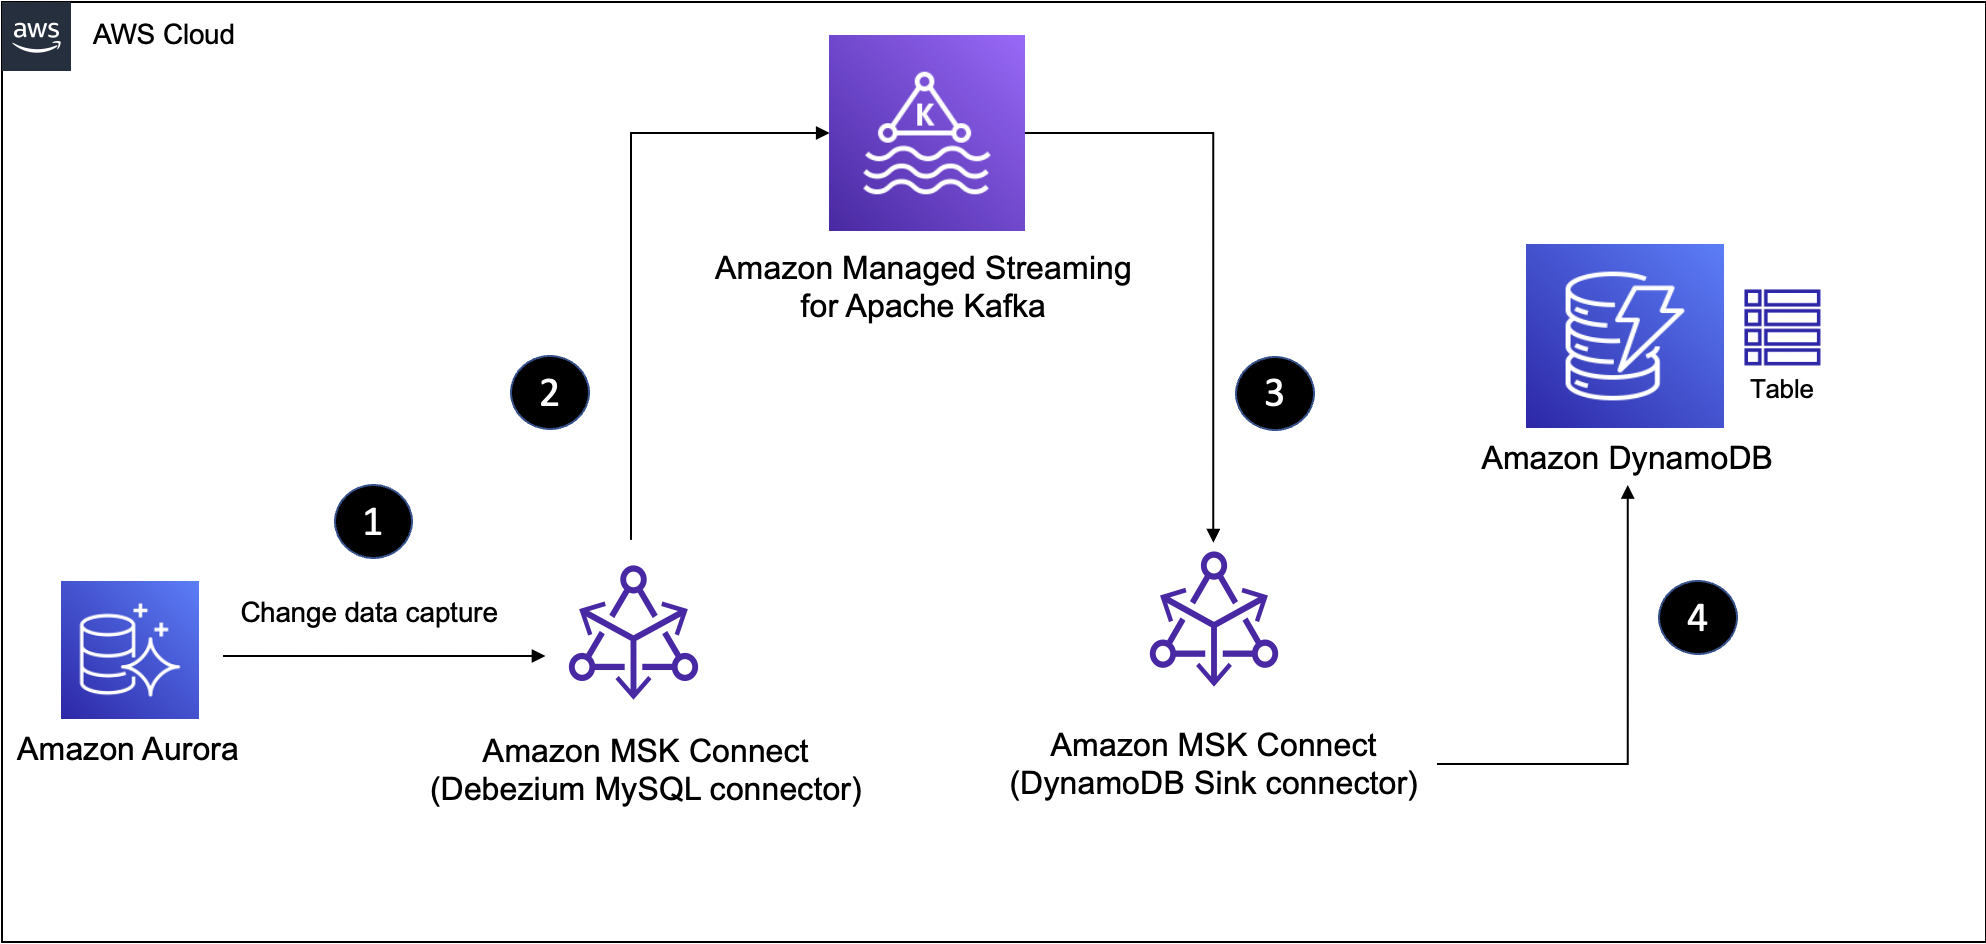
In Part 1, we used the Datagen connector in the source part of the data pipeline - it helped us generate mock data for the MSK topic and keep things simple. We will use Aurora MySQL as the source of data and leverage its Change Data Capture capability with the Debezium connector for MySQL to extract data in real-time from tables in Aurora MySQL, push that to MSK topics. Then, we will continue to use the DynamoDB sink connector just like we did before.
If you're new to Debezium...
It is a distributed platform that builds on top of Change Data Capture features available in different databases. It provides a set of Kafka Connect connectors that tap into row-level changes (using CDC) in database table(s) and converts them into event streams. These are sent to Kafka and can be made available to all the downstream applications.
Here is a high-level diagram of the solution presented in this blog post.
I am assuming that you are following along from Part 1 where the creation process for the base infrastructure and services required for this tutorial was already covered. If you haven't already, refer to the Prepare infrastructure components and services section in part 1 section
Data Pipeline Part 1: Aurora MySQL to MSK
Let's start by creating the first half of the pipeline to synchronize data from the Aurora MySQL table to a topic in MSK.
In this section, you will:
- Download the Debezium connector artifacts
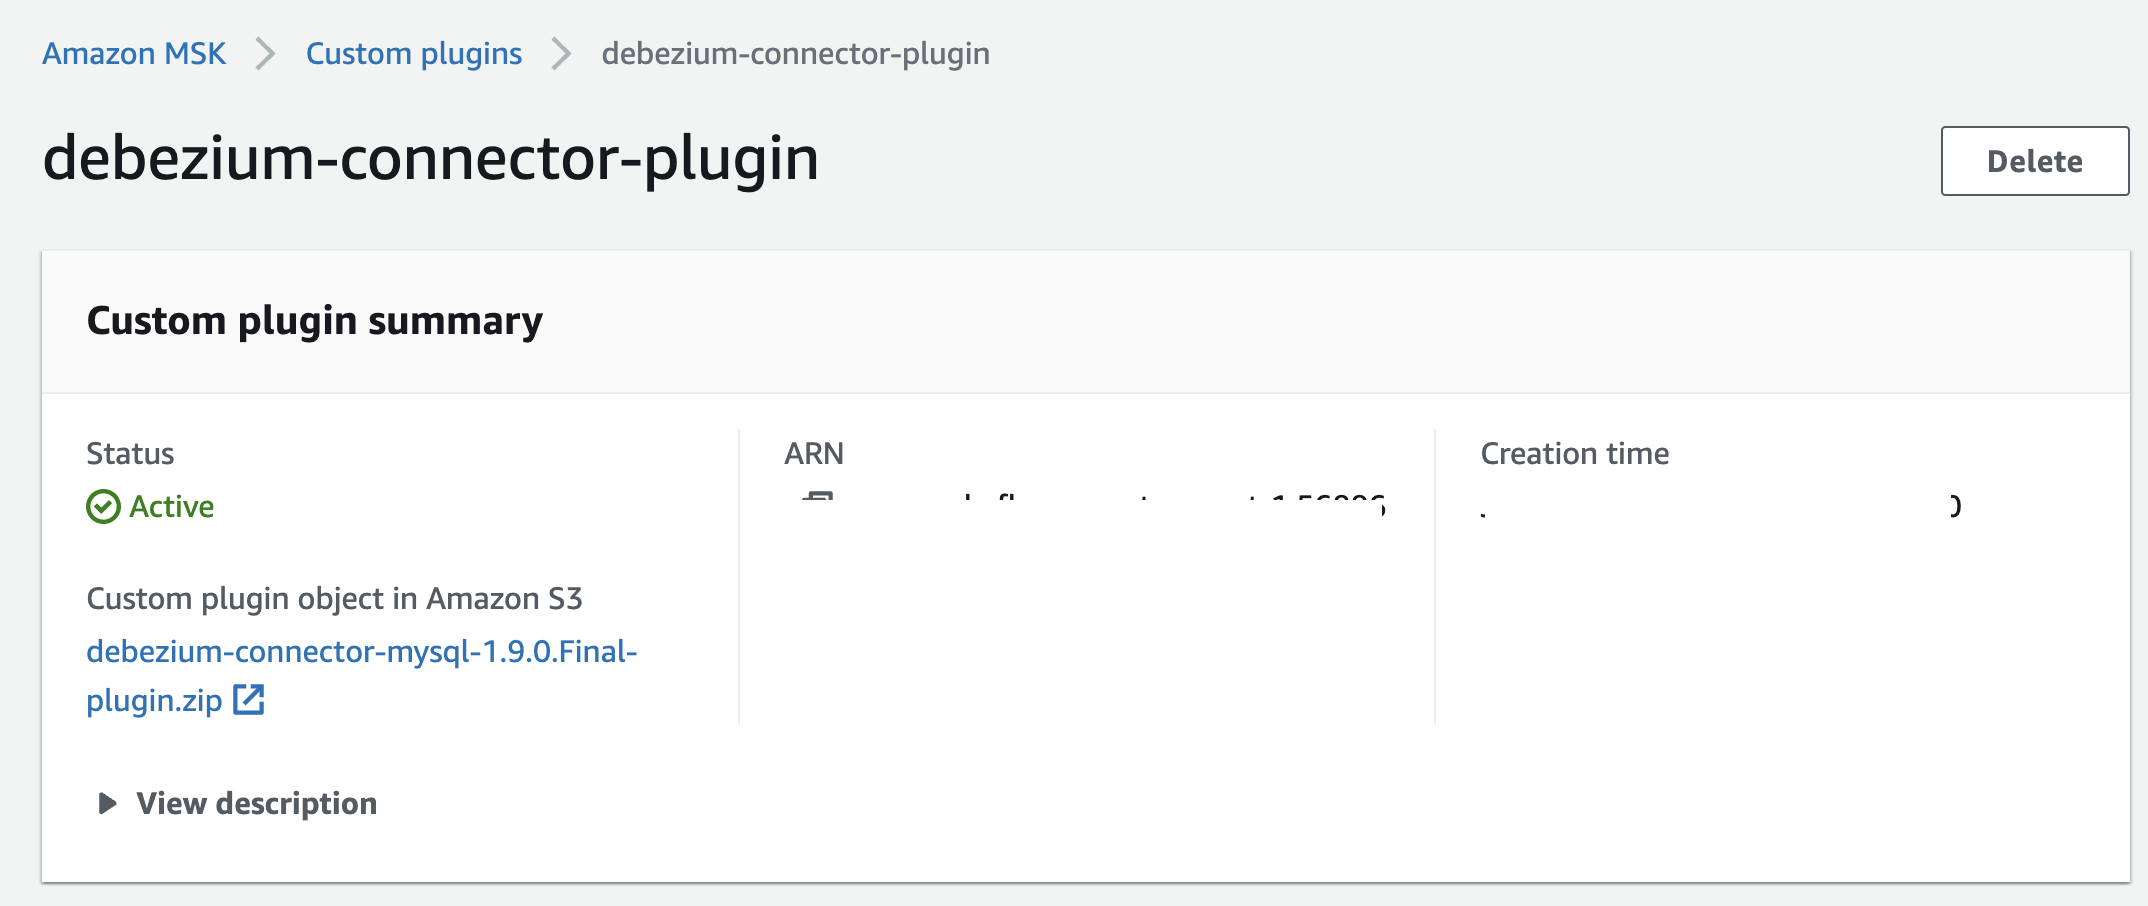
- Create Custom Plugin in MSK
- Deploy the Debezium source connector to MSK Connect
In the end, you will have the first half of the data pipeline ready to go!
Create a Custom Plugin and Connector
Upload the Debezium Connector to Amazon S3
Log into the Kafka client EC2 instance and run these commands:
sudo -u ec2-user -i
mkdir debezium && cd debezium

wget https://repo1.maven.org/maven2/io/debezium/debezium-connector-mysql/1.9.0.Final/debezium-connector-mysql-1.9.0.Final-plugin.tar.gz
tar xzf debezium-connector-mysql-1.9.0.Final-plugin.tar.gz

cd debezium-connector-mysql
zip -9 ../debezium-connector-mysql-1.9.0.Final-plugin.zip *

cd ..
aws s3 cp ./debezium-connector-mysql-1.9.0.Final-plugin.zip s3://msk-lab-<ENTER_YOUR_AWS_ACCOUNT_ID>-plugins-bucket/
Create Custom Plugin
For step by step instructions on how to create a MSK Connect Plugin, refer to Creating a custom plugin using the AWS Management Console in the official documentation.
While creating the Custom Plugin, make sure to choose the Debezium connector zip file you uploaded to S3 in the previous step.
Create the Debezium Source Connector
For step-by-step instructions on how to create an MSK Connect Connector, refer to Creating a connector in the official documentation.
To create a connector:
- Choose the plugin you just created.
- Enter the connector name and choose the MSK cluster along with IAM authentication
- You can enter the content provided below in the connector configuration section. Make sure you replace the following configuration as per your setup:
database.history.kafka.bootstrap.servers- Enter the MSK cluster endpointdatabase.hostname- Enter Aurora RDS MySQL Endpoint
Leave the rest of configuration unchanged
connector.class=io.debezium.connector.mysql.MySqlConnector
database.user=master
database.server.id=123456
tasks.max=1
database.history.kafka.topic=dbhistory.salesdb
database.history.kafka.bootstrap.servers=<ENTER MSK CLUSTER ENDPOINT>
database.server.name=salesdb
database.port=3306
include.schema.changes=true
database.hostname=<ENTER RDS MySQL ENDPOINT>
database.password=S3cretPwd99
database.include.list=salesdb
value.converter.schemas.enable=false
key.converter.schemas.enable=false
key.converter=org.apache.kafka.connect.storage.StringConverter
value.converter=org.apache.kafka.connect.json.JsonConverter
database.history.consumer.security.protocol=SASL_SSL
database.history.consumer.sasl.mechanism=AWS_MSK_IAM
database.history.consumer.sasl.jaas.config=software.amazon.msk.auth.iam.IAMLoginModule required;
database.history.consumer.sasl.client.callback.handler.class=software.amazon.msk.auth.iam.IAMClientCallbackHandler
database.history.producer.security.protocol=SASL_SSL
database.history.producer.sasl.mechanism=AWS_MSK_IAM
database.history.producer.sasl.jaas.config=software.amazon.msk.auth.iam.IAMLoginModule required;
database.history.producer.sasl.client.callback.handler.class=software.amazon.msk.auth.iam.IAMClientCallbackHandler
transforms=unwrap
transforms.unwrap.type=io.debezium.transforms.ExtractNewRecordState- Under Access Permissions, choose the correct IAM role (the one with
AuroraConnectorIAMRolein its name) for the connector - Click Next to move to the Security options - leave them unchanged
- Click Next. For Log delivery, choose to Deliver to Amazon CloudWatch Logs. Locate and select
/msk-connect-demo-cwlog-group - Click Next - On the final page, scroll down and click Create connector to start the process and wait for the connector to start.
Once that's done and the connector has transitioned to a Running state, proceed with the below steps.
Test the Pipeline
We want to confirm whether records from the SALES_ORDER table in the salesdb database has been pushed to the MSK topic. To do that, from the EC2 host, run the Kafka CLI consumer.
Note the topic name
salesdb.salesdb.SALES_ORDER- this is as per Debezium convention
sudo -u ec2-user -i
export MSK_BOOTSTRAP_ADDRESS=<ENTER MSK CLUSTER ENDPOINT>
/home/ec2-user/kafka/bin/kafka-console-consumer.sh --bootstrap-server $MSK_BOOTSTRAP_ADDRESS --consumer.config /home/ec2-user/kafka/config/client-config.properties --from-beginning --topic salesdb.salesdb.SALES_ORDER | jq --color-output .
In another terminal, use MySQL client and connect to the Aurora database and insert a few records:
sudo -u ec2-user -i

export RDS_AURORA_ENDPOINT=<ENTER RDS MySQL ENDPOINT>

mysql -f -u master -h $RDS_AURORA_ENDPOINT  --password=S3cretPwd99

USE salesdb;

select * from SALES_ORDER limit 5;

INSERT INTO SALES_ORDER (ORDER_ID, SITE_ID, ORDER_DATE, SHIP_MODE) VALUES (29001, 2568, now(), 'STANDARD');
INSERT INTO SALES_ORDER (ORDER_ID, SITE_ID, ORDER_DATE, SHIP_MODE) VALUES (29002, 1649, now(), 'ONE-DAY');
INSERT INTO SALES_ORDER (ORDER_ID, SITE_ID, ORDER_DATE, SHIP_MODE) VALUES (29003, 3861, now(), 'TWO-DAY');
INSERT INTO SALES_ORDER (ORDER_ID, SITE_ID, ORDER_DATE, SHIP_MODE) VALUES (29004, 2568, now(), 'STANDARD');
INSERT INTO SALES_ORDER (ORDER_ID, SITE_ID, ORDER_DATE, SHIP_MODE) VALUES (29005, 1649, now(), 'ONE-DAY');
INSERT INTO SALES_ORDER (ORDER_ID, SITE_ID, ORDER_DATE, SHIP_MODE) VALUES (29006, 3861, now(), 'TWO-DAY');
If everything is set up correctly, you should see the records in the consumer terminal.
{
  "ORDER_ID": 29001,
  "SITE_ID": 2568,
  "ORDER_DATE": 1655279536000,
  "SHIP_MODE": "STANDARD"
}
{
  "ORDER_ID": 29002,
  "SITE_ID": 1649,
  "ORDER_DATE": 1655279536000,
  "SHIP_MODE": "ONE-DAY"
}
{
  "ORDER_ID": 29003,
  "SITE_ID": 3861,
  "ORDER_DATE": 1655279563000,
  "SHIP_MODE": "TWO-DAY"
}
...
The Secret to Compact Change Event Payloads
Notice how compact the change data capture event payload is. This is because we configured the connector to use io.debezium.transforms.ExtractNewRecordState which is a Kafka Single Message Transform (SMT). By default Debezium change event structure is quite complex - along with the change event, it also includes metadata such as schema, source database info, etc. It looks something like this:
{
  "before": null,
  "after": {
    "ORDER_ID": 29003,
    "SITE_ID": 3861,
    "ORDER_DATE": 1655279563000,
    "SHIP_MODE": "TWO-DAY"
  },
  "source": {
    "version": "1.9.0.Final",
    "connector": "mysql",
    "name": "salesdb",
    "ts_ms": 1634569283000,
    "snapshot": "false",
    "db": "salesdb",
    "sequence": null,
    "table": "SALES_ORDER",
    "server_id": 1733046080,
    "gtid": null,
    "file": "mysql-bin-changelog.000003",
    "pos": 43275145,
    "row": 0,
    "thread": null,
    "query": null
  },
  "op": "c",
  "ts_ms": 1655279563000,
  "transaction": null
...
Thanks to the Kafka SMT (specified using transforms.unwrap.type=io.debezium.transforms.ExtractNewRecordState), we can effectively flatten the event payload and customize it as per our requirements.
For details, refer to New Record State Extraction in the Debezium documentation.
Data Pipeline Part 2: MSK to DynamoDB
We can now shift our focus to the second half of the pipeline that's responsible for taking data from the MSK topic to the DynamoDB table with the help of the DynamoDB Sink connector.
If the DynamoDB table is not present, the connector automatically creates one for you, but it uses default settings i.e. it creates a table in Provisioned Mode, with 10 read capacity units (RCUs) and 10 write capacity units (WCUs).
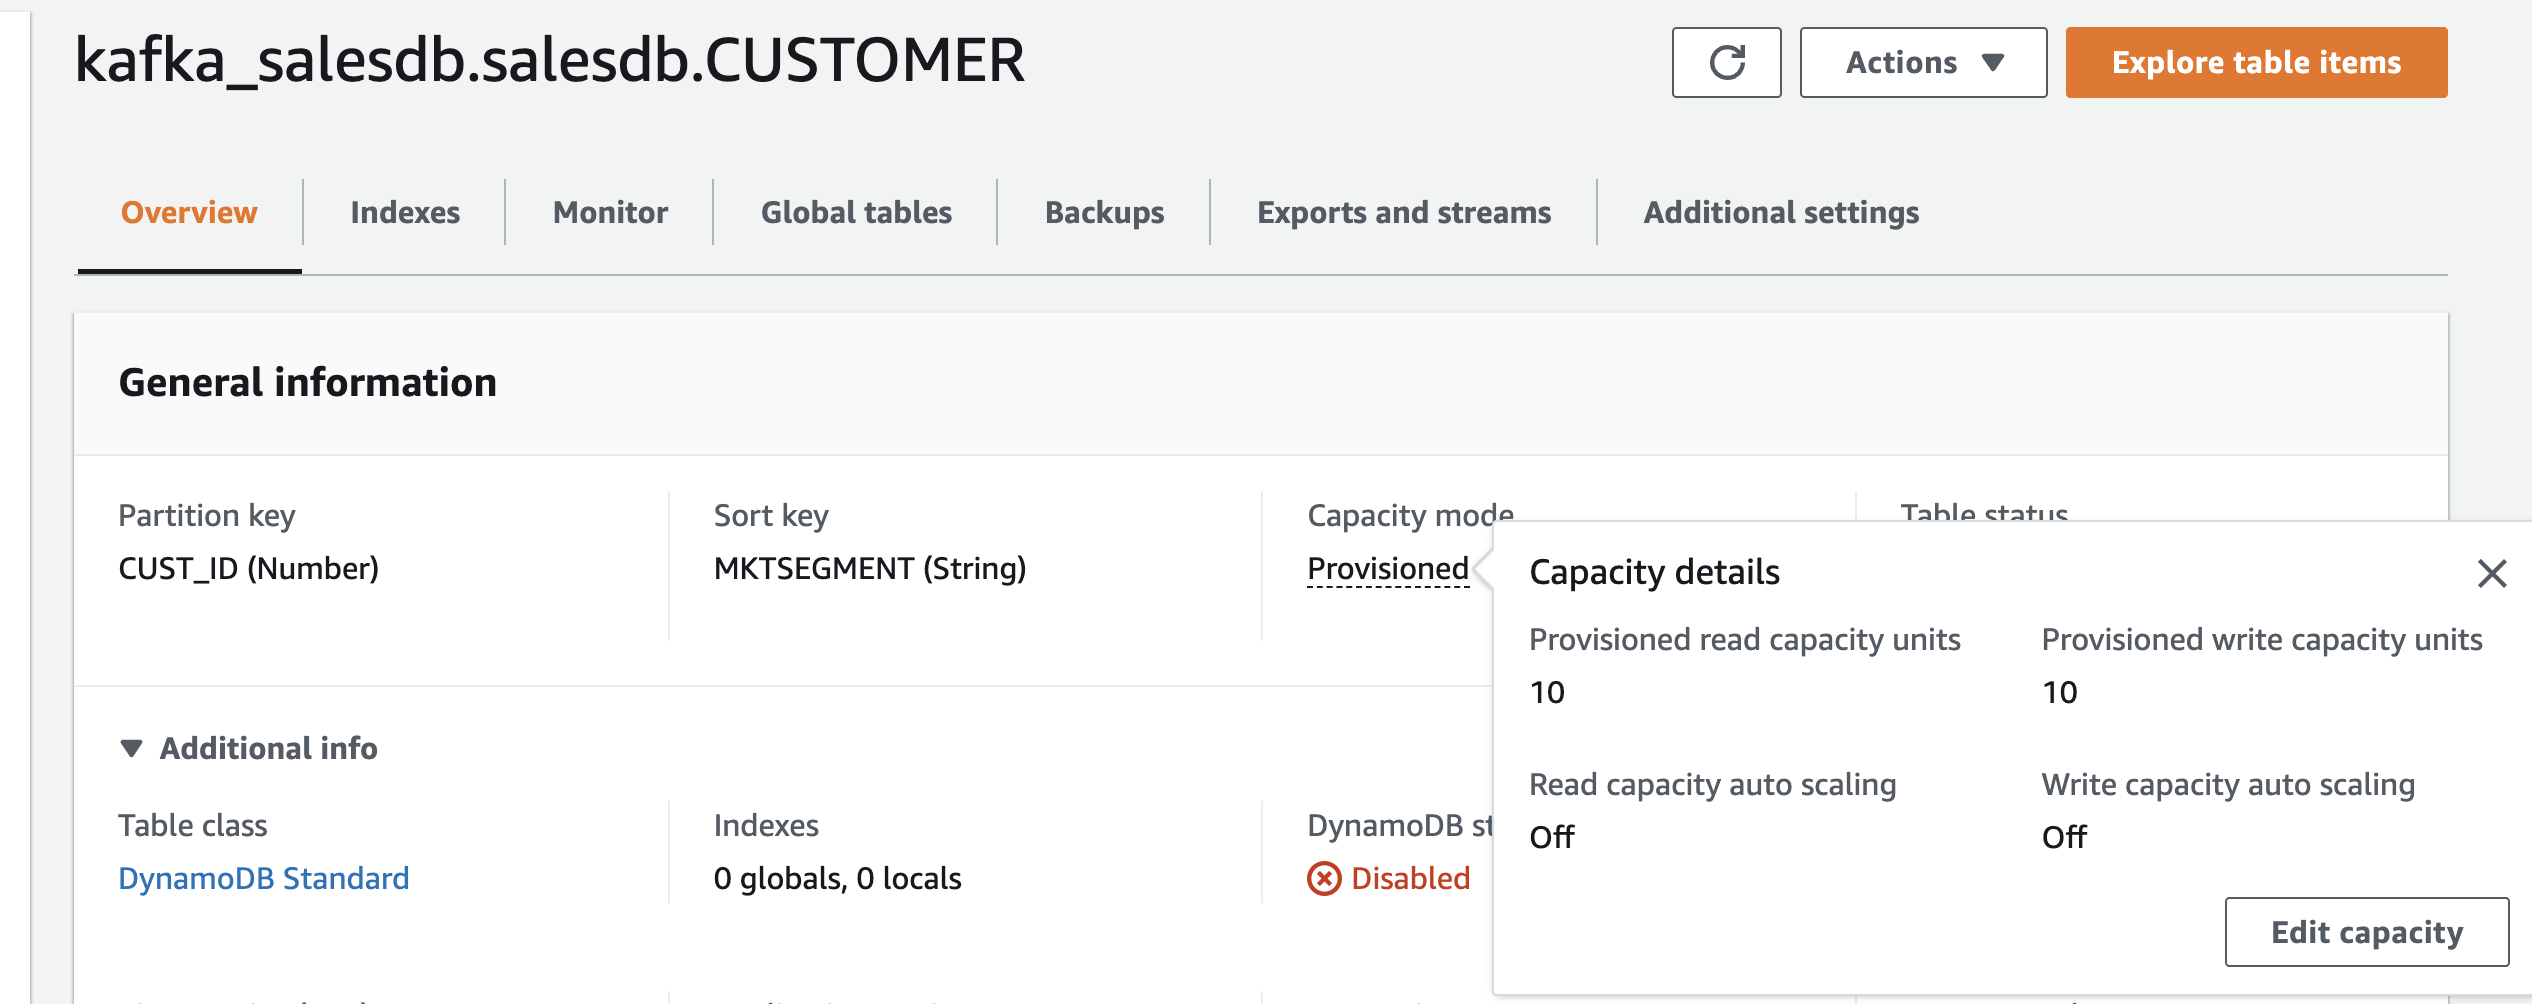 But your use case might need a configuration. For example, in order to handle the high volume of data, you may want to configure Auto scaling, or even better, activate On-Demand mode for your table.
That's exactly what we will do.
Before You Proceed, Create a DynamoDB Table
Use the following settings:
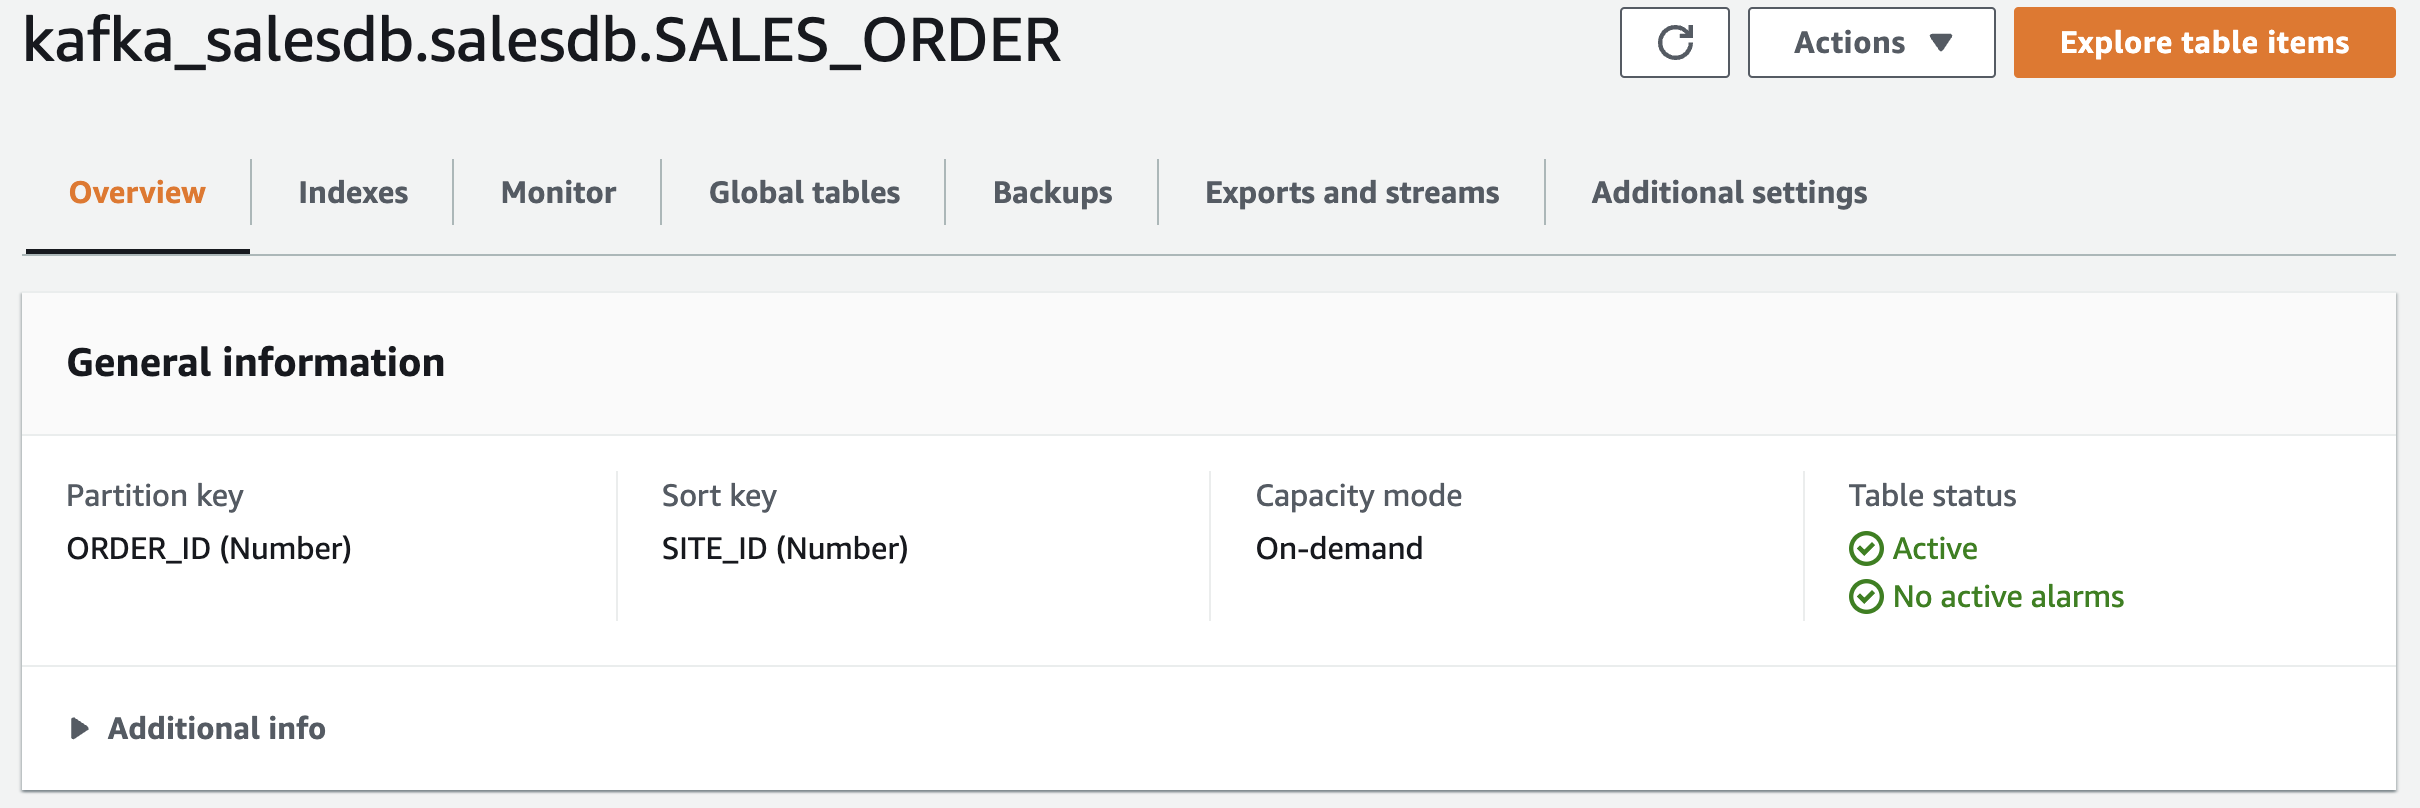
- Table name -
kafka_salesdb.salesdb.SALES_ORDER(do not change the table name) - Partition key -
ORDER_ID(Number) - Range key -
SITE_ID(Number) - Capacity mode - On-demand
That's it, you're good to go!
Create a Custom Plugin and Connector
For step by step instructions on how to create a MSK Connect Plugin, refer to Creating a custom plugin using the AWS Management Console in the official documentation.
While creating the Custom Plugin, make sure to choose the DynamoDB connector zip file you uploaded to S3 in the previous step.
For step by step instructions on how to create a MSK Connect Connector, refer to Creating a connector in the official documentation.
To create a connector:
- Choose the plugin you just created.
- Enter the connector name and choose the MSK cluster along with IAM authentication
- You can enter the content provided below in the connector configuration section. Make sure you replace the following configuration as per your setup:
- Use the right topic name for
topicsattribute (we are usingsalesdb.salesdb.SALES_ORDERin this example, since that's the topic name format that Debezium source connector adopts) - For
confluent.topic.bootstrap.servers, enter the MSK cluster endpoint - For
aws.dynamodb.endpointandaws.dynamodb.region, enter the region where you created the DynamoDB table e.g.us-east-1
Leave the rest of configuration unchanged
connector.class=io.confluent.connect.aws.dynamodb.DynamoDbSinkConnector
tasks.max=2
aws.dynamodb.region=<ENTER AWS REGION e.g. us-east-1>
aws.dynamodb.endpoint=https://dynamodb.<ENTER AWS REGION>.amazonaws.com
topics=salesdb.salesdb.SALES_ORDER
value.converter.schemas.enable=false
key.converter=org.apache.kafka.connect.storage.StringConverter
value.converter=org.apache.kafka.connect.json.JsonConverter
table.name.format=kafka_${topic}
confluent.topic.bootstrap.servers=<ENTER MSK CLUSTER ENDPOINT>
confluent.topic.security.protocol=SASL_SSL
confluent.topic.sasl.mechanism=AWS_MSK_IAM
confluent.topic.sasl.jaas.config=software.amazon.msk.auth.iam.IAMLoginModule required;
confluent.topic.sasl.client.callback.handler.class=software.amazon.msk.auth.iam.IAMClientCallbackHandler
aws.dynamodb.pk.hash=value.ORDER_ID
aws.dynamodb.pk.sort=value.SITE_ID- Under Access Permissions, choose the correct IAM role (the one with
DynamoDBConnectorIAMRolein its name) for the connector - Click Next to move to the Security options - leave them unchanged
- Click Next. For Log delivery, choose Deliver to Amazon CloudWatch Logs. Locate and select
/msk-connect-demo-cwlog-group - Click Next - On the final page, scroll down and click Create connector to start the process and wait for the connector to start.
Once that's done and the connector has transitioned to a Running state, proceed with the below steps.
Choosing DynamoDB’s Primary Key
In the above configuration, we set aws.dynamodb.pk.hash and aws.dynamodb.pk.sort to value.ORDER_ID and value.SITE_ID respectively. This implies that the ORDER_ID field from the Kafka topic event payload will be used as the partition key and the value for SITE_ID will we be designated as the Range key (depending on your requirements, you can also leave aws.dynamodb.pk.sort empty).
Test the End-To-End Pipeline
As part of the initial load process, the connector makes sure that all the existing records from the Kafka topic are persisted in the DynamoDB table specified in the connector configuration. In this case, you should see more than 29000 records (as per SALES_ORDER table) in DynamoDB and you can run queries to explore the data.

To continue testing the end-to-end pipeline, you can insert more data in the SALES_ORDER table and confirm that they were synchronized to Kafka via the Debezium source connector and all the way to DynamoDB, thanks to the sink connector.
Delete Resources
Once you're done, delete the resources that you had created.
- Delete the contents of the S3 bucket (
msk-lab-<YOUR ACCOUNT_ID>-plugins-bucket) - Delete the CloudFormation stack
- Delete the DynamoDB table
- Delete the MSK Connect connectors, Plugins, and Custom configuration
Change Data Capture is a powerful tool, but we need a way to tap into these event logs and make them available to other services which depend on that data. In this part, you saw how we can leverage this capability to set up a streaming data pipeline between MySQL and DynamoDB using Kafka Connect.
This wraps up this series. Happy building!
Published at DZone with permission of Abhishek Gupta. See the original article here.
Opinions expressed by DZone contributors are their own.
Comments