Perfomance Testing with Gatling
Gatling is a handy tool for quickly and easily scripting performance tests. Let's take a closer look at it and how to make good use of it.
Join the DZone community and get the full member experience.
Join For FreeHow many of you have ever created automated performance tests before running applications on production? Usually, developers attache importance to the functional testing and tries to provide at least some unit and integration tests. However, sometimes a performance leak may turn out to be more serious than undetected business error, because it can affect the whole system, not the only the one business process.
Personally, I have been implementing performance tests for my application, but I have never run them as a part of the Continuous Integration process. Of course it took place some years ago, and my knowledge and experience were a lot smaller. Anyway, recently I have became interested in topics related to performance testing, partly for the reasons of performance issues with the application in my organisation. As it happens, the key is to find the right tool. Probably many of you have heard about JMeter. Today I’m going to present the competitive solution – Gatling. I’ve read it generates rich and colorful reports with all the metrics collected during the test case. That feature seems to be better than in JMeter.
Before starting the discussion about Gatling let me say some words about theory. We can distinguish between two types of performance testing: load and stress testing. Load testing verifies how the system functions under a heavy number of concurrent clients sending requests over a certain period of time. However, the main goal of that type of tests is to simulate the standard traffic similar to that, which may arise on production. Stress testing takes load testing and pushes your app to the limits to see how it handles an extremely heavy load.
What Is Gatling?
Gatling is a powerful tool for load testing, written in Scala. It has a full support of HTTP protocols and can also be used for testing JDBC connections and JMS. When using Gatling you have to define test scenario as a Scala dsl code. It is worth mentioning that it provides a comprehensive informative HTML load reports and has plugins for integration with Gradle, Maven and Jenkins.
Building Sample Application
Before we run any tests we need to have something for tests. Our sample application is really simple. Its source code is available as usual on GitHub. It exposes RESTful HTTP API with CRUD operations for adding and searching entity in the database. I use Postgres as a backend store for the application repository. The application is build on the top of Spring Boot framework. It also uses Spring Data project as a persistence layer implementation.
plugins {
    id 'org.springframework.boot' version '1.5.9.RELEASE'
}
dependencies {
compile group: 'org.springframework.boot', name: 'spring-boot-starter-web'
compile group: 'org.springframework.boot', name: 'spring-boot-starter-data-jpa'
compile group: 'org.postgresql', name: 'postgresql', version: '42.1.4'
testCompile group: 'org.springframework.boot', name: 'spring-boot-starter-test'
}
There is one entity Person which is mapped to the table person.
@Entity
@SequenceGenerator(name = "seq_person", initialValue = 1, allocationSize = 1)
public class Person {
@Id
@GeneratedValue(strategy = GenerationType.SEQUENCE, generator = "seq_person")
private Long id;
@Column(name = "first_name")
private String firstName;
@Column(name = "last_name")
private String lastName;
@Column(name = "birth_date")
private Date birthDate;
@Embedded
private Address address;
// ...
}
Database connection settings and hibernate properties are configured in application.yml file.
spring:
  application:
    name: gatling-service
  datasource:
    url: jdbc:postgresql://192.168.99.100:5432/gatling
    username: gatling
    password: gatling123
  jpa:
    properties:
      hibernate:
        hbm2ddl:
          auto: update

server:
  port: 8090
Like I have already mentioned the application exposes API methods for adding and searching persons in database. Here’s our Spring REST controller implementation.
@RestController
@RequestMapping("/persons")
public class PersonsController {
private static final Logger LOGGER = LoggerFactory.getLogger(PersonsController.class);
@Autowired
PersonsRepository repository;
@GetMapping
public List
<Person> findAll() {
  return (List
  <Person>) repository.findAll();
    }
    @PostMapping
    public Person add(@RequestBody Person person) {
    Person p = repository.save(person);
    LOGGER.info("add: {}", p.toString());
    return p;
    }
    @GetMapping("/{id}")
    public Person findById(@PathVariable("id") Long id) {
    LOGGER.info("findById: id={}", id);
    return repository.findOne(id);
    }
    }
Running Database
The next after the sample application development is to run the database. The most suitable way of running it for the purposes is by Docker image. Here’s a Docker command that starts Postgres container and initializes gatling user and database.
docker run -d --name postgres -e POSTGRES_DB=gatling -e POSTGRES_USER=gatling -e POSTGRES_PASSWORD=gatling123 -p 5432:5432 postgresProviding Test Scenario
Every Gatling test suite should extend Simulation class. Inside it you may declare a list of scenarios using Gatling Scala DSL. Our goal is to run 30 clients which simultaneously sends requests 1000 times. First, the clients adds new person into the database by calling POST /persons method. Then they try to search person using its id by calling GET /persons/{id} method. So, totally 60k would be sent to the application: 30k to POST endpoint and 30k to GET method. Like you see on the code below the test scenario is quite simple. ApiGatlingSimulationTest is available under directory src/test/scala.
class ApiGatlingSimulationTest extends Simulation {

  val scn = scenario("AddAndFindPersons").repeat(1000, "n") {
        exec(
          http("AddPerson-API")
            .post("http://localhost:8090/persons")
            .header("Content-Type", "application/json")
            .body(StringBody("""{"firstName":"John${n}","lastName":"Smith${n}","birthDate":"1980-01-01", "address": {"country":"pl","city":"Warsaw","street":"Test${n}","postalCode":"02-200","houseNo":${n}}}"""))
            .check(status.is(200))
        ).pause(Duration.apply(5, TimeUnit.MILLISECONDS))
  }.repeat(1000, "n") {
        exec(
          http("GetPerson-API")
            .get("http://localhost:8090/persons/${n}")
            .check(status.is(200))
        )
  }

  setUp(scn.inject(atOnceUsers(30))).maxDuration(FiniteDuration.apply(10, "minutes"))

}
To enable Gatling framework for the project we should also define the following dependency in the Gradle build file.
testCompile group: 'io.gatling.highcharts', name: 'gatling-charts-highcharts', version: '2.3.0'Running Tests
There are some Gradle plugins available, which provides support for running tests during project build. However, we may also define simple gradle task that just run tests using io.gatling.app.Gatling class.
task loadTest(type: JavaExec) {
   dependsOn testClasses
   description = "Load Test With Gatling"
   group = "Load Test"
   classpath = sourceSets.test.runtimeClasspath
   jvmArgs = [
        "-Dgatling.core.directory.binaries=${sourceSets.test.output.classesDir.toString()}"
   ]
   main = "io.gatling.app.Gatling"
   args = [
           "--simulation", "pl.piomin.services.gatling.ApiGatlingSimulationTest",
           "--results-folder", "${buildDir}/gatling-results",
           "--binaries-folder", sourceSets.test.output.classesDir.toString(),
           "--bodies-folder", sourceSets.test.resources.srcDirs.toList().first().toString() + "/gatling/bodies",
   ]
}
The Gradle task defined above may be run with command gradle loadTest. Of course, before running tests you should launch the application. You may perform it from your IDE by starting the main class pl.piomin.services.gatling.ApiApplication or by running command java -jar build/libs/sample-load-test-gatling.jar.
Test Reports
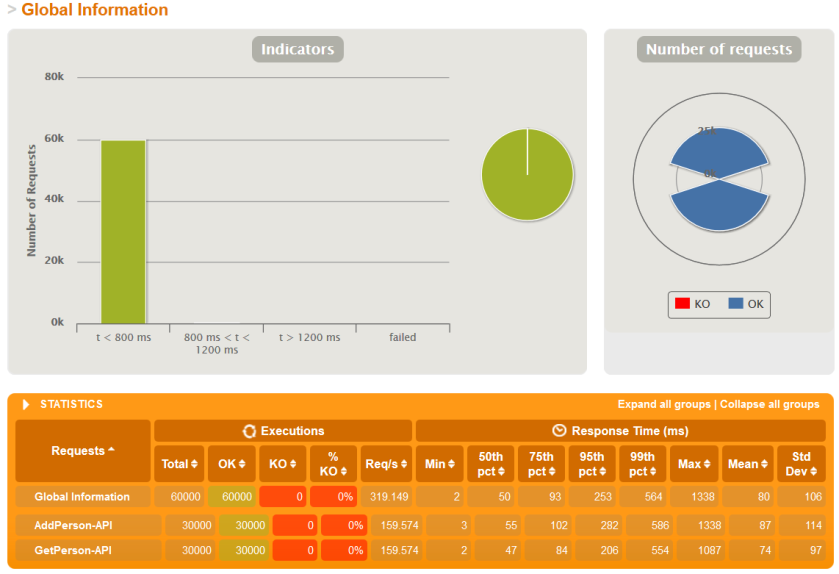
After test execution the report is printed in a text format.
================================================================================
---- Global Information --------------------------------------------------------
> request count                                      60000 (OK=60000  KO=0     )
> min response time                                      2 (OK=2      KO=-     )
> max response time                                   1338 (OK=1338   KO=-     )
> mean response time                                    80 (OK=80     KO=-     )
> std deviation                                        106 (OK=106    KO=-     )
> response time 50th percentile                         50 (OK=50     KO=-     )
> response time 75th percentile                         93 (OK=93     KO=-     )
> response time 95th percentile                        253 (OK=253    KO=-     )
> response time 99th percentile                        564 (OK=564    KO=-     )
> mean requests/sec                                319.149 (OK=319.149 KO=-     )
---- Response Time Distribution ------------------------------------------------
> t < 800 ms                                         59818 (100%) > 800 ms < t < 1200 ms                                 166 (  0%) > t > 1200 ms                                           16 (  0%)
> failed                                                 0 (  0%)
================================================================================
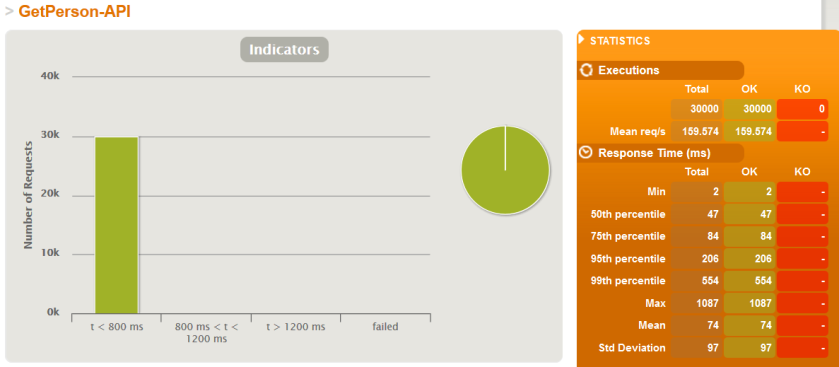
But that what is really cool in Gatling is an ability to generate reports in a graphical form. HTML reports are available under directory build/gatling-results. The first report shows global information with total number of requests and maximum response time by percentiles. For example, you may see that maximum response time in 95% of responses for GetPerson-API is 206 ms.

We may check out such report for all requests or filter them to see only those generated by selected API. In the picture below there is visualization only for GetPerson-API.

Here’s the graph with percentage of requests grouped by average response time.

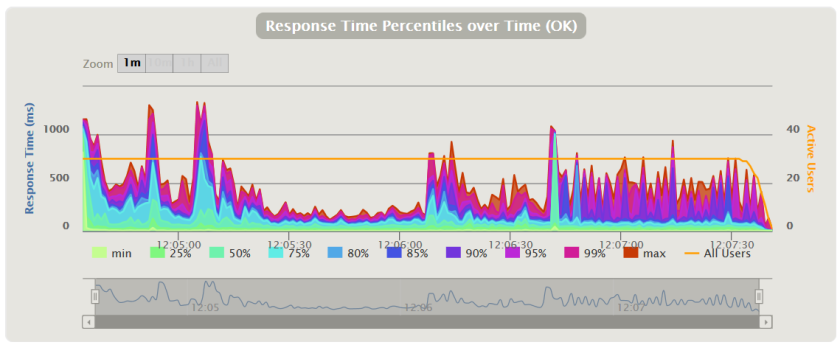
Here’s the graph which ilustrates timeline with average response times. Additionally, that timeline also shows the statistics by percentiles.

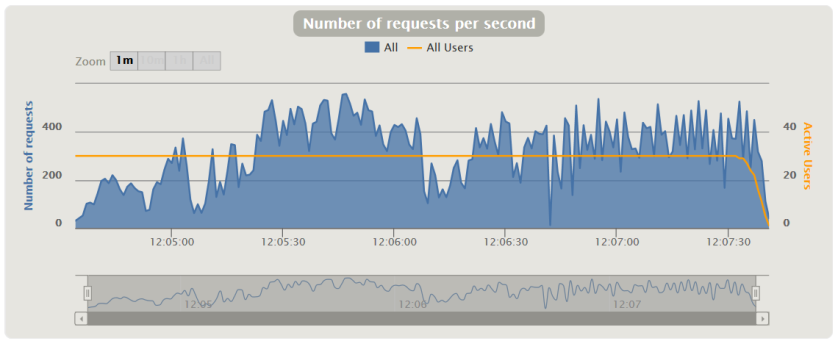
Here’s the graph with number of requests processed succesfully by the application in a second.

Published at DZone with permission of Piotr Mińkowski. See the original article here.
Opinions expressed by DZone contributors are their own.

Comments