Push Notifications in PWA (React.js) Using Firebase
In this post, we figure out how to push alerts to the users of PWAs using Google Firebase.
Join the DZone community and get the full member experience.
Join For FreeMany sites send notifications to their users through the browser for various events occurring within the web app. We can easily do this using Cloud Messaging, which allows us to send messages to any device using HTTP requests with Firebase.
Here are the basic steps required for pushing the notifications to a web app using Firebase.
Setup
Firstly, it's necessary to have a Firebase account. Once you have an account, go to the 'Create a Project' section.
For this demo, we are creating the project using the create-react-app command.
In addition to this, we need the Firebase library. For that, open your terminal and run the command npm install firebase –save.
Coding
- Let’s create a file inside the project directory named push-notification.js. Now we must create a function that initializes Firebase and has the important keys to our project.
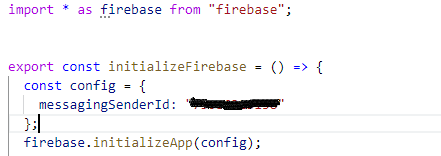
- Next, we must call the respective function.
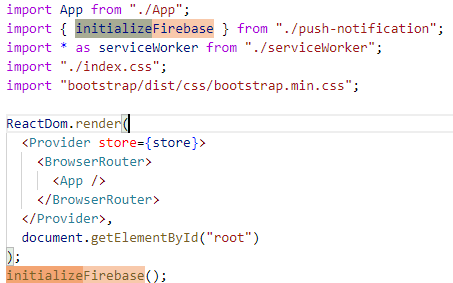
In the above image, the function named initializeFirebase() has been called.
- Service Worker: A service worker is used as a script that the browser runs in the background, separate from the web app. It is mainly providing data in the form of local storage cache. Even if we refresh the web page, the locally stored cache doesn’t change.
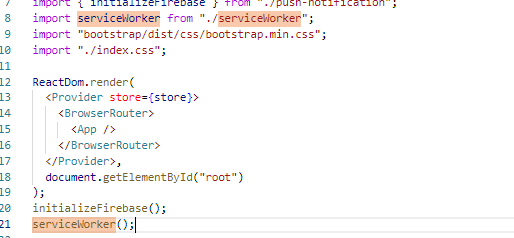 In the above image, we are importing a service worker (
serviceWorker) into the index.js file, where other packages are also imported. Now, after importing it into the index.js file, let’s get that exported by developing a new file called serviceWorker.js, which is served as a service.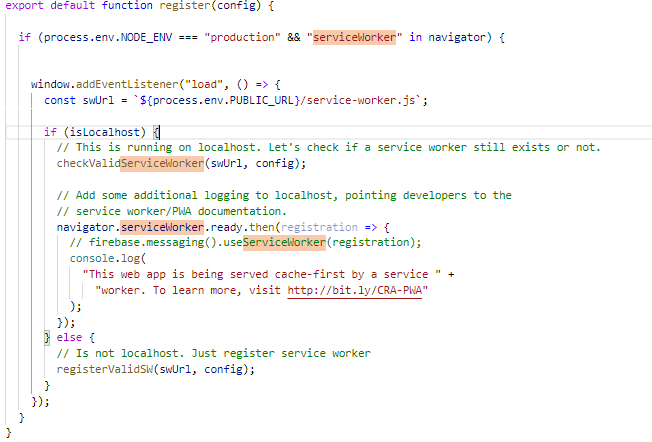 In the
 registerfunction, the default is used so that user can use any name they want to enter in index.js while importing as a user. For example, we can use “import swore(or any other name) from. /serviceWorker;” instead of “import serviceWorker from. /serviceWorker;”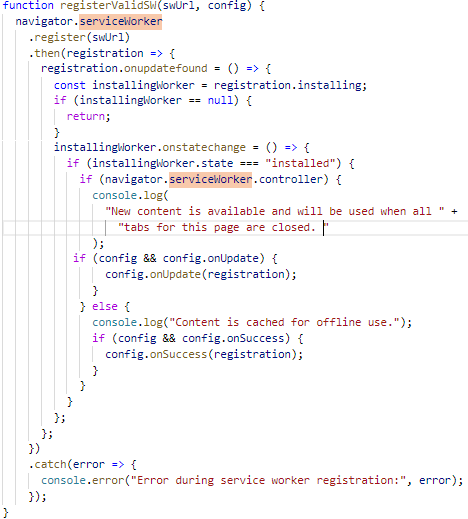 If (navigator. serviceWorker. Controller) {} =>This is the point from which the updated pre-cached content has been fetched, but the previous service worker will still serve the older content until all the client's tabs are closed. New content is available and will be used when all tabs for this page are closed.
serviceWorkerwill basically import all the scripts that are needed to show the notifications when your app is running in the background.- It is mandatory to have a firebase-messaging-sw.js file in the location where all the other files are served.

- Pass
messagingSenderIdto thefirebase.initializeAppfunction in this file and push it to the notification.js file as shown above.
Requesting Permissions to Notifications: It is best practice to allow the user to choose whether or not they wish to see the notifications. For that, let’s create a function in the push-notification.js file that will make a request and generate a token. For example, the
askForPermissionToReceiveNotifications()function is, first, requesting permission and then going through thegetToken()method to generate the token and save it to local storage.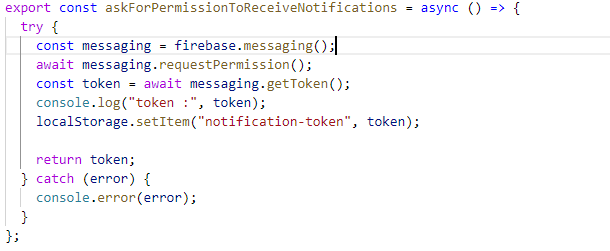 Note: You can also check the generated token in the developer mode=>Application=>LocalStorage=>requestedURL=>notification-token. Now, here you get your desired generated token. The value of notification-token(key) is the example of a generated token.
Now, after generating the token we need to call the function. Here, we call it in index.js file wherever we need to generate the token, or you can also call this function on click of a button.

- Send the Notifications to the User: For sending notifications to the user, we must make a request to the Firebase API and inform the Firebase API about the token the user will receive.Note: In the below example we use Postman, but, if you are willing to use anything else you are free to do that as well.
The steps required to make the request are as follows:
Firstly, we need to make a POST request to the Google API like https://fcm.google.apis.com/fcm/send, by sending the JSON in the request body.
Our JSON should look like: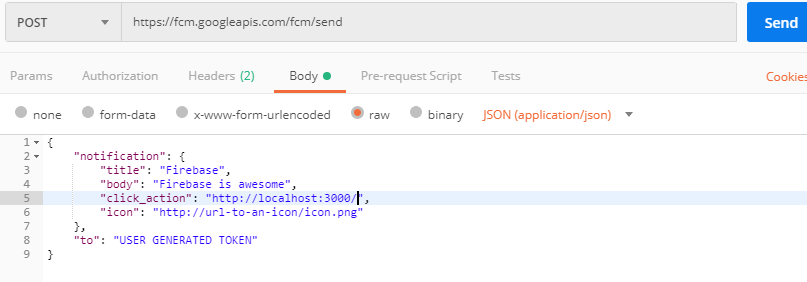
“Click_action” in the above JSON describes the URL and “to” describes the token that gets generated.
In the request header, we need to pass the key as content-type and authorization and the value as application/json and server key of our project, respectively:

This key is the server key which you can find in your Firebase account:
1. Login to your Firebase account.
2. Go to the project settings through project Overview settings icon.
3. Then go to the Cloud Messaging and there you can easily get the server key for your Firebase account.
Here, you just click to send our request to Postman and everything is good to go.
Note: Remember that notification will only appear when your app is in the background or minimized.
Opinions expressed by DZone contributors are their own.

Comments