Quickstart to Using SingleStoreDB, MindsDB, and Deepnote for Data Science
Build a quick data science stack
Join the DZone community and get the full member experience.
Join For FreeAbstract
This article will show how to use SingleStoreDB with MindsDB using Deepnote. We'll create integrations within Deepnote, load the Iris flower data set into SingleStoreDB, and then use MindsDB to create a Machine Learning (ML) model from the Iris data stored in SingleStoreDB. We'll also make some example predictions using the ML model. Most of the code will be in SQL, enabling developers with solid SQL skills to hit the ground running and start working with ML immediately.
The notebook file used in this article is available on GitHub.
Introduction
In many previous articles, we have successfully used Spark Dataframes and the SingleStore Spark Connector to perform various data science, data analyses, and ETL operations with SingleStoreDB. Often our applications have been built using Python. However, we can also use other methods to perform data science with SingleStoreDB. One approach that uses SQL is MindsDB, and a previous article showed How to Add Real-Time Machine Learning Predictions to Your SingleStore Data with MindsDB.
MindsDB allows existing SQL skills to be used on data science problems. Additionally, many online services that provide cloud-based notebook environments have appeared. Deepnote is one such service that also offers a range of integrations. We'll use these integrations to combine SingleStoreDB and MindsDB with Deepnote.
Create a SingleStore Cloud Account
First, we'll create a free Cloud account on the SingleStore website. At the time of writing, the Cloud account from SingleStore comes with $500 of Credits. A previous article showed how to create a SingleStoreDB Cloud cluster. We'll use those instructions for this use case. We'll note our cluster host address and password as we'll need this information for Deepnote.
Create a MindsDB Cloud Account
Next, we'll create a free Cloud account on the MindsDB website. We'll note our login email address and password as we'll need this information for Deepnote.
Create a Deepnote Account
Finally, we'll create a free account on the Deepnote website. Once we are logged in, we'll create two Deepnote integrations:
- MySQL
- MindsDB
We can use the MySQL integration for SingleStoreDB. Figure 1 shows an example of the information required for this integration.
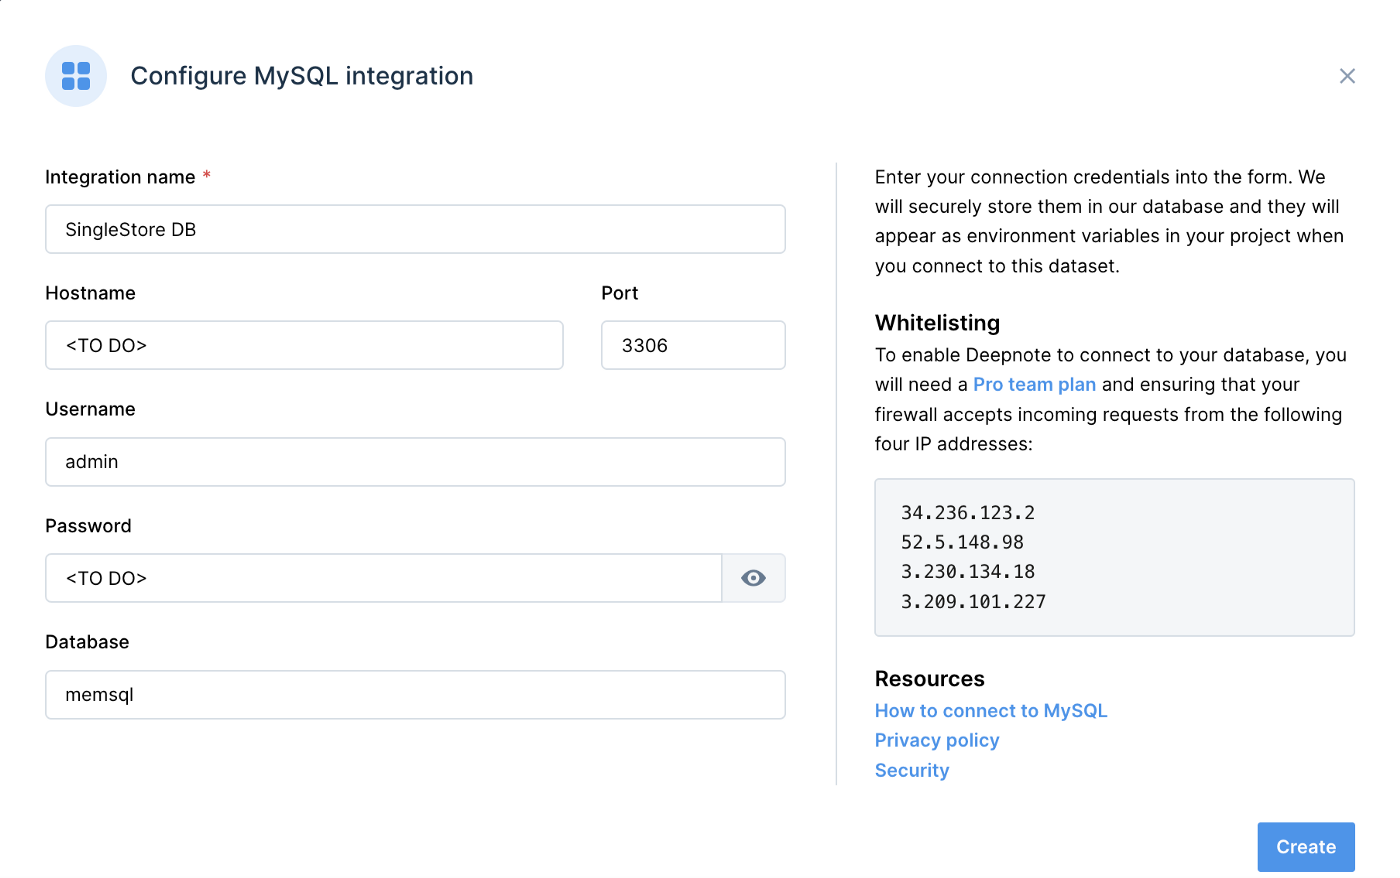
Figure 1. SingleStoreDB.
- Integration name: SingleStoreDB
- Hostname: <TO DO>
- Port: 3306
- Username: admin
- Password: <TO DO>
- Database: memsql
The <TO DO> for Hostname and Password should be replaced with the values obtained from SingleStoreDB Cloud when creating a cluster. We can use memsql for the Database name.
Figure 2 shows an example of the information required for the MindsDB integration.
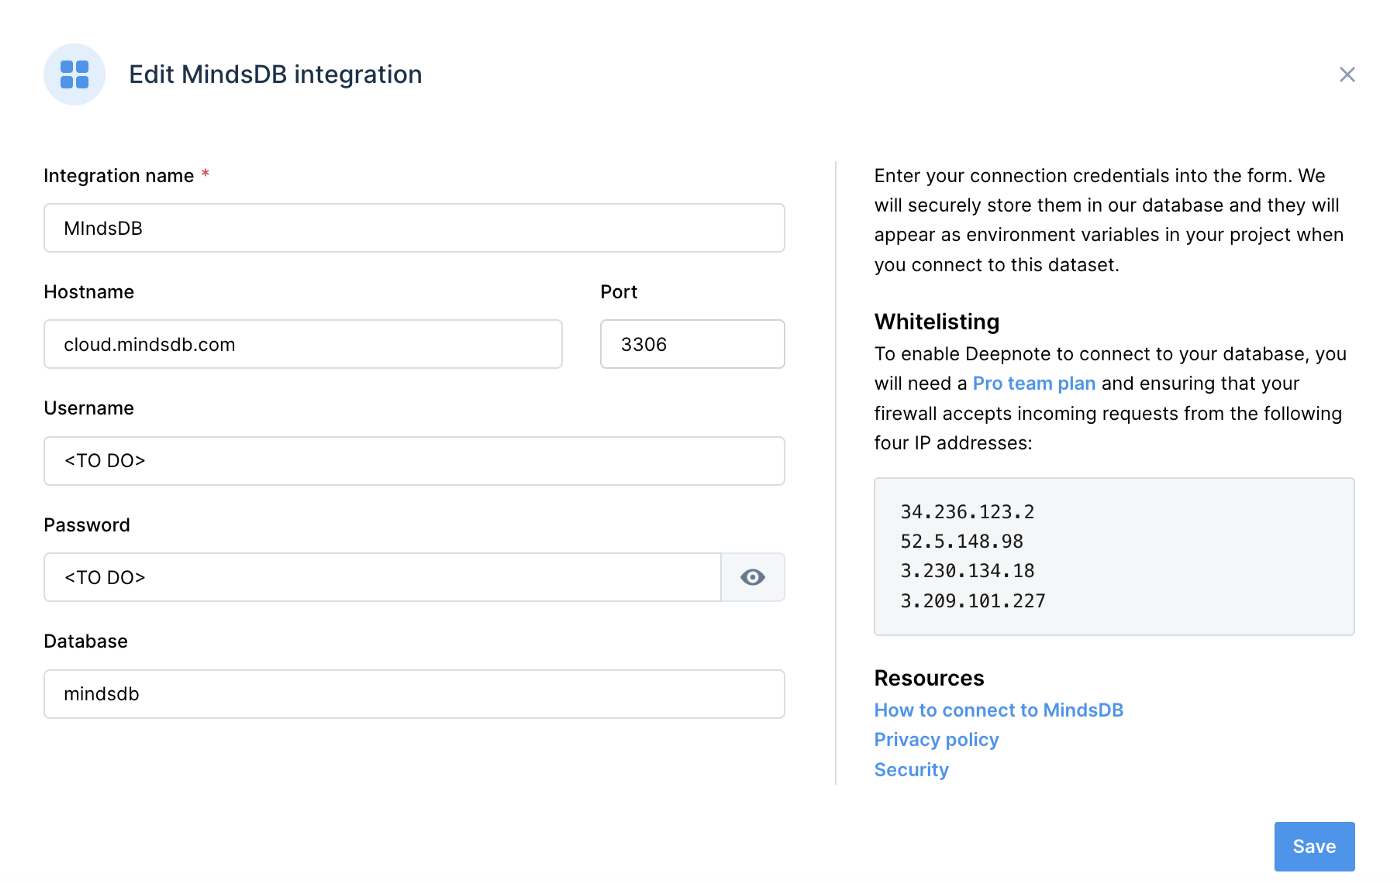
Figure 2. MIndsDB.
- Integration name: MindsDB
- Hostname: cloud.mindsdb.com
- Port: 3306
- Username: <TO DO>
- Password: <TO DO>
- Database: mindsdb
The <TO DO> for Username and Password should be replaced with the login values for MindsDB Cloud. We'll use mindsdb for the Database name.
Fill out the Notebook
We'll now create a new Deepnote project which will give us a new notebook. We'll add the SingleStoreDB and MindsDB integrations to the notebook. To use each integration correctly, we need to add an appropriate code cell associated with a particular integration. Note that your code execution results may vary from the output shown below in this article. First, let's start with SingleStoreDB.
SingleStoreDB Integration
For our quickstart, we'll work with the Iris flower data set. We'll start by dropping the database:
DROP DATABASE IF EXISTS iris_db;and then creating a suitable database in SingleStoreDB:
CREATE DATABASE iris_db;Now we need a table to store the data:
CREATE TABLE iris_db.iris (
    sepal_length FLOAT,
    sepal_width FLOAT,
    petal_length FLOAT,
    petal_width FLOAT,
    species VARCHAR(20)
);
We'll load the data directly as follows:
INSERT INTO iris_db.iris VALUES
(5.1,3.5,1.4,0.2,'Iris-setosa'),
(4.9,3,1.4,0.2,'Iris-setosa'),
(4.7,3.2,1.3,0.2,'Iris-setosa'),
(4.6,3.1,1.5,0.2,'Iris-setosa'),
(5,3.6,1.4,0.2,'Iris-setosa'),
...
(6.7,3,5.2,2.3,'Iris-virginica'),
(6.3,2.5,5,1.9,'Iris-virginica'),
(6.5,3,5.2,2,'Iris-virginica'),
(6.2,3.4,5.4,2.3,'Iris-virginica'),
(5.9,3,5.1,1.8,'Iris-virginica');
Only the first five and last five rows are shown above. The complete code listing is available in the notebook file on GitHub.
There are other ways we could load the Iris data. For example, we could use a MySQL client:
mysql --local-infile -u admin -h <TO DO> -P 3306 --default-auth=mysql_native_password -pThe <TO DO> for host (-h) being replaced with the value obtained from SingleStoreDB Cloud. We can then load the data into SingleStoreDB from a CSV file, as follows:
USE iris_db;LOAD DATA LOCAL INFILE '/path/to/iris.csv'
INTO TABLE iris
IGNORE 1 LINES
COLUMNS TERMINATED BY ',';
The Iris data set is widely available in a CSV format.
- The
/path/to/would need to be replaced with the actual path to where the CSV file was located. - We are ignoring the header row (
IGNORE 1 LINES) in the example above. We would need to adjust the code if there was no header row.
Once the data have been loaded into SingleStoreDB, we can check the table:
SELECT *
FROM iris_db.iris
LIMIT 5;
The output should be similar to the following:
+------------+------------+------------+------------+-------------+
| sepal_l... | sepal_w... | petal_l... | petal_w... | species     |
+------------+------------+------------+------------+-------------+
|        5.1 |        3.5 |        1.4 |        0.2 | Iris-setosa |
|        4.9 |          3 |        1.4 |        0.2 | Iris-setosa |
|        4.7 |        3.2 |        1.3 |        0.2 | Iris-setosa |
|        5.4 |        3.9 |        1.7 |        0.4 | Iris-setosa |
|        4.6 |        3.4 |        1.4 |        0.3 | Iris-setosa |
+------------+------------+------------+------------+-------------+
MIndsDB Integration
Next, we'll switch to MindsDB integration cells. The following cell should be run if this particular DATASOURCE was previously created:
DROP DATASOURCE iris_db;We'll now create the DATASOURCE to SingleStoreDB:
CREATE DATASOURCE iris_db
WITH ENGINE = "singlestore",
     PARAMETERS = {
         "user" : "admin",
         "password" : "<TO DO>",
         "host" : "<TO DO>",
         "port" : "3306",
         "database" : "iris_db"
     }
The <TO DO> for password and host should be replaced with the values obtained from SingleStoreDB Cloud when creating a cluster.
We can now check the table from MindsDB:
SELECT *
FROM iris_db.iris
LIMIT 5;
The output should be similar to the following:
+------------+------------+------------+------------+-------------+
| sepal_l... | sepal_w... | petal_l... | petal_w... | species     |
+------------+------------+------------+------------+-------------+
| 4.6        | 3.1        | 1.5        | 0.2        | Iris-setosa |
| 5.0        | 3.6        | 1.4        | 0.2        | Iris-setosa |
| 5.0        | 3.4        | 1.5        | 0.2        | Iris-setosa |
| 4.8        | 3.4        | 1.6        | 0.2        | Iris-setosa |
| 5.8        | 4.0        | 1.2        | 0.2        | Iris-setosa |
+------------+------------+------------+------------+-------------+
The following cell should be run if the PREDICTOR was previously created:
DROP PREDICTOR mindsdb.iris_model_v1;and we'll create a new PREDICTOR:
CREATE PREDICTOR mindsdb.iris_model_v1
FROM iris_db (SELECT * FROM iris)
PREDICT species;
We can see the status by running and rerunning the following command:
SHOW PREDICTORS;The status field will change from generating --> training --> complete. The output for the first five columns should look similar to the following:
+---------------+----------+----------+---------+---------------+---
| name          | status   | accuracy | predict | update_status |
+---------------+----------+----------+---------+---------------+---
| iris_model_v1 | complete | 1.0      | species | up_to_date    |
+---------------+----------+----------+---------+---------------+---
When the status field is marked as complete, we can obtain more information about the model by using the following command:
DESCRIBE iris_model_v1;and get details about the features as follows:
DESCRIBE iris_model_v1.features;We can also use some fictitious data values to make a prediction:
SELECT species, species_confidence, species_explain
FROM mindsdb.iris_model_v1
WHERE sepal_length = 5.2 AND
      sepal_width = 3.6 AND
      petal_length = 1.5 AND
      petal_width = 0.3;
The output should be similar to the following:
+-------------+--------------------+--------------------------------
| species     | species_confidence | species_explain
+-------------+--------------------+--------------------------------
| Iris-setosa | 0.9999             | {"predicted_value": "Iris-
|             |                    | setosa",
|             |                    | "confidence": 0.9999,
|             |                    | "anomaly": null,
|             |                    | "truth": null}
+-------------+--------------------+--------------------------------
We can also compare the actual and predicted values for all the data, as follows:
SELECT orig_table.species AS actual,
       pred_table.species AS predicted
FROM iris_db.iris AS orig_table
JOIN mindsdb.iris_model_v1 AS pred_table;
This should produce output similar to the following:
+-----------------+-----------------+
| actual          | predicted       |
+-----------------+-----------------+
| Iris-setosa     | Iris-setosa     |
| Iris-setosa     | Iris-setosa     |
| Iris-setosa     | Iris-setosa     |
| Iris-setosa     | Iris-setosa     |
| Iris-setosa     | Iris-setosa     |
...
| Iris-virginica  | Iris-virginica  |
| Iris-virginica  | Iris-virginica  |
| Iris-virginica  | Iris-virginica  |
| Iris-virginica  | Iris-virginica  |
| Iris-virginica  | Iris-virginica  |
+-----------------+-----------------+
Only the first five and last five rows are shown above.
Python Integration
Using a standard Deepnote cell, some quick Python code can be used to show any misclassification:
print(df[df["actual"] != df["predicted"]])For example, we may see the following output:
              actual       predicted
115  Iris-versicolor  Iris-virginica
We can also create a quick Confusion Matrix, as follows:
import seaborn as sns
import matplotlib.pyplot as plt
from sklearn.metrics import confusion_matrix

classes = ["Iris-setosa", "Iris-versicolor", "Iris-virginica"]

sns.heatmap(
    confusion_matrix(df["actual"], df["predicted"]),
    cmap = "Reds",
    xticklabels = classes,
    yticklabels = classes,
    annot = True
)

plt.title("Confusion Matrix")
plt.xlabel("Predicted")
plt.ylabel("Actual")
For example, we may see the chart shown in Figure 3.

Figure 3. Confusion Matrix.
From Figure 3, we can see that one instance of Iris-versicolor was misclassified as Iris-virginica.
If we rerun the code several times to rebuild our ML model, we will often see that some Iris-versicolor and Iris-virginica instances are misclassified. To understand why, we can create a plot using an example from Plotly:
import plotly.express as px

df = px.data.iris()

fig = px.scatter_matrix(
    df,
    dimensions = ["sepal_width", "sepal_length", "petal_width", "petal_length"],
    color = "species",
    symbol = "species",
    title = "Scatter matrix of Iris data set",
    labels = {col:col.replace('_', ' ') for col in df.columns}
)

fig.update_traces(diagonal_visible = False)

fig.show()
This produces the chart shown in Figure 4.
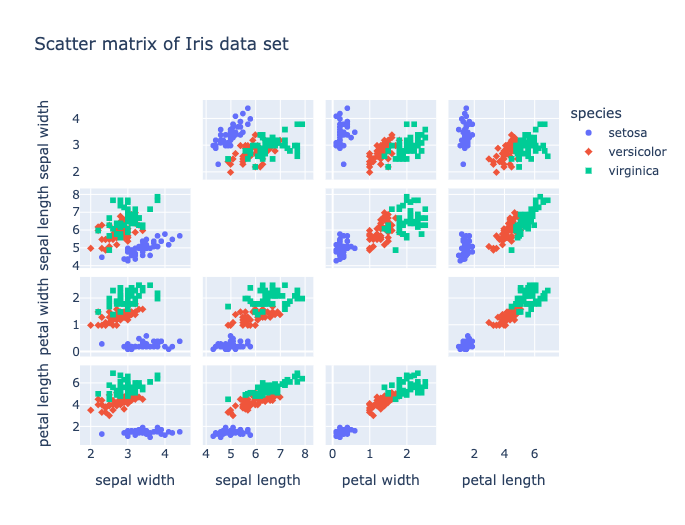
Figure 4. Iris Scatter Matrix.
From Figure 4, we can see that Iris-setosa is quite distinct. However, there is often an overlap between Iris-versicolor and Iris-virginica.
Summary
This article showed how to quickly combine several modern technologies to build a data science stack. Whilst we could run the commands across different platforms to obtain the same results, using Deepnote has enabled us to work within a single environment with access to all the necessary tools, saving us time and effort.
Using SingleStoreDB for data storage gives us a solid platform for performing analytics and working with data at scale.
The SQL interface provided by MindsDB enables developers with good SQL skills to be productive immediately; developers can quickly build ML models and make predictions.
In future articles, we'll further explore the integration of SingleStoreDB and MindsDB and test MindsDB's capabilities in other areas, such as Time Series data.
Published at DZone with permission of Akmal Chaudhri. See the original article here.
Opinions expressed by DZone contributors are their own.
Comments