Stop React Native Crashes: A Production-Ready Error Handling Guide
Learn about various error types and three-layer error handling to build reliable and resilient React Native mobile applications.
Join the DZone community and get the full member experience.
Join For FreeYou are demonstrating your next mobile application idea to investors, and suddenly the application crashes. Now you are clueless whether it crashed due to bad WIFI at the venue, your service is down, or your application itself hit a snag. There are no logs or alerts to tell you what just happened. Mere imagination of this scenario can send any founder or developer into panic and nervousness. Therefore, having robust error handling is critical to modern-day mobile applications. React Native has become an industry standard in building cross-platform native mobile applications. React Native boasts a rich ecosystem of error handling at various levels of architecture.
However, often projects lack clear guidelines on how to handle various error scenarios. This results in either overdoing or underdoing error handling in otherwise robust and feature-rich applications. In this article, you will learn how to adopt a three-layer error handling mechanism, which is gaining widespread popularity with major enterprise-level applications built at leading companies. The article will give you a practical guide instead of pure theory, so you are ready to adapt these concepts immediately.
Error Types
It is important for you to understand core error types to understand layers of error handling in React Native applications. These error categories are explained below:
- Network errors: Network errors can occur due to service loss, for example, losing cell reception while traveling or WIFI disconnection. These are the most common types of errors a mobile app experiences.
- Component errors: Component errors can happen due to wrongly implemented React lifecycle hooks, incorrect rendering of JSX, accessing undefined state properties, or infinite render loops. These errors can crash the entire app at once.
- Runtime errors: These errors are core JavaScript runtime errors like accessing properties on null or undefined values, JSON parsing failures, type mismatches, and unhandled promise rejections. These errors are the toughest to catch as they usually slip through standard testing. Due to the varied nature of these errors, error handling needs to be layered to prevent and recover the application from a crash state.
Three Layers of Error Handling
Implementing error handling at three critical layers ensures you catch all major errors. These layers are local error handling, component-level error handling, and global error handling. Please note that these layers are not a 1:1 match for each of the above error types; instead, they work together to ensure that you catch all errors safely.
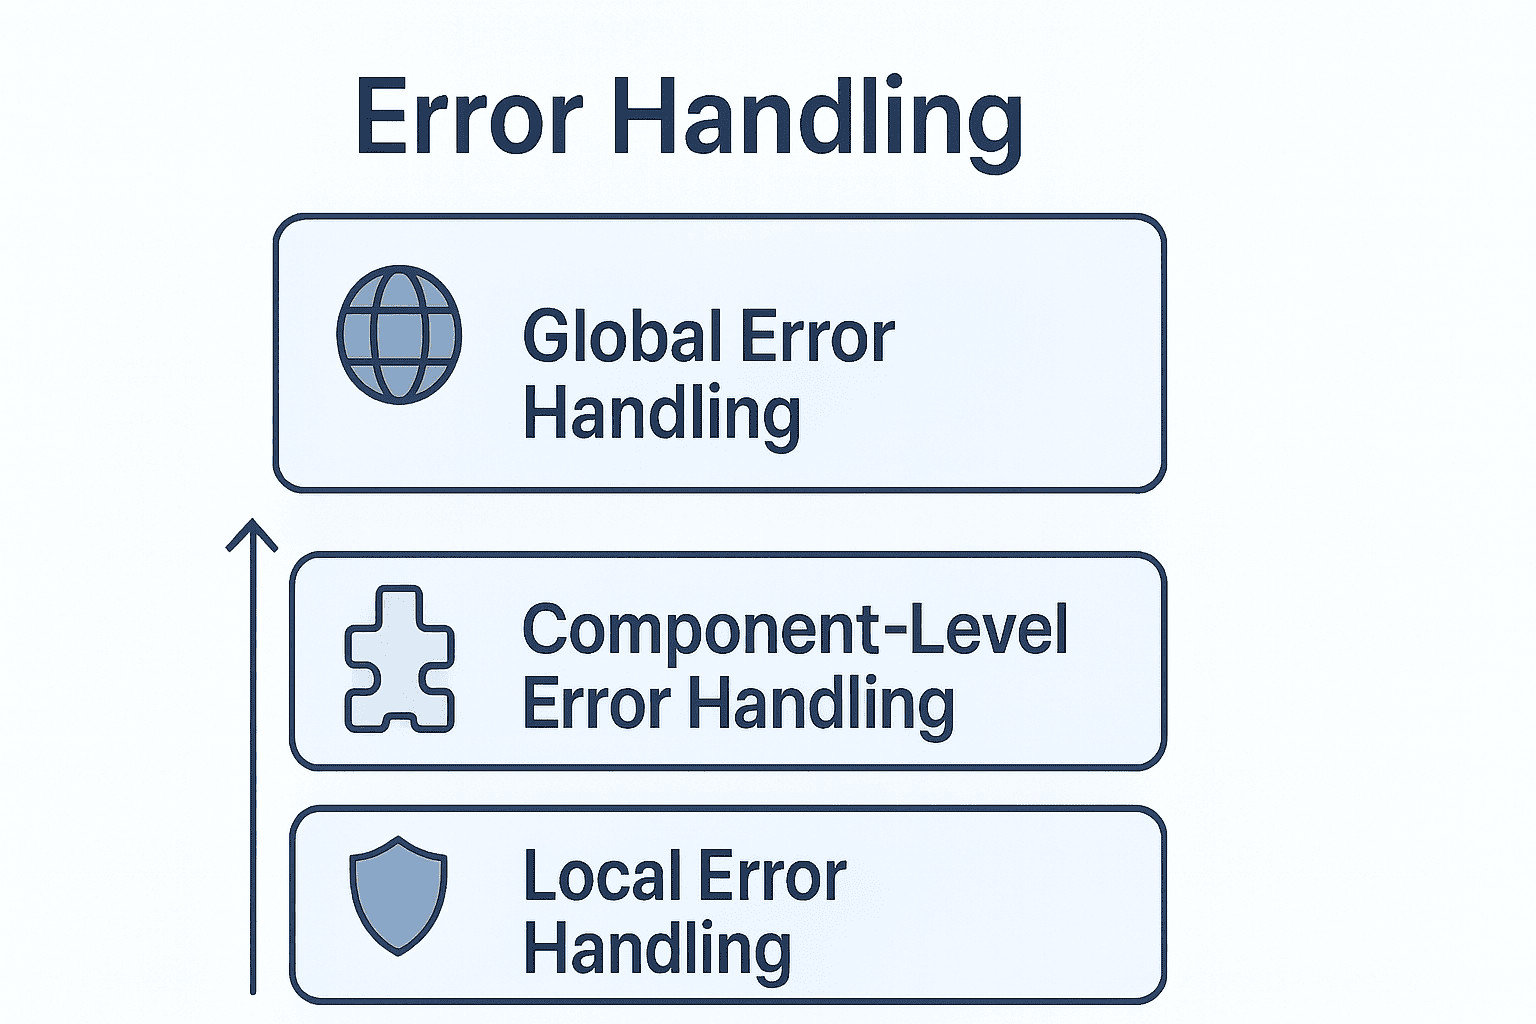
Layer 1: Local Error Handling
Local error handling refers to errors caught and handled within specific functions or code blocks. These errors are predictable and generally recoverable. You can perform several types of local error handling as described ahead:
Try-catch: Classic try-catch blocks are particularly useful when working with async operations such as calling external APIs. Please refer to the code below:
const fetchUserProfile = async (userId) => {
  try {
    const response = await fetch(`https://api.example.com/users/${userId}`);
    if (!response.ok) {
      throw new Error(`HTTP error! status: ${response.status}`);
    }
    const data = await response.json();
    return data;
  } catch (error) {
    console.error('Failed to fetch user profile:', error);
    Alert.alert('Error', 'Unable to load profile. Please try again.');
    return null;
  }
};
React query error handling: Async operations can be enhanced using modern constructs like React Query, which, along with standard try-catch level error handling, offers more options such as retrying failed operations. This allows for graceful recovery from an error state. Observe the sample implementation given below.
import { useQuery, useMutation } from '@tanstack/react-query';
import api from './services/api';

const UserProfile = () => {
  const { data, error, isError, isLoading } = useQuery({
    queryKey: ['user', 'profile'],
    queryFn: async () => {
      const response = await api.get('/user/profile');
      return response.data;
    },
    retry: 3,
    retryDelay: (attemptIndex) => Math.min(1000 * 2 ** attemptIndex, 30000),
    onError: (error) => {
      if (error.code !== 'NETWORK_ERROR') {
        Alert.alert('Error', 'Failed to load profile');
      }
    },
  });

  if (isLoading) return <Text>Loading...</Text>;
  if (isError) return <Text>Error: {error.message}</Text>;

  return <Text>{data?.name}</Text>;
};
Form validation: Form validations at React Native components not only improve the app’s user experience but also improve backend performance by reducing unnecessary API calls. Below is an example for you to refer to:
import { useForm } from 'react-hook-form';
import { z } from 'zod';
import { zodResolver } from '@hookform/resolvers/zod';

const loginSchema = z.object({
  email: z.string().email('Invalid email address'),
  password: z.string().min(6, 'Password must be at least 6 characters'),
});

const LoginForm = () => {
  const { handleSubmit, formState: { errors } } = useForm({
    resolver: zodResolver(loginSchema),
  });

  const onSubmit = async (data) => {
    try {
      await api.post('/auth/login', data);
    } catch (error) {
      Alert.alert('Login Failed', error.message);
    }
  };

  return (
    <View>
      {errors.email && <Text style={styles.error}>{errors.email.message}</Text>}
      {errors.password && <Text style={styles.error}>{errors.password.message}</Text>}
    </View>
  );
};
Layer 2: Component-Level Error Handling
Error boundaries catch component-level errors in the child component tree that go uncaught during local error handling. These can include infinite rendering, improper lifecycle management, and accessing undefined properties during rendering inside components. Without an Error Boundary, a single error can crash the entire application, leading to an unpleasant customer experience.
There are two major steps involved in creating an error boundary: 1) creating a dedicated error boundary component, and 2) wrapping the entire application code in it as a child. The code below highlights how to create the error boundary component.
import React from 'react';
import { View, Text, TouchableOpacity, StyleSheet } from 'react-native';
class ErrorBoundary extends React.Component {
  constructor(props) {
    super(props);
    this.state = {
      hasError: false,
      error: null,
      errorInfo: null
    };
  }

  static getDerivedStateFromError(error) {
    return { hasError: true, error };
  }

  componentDidCatch(error, errorInfo) {
    console.error('ErrorBoundary caught an error:', error, errorInfo);
    this.setState({
      errorInfo: errorInfo.componentStack,
    });
  }

  handleReset = () => {
    this.setState({
      hasError: false,
      error: null,
      errorInfo: null
    });
  };

  render() {
    if (this.state.hasError) {
      return (
        <View style={styles.container}>
          <Text style={styles.title}>Oops! Something went wrong</Text>
          <Text style={styles.message}>
            We're sorry for the inconvenience. Please try again.
          </Text>

          {__DEV__ && this.state.error && (
            <View style={styles.errorDetails}>
              <Text style={styles.errorText}>
                {this.state.error.toString()}
              </Text>
              {this.state.errorInfo && (
                <Text style={styles.errorStack}>
                  {this.state.errorInfo}
                </Text>
              )}
            </View>
          )}

          <TouchableOpacity
            style={styles.button}
            onPress={this.handleReset}
          >
            <Text style={styles.buttonText}>Try Again</Text>
          </TouchableOpacity>
        </View>
      );
    }

    return this.props.children;
  }
}
Once the error boundary component is created, you can wrap the entire application around it by referring to the code below.
import React from 'react';
import { SafeAreaView } from 'react-native';
import ErrorBoundary from './components/ErrorBoundary';
import MainNavigator from './navigation/MainNavigator';
const App = () => {
  return (
    <ErrorBoundary>
      <SafeAreaView style={{ flex: 1 }}>
        <MainNavigator />
      </SafeAreaView>
    </ErrorBoundary>
  );
};
export default App;
Layer 3: Global Error Handling
Global error handling is the final safety measure that can help catch uncaught errors in local layer and component layer error handling. These include catching uncaught JavaScript exceptions, unhandled promise rejections, and more.
Furthermore, global error handling can help centralize API error handling, creating manageable error handling for entire applications.
Global error handling component: Implementation of the global error handling component is quite similar to the error boundary component, with two stages: creating the component and using it in the root application initialization. You can refer to the code below to create a global error handling component.
import { Alert } from 'react-native';

class GlobalErrorHandler {
  static init() {
    this.setupErrorHandler();
    this.setupPromiseRejectionHandler();
  }

  static setupErrorHandler() {
    ErrorUtils.setGlobalHandler((error, isFatal) => {
      console.error('Global Error Handler:', {
        error,
        isFatal,
        message: error.message,
        stack: error.stack,
      });

      if (isFatal) {
        Alert.alert(
          'Unexpected Error',
          'The app encountered a critical error and needs to restart. ' +
          'We apologize for the inconvenience.',
          [
            {
              text: 'Restart',
              onPress: () => {},
            },
          ]
        );
      } else {
        console.warn('Non-fatal error occurred:', error.message);
      }
    });
  }

  static setupPromiseRejectionHandler() {
    if (__DEV__) {
      require('promise/setimmediate/rejection-tracking').enable({
        allRejections: true,
        onUnhandled: (id, error) => {
          console.warn('Unhandled Promise Rejection (Dev):', id, error);
        },
        onHandled: (id) => {
          console.log('Promise rejection was handled:', id);
        },
      });
    }
  }

  static handleError(error, context = {}) {
    console.error('Handled Error:', {
      error,
      context,
      message: error.message,
      stack: error.stack,
    });

    let userMessage = 'Something went wrong';

    if (error.code === 'NETWORK_ERROR') {
      userMessage = 'No internet connection. Please check your network.';
    } else if (error.code === 'UNAUTHORIZED') {
      userMessage = 'Your session has expired. Please login again.';
    } else if (error.message) {
      userMessage = error.message;
    }

    return userMessage;
  }
}

export default GlobalErrorHandler;
Once created, initialize it in the main application component using the below reference code.
import React, { useEffect } from 'react';
import { SafeAreaView } from 'react-native';
import ErrorBoundary from './components/ErrorBoundary';
import GlobalErrorHandler from './utils/GlobalErrorHandler';
import MainNavigator from './navigation/MainNavigator';

const App = () => {
  useEffect(() => {
    GlobalErrorHandler.init();
  }, []);

  return (
    <ErrorBoundary>
      <SafeAreaView style={{ flex: 1 }}>
        <MainNavigator />
      </SafeAreaView>
    </ErrorBoundary>
  );
};

export default App;
Axios Interceptor: Axios Interceptor acts as a centralized API error handler. You can refer to the code below to implement it. After the implementation, you can import it wherever you need API calling.
import axios from 'axios';
import AsyncStorage from '@react-native-async-storage/async-storage';
import { Alert } from 'react-native';

const api = axios.create({
  baseURL: 'https://api.example.com',
  timeout: 10000,
});

api.interceptors.request.use(
  async (config) => {
    const token = await AsyncStorage.getItem('authToken');
    if (token) {
      config.headers.Authorization = `Bearer ${token}`;
    }
    return config;
  },
  (error) => Promise.reject(error)
);

api.interceptors.response.use(
  (response) => response,
  async (error) => {
    if (!error.response) {
      Alert.alert('Network Error', 'Please check your internet connection');
      return Promise.reject({
        code: 'NETWORK_ERROR',
        message: 'No internet connection',
      });
    }

    switch (error.response.status) {
      case 401:
        await AsyncStorage.removeItem('authToken');
        return Promise.reject({
          code: 'UNAUTHORIZED',
          message: 'Session expired. Please login again.',
        });
      case 403:
        Alert.alert('Access Denied', 'You do not have permission');
        break;
      case 404:
        Alert.alert('Not Found', 'Resource not found');
        break;
      case 500:
      case 502:
      case 503:
        Alert.alert('Server Error', 'Please try again later');
        break;
    }

    return Promise.reject(error);
  }
);
export default api;
Conclusion
You have learned about different errors your React Native application can encounter and a layered approach to handling them. This knowledge will help you build robust mobile applications that are reliable and resilient. If you wish to dive deeper, you can explore error logging services like Sentry and Firebase Crashlytics. While these services have costs, they are very useful tools for understanding and fixing production errors.
Opinions expressed by DZone contributors are their own.
Comments