Secure Spring Boot Application With Keycloak
Are you an experienced Java developer but new to Keycloak? Read through this tutorial presenting step-by-step examples of how to secure your REST API.
Join the DZone community and get the full member experience.
Join For FreeIn my last article about Keycloak, I mentioned Spring Boot as one of the frameworks to integrate with Keycloak. Here, I will dive deeper into how to integrate them; namely, I will describe how you can secure your Spring Boot-based REST API with the help of Keycloak.
I will also add a few words about the Keycloak admin console and how to use it. Of course, all necessary configurations from Spring Boot’s side will also be detailed and explained.
Before we start — a quick disclaimer:
Here you can find only the most interesting code samples. The full source code is available in my GitHub repository.
Spring Boot Adapter Deprecation
Some time ago, the people behind Keycloak decided to deprecate Spring Boot Keycloak Adapter. As for the main reason, the authors state that existing support for OIDC through the frameworks is more than enough and there is no longer a need to maintain a Keycloak specific adapter. Additionally, they want to focus more on the development of Keycloak itself, not maintaining the libraries around.
Such deprecation means that among other problems, we will not be getting an updated Keycloak adapter to support Spring Boot. What is more, we should consider switching our Keycloak integration to the Spring Security standard library as soon as possible.
This tutorial describes the integration of Spring Boot 2 and Keycloak Spring Boot Adapter.
Local Keycloak Instance
Before we start doing any integration and configurations we need to run our local Keycloak instance. I recommend using the Keycloak Docker image but you can use the standalone version as well.
In the case of Docker Image, the following command should do the job.
docker run -p 8090:8080 -e KEYCLOAK_ADMIN=admin -e KEYCLOAK_ADMIN_PASSWORD=admin quay.io/keycloak/keycloak:22.0.0 start-dev
It will run the Keycloak image if you have one locally or pull it and then run it if you do not. Additionally, it will forward the Docker image port 8080 to 8090 on your local device (it will be important later on). It will also set Keycloak Admin Console credentials to admin/admin.
For standalone distribution, first, you need to download the .zip file from the official page. After downloading the .zip file, you need to run the commands below in the download directory.
unzip keycloak-22.0.0.zip
cd keycloak-22.0.0/bin
./kc.sh start-dev
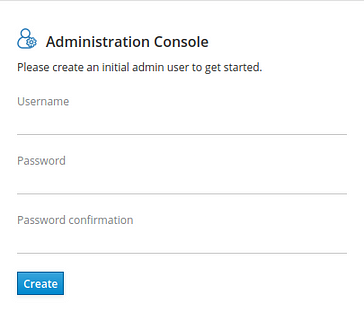
Unfortunately, to be able to log into Admin Console you will have to create the admin user yourself. Go to http://localhost:8080/auth/ and fill in the form in the Administrator Console part. For the purpose of this exercise, admin/admin will be enough.
Then you should be able to log in to Keycloak Admin Console. Please keep in mind that with such a setting Keycloak is using port 8080 so it will clash with the REST API port — I would recommend changing the API port as it is a simpler task.
Configuration
In this paragraph, I will describe all configurations needed by Spring and Keycloak to work together. We will start by configuring the Keycloak instance and then we will move on to Spring Boot configuration.
Keycloak
1. Log in to Admin Console on localhost:8090.
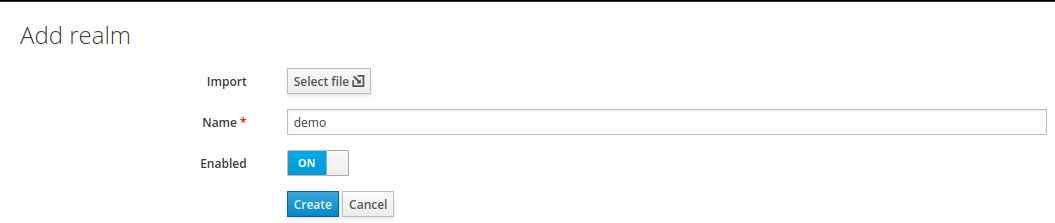
2. Create a new realm named demo.
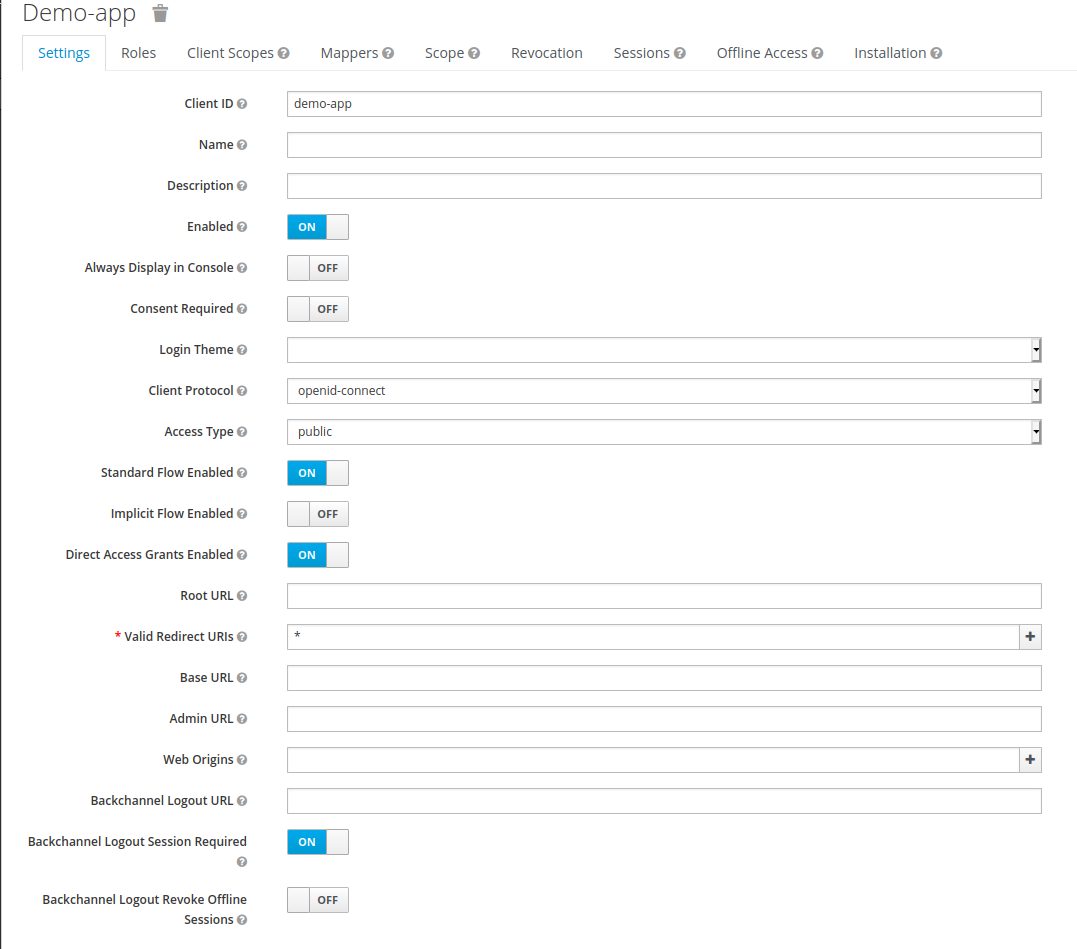
3. Create a new client named demo-app with public access type. Set its Valid Redirect URIs to * (I do not recommend this for any production services), and save your changes.

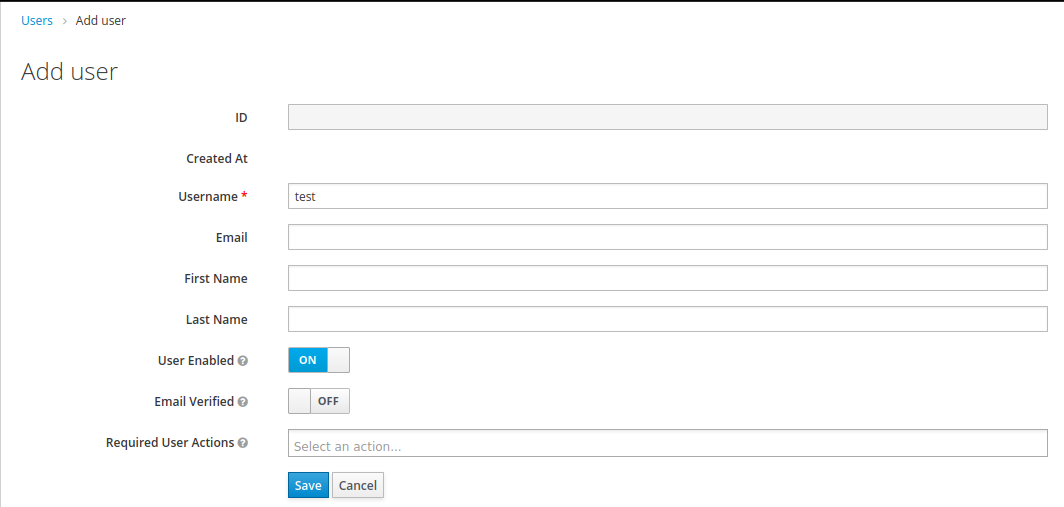
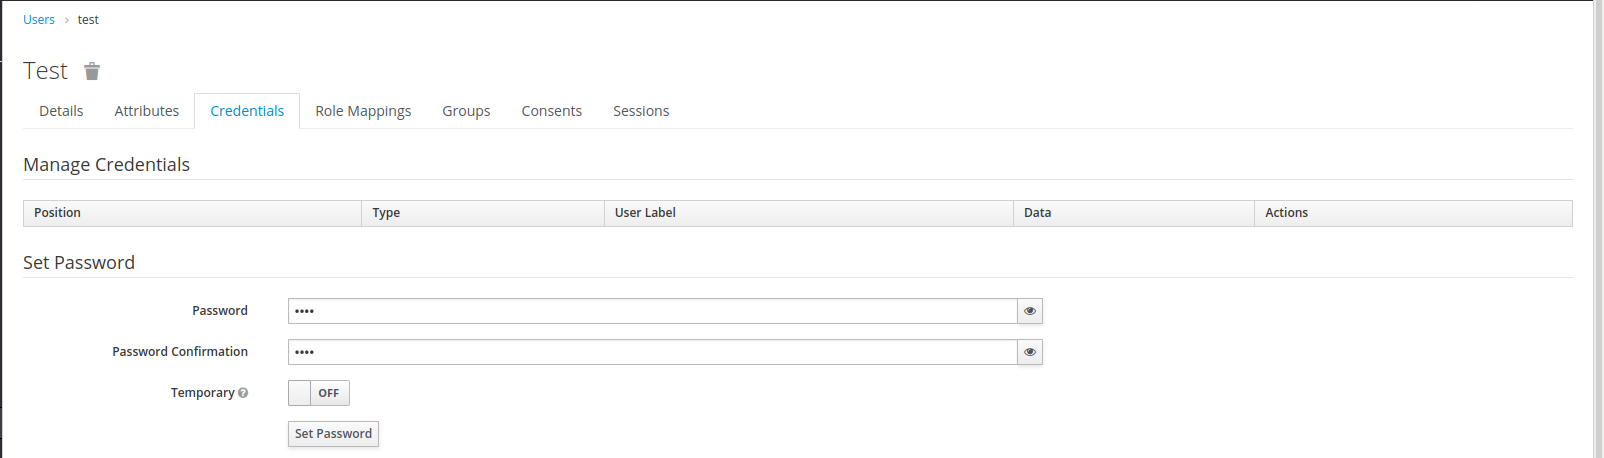
4. Create a new user with credentials test/test.

For the purpose of this article, the above configuration of Keycloak will be sufficient. Now we move on to configuring your Spring Boot application. I assume that you already have the Spring Boot project and you are using Maven. For Gradle-based projects, the only difference will be the style of adding project dependencies.
Spring Boot
As I mentioned in the previous article, integrating Spring Boot and Keycloak will require a library named: spring-boot-keycloak-starter but it is not all, you will have to do a few more things.
1. Add the library mentioned above in your Maven or Gradle build file as a dependency.
2. Add spring-boot-starter-security in your Maven or Gradle build file as a dependency.
<dependencies>
  <dependency>
    <groupId>org.keycloak</groupId>
    <artifactId>keycloak-spring-boot-starter</artifactId>
    <version>22.0.0</version>
  </dependency>
  <dependency>
    <groupId>org.springframework.boot</groupId>
    <artifactId>spring-boot-starter-security</artifactId>
  </dependency>
</dependencies>

<dependencyManagement>
  <dependencies>
    <dependency>
      <groupId>org.keycloak.bom</groupId>
      <artifactId>keycloak-adapter-bom</artifactId>
      <version>22.0.0</version>
      <type>pom</type>
      <scope>import</scope>
    </dependency>
  </dependencies>
</dependencyManagement>
3. Add org.keycloak.bom.keycloak-adapter-bom as a dependency in the dependecnymanager tag.
4. Configure Spring Boot properties required by Keycloak.
keycloak.auth-server-url= http://localhost:8090/auth: URL to your Keycloak instancekeycloak.realm=demo: The name of the realm used to hold users’ data of our applicationkeycloak.resource=demo-app: The name of the client that our Spring Boot application will use to integrate with the following:

keycloak.public-client=true: Spring Boot adapter will not send credentials to authenticate within Keycloak; it will use only client_id, demo-app in our case.
Additionally, I will add keycloak.principal-attribute property and set it to preferred_username. This parameter is not required by Keycloak or Spring Boot but will make examples much more readable. With such a configuration, we can easily extract the Keycloak user name from a token available on the Spring Boot side. By default — without this configuration, after calling .getName() on the Authentication object we will get the Keycloak user id which is standard UUID.
Beware: If your Spring Boot application runs without these properties being set, an exception will be thrown in runtime (welcome to the Spring Magic). What is even more disturbing: it will not happen straight away after the application starts but only when you try to authenticate your user.
5. Create a class that will extend KeycloakWebSecurityConfigurerAdapter and add @EnableWebSecurity annotation. We will use this class to configure security for your application.
@EnableWebSecurity
public class GlobalSecurityConfiguration extends KeycloakWebSecurityConfigurerAdapter
6. Now we will fill our security class and create all beans required by Spring.
Firstly, we will create two Spring beans: SessionAuthenticationStrategy and KeycloakConfigResolver.
The first one is responsible for our HTTP session behavior when authentication occurs, while the second one is used to resolve Keycloak configuration properties used by Spring Boot. This bean will resolve the configuration properties mentioned in the third point.
In the current version of the Spring Boot Keycloak adapter (22.0.0), the KeycloakWebSecurityConfigurerAdapter class requires KeycloakConfigResolver. Our bean implementation has to be declared in a separate class.
@Configuration
public class KeycloakConfigResolverBean {

    @Bean
    public KeycloakConfigResolver keycloakConfigResolver() {
        return new KeycloakSpringBootConfigResolver();
    }
}
For SessionAuthenctionStartegy we should use RegisterSessionAuthenticationStrategy because we are using a public Keycloak client for authentication.
@Bean
@Override
protected SessionAuthenticationStrategy sessionAuthenticationStrategy() {
  return new RegisterSessionAuthenticationStrategy(new SessionRegistryImpl());
}
7. Next you need to override two configuration methods which will add KeycloakAuthenticationProvider and configure our REST API security.
@Override
public void configure(AuthenticationManagerBuilder auth) {
  KeycloakAuthenticationProvider keycloakAuthenticationProvider = keycloakAuthenticationProvider();
  auth.authenticationProvider(keycloakAuthenticationProvider);
}
Now our application will use Keycloak as a default authentication provider. If you want to know more about what it exactly means, I encourage you to take a look at the implementation of the KeycloakAuthenticationProvider and the authenticate method in particular.
@Override
protected void configure(HttpSecurity http) throws Exception {
  super.configure(http);
  http
  .authorizeRequests()
  .anyRequest()
  .authenticated();
}
With such a configuration, Spring Security requires all the incoming requests to our REST API to be authenticated. If the request is not authenticated it will fail with the 401 HTTP status code.
What is more, at this point, there are no roles and accesses, in the production-grade application probably some more config will be needed.
8. The last thing to do is create a REST endpoint that we will use to test our API security. Here I have prepared a very simple hello-world style controller and endpoint.
@RestController
public class HelloController {

    @GetMapping("/hello")
    public ResponseEntity<String> hello(Authentication authentication) {
        final String body = "Hello " + authentication.getName();
        return ResponseEntity.ok(body);
    }
}
That is all the configuration you will need to secure your REST API with Keycloak and Spring Boot. Now let’s test it.
Test
For testing our integration, I will use the IntelliJ built-in HTTP client. In my opinion, Keycloak requests can be somewhat complex, and creating such a request in curl can take some time.
If everything is done correctly, sending a request http://localhost:8080/hello/ from the browser should result in redirection to the Keycloak login page.

With IntelliJ HTTP client, the result should look more or less like this.
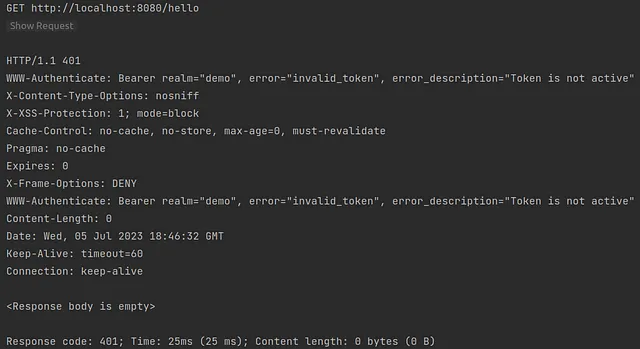
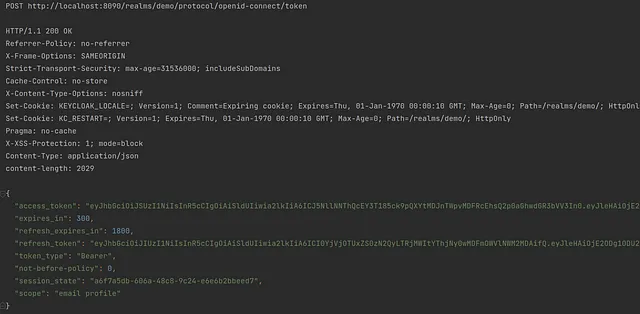
Now we can see that our API is protected by Keycloak and accessing an endpoint will require authentication within the Keycloak. The next thing we have to do is to obtain the access token from Keycloak. Fortunately, Keycloak exposes REST API that can be used to request and refresh access tokens. The following request should be sufficient to get our access token.

Here is a list of request parameters used with a short description:
client_id: The name of the client which you want to use to authenticate your userusername: Your user’s namepassword:Your user’s passwordgrant_type: A name of Grant Type we are using to exchange a user’s credentials for an access token
Here we use the password as Grant Type (OAuth-specific mechanism) so we use the username and password to authenticate ourselves within Keycloak and get the correct token. If you want to read more about OAuth Grant Types I encourage you to read this text.
The response should look more or less like this.
Now we need to go back to the previous request. Thanks to some magic of the HTTP client we do not need to perform any changes — the client will get the value of the access_token field from the response. Then the client will use the value as the bearer token for the next request in the hello endpoint.
Here is the request:

The response from our backend should be similar to the one on the screen.
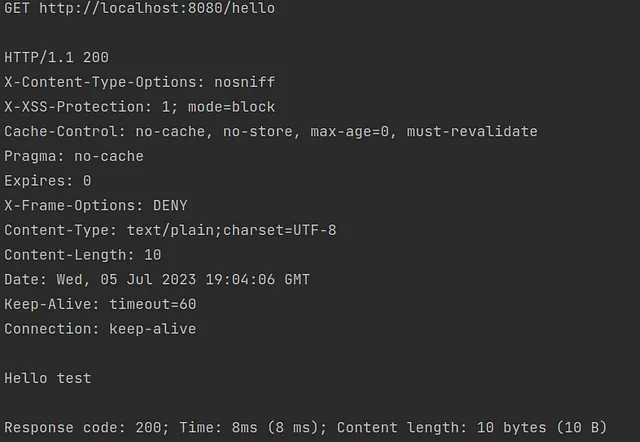
Et voilà — your API is secured with Keycloak and you have learned something new (at least I hope so).
Summary
As you can see integrating Spring Boot and Keycloak does not have to be hard. Thanks to all the Spring Boot auto-configuration it can be done relatively easily. I hope my article deepened your Keycloak or Spring Boot knowledge.
If you'd like to read more about security and Keycloak I encourage you to check out these additional articles:
- Secure Spring Boot 3 Application With Keycloak
- What Keycloak Is and What It Does
- OpenID Connect Flows
- SAML vs OAuth vs OpenID Connect — Which One Suits You the Most?
Thank you for your time.
Opinions expressed by DZone contributors are their own.
Comments