SQL INSERT, UPDATE, DELETE — Oh My!
In this article, learn about SQL INSERT, UPDATE, and DELETE statements and explore a case study.
Join the DZone community and get the full member experience.
Join For FreeSQL INSERT, UPDATE, and DELETE statements — what are they all about? If you’re a data engineer, a database administrator, or even just your average data fanboy or girl, one day you’re going to find yourself with a database that becomes your “baby.” Charged with this special bundle of joy, you’re going to need to feed and change the little fella. Yes, we’re still talking about databases! INSERT, UPDATE, and DELETE are all functions in SQL that help you ensure your data is up-to-date and kept clear of unnecessary or outdated information.
INSERT, UPDATE, and DELETE, as well as SELECT and MERGE, are known as Data Manipulation Language (DML) statements, which let SQL users view and manage data. While data is, of course, often updated by the application itself, it regularly requires manual entry or maintenance, and this demands not only a good understanding of SQL Basics, but also how to INSERT, UPDATE, and DELETE in SQL.
Mickey Mouse Children’s Hospital – A Database Case Study
Let’s look at these SQL triplets one-by-one and understand how they work.
We’ll use a sample database to demonstrate each of the three. Keeping with the baby theme, let’s say you’re the data administrator at a children’s hospital, “Mickey Mouse Children’s Hospital,” to be precise. The hospital keeps records of all its little patients, including their age, weight, blood test results — you get the adorable picture.
Usually, the doctors enter and update this information into the hospital’s system each time they see their patients, and much of the inserting, updating, and deleting of records into the database is performed by the system. But often there are things that need manual fixing, and as the resident database administrator, this is your time to shine!
In the article below, we use three different tables to demonstrate the three different statements.
Sample table number one shows patient records and their basic information:
Patient table
| PatientID | Surname | FirstName | DOB | Sex | Weight | Height | Vaccinated |
|---|---|---|---|---|---|---|---|
| 15223 | Smith | Deniz | 12/31/2018 | F | 21.4 | 29.2 | Y |
| 15224 | Agarwal | Arjun | 08/29/2017 | M | 28.1 | 34.2 | Y |
| 15225 | Adams | Poppy | 02/14/2015 | F | 34.0 | 39.2 | N |
| 15226 | Johnson | Tierra | 08/15/2019 | F | 14.6 | 24.5 | Y |
| 15227 | Khouri | Mohammed | 03/30/2014 | M | 41.5 | 44.1 | Y |
| 15228 | Jones | Ben | 04/04/2011 | M | 70.1 | 52.2 | Y |
| 15229 | Kowalczyk | Alexandra | 08/27/2019 | F | 15.2 | 23.9 | Y |
Sample table number two carries the different departments of the hospital and the groups and categories those departments fall under:
Department table
| DepartmentID | DepartmentName | GroupName | CategoryName |
|---|---|---|---|
| 1 | Cardiology | Heart Center | Clinical |
| 2 | Central ICU | Emergency | Clinical |
| 3 | Emergency | Emergency | Clinical |
| 4 | Communications | Administration | Operational |
| 5 | Oncology | Internal Medicine | Clinical |
| 6 | Neurology | Internal Medicine | Clinical |
| 7 | Human Resources | Administration | Operational |
| 8 | Pathology | Service | Technical |
| 9 | Radiology | Service | Technical |
| 10 | Pharmacy | Service | Technical |
| 11 | Executive Board | Administration | Operational |
| 12 | Urology | Surgery | Clinical |
| 13 | Hematology | Internal Medicine | Clinical |
| 14 | Montana Ward | Ward | Operational |
| 15 | Chicago Ward | Ward | Operational |
| 16 | Lincoln Ward | Ward | Operational |
| 17 | Yellowstone Ward | Ward | Operational |
| 18 | Brooklyn Ward | Ward | Operational |
Sample table number three records patients’ visits over the years:
PatientAdmittance table
| PatientID | LastAdmitted | LastDischarged |
|---|---|---|
| 33 | 12/29/1952 | 01/05/1953 |
| 34 | - | - |
| 35 | 08/01/2004 | 08/04/2004 |
| 36 | 07/28/2011 | 07/30/2011 |
| 37 | 05/27/1950 | 05/30/1950 |
| 38 | - | - |
| 39 | 10/11/1970 | 10/20/1970 |
Armed with these sample tables, let’s get into the nitty-gritty of INSERT, UPDATE, and DELETE.
INSERT Data Using SQL
Just like babies, there’s new data born every minute. With lots of savvy systems in place, often that data is added seamlessly to its intended databases. In many instances, though, you’ll find you need to add it manually, and that’s where the INSERT statement in SQL comes in.
INSERT is your go-to for adding single or multiple rows to a table. INSERT can also help with adding rows from one table into another table.
Let’s look at the basic structure of an SQL INSERT statement:
xxxxxxxxxx
INSERT INTO tableName
(column1, column2, …)
VALUES (value1, value2, …)
First, we need to identify the table we’re wanting to insert rows into. Next, we specify the columns we want to fill. Finally, we stipulate the values we need to add. This is the basic form of the INSERT feature, and it’s pretty intuitive.
To give this structure some real-life application, here’s an example from our case study.
One of the doctors at Mickey Mouse Children’s Hospital has a newborn patient who has not yet been named. The doctor needs to enter the baby into the database immediately in order to access a drug trial for the sick child, but the system won’t allow the littlun’s file to be submitted without a name. The doctor wants the patient to be added using her patient number, with her name left blank until a later date. As the administrator, you’ll need to enter the patient manually into the database.
Here’s how the INSERT statement would look:
xxxxxxxxxx
INSERT INTO dbo.Patient
(Surname, FirstName, DOB, Sex, [Weight], Height, Vaccinated)
VALUES (NULL, NULL,'2019-11-19', 'F', 14.0, 23.1, 'No')
As you can see, we’re not only giving the name of the table we need to insert into but also the names of the columns and values we want to add. We don’t specify the PatientID in the column list because as an identity column, this is automatically populated.
Because we want to keep the patient’s name blank for now, we write NULL for the name columns.
Once we run this command, it will create the following addition to the database:

Inserting Multiple Rows
To insert more than one row of data with just one statement, use parentheses and commas to specify the distinct new rows.
xxxxxxxxxx
INSERT INTO dbo.Patient
(Surname, FirstName, DOB, Sex, [Weight], Height, Vaccinated)
VALUES ('Hitson', 'George','2019-11-19', 'M', 13.9, 22.5, 'No'),
VALUES ('Hitson', 'Jenny','2019-11-19', 'F', 13.7, 22.3, 'No')
Tip! Use a transaction to test out your insert without committing and permanently altering your table. To do this, start with BEGIN TRANSACTION, and end the transaction with either COMMIT, if you want to keep the changes, or ROLLBACK, if you want to reverse what you have done. Below is how we’d add a transaction to the above example:
Begin Transaction
xxxxxxxxxx
BEGIN TRANSACTION
INSERT INTO dbo.Patient
(Surname, FirstName, DOB, Sex, [Weight], Height, Vaccinated)
VALUES ('Hitson', 'George','2019-11-19', 'M', 13.9, 22.5, 'No'),
('Hitson', 'Jenny','2019-11-19', 'F', 13.7, 22.3, 'No')
ROLLBACK
--COMMIT
Inserting From One Table to Another
Need to insert one or multiple rows of data from one table into another table? You can use the INSERT INTO SELECT statement.
Let’s say several of our young patients are taking part in a new drug trial, and you’re setting up a new table to record their participation. The basic structure of this statement is:
xxxxxxxxxx
INSERT INTO targetTable (column1, column2, …)
SELECT (column1, column2, …)
FROM sourceTable
The statement for our drug trial example would look like this:
xxxxxxxxxx
INSERT INTO [dbo].[DrugTrialAlpha]
(Surname, FirstName, DOB, Sex, DrugOrPlacebo, Notes)
SELECT
p.Surname, p.FirstName, p.DOB, p.Sex, 'Drug', NULL
FROM dbo.Patient AS p
WHERE
p.PatientID IN (15226, 15229, 15230)
UNION
SELECT
p.Surname, p.FirstName, p.DOB, p.Sex, 'Placebo', NULL
FROM dbo.Patient AS p
WHERE
p.PatientID IN (15231)
You could also write the example as a Common Table Expression (CTE). Among other things, CTE can be used to create a temporary result set which can be reused during the query. Here’s how the same command written as a CTE would look:
xxxxxxxxxx
WITH drugTrialPatients (Surname, FirstName, DOB, Sex, DrugOrPlacebo, Notes)
AS (
SELECT
p.Surname, p.FirstName, p.DOB, p.Sex, 'Drug', NULL
FROM dbo.Patient AS p
WHERE
p.PatientID IN (15226, 15229, 15230)
UNION
SELECT
p.Surname, p.FirstName, p.DOB, p.Sex, 'Placebo', NULL
FROM dbo.Patient AS p
WHERE
p.PatientID IN (15231)
)
INSERT INTO [dbo].[DrugTrialAlpha]
(Surname, FirstName, DOB, Sex, DrugOrPlacebo, Notes)
SELECT Surname, FirstName, DOB, Sex, DrugOrPlacebo, Notes
FROM drugTrialPatients

Tip! If you’re using SELECT to add data from one table to another, it’s a good idea as an initial step to run the SELECT statement alone—just to make sure the right rows are returned and you’re happy with the result!
UPDATE Data Using SQL
The SQL UPDATE statement is another common task used by data engineers and database administrators. Use it to change a column value for one or multiple rows.
Here’s how an SQL UPDATE statement is generally structured:
xxxxxxxxxx
UPDATE tableName
SET column1=value1, column2=value2,...
WHERE filterColumn=filterValue
Just like with the SQL INSERT statement, first we need to identify the table we’re wanting to update. Then we use the SET clause, which details the columns we want to update. Finally, we use the WHERE clause to pinpoint which rows we want to include in the update.
Tip! Because a new column value can effect more than one row, make sure you’re happy with the extent of your update before committing! Just like INSERT, an SQL UPDATE can be written as a transaction, meaning you can either COMMIT or ROLLBACK the update depending on whether or not you’re happy with the changes.
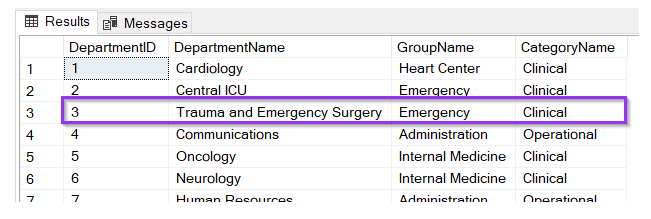
Here’s an example using our case study. Our Emergency department is rebranding to the “Trauma and Emergency Surgery” department, so its name needs changing in the database. To update this name, you could execute this statement:
xxxxxxxxxx
UPDATE dbo.Department
SET DepartmentName = 'Trauma and Emergency Surgery'
WHERE DepartmentID = 3
SELECT * FROM dbo.Department WHERE DepartmentName = 'Emergency'

Here’s what the updated department name would look like in our table:
When using the SQL UPDATE statement, make sure your WHERE clause specifies precisely which rows you want to update. When in doubt, write the statement as a transaction, which you can then roll back if you’re not happy with the change — no harm done!
To check you’re selecting the right data to update in the first place, you can do a test by using SELECT to make sure you’re targeting the right rows.
Update Multiple Rows
If you need to update multiple rows of data, it’s easy with the UPDATE statement. The WHERE clause is your friend here.
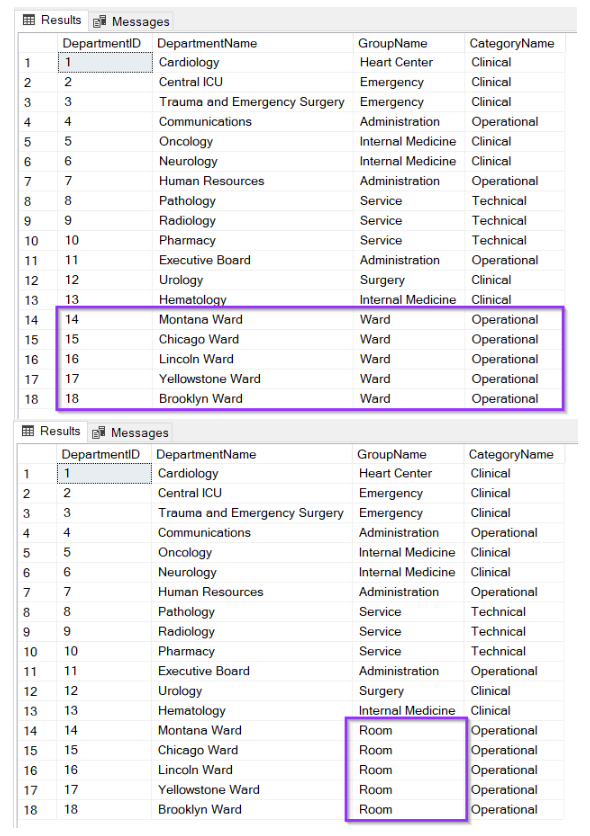
Imagine you want to recategorize all the inpatient wards from “Ward” to “Room” under the group column.
xxxxxxxxxx
UPDATE dbo.Department
SET GroupName = 'Room'
WHERE GroupName = 'Ward'
Which would change the table to look like this:
DELETE Data Using SQL

SQL DELETE is the diaper change of the SQL world. Is there something you don’t want in there? Delete it!
DELETE removes one or multiple rows from a table, but be careful! You need to make sure you know what you’re deleting before you go ahead and commit to the statement!
Here’s what your average SQL DELETE statement looks like:
xxxxxxxxxx
DELETE tableName
WHERE filterColumn=filterValue;
It’s just two parts: specifying the table and specifying WHERE—which rows you want to delete.
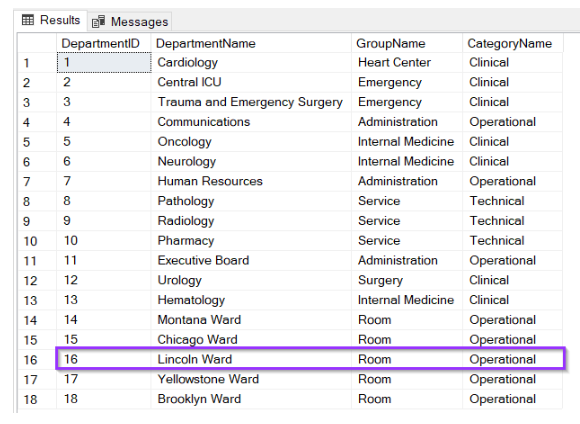
If you know the primary key of a row you want to delete, your job is simple. Do you want to delete the Lincoln Ward from your table? It’s just:
xxxxxxxxxx
DELETE FROM dbo.Department
WHERE DepartmentID = 16
Deleting Multiple Rows
Back we go to Mickey Mouse Children’s Hospital. Let’s say the hospital’s data manager wants to delete all patient records of those who haven’t visited the hospital since 1969. Here’s how you could write that DELETE statement:
xxxxxxxxxx
DELETE FROM dbo.PatientAdmittance
WHERE LastDischarged < '1969-01-01'
The result? This is the table before…
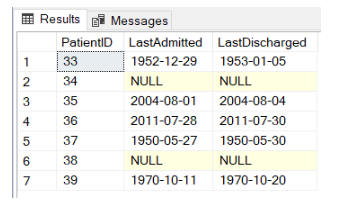
… and this is how it looks after we run that script:
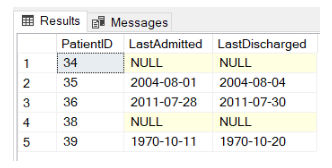
The best thing to do before running this DELETE statement, however, would be to test the result using SELECT. This will return all the rows you were about to delete, so you can check first whether you’re removing the right rows!
To run this test, you’d type:
SELECT * FROM dbo.PatientAdmittance
WHERE LastDischarged < '1969-01-01'
Warning! If you use DELETE without adding a WHERE clause, you’ll delete every row out of your table.
Conclusion
Once you’ve mastered the SQL Basics, then SQL INSERT, UPDATE, and DELETE statements are your next step to database glory!
Opinions expressed by DZone contributors are their own.

Comments