Step by Step Guide to Create Mule Custom Connector Using Java SDK
This tutorial guides you to create a custom connector for Mule 4 which includes both Source and Operation components.
Join the DZone community and get the full member experience.
Join For FreeConnectors in Mule are also called Extensions or Module. Every connector in Mule has the following important elements,
Components - Given a set of parameters, Components can be executed to produce or alter messages in a flow. Sources and Operations are the most common components of a module.
Source - components that receive or generate new messages to be processed by the Mule Runtime.
Operations - components that process an incoming message and generate a result.
Configuration - Configurations are a set of configurable parameters that affect the behavior of the Module. Sources and Operations typically depend on a Configuration for parameters that determine their behavior. However, some can work on their own without a Configuration.
Connection Providers - A Connection Provider, is the Module element in charge of handling connections, which are created from a Configuration. Connection Providers typically depend on a connection in order to be executed. A connection is not required but is common. Connections used by Operations and Sources are provided by the Connection Provider.
Parameter - Parameters are the most granular elements on the module model, and they are used in all these elements: Operations, Sources, Configurations, and Connection Providers.
Now let's go ahead and create one. We will be creating a connector for Apache Pulsar. Apache® Pulsar™ is a distributed, open-source pub-sub messaging and streaming platform for real-time workloads, managing hundreds of billions of events per day. We will use Apache Pulsar’s Java client to build the connector. The source code for this tutorial can be found here - https://github.com/j28rawat/mule-custom-connector.
Step 1 - Create Mule Project
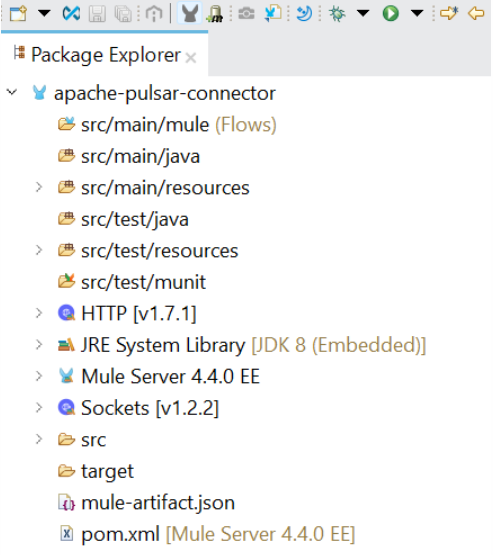
- Delete Mule configuration files in src/main/mule folder, if any, because you don't need them.
<groupId>com.mycompany</groupId>
<artifactId>apache-pulsar-connector</artifactId>
<version>0.0.1</version>
<packaging>mule-extension</packaging>- Change the package in the pom file from “mule-application” to “mule-extension”.
<parent>
	<groupId>org.mule.extensions</groupId>
	<artifactId>mule-modules-parent</artifactId>
	<version>1.1.3</version>
</parent>- Add Mule modules parent entry.
<properties>
	<pulsar.version>2.10.0</pulsar.version>
</properties>
<dependencies>
	<dependency>
		<groupId>org.apache.pulsar</groupId>
		<artifactId>pulsar-client</artifactId>
		<version>${pulsar.version}</version>
	</dependency>
</dependencies>- Add Apache Pulsar Maven dependency in the file. The current Java client version is 2.10.0.
Step 2 - Create Standard Java Packages in the Project
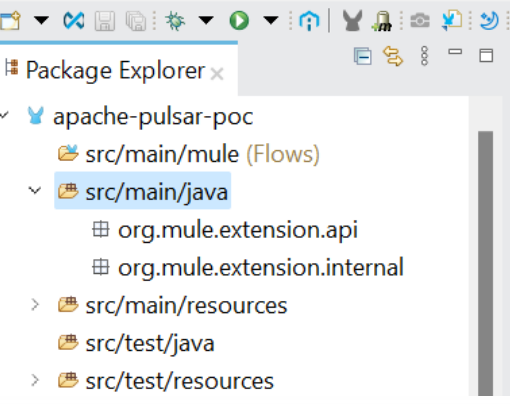
![]() The package org.mule.extension.api will contain classes related to Apache Pulsar.
The package org.mule.extension.api will contain classes related to Apache Pulsar.- The package org.mule.extension.internal will contain standard classes related to Mule Java SDK.
Step 3 - Create Entry Point Class for Our Connector
@Extension(name = "Apache Pulsar")
@Xml(prefix = "pulsar")
public class PulsarConnector {
}
Let's create a class named PulsarConnector, which serves as an entry for our connector.
- @Extension annotation provides a descriptive and concise name for the module
- @Xml annotation allows the customization of the schema attributes
Step 4 - Create Connection Provider
- To build a Connection Provider for our connector, we will need two additional classes, one(PulsarConnectionParameter.java), which holds parameters required for building the connection, and the second a class(PulsarConnection.java) which actually builds the connection for the connector.
package com.mule.extension.api.parameter;

import org.mule.runtime.extension.api.annotation.param.Parameter;
import org.mule.runtime.extension.api.annotation.param.display.DisplayName;

public class PulsarConnectionParameter {

	@Parameter
	@DisplayName("Bootstrap Server URL")
	private String bootstrapServer;

	public String getBootstrapServer() {
		return bootstrapServer;
	}
}
package com.mule.extension.api.connection;

import org.apache.pulsar.client.api.PulsarClient;
import org.apache.pulsar.client.api.PulsarClientException;

import com.mule.extension.api.parameter.PulsarConnectionParameter;

public class PulsarConnection {

	private PulsarClient client;

	private PulsarConnectionParameter pulsarConnectionParameter;

	public PulsarConnection(PulsarConnectionParameter pulsarConnectionParameter) throws PulsarClientException {

		this.pulsarConnectionParameter = pulsarConnectionParameter;
		this.client = createClient();
	}

	public PulsarClient createClient() throws PulsarClientException {

		return PulsarClient.builder().serviceUrl(pulsarConnectionParameter.getBootstrapServer()).build();
	}

	public PulsarClient getClient() {

		return this.client;
	}

	public void invalidate() throws PulsarClientException {
		if (this.client != null) {

			((PulsarClient) client).close();
		}
	}
}
- Let’s create a Connection Provider class(PulsarConnectionProvider.java) which will initiate and validate this connection.
package com.mule.extension.internal.connection;

import org.apache.pulsar.client.api.PulsarClient;
import org.apache.pulsar.client.api.PulsarClientException;
import org.mule.runtime.api.connection.ConnectionException;
import org.mule.runtime.api.connection.ConnectionProvider;
import org.mule.runtime.api.connection.ConnectionValidationResult;
import org.mule.runtime.extension.api.annotation.param.ParameterGroup;

import com.mule.extension.api.connection.PulsarConnection;
import com.mule.extension.api.parameter.PulsarConnectionParameter;

public class PulsarConnectionProvider implements ConnectionProvider<PulsarConnection> {

	@ParameterGroup(name = "Connection")
	PulsarConnectionParameter pulsarConnectionParameter;

	@Override
	public PulsarConnection connect() throws ConnectionException {

		try {
			return new PulsarConnection(pulsarConnectionParameter);
		} catch (PulsarClientException e) {
			e.printStackTrace();
		}
		return null;
	}

	@Override
	public void disconnect(PulsarConnection connection) {

		try {
			connection.invalidate();
		} catch (PulsarClientException e) {
			e.printStackTrace();
		}
	}

	@Override
	public ConnectionValidationResult validate(PulsarConnection connection) {

		PulsarClient client = connection.getClient();
		ConnectionValidationResult result = null;

		// Check whether PulsarClient is alive
		result = (!((PulsarClient) client).isClosed()) ? ConnectionValidationResult.success()
				: ConnectionValidationResult.failure("Apache Pulsar Connection Test Failed", new Exception());
		return result;
	}
}
PulsarConnectionProvider class implements the ConnectionProvider interface, which provides three important methods to implement:
- First, the connect() method to initiate a connection.
- Second, the disconnect(PulsarConnection connection) method which disconnects the connection.
- Lastly, validate(PulsarConnection connection) that will validate this connection.
@Extension(name = "Apache Pulsar")
@Xml(prefix = "pulsar")
@ConnectionProviders(PulsarConnectionProvider.class)
public class PulsarConnector {
}
Finally, we will add this ConnectionProvider to the entry point PulsarConnector.java file.
Step 5 - Build and Test the Connection
- Firstly, to test the connection, we will require local instance of Apache Pulsar.
docker run -it -p 6650:6650 -p 8080:8080 apachepulsar/pulsar:2.10.0 bin/pulsar standalone- Use the following docker command to start the Pulsar instance.
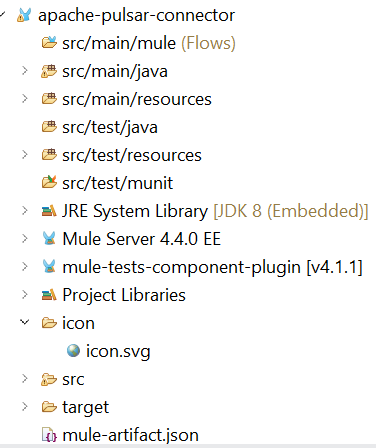
![]() Add an SVG image(icon/icon.svg) to our project so that our connector can be easily identified in Mule palette.
Add an SVG image(icon/icon.svg) to our project so that our connector can be easily identified in Mule palette.- Let's build the project we have created till now. Move to the project folder and type mvn clean install.

- Once your build has successfully run, you should see the repo in your local directory.

- Now, create a new Test Mule project and add the dependency of the newly created Apache Pulsar connector.
<dependency>
	<groupId>com.mycompany</groupId>
	<artifactId>apache-pulsar-connector</artifactId>
	<version>1.0.0-SNAPSHOT</version>
	<classifier>mule-plugin</classifier>
</dependency>![]() Go to the Global Elements section of the Mule Configuration file and search Apache Pulsar Config.
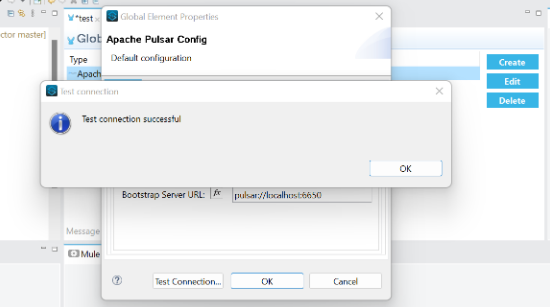
Go to the Global Elements section of the Mule Configuration file and search Apache Pulsar Config.- Once in, enter pulsar://localhost:6650 in the Bootstrap Server URL section, which is the broker instance of Apache Pulsar running locally.
- Once entered, click on Test connection; if your local instance of Apache Pulsar is running, you will get a Test connection successful message.
Step 6 - Create Source Component
- A source component is one that initiates or triggers a flow. E.g., HTTP listener, Scheduler, JMS’s On New Message, etc.
- The Source Component is defined by a Java class.
- We will define the parameters required to configure the Source in the same class.
public class PulsarListener extends Source<InputStream, Map<String, String>> {

	@Override
	public void onStart(SourceCallback<InputStream, Map<String, String>> sourceCallback) throws MuleException {
	}

	@Override
	public void onStop() {
	}
}
The Component class that triggers the flow typically extends Source<T,A> class,
- T - the generic type for the generated message's payload.
- A - the generic type for the generated message's attributes
The Source<T,A> class provides two methods to be implemented,
- onStart(SourceCallback<T,A> sourceCallback) - This method will be invoked by the runtime to make the source start producing messages.
- onStop() - This method will be invoked by the runtime to make the source stop producing messages.
- The SourceCallback<T,A> parameter of onStart method will help us pass the data(in the form of Result<T,A> result) to the flow.
@Override
	public void onStart(SourceCallback<InputStream, Map<String, String>> sourceCallback) throws MuleException {

      	// Get connection
		pulsarConnection = connectionProvider.connect();

		Consumer consumer = null;

		try {

			consumer = pulsarConnection.getClient().newConsumer().topic(topic).subscriptionName(subscriptionName)
					.subscribe();
		} catch (PulsarClientException pulsarClientException) {

			pulsarClientException.printStackTrace();
		}

		while (true) {

			try {

				// Wait for a message
				msg = consumer.receive();

				// Create attributes
				Map<String, String> attributes = new HashMap<String, String>();
				String msgIdStr = new String(msg.getMessageId().toByteArray());
				attributes.put("messageId", msgIdStr);
				attributes.put("producerName", msg.getProducerName());
				attributes.put("publishTime", String.valueOf(msg.getPublishTime()));
				attributes.put("topicName", msg.getTopicName());

				// Create payload
				ByteArrayInputStream inputStream = new ByteArrayInputStream(msg.getData());

				// Create Result object
				Result<InputStream, Map<String, String>> result = Result.<InputStream, Map<String, String>>builder()
						.output(inputStream).attributes(attributes)
						.mediaType(org.mule.runtime.api.metadata.MediaType.ANY).build();

				// Push result to flow
				sourceCallback.handle(result);

				// Acknowledge the message if successful
				consumer.acknowledge(msg);

			} catch (Exception e) {

				// Negative acknowledgement on failure
				consumer.negativeAcknowledge(msg);
			}
		}
	}

	@Override
	public void onStop() {

      if (pulsarConnection != null) {
			try {

				pulsarConnection.getClient().close();
			} catch (PulsarClientException e) {

				e.printStackTrace();
			}
		}
}- Finally, map this Java class with @Sources annotation in the Entry point Java class.
@Extension(name = "Apache Pulsar")
@Xml(prefix = "pulsar")
@ConnectionProviders(PulsarConnectionProvider.class)
@Sources(PulsarListener.class)
public class PulsarConnector {
}
Step 7 - Create Operation Component
- The operation component is one of the event processors in the flow.
- The Operation Component is defined by a Java method.
- You can customize the parameters and return type for this method.
- Generally, the parameters of an operation method can be a Connection object or a Parameter class object.
- If the Operation does not modify the payload or attributes in the flow, it can return void.
- If the Operation modifies the payload or attributes in the flow, it should return an object of the form Result<T,A>.
@DisplayName("Publisher")
	public void publish(@Connection PulsarConnection connection, PulsarProducerParameter pulsarProducerParameter)
			throws IOException {

		// Create producer
		Producer<byte[]> producer = connection.createClient().newProducer().topic(pulsarProducerParameter.getTopic())
				.create();

		// You can then send messages to the broker and topic you specified:
		producer.send(Utility.readFully(pulsarProducerParameter.getBody().getValue()));

		// Close producer
		producer.close();
}- Now, let's refer to the class containing the operation methods for the Entry point class.
@Extension(name = "Apache Pulsar")
@Xml(prefix = "pulsar")
@ConnectionProviders(PulsarConnectionProvider.class)
@Sources(PulsarListener.class)
@Operations(PulsarPublisher.class)
public class PulsarConnector {
}
Step 8 - Build and Test Components
- Update the project version to, let’s say 0.0.1 in the pom file. Now move to the project folder and type mvn clean install.
- Update the dependency in Test Mule project accordingly.
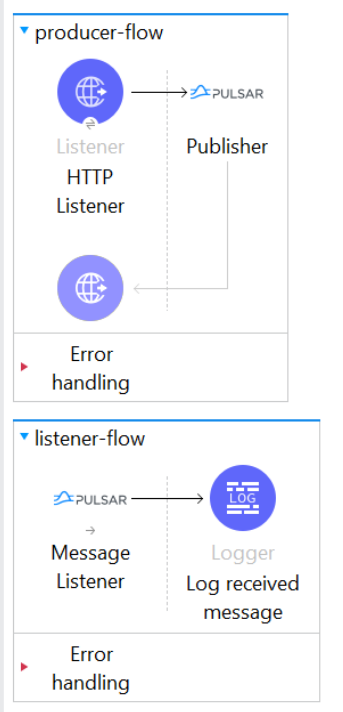
- In the Message flow section of the Test Mule project, create flows as shown below.
![Message flow section of the Test Mule project]()
- Make sure both publisher and listener are listening to the same topic.
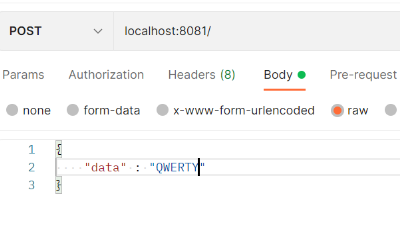
- Now, post a message to the HTTP listener.
![HTTP listener]()
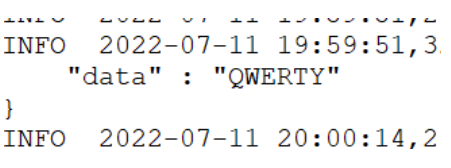
- You must see the same message logged in the console.
![same message logged in the console]()
Opinions expressed by DZone contributors are their own.

 The package org.mule.extension.api will contain classes related to Apache Pulsar.
 Add an SVG image(icon/icon.svg) to our project so that our connector can be easily identified in Mule palette.
 Go to the Global Elements section of the Mule Configuration file and search Apache Pulsar Config.
Comments