

How to Test PUT API Request Using REST-Assured Java
This tutorial demonstrates how to test PUT requests with REST Assured in Java for API testing, including code examples to update data.
 CORE
·
CORE
·
Join the DZone community and get the full member experience.
Join For FreePUT requests are typically used for updating an existing resource. This means replacing the current data for the target resource with the data sent in the API request body.
Just like POST requests, the content-type header is important because it tells the server how to interpret the data we’re sending.
When successful, a PUT request usually returns a 200 OK status along with the updated resource in the response. That said, not all APIs behave the same way; some may choose not to return any data at all, depending on how the API is designed.
Difference Between PUT and POST APIs
The following table shows the clear difference between PUT and POST APIs:
| Criteria | PUT | POST |
|---|---|---|
| Purpose | It is used to update or replace an existing resource entirely. | It is used to create a new resource or submit data to a resource. |
| Idempotency | It is Idempotent; multiple identical requests result in the same outcome. | It is not idempotent; multiple identical requests may create multiple records. |
| Response Status Code | Commonly returns 200 OK with updated resource. | Commonly returns 201 Created with the new resource details. |
| Use Case Example | Updating a user’s profile information. | Creating a new user account |
PUT API Example
Let’s take an example of the PUT /updateOrder/{id} API that updates the available order using its order ID. This API is a part of the RESTful e-commerce application available on GitHub.
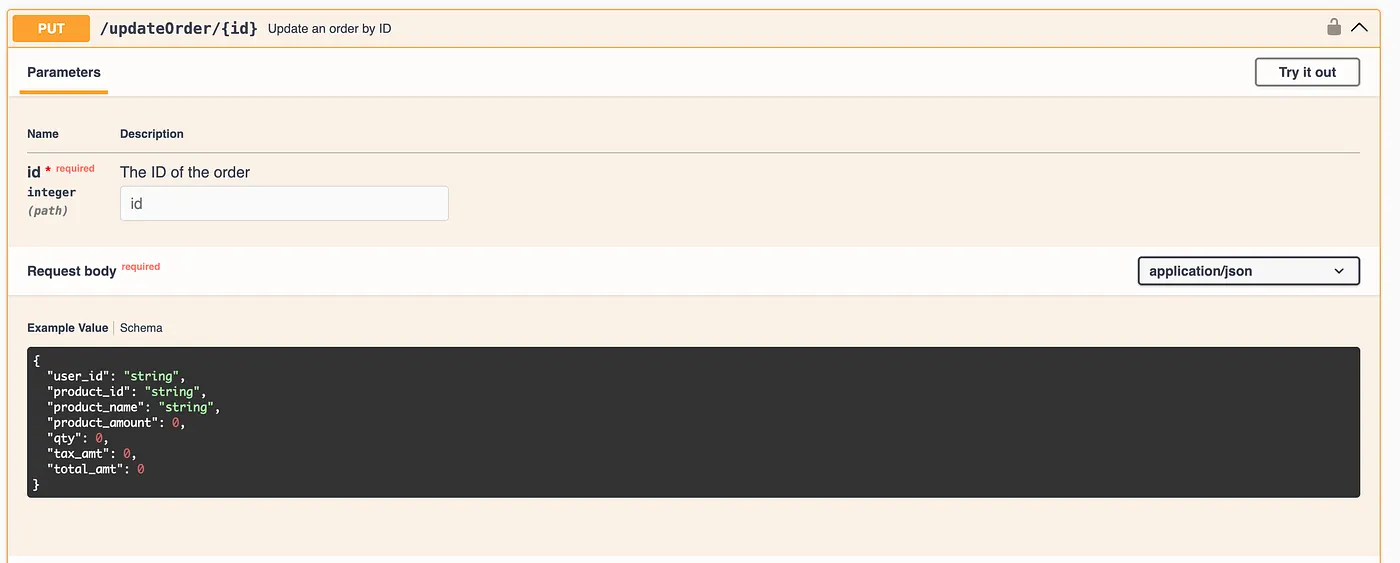
This API requires an authentication token to identify and update the order. If the token is missing or invalid, the request will fail with an error.
The order ID must be provided as a path parameter to identify and update the respective order. The updated order details must then be included in the JSON format in the request body.
It is important to note that since it is a PUT request, we have to send the entire order object, and not just the field we want to change. Even if we’re updating a single value, the full order data must be supplied.
How to Test PUT APIs Using REST-Assured Java
The following test scenario will be used to demonstrate testing PUT APIs with REST-assured Java.
## Test Scenario Title: Update the existing orders in the system.

## Pre-condition: Valid orders are available in the system

## Test
1. Update all the order details of order_id “2.”
2. Verify that the Status Code 200 is returned in the response.
3. Assert that the order details have been updated correctly.
Test Implementation
The implementation of this test scenario is divided into two parts:
- Writing a test to hit the Authorization API and extract the token from it. (Since an authorization token is mandatory to update the order).
- Updating the order and verifying the updated details.
Step 1: Write a Test to Generate and Extract the Token
The POST /auth API takes the username and password as the request body and returns the Authorization token in the response with a 201 status.
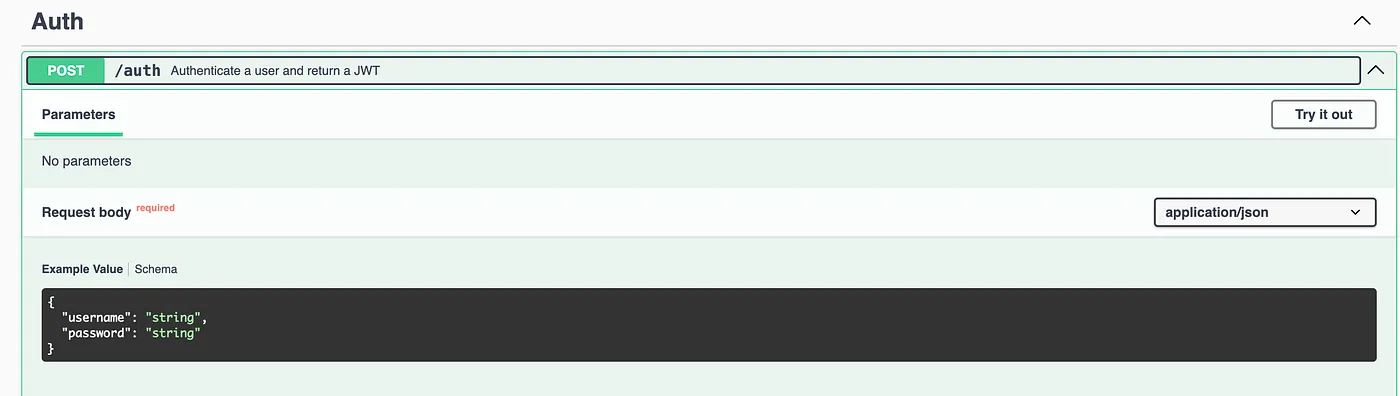
Let’s create a new Java class named TestPutRequestExamples to implement this test scenario, and create a new method testTokenGeneration() in it.
public class TestPutRequestExamples {

    private String token;

    @Test
    public void testTokenGeneration () {
        String requestBody = """
            {
              "username": "admin",
              "password": "secretPass123"
            }""";
        token = given ().contentType (ContentType.JSON)
            .when ()
            .body (requestBody)
            .post ("http://localhost:3004/auth")
            .then ()
            .statusCode (201)
            .and ()
            .body ("token", notNullValue ())
            .extract ()
            .path ("token");

    }
}
The testTokenGeneration() test sends a POST request with login credentials to generate an authentication token using REST-assured. It validates that the response returns a 201 status code and ensures the token is present.
Finally, it extracts and stores the authorization token in the “token” variable, which is declared at the global level so other tests can use its value.
Step 2: Updating the Order With a PUT Request
Let’s create a new test method, testUpdateOrder(), in the same class. This test will use the OrderData generated using the Builder Pattern + Datafaker library, so we don't have to worry about updating the test data manually.
POJO for the order object:
@Getter
@Setter
@Builder
@JsonPropertyOrder ({ "user_id", "product_id", "product_name", "product_amount", "qty", "tax_amt", "total_amt" })
public class OrderData {
    @JsonProperty ("user_id")
    private String userId;
    @JsonProperty ("product_id")
    private String productId;
    @JsonProperty ("product_name")
    private String productName;
    @JsonProperty ("product_amount")
    private int    productAmount;
    private int    qty;
    @JsonProperty ("tax_amt")
    private int    taxAmt;
    @JsonProperty ("total_amt")
    private int    totalAmt;
}
This OrderData class is a POJO used to represent order details, where annotations like @Getter, @Setter, and @Builder, from Lombok, reduce boilerplate code. The Jackson annotations @JsonProperty and @JsonPropertyOrder ensure proper JSON field mapping and ordering when sending or receiving API requests.
Generating a new Order with random values using the Datafaker library:
public class OrderDataBuilder {

    public static OrderData getOrderData () {

        Faker faker = new Faker ();
        int productAmount = (faker.number ()
            .numberBetween (1, 1999));
        int qty = faker.number ()
            .numberBetween (1, 10);
        int grossAmt = qty * productAmount;
        int taxAmt = (int) (grossAmt * 0.10);
        int totalAmt = grossAmt + taxAmt;

        return OrderData.builder ()
            .userId (String.valueOf (faker.number ()
                .numberBetween (301, 499)))
            .productId (String.valueOf (faker.number ()
                .numberBetween (201, 533)))
            .productName (faker.commerce ()
                .productName ())
            .productAmount (productAmount)
            .qty (qty)
            .taxAmt (taxAmt)
            .totalAmt (totalAmt)
            .build ();
    }
}
The OrderDataBuilder class generates dynamic test data for testing the Order APIs using the Datafaker library. It creates random values for the fields such as product amount, quantity, and product name, calculates tax and total amount, and then uses the Builder pattern to construct and return an OrderData object with all fields populated.
Step 3: Writing the Test to Update and Verify the Order
Let’s create a new test method, testUpdateOrder(), in the existing class TestPutRequestExamples.
@Test
public void testUpdateOrder () {

    int orderId = 1;
    OrderData updatedOrder = getOrderData ();

    String responseBody = given ().contentType (ContentType.JSON)
        .header ("Authorization", token)
        .when ()
        .log ()
        .all ()
        .body (updatedOrder)
        .put ("http://localhost:3004/updateOrder/" + orderId)
        .then ()
        .log ()
        .all ()
        .statusCode (200)
        .and ()
        .assertThat ()
        .body ("message", equalTo ("Order updated successfully!"))
        .extract ()
        .response ()
        .asPrettyString ();

    JSONObject responseObject = new JSONObject (responseBody);
    JSONObject orderObject = responseObject.getJSONObject ("order");

    assertThat (orderObject.get ("id"), equalTo (orderId));
    assertThat (orderObject.get ("user_id"), equalTo (updatedOrder.getUserId ()));
    assertThat (orderObject.get ("product_id"), equalTo (updatedOrder.getProductId ()));
    assertThat (orderObject.get ("product_name"), equalTo (updatedOrder.getProductName ()));
    assertThat (orderObject.get ("product_amount"), equalTo (updatedOrder.getProductAmount ()));
    assertThat (orderObject.get ("qty"), equalTo (updatedOrder.getQty ()));
    assertThat (orderObject.get ("tax_amt"), equalTo (updatedOrder.getTaxAmt ()));
    assertThat (orderObject.get ("total_amt"), equalTo (updatedOrder.getTotalAmt ()));
}
The testUpdateOrder() method sends a PUT request with authorization and JSON body, validates the response status, and verifies that the updated order data matches the request payload. It updates the order with ID 1.

The code can be divided further into the following categories to understand it in simple terms:
Request building methods:
- given(): It is the entry point to start building the API request.
- .contentType(ContentType.JSON): It specifies that the request body is in JSON format.
- .header(“Authorization”, token): It adds the Authorization header and uses the global variable token for authentication. Here, it should be ensured that the token authorization test runs first; otherwise, the update order test will fail at this point.
Request execution methods:
- when(): It marks the transition from request setup to execution.
- .log().all(): It logs the complete request details, including headers and request body. Logging request details helps in simplifying the debugging process.
- .body(updatedOrder): It sends the
updatedOrderobject as the request payload and automatically converts the Java object to JSON. - .put(“http://localhost:3004/updateOrder/” + orderId): It sends a PUT request to update an existing order with the order ID. The
orderIdvalue is passed as a path parameter in the URL for updating the specific order.
Response validation methods:
- then(): It starts the response validation.
- .log().all(): It logs the entire response, including headers, response body, and other details.
- .statusCode(200): It verifies that the request was successfully executed and a 200 OK status was returned in response.
- .body(“message”, equalTo(“Order updated successfully!”)): It verifies that the response contains the expected success message. The
equalTo()is a static method used from the Hamcrest library.
Response body extraction:
- .extract().response().asString(): It extracts the response and converts it into a readable JSON string.
{
    "message": "Order updated successfully!",
    "order": {
        "id": 1,
        "qty": 7,
        "user_id": "326",
        "product_id": "1046",
        "product_name": "muller.org",
        "product_amount": 22,
        "tax_amt": 287,
        "total_amt": 1713
    }
}
Response body verification:
JSONObject responseObject = new JSONObject (responseBody);
JSONObject orderObject = responseObject.getJSONObject ("order");
Using this code, the response string is converted into a JSON object. Then, the nested order object is extracted.
assertThat (orderObject.get ("id"), equalTo (orderId));
assertThat (orderObject.get ("user_id"), equalTo (updatedOrder.getUserId ()));
assertThat (orderObject.get ("product_id"), equalTo (updatedOrder.getProductId ()));
assertThat (orderObject.get ("product_name"), equalTo (updatedOrder.getProductName ()));
assertThat (orderObject.get ("product_amount"), equalTo (updatedOrder.getProductAmount ()));
assertThat (orderObject.get ("qty"), equalTo (updatedOrder.getQty ()));
assertThat (orderObject.get ("tax_amt"), equalTo (updatedOrder.getTaxAmt ()));
assertThat (orderObject.get ("total_amt"), equalTo (updatedOrder.getTotalAmt ()));
}
The assertThat() method is a static method from the Hamcrest library, used for validating each field of the order object in the response body. The “updatedOrder” object generated using the Builder pattern and Datafaker library is used here to verify that the response order object contains the same values that were provided in the request.
It is important to note here that asserting all the fields in the response body is suggested; however, depending on the test case, only the respective assertions can be performed.
Test Execution
The tests should be executed in such a way that the token generation test runs first, followed by the update order test, as it depends on the token. Let’s create a testng.xml file, as it allows running the tests in a specific order.
<?xml version="1.0" encoding="UTF-8"?>
<!DOCTYPE suite SYSTEM "http://testng.org/testng-1.0.dtd">
<suite name="Restful ECommerce Test Suite">
    <test name="Restful ECommerce End to End tests">
        <classes>
            <class name="restfulecommerce.tutorial.TestPutRequestExamples">
                <methods>
                    <include name="testTokenGeneration"/>
                    <include name="testUpdateOrder"/>
                </methods>
            </class>
        </classes>
    </test>
</suite>
The following screenshot of the test execution shows that the test was executed successfully:
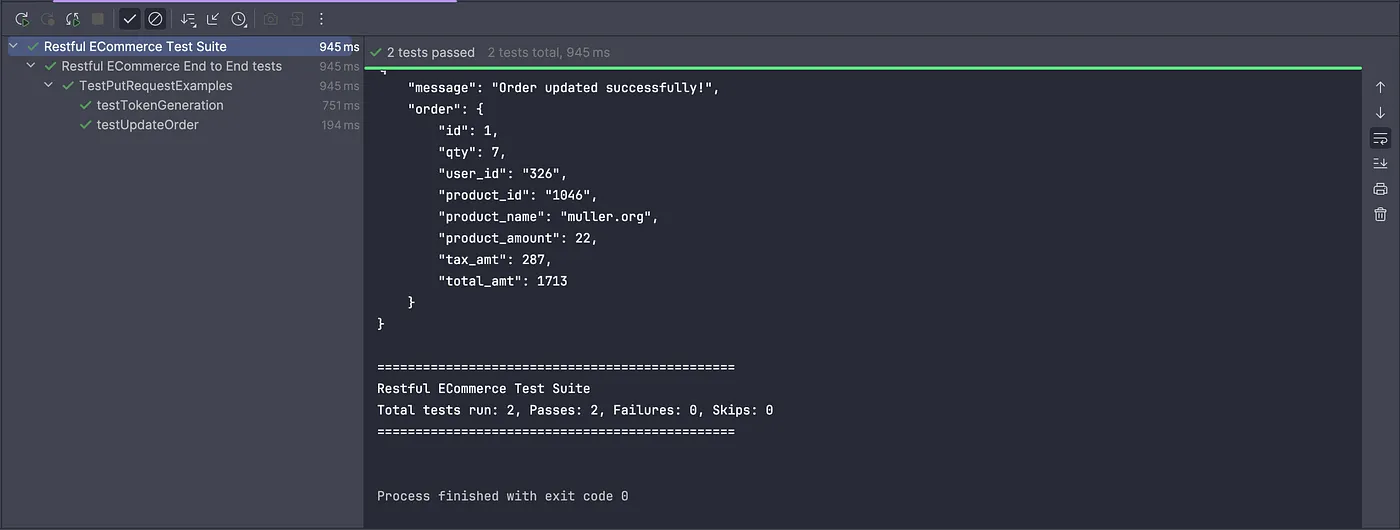
Summary
Testing PUT requests is important in automation testing, as they are commonly used to update or modify existing data. Using Datafaker helps generate random test data, which enables effective testing of PUT endpoints while avoiding duplicate data issues.
When automating a PUT request, it’s important to provide the correct headers and ensure the data is sent in the expected format. If the API requires an authorization token, that should be included as well. Additionally, to run the API automation tests sequentially. testng.xml can be used, as it is a recommended way to run the tests locally or in the CI/CD pipeline.
In my experience, covering both happy paths and negative scenarios in automated tests helps keep regression suites efficient and makes it easier to catch issues early. Using a POJO-based approach helps in easily creating, managing, and maintaining request and response payloads, making the test code more readable and maintainable.
Happy testing!
Published at DZone with permission of Faisal Khatri. See the original article here.
Opinions expressed by DZone contributors are their own.
Comments