The JMeter HTTP Raw Request Sampler — When and How to Use It
See how to use the HTTP Raw Request sampler plugin for JMeter to construct a customized HTTP request.
Join the DZone community and get the full member experience.
Join For FreeApache JMeter™ samplers are highly customizable when determining which request you want to send to a host. However, samplers don’t enable you full control of your test actions. Standard HTTP samplers indirectly form header and cookie information for your requests. Therefore, things might become a bit complicated if you want to send a multipart PUT request, for example.
Sure, you can use built-in tools to construct your request entirely by yourself via preprocessor scripting, but that may take a lot of time. So what if you know exactly which request to send? Then, you should look at the HTTP Raw Request sampler plugin, developed by Andrey Pokhilko.
This JMeter sampler allows you to manually write the whole request you want to send, and then execute it and receive the response.
HTTP Raw Request - Component Description
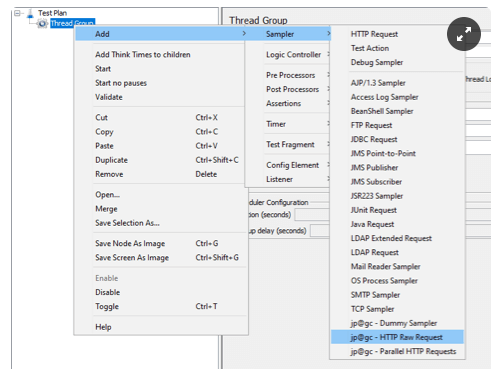
Thread Group -> Add -> Sampler -> jp@gc HTTP Raw Request (Make sure you have JMeter plugins installed).
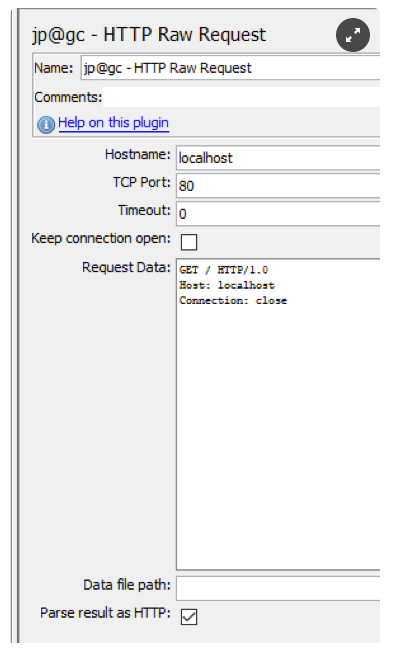
- Hostname: the name of the host you want to access
- TCP Port: the port your host is listening to
- Timeout: the timeout entered works both for the server connection and receiving the data
- Keep connection open: check the box to keep the connection open. Each sampler has its own connection
- Request Data: your request
- Data file path: the file’s binary content will be added at the end of your request. It is important because the sampler’s GUI doesn’t handle binary data well, so, in order to pass, for example, a binary file in your request, you need to specify it here
- Parse results as HTTP: this option is used to shorten the response data stored in the results, to a HTTP response
HTTP Raw Request Sampler Advantages
- Enables full control over request data.
- Has the option to send files directly to the network without storing them in a variable.
- Speed: If you know the exact request you want to send, using the HTTP raw request sampler is much faster than configuring a regular HTTP sampler.
- You can use the HTTP raw request sampler to test TCP servers.
- You can test non-RSCs methods like PURGE.
HTTP Raw Request Sampler Challenges
- This Sampler requires very good knowledge of the protocol you are testing.
- You need to know the exact request you want to send.
- Doesn’t support HTTPS communications.
- Doesn’t communicate with Config Elements such as HTTP Header Manager, Cookie Manager, HTTP Request Defaults. So you have to handle headers and cookies manually for each Raw Request sampler in the Test Plan.
Using the HTTP Raw Request Sampler
Using the HTTP Raw Request Sampler is fairly simple, if you are familiar with the protocol you want to test. The easiest way to use the HTTP Raw Request sampler is to have prerecorded request data to use in the sampler. You can get this data in a number of ways. Probably, the easiest way is to use a third party tool like the Wireshark Network Protocol Analyzer to record your requests and export the request data to a file for JMeter to process.
How to Send Files with the HTTP Raw Request
The ability to send files directly to the network makes this sampler the perfect tool for testing uploading scenarios with high load and large files. Let’s see exactly how we can organize the Multipart/form-data file upload process, the most common way to upload files, by using the HTTP Raw Request sampler.
For our test, we will try uploading a file to the upload testing site www.csm-testcenter.org.
How does the process work? The HTTP Raw Request sampler sends chunked data to the network. The size of these chunks can be changed by setting JMeter’s property “The HTTP Raw Request sampler sends chunked data to the network. The size of these chunks can be changed by setting JMeter’s property “kg.apc.jmeter.samplers.FileReadChunkSize” in the JMeter property file. By default, it is 4096 bytes.
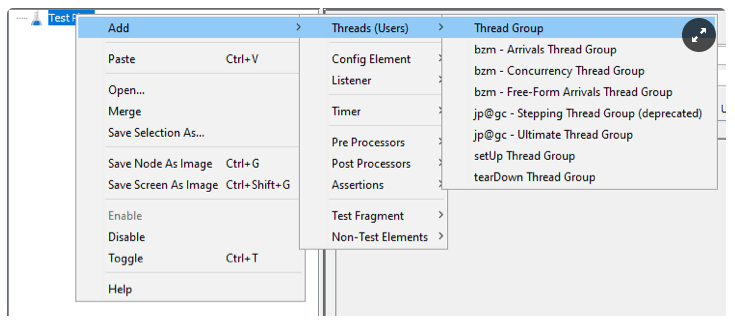
1. Add a Thread Group to your Test Plan. Right click -> Add -> Threads -> Thread Group
2. Add an HTTP Raw Request sampler component. Right click -> Add -> Samplers -> jp@gc - HTTP Raw Request
3. Set the “Hostname” value to “www.csm-testcenter.org”.
4. To achieve direct file transport you have to save your request data (or just the end of it, containing a file to send and everything following) to a file, that will be added to the sampler under “Data file path”.
This is necessary because if we only put a path to the file we want to upload in the “Data file path” field of our sampler, then the file data will be added right after our request data, ruining our format. To get a correct Multipart/form-data request, we have to have an ending boundary at the end of our request, and the file we want to send lacks it. But the request data we will gather in the next steps does have it. So we have to specify here the path to a file that contains our whole request including a binary data of a file we want to upload and all necessary boundaries.
5. Here’s how to get proper request data for the file to specify under the “Data file path” field:
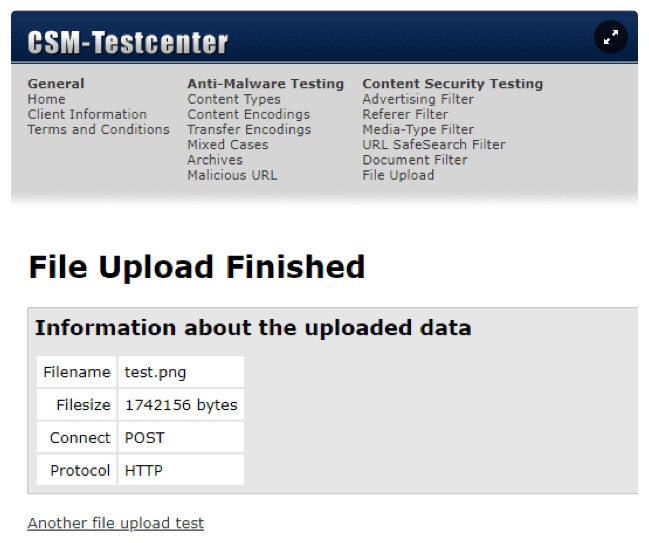
Start a capture in the Wireshark Network Protocol Analyzer, apply “http” display the filter and upload the file to www.csm-testcenter.org/test (or your website) manually.
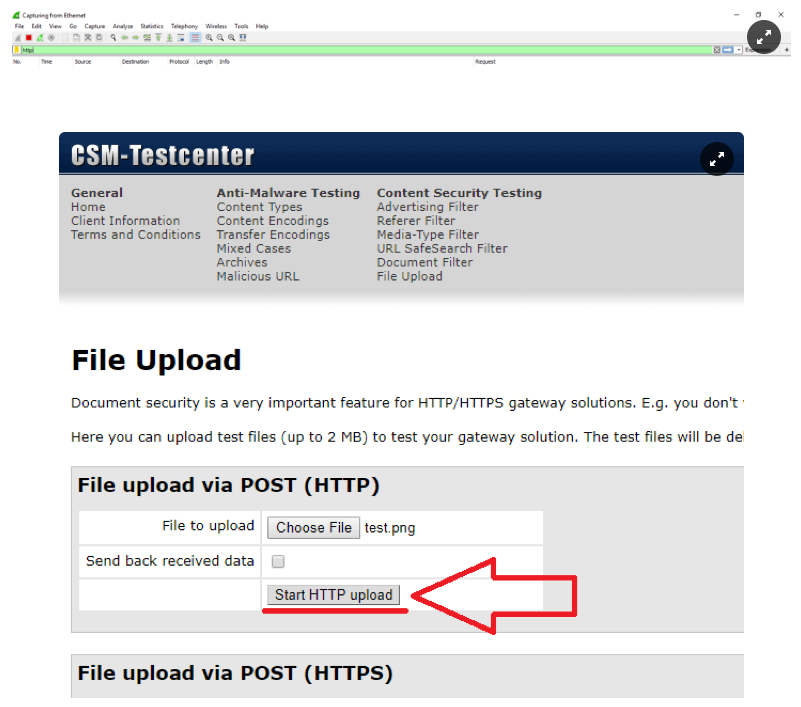
The results:
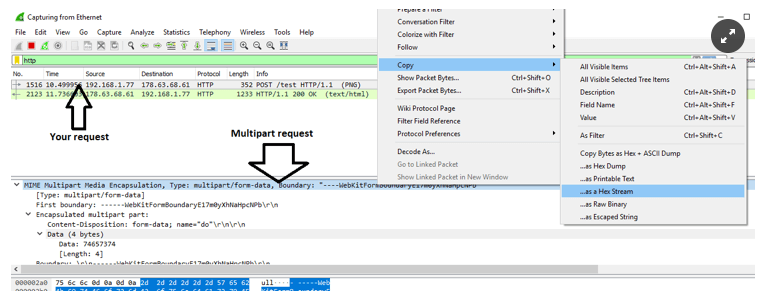
Stop the capture and copy the MIME multipart request as a HEX Stream.
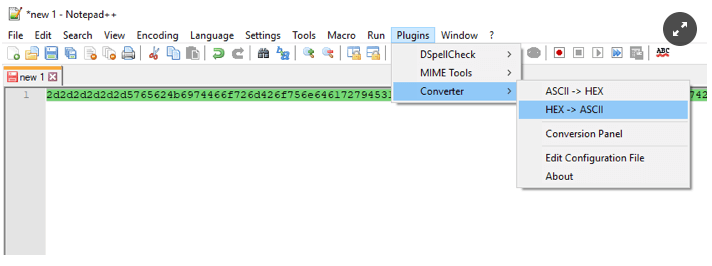
Open the text editor capable of HEX->ASCII conversion (I use Notepad++) and paste the HEX data.

Select all and convert the data to ASCII characters.
The results:
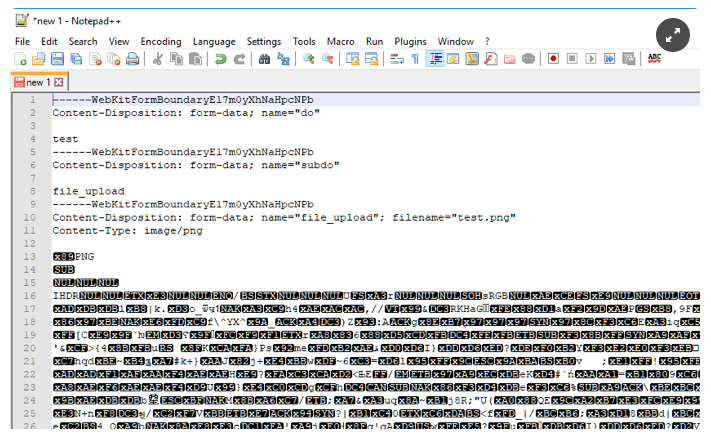
Now that’s your request data file. Save it.
6. I usually add request headers to the sampler manually in the “Request data” field. This is useful if you need to pass variables to headers, to handle authorization.
Let’s add request headers, which will upload a file for us, into the “Request data” field:
7. Specify a request method and Request-URI under the “Request Data” field in the sampler.
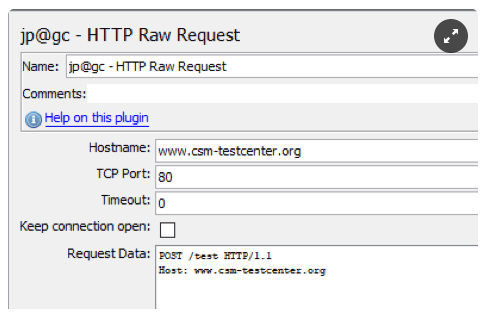
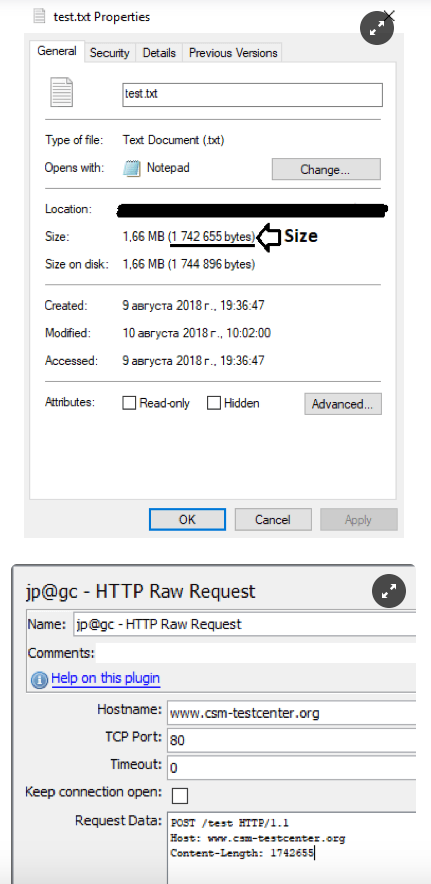
8. Set the Content-Length header value to the exact size of your data file. You can find the number in the properties of your file.
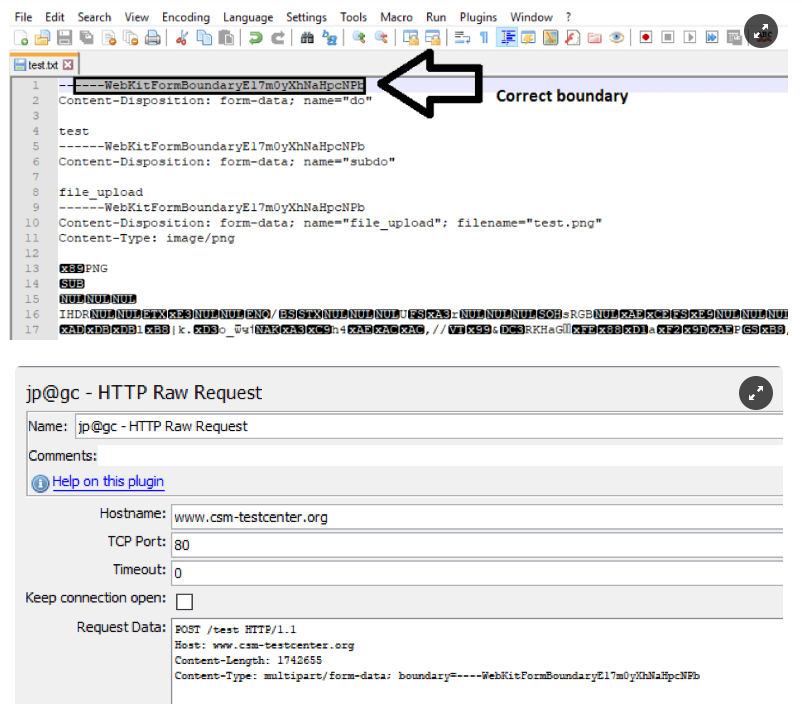
9. Set the Content-Type header value to “multipart/form-data” and add the boundary parameter equal to the boundary used in our file. Don’t forget to remove the initial “--” characters from the boundary value. This way we’ll get the right Content-Type header.
10. Add double newline characters after the last header. Headers should be separated from the request body by double newline characters "carriage return" (\r) and "line feed" (\n).
That’s it - we want to have “\r\n\r\n” characters after all of our headers before the request body. This is easy to miss, because you can’t see newline characters in the sampler’s GUI - so just remember to press the “Enter” key twice after the last header value. Twice - no more, no less!
We get something like:
POST /test HTTP/1.1
Host: www.csm-testcenter.org
Content-Length: 1742655
Content-Type: multipart/form-data; boundary=----WebKitFormBoundaryE17m0yXhNaHpcNPb
11. Add the path to your data file under the “Data file path” field of your sampler. The binary content of the file will be added to our request right after the specified headers.
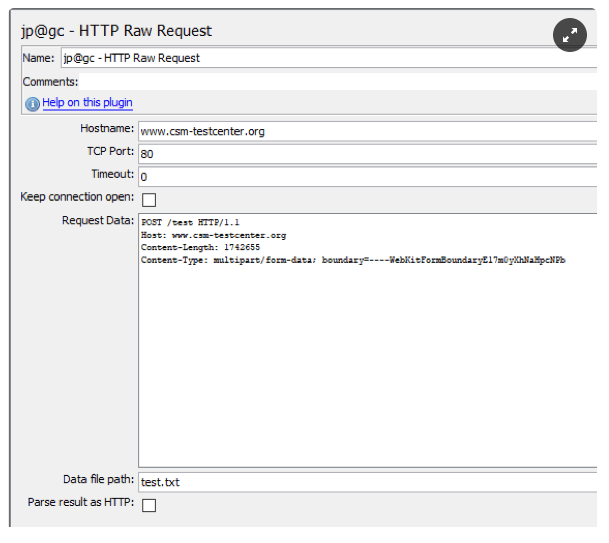
12. Add the View Results Tree listener. Right click -> Add -> Listener -> View Results Tree
We’re done! Now, when we start our script, the HTTP Raw Request plugin will execute the request we specified — uploading a file to a test upload server. Check the response in the listener to see that your file has been successfully uploaded.
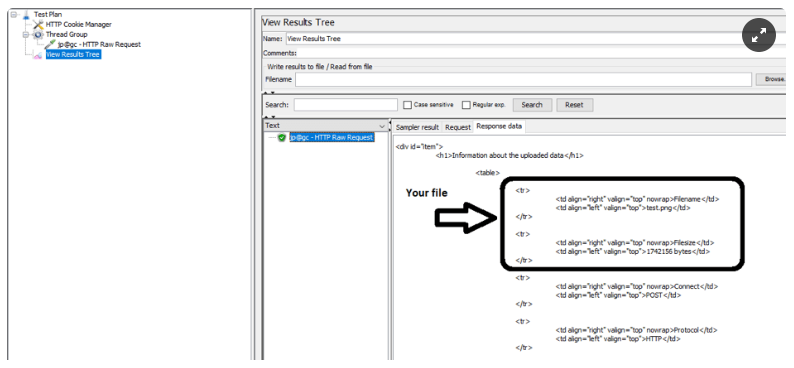
Here we see the HTML response data from our server, that shows us the name of our file and the exact size of it, meaning we’ve successfully uploaded our file.
It wasn’t a big file, the uploader server limits our test uploads to only 2Mb files. Despite all the difficulties, if you ramp up the file size and the load, you will notice the difference in the results. So, the HTTP Raw Request sampler is a very useful tool to master.
If you need to massively scale your test or run it from different geo-locations, upload your JMeter script to BlazeMeter. You will also be able to share tests and results, and get advanced analysis. Try out BlazeMeter by putting your URL in the box below, and your test will start in minutes. Or, request a BlazeMeter demo from one of our performance engineers.
Published at DZone with permission of Konstantin Tonkov, DZone MVB. See the original article here.
Opinions expressed by DZone contributors are their own.

Comments