Tutorial: Building an IoT App With Rust + ScyllaDB NoSQL
Follow along with this step-by-step look at how to build an IoT app from scratch in Rust and configure it to use ScyllaDB as the backend NoSQL datastore.
Join the DZone community and get the full member experience.
Join For FreeThis tutorial will show you how to create an IoT app from scratch using Rust and configure it to use ScyllaDB as the backend NoSQL datastore. It’ll walk you through all the stages of the development process, from gathering requirements to building and running the application.
As an example, you will use an application called CarePet. CarePet allows pet owners to track their pets’ health by monitoring their key health parameters, such as temperature or pulse. The application consists of three parts:
- A pet collar with sensors that collects pet health data and sends the data to the datastore.
- A web app for reading the data and analyzing the pets’ health.
- A database migration module.
You can use this example with minimal changes for any IoT application.
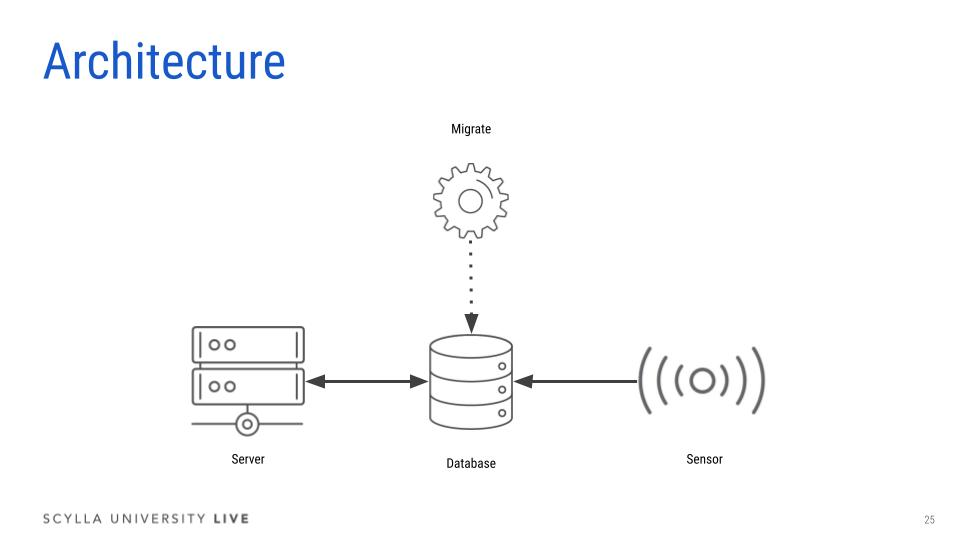
Architecture
The project is structured as follows:
- Migrate (
/bin/migrate/main.rs) - Creates thecarepetkeyspace and tables - Collar (
/bin/sensor/main.rs) - Generates pet health data and pushes it into the storage - Web app (
/main.rs) - REST API service for tracking pet health state
Requirements
Prerequisites for Deploying the Application
The example application uses Docker to run a three-node ScyllaDB cluster. You can also use Scylla Cloud as your database.
Use Case Requirements
Each pet collar has sensors that report four different measurements: temperature, pulse, location, and respiration.
The collar reads the measurements from the sensors once per second and sends the data directly to the app.
Performance Requirements
The application has two performance-related parts: sensors that write to the database (throughput sensitive) and a backend dashboard that reads from the database (latency sensitive).
- This example assumes 99% writes (sensors) and 1% reads (backend dashboard).
- SLA:
- Writes: Throughput of 100K operations per second
- Reads: Latency of up to 10 milliseconds for the 99th percentile
- The application requires high availability and fault tolerance. Even if a ScyllaDB node goes down or becomes unavailable, the cluster is expected to remain available and continue to provide service. You can learn more about ScyllaDB high availability in this lesson.
Deploying the Application in ScyllaDB Cloud
Using the ScyllaDB Cloud Terraform provider, you can easily spin up new ScyllaDB Cloud clusters. Complete this tutorial quicker by creating a new t3.micro cluster (the smallest instance) in ScyllaDB Cloud. Go to Deploy in ScyllaDB Cloud with Terraform for instructions.
Deploying the Application Locally
Check out the care-pet repository from GitHub and go to the directory of the language you want to use (use Rust here, but note there are other options such as Go, Java, etc.):
Create a local ScyllaDB cluster consisting of three nodes:
docker-compose up -d
Docker-compose will spin up a ScyllaDB cluster consisting of three nodes: carepet-scylla1, carepet-scylla2 and carepet-scylla3. The process will take about two minutes.Check the status of the cluster:
docker exec -it carepet-scylla1 nodetool status
Once all the nodes are in UN (Up Normal) status, run the below commands.
The below command allows you to get the node IP address:
docker inspect -f '{{range .NetworkSettings.Networks}}{{.IPAddress}}{{end}}' carepet-scylla1
Then run the following commands to execute the migrate main function.
NODE1=$(docker inspect -f '{{range .NetworkSettings.Networks}}{{.IPAddress}}{{end}}' carepet-scylla1)
cargo run --bin migrate -- --hosts $NODE1
The command executes the main function in the bin/migrate/main.rs. The function creates the keyspace and tables that you need to run the collar and server services.
The below code in the bin/migrate/main.rs creates a new session and then calls the create_keyspace , migrate functions.
// migrate/main.rs

async fn main() -> Result<()> {
    care_pet::log::init();

    let app = App::from_args();
    debug!("Configuration = {:?}", app);

    info!("Bootstrapping database...");

    let sess = db::new_session(&app.db_config).await?;

    db::create_keyspace(&sess).await?;
    db::migrate(&sess).await?;

    Ok(())
}
The new_session function takes the config as a parameter and uses SessionBuilder class to create a new session.
// db/mod.rs

pub async fn new_session(config: &Config) -> Result<Session> {
    info!("Connecting to {}", config.hosts.join(", "));

    SessionBuilder::new()
        .known_nodes(&config.hosts)
        .connection_timeout(config.timeout.into())
        .user(
            config.username.clone().unwrap_or_default(),
            config.password.clone().unwrap_or_default(),
        )
        .build()
        .await
        .map_err(From::from)
}
For more information about creating a new session with the Rust Driver, please have a look at the docs.
The create_keyspace function takes a session as an argument and creates a keyspace as defined in db/keyspace.cql:
CREATE KEYSPACE IF NOT EXISTS carepet WITH replication = { 'class': 'NetworkTopologyStrategy', 'replication_factor': '3' };
The CQL query above creates a new keyspace named carepet, with NetworkTopologyStrategy as a replication strategy and a replication factor of 3. More information about keyspace and replication is in this lesson.
Finally, migrate will execute the queries listed in db/migrate.cql to create the tables you need for the project.
CREATE TABLE IF NOT EXISTS carepet.owner
(    owner_id UUID,    address TEXT,    name    TEXT,    PRIMARY KEY (owner_id)
);

...
You can check the database structure with:
docker exec -it carepet-scylla1 cqlsh cqlsh> USE carepet;
cqlsh:carepet> DESCRIBE TABLES cqlsh:carepet> DESCRIBE TABLE pet
You should expect the following result:
CREATE TABLE carepet.pet (    owner_id uuid,    pet_id uuid,    chip_id text,    species text,    breed   text,    color   text,    gender  text,    address text,    age int,    name text,    weight float,    PRIMARY KEY (owner_id, pet_id)
) WITH CLUSTERING ORDER BY (pet_id ASC)    AND bloom_filter_fp_chance = 0.01    AND caching = {'keys': 'ALL', 'rows_per_partition': 'ALL'}    AND comment = ''    AND compaction = {'class': 'SizeTieredCompactionStrategy'}    AND compression = {'sstable_compression': 'org.apache.cassandra.io.compress.LZ4Compressor'}    AND crc_check_chance = 1.0    AND dclocal_read_repair_chance = 0.1    AND default_time_to_live = 0    AND gc_grace_seconds = 864000    AND max_index_interval = 2048    AND memtable_flush_period_in_ms = 0    AND min_index_interval = 128    AND read_repair_chance = 0.0    AND speculative_retry = '99.0PERCENTILE';
Sensor
The sensor service simulates the collar’s activity and periodically saves data to the database. Use the below commands to run the sensor service:
NODE1=$(docker inspect -f '{{range .NetworkSettings.Networks}}{{.IPAddress}}{{end}}' carepet-scylla1)
cargo run --bin sensor -- --hosts $NODE1 --measure 5s --buffer-interval 1m
The above command executes bin/sensor/main.rs and takes the following as arguments.
hosts: The IP address of the ScyllaDB nodemeasure: The interval between sensor measuresbuffer-interval: The interval between two database queries
// sensor/main.rs

#[tokio::main]
async fn main() -> Result<()> {
    care_pet::log::init();

    let app = App::from_args();
    debug!("Configuration = {:?}", &app);

    info!("Welcome to the Pet collar simulator");

    let sess = db::new_session_with_keyspace(&app.db_config).await?;

    let (owner, pet, sensors) = random_data();
    save_data(&sess, &owner, &pet, &sensors).await?;
    run_sensor_data(&app, &sess, sensors).await?;

    Ok(())
}
The app object contains the command’s arguments listed above. We then create a new session sess using new_session_with_keyspace function defined in db/mod.rs:
// db/mod.rs

pub async fn new_session_with_keyspace(config: &Config) -> Result<Session> {
    let session = new_session(config).await?;
    session.use_keyspace(KEYSPACE, true).await?;
    Ok(session)
}
The save_data method connects to the database and saves random owner, pet, and the sensors to the database using insert_query macro defined in src/mod.rs.
// sensor/main.rs

async fn save_data(sess: &Session, owner: &Owner, pet: &Pet, sensors: &[Sensor]) -> Result<()> {
    sess.query(insert_query!(Owner), owner).await?;
    info!("New owner # {}", owner.owner_id);

    sess.query(insert_query!(Pet), pet).await?;
    info!("New pet # {}", pet.pet_id);

    for sensor in sensors {
        sess.query(insert_query!(Sensor), sensor).await?;
    }

    Ok(())
}
The run_sensor_data generates random data and inserts it into the database every buffer_interval.
async fn run_sensor_data(cfg: &App, sess: &Session, sensors: Vec<Sensor>) -> Result<()> {
    let measure: time::Duration = cfg.measure.into();
    let buffer_interval: time::Duration = cfg.buffer_interval.into();

    let mut last = Instant::now();
    loop {
        let mut measures = vec![];
        while last.elapsed() < buffer_interval {
            sleep(measure).await;

            for sensor in &sensors {
                let measure = read_sensor_data(sensor);
                info!(
                    "sensor # {} type {} new measure {} ts {}",
                    sensor.sensor_id,
                    sensor.r#type.as_str(),
                    &measure.value,
                    measure.ts.format_rfc3339(),
                );

                measures.push(measure);
            }
        }

        last = last
            + time::Duration::from_nanos(
                (measure.as_nanos() * (last.elapsed().as_nanos() / measure.as_nanos())) as u64,
            );

        info!("Pushing data");

        let batch = measures.iter().fold(Batch::default(), |mut batch, _| {
            batch.append_statement(insert_query!(Measure));
            batch
        });

        sess.batch(&batch, measures)
            .await
            .map_err(|err| error!("execute batch query {:?}", err))
            .ok();
    }
}
Server
The server service is a REST API for tracking the pets’ health state. The service was built using Rocket and allows users to query the database via HTTP.
Run the following commands to start the server:
NODE1=$(docker inspect -f '{{range .NetworkSettings.Networks}}{{.IPAddress}}{{end}}' carepet-scylla1)
cargo run -- --hosts $NODE1
The src/main.rs main function mounts the API on /api and defines the routes.
// src/main.rs

#[rocket::main]
async fn main() -> Result<()> {
    care_pet::log::init();

    let app = App::from_args();
    if app.verbose {
        info!("Configuration = {:?}", app);
    }

    let sess = db::new_session_with_keyspace(&app.db_config).await?;

    rocket::build()
        .mount(
            "/api",
            routes![
                handler::measures::find_sensor_data_by_sensor_id_and_time_range,
                handler::owner::find_owner_by_id,
                handler::pets::find_pets_by_owner_id,
                handler::sensors::find_sensors_by_pet_id,
                handler::avg::find_sensor_avg_by_sensor_id_and_day
            ],
        )
        .manage(sess)
        .launch()
        .await
        .map_err(From::from)
}
The handlers can be found in the src/handler folder for each route.
Let’s have a look at handler/mesure.rs file:
#[get("/sensor/<id>/values?<from>&<to>")]
pub async fn find_sensor_data_by_sensor_id_and_time_range(
    session: &State<Session>,
    id: UuidParam,
    from: DateTimeParam,
    to: DateTimeParam,
) -> Result<Json<Vec<f32>>, JsonError> {
    let rows = session
        .query(
            format!(
                "SELECT {} FROM {} WHERE {} = ? and {} >= ? and {} <= ?",
                Measure::FIELD_NAMES.value,
                Measure::table(),
                Measure::FIELD_NAMES.sensor_id,
                Measure::FIELD_NAMES.ts,
                Measure::FIELD_NAMES.ts,
            ),
            (id.0, from.0, to.0),
        )
        .await
        .map_err(|err| json_err(Status::InternalServerError, err))?
        .rows
        .unwrap_or_default()
        .into_typed::<(f32,)>();

    let values = rows
        .map(|v| v.map(|v| v.0))
        .collect::<Result<Vec<_>, _>>()
        .map_err(|err| json_err(Status::InternalServerError, err))?;

    Ok(Json(values))
}
The GET request on the URL /sensor/<id>/values?<from>&<to> triggers find_sensor_data_by_sensor_id_and_time_range function.
find_sensor_data_by_sensor_id_and_time_range takes session, id, from and to as params. The function runs a SELECT query and then returns rows.
Retrieving Information From the API
To test out the API in your terminal, use the following command to retrieve information about a specific pet owner:
curl http://127.0.0.1:8000/owner/{id}
If you don’t have an owner_id, run the sensor command and it will generate users and pets on your terminal.
You should receive a response similar to this:
{
  "owner_id": "5b5a7b4d-a2c0-48b0-91e1-de6a5b37c923",
  "address": "home",
  "name": "sedtdkaa"
}
If you want to list the owner’s pets you can use the following command:
curl http://127.0.0.1:8000/owner/{id}/pets
And you should receive a response similar to this:
[
  {
    "owner_id": "5b5a7b4d-a2c0-48b0-91e1-de6a5b37c923",
    "pet_id": "9e9facb9-3bd8-4451-b179-8c951cdf0999",
    "chip_id": null,
    "species": "dog",
    "breed": "golden-retriever",
    "color": "black",
    "gender": "M",
    "age": 4,
    "weight": 9.523097,
    "address": "awesome-address",
    "name": "doggo"
  }
]
If you want to list the active pet sensors you can use the following command:
curl http://127.0.0.1:8000/pet/{pet_id}/sensors
You should receive a response similar to this:
[
  {
    "pet_id": "9e9facb9-3bd8-4451-b179-8c951cdf0999",
    "sensor_id": "7a8b3831-0512-4501-90f2-700c7133aeed",
    "type": "T"
  },
  {
    "pet_id": "9e9facb9-3bd8-4451-b179-8c951cdf0999",
    "sensor_id": "81250bab-cf1c-4c7a-84f1-b291a0f325ef",
    "type": "P"
  },
  {
    "pet_id": "9e9facb9-3bd8-4451-b179-8c951cdf0999",
    "sensor_id": "a22a2fdb-4aad-4abe-b0d9-381aa07a26af",
    "type": "L"
  }
]
Resources
Published at DZone with permission of Attila Toth. See the original article here.
Opinions expressed by DZone contributors are their own.
Comments