Tutorial: Implement MongoDB to Your Angular App
In this tutorial, you will learn how to build a simple web application using Angular and MongoDB.
Join the DZone community and get the full member experience.
Join For Free
When selecting a NoSQL database, MongoDB is often one of the top choices. Unlike traditional SQL databases, NoSQL databases are known for their ability to work with large datasets, which offers scalability and flexibility in app development. SQL databases, on the contrary, are comparatively stiff and not easily scalable when dealing with large sets of data
In the end, NoSQL and SQL databases are used for different reasons. In this tutorial, we’ll focus on a NoSQL use case where you’ll learn how to connect a MongoDB database to a simple Hungarian game. We’ll build the front-end of the game using the Angular framework and for the back-end, we’ll use a Node-based REST server with Express.
Prerequisites:
- Node.js 10+
- MongoDB (instructions below)
- A free Okta developer account for OIDC authentication
Install MongoDB
Before you start, install the MongoDB database from the mongodb.com servers or via Homebrew. The MongoDB documentation pages provide excellent install instructions specific to your operating system.
You can install and run MongoDB using Homebrew like so:
brew tap mongodb/brew
brew install [email protected]
mongod
You can also use Docker:
docker run -d -it -p 27017:27017 mongoImplement an Express API
You will need the Node JavaScript environment and the npm package manager for the server as well as the client. This article assumes you have the latest version of Node installed on your system. To create the server, open a terminal and create a new directory hangman-server. Navigate into this directory and initialize the Node package.
npm initSelect all the defaults and a package.json file will be generated containing information about the project and all its dependencies. The next step is to add those dependencies. In the terminal, run the following command.
npm install --save-exact [email protected] [email protected] [email protected] \
  @okta/[email protected] [email protected]
The express library provides a framework for creating Node-based REST servers. Express heavily uses middleware to extend the basic functionality. The cors module provides response headers for Cross-Origin Resource Sharing support, and you’ll use Okta to provide user management and authentication.
Okta works by passing a bearer token to the server, which is first extracted by the express-bearer-token middleware. The @okta/jwt-verifier library then allows you to validate that token and extract the user data from it.
Finally, we’ll use the mongoose library to provide a JavaScript client interface for the MongoDB database.
In the project directory, create a directory called src and, using your favorite IDE, create a file called src/index.js. This source file will contain the entry point of the server application.
const express = require('express');
const cors = require('cors');
const bodyParser = require('body-parser');
const mongoose = require('mongoose');
const bearerToken = require('express-bearer-token');
const oktaAuth = require('./auth');
const hangman = require('./hangman');

const port = process.env.PORT || 8080;

const app = express()
  .use(cors())
  .use(bodyParser.json())
  .use(bearerToken())
  .use(oktaAuth)
  .use(hangman());

mongoose.connect(`mongodb://localhost:27017/hangman`)
.then(() => {
  console.log('Connected to database');
  app.listen(port, () => {
    console.log(`Express server listening on port ${port}`);
  });
});
Calling express() creates the application object app and uses several middlewares. Connection to the MongoDB database is established through Mongoose, listening on port 27017 by default.
Once the connection is up and running, the listen() method starts the server.
The code above also contains two references to local modules, which you’ll implement below.
The hangman game uses Okta, an identity service for developers, for user management and authentication. On the server-side, Okta’s functionality is implemented in src/auth.js.
const OktaJwtVerifier = require('@okta/jwt-verifier');

const oktaJwtVerifier = new OktaJwtVerifier({
  clientId: '{yourClientId}',
  issuer: 'https://{yourOktaDomain}/oauth2/default'
});

async function oktaAuth(req, res, next) {
  try {
    const token = req.token;
    if (!token) {
      return res.status(401).send('Not Authorized');
    }
    const jwt = await oktaJwtVerifier.verifyAccessToken(token, ['api://default']);
    req.user = {
      uid: jwt.claims.uid,
      email: jwt.claims.sub
    };
    next();
  }
  catch (err) {
    console.log('AUTH ERROR: ', err);
    return res.status(401).send(err.message);
  }
}

module.exports = oktaAuth;
The function oktaAuth() is an Express middleware. It reads the req.token from the request and checks it using the OktaJwtVerifier. On success, the verifyAccessToken() method returns the data contained in the token.
The data is used to create a user object and attach it to the incoming request. In the code above, {yourClientId} and {yourOktaDomain} are placeholders that we’ll populate in a moment.
For now, implement another middleware to take the user’s email and look up the user data in the database.
Create a file called src/users.js and add the following code.
const mongoose = require('mongoose');

const UserSchema = new mongoose.Schema({
  email: { type: String, required: true },
  username: { type: String, required: true },
  score: { type: Number, required: true },
  currentWord: { type: String, required: false },
  lettersGuessed: { type: String, required: false },
});

const User = mongoose.model('User', UserSchema);

function getUserDocument(req, res, next) {
  User.findOne({email: req.user.email}, (err, user) => {
     if (err || !user) {
         res.status('400').json({status: 'user-missing'});
     }
     req.userDocument = user;
     next();
  });
}

module.exports = { UserSchema, User, getUserDocument };
Mongoose uses schema objects to define the data stored in the database. The schema defines a number of fields together with the field type and other attributes. The mongoose.model() method can then be used to create a database model that allows access to the documents through API functions. For example, findOne() retrieves a single database object based on search criteria.
The code above takes an email address to search for a corresponding user. On success, it attaches the Mongoose document to the request object with the property name userDocument. This document is more than just a piece of data - it can modify the document’s values and save the changes back into the database.
Now create a new file named src/hangman.js and paste the following code into it.
const express = require('express');
const users = require('./users');
const fs = require("fs");

function createRouter() {
  const router = express.Router();
  const words = fs.readFileSync('./src/words.txt')
                  .toString()
                  .split('\n')
                  .map(w => w.trim().toUpperCase())
                  .filter(w => w!=='');

  return router;
}

module.exports = createRouter;
This module exports a single function that creates an Express router. The router doesn’t define any routes yet, but I will show you how to do so below. The function also reads a file called src/words.txt and converts it to an array of uppercase strings.
The file contains plain text with one word on each line. These are the words for the hangman game, and the dictionary choice determines the difficulty of the game.
For a good source of English words, I recommend https://www.english-corpora.org/, which contains a list of the largest and most widely used text corpora.
As an example, you could create src/words.txt with the following words:
hangman
angular
mongodb
mongoose
express
javascript
typescript
okta
authentication
database
The first route you’ll implement queries the current game and creates a new game if necessary.
Within the createRouter() function, paste the following code.
function makeClue(word, letters) {
  return word.split('').map(c => letters.includes(c) ? c : '_').join('');
}

router.get('/game',
           users.getUserDocument,
           async (req, res, next) => {
  const user = req.userDocument;
  if (!user.currentWord) {
    const newWord = words[Math.floor(Math.random()*words.length)];
    user.currentWord = newWord;
    user.lettersGuessed = '';
    await user.save();
  }
  res.status(200).json({
      status: 'ok',
      clue: makeClue(user.currentWord, user.lettersGuessed),
      guesses: user.lettersGuessed
  });
});
The function makeClue() is a helper function that creates a clue from the word and the letters the user has already guessed. Character by character, it replaces any letter that has not yet been guessed with an underscore.
The line router.get('/game', ...) registers a callback function for a GET request on the /game route. First, the getUserDocument middleware retrieves the document. Inside the callback, the document is available through req.userDocument. If the document does not contain a current word, a random word is chosen, and the document is saved back into the database via the call to user.save(). Finally, a response is sent back containing the clue, and the letters guessed so far.
The next route implements a player’s guess. Still inside the createRouter() function, add the following lines.
router.put('/game',
           users.getUserDocument,
           async (req, res, next) => {
  const user = req.userDocument;
  if (!user.currentWord) {
    return res.status(400).json({status: 'no-game'});
  } else {
    const c = req.body.guess[0].toUpperCase();
    if (!user.lettersGuessed.includes(c)) {
        user.lettersGuessed += c;
    }
    const clue = makeClue(user.currentWord, user.lettersGuessed);
    const response = {
        clue: clue,
        guesses: user.lettersGuessed
    };

    if (user.lettersGuessed.length>6 && clue.includes('_')) {
      response.status = 'lost';
      response.clue = user.currentWord;
      user.currentWord = '';
      user.lettersGuessed = '';
    } else if (!clue.includes('_')) {
      response.status = 'won';
      user.currentWord = '';
      user.lettersGuessed = '';
    } else {
      response.status = 'ok';
    }
    await user.save();
    res.status(200).json(response);
  }
});
The req.body.guess contains the incoming guess of the player, which is added to the lettersGuessed property of the user document and saved back to the database. The response depends on the game’s status as lost, won, or ongoing.
The profile route gives access to the user data through a GET request and allows a user to set their username through a PUT request. Add the following routes to src/hangman.js:
router.get('/profile',
           users.getUserDocument,
           (req, res, next) => {
  const user = req.userDocument;
  res.status(200).json({
      email: user.email,
      username: user.username,
      score: user.score
  });
});

router.put('/profile', async (req, res, next) => {
  const exists = await users.User.exists({email: req.user.email});
  if (exists) {
    return res.status(400).json({status: 'user-exists'});
  }
  await users.User.create({email: req.user.email, username: req.body.username, score: 0});
  res.status(200).json({status: 'ok'});
});
You will also want to show a list of high scores. This is provided by the leaderboard route.
router.get('/leaderboard', async (req, res, next) => {
  const result = await users.User.find()
                                 .sort({ score: 'desc'})
                                 .limit(20)
                                 .select('username score');
  res.status(200).json(result.map(entry => ({
    username: entry.username,
    score: entry.score
  })));
});
Here, you use the User model to query the database and get the 20 top-scoring players’ usernames and scores.
Add User Management to Your Angular + MongoDB App
In this section, I will show you how to create an account with Okta and finish off the user registration and authentication logic.
Registration with Okta is free and only takes a couple of minutes. Open a browser and head over to developer.okta.com/signup.
After registration, you will receive a confirmation email with a temporary password and your Okta domain.
To register an application with Okta, sign in to your account and navigate to Applications in your developer dashboard. Then click on Add Application. You will be presented with a selection of the type of application. Choose Single-Page App and click on Next.
The following screen lets you modify the application settings. You will be testing the application on your own computer, so the base URI should be set to http://localhost:4200. This is the default URI used by Angular when running the testing server.
You will also need to set the Login Redirect URI to http://localhost:4200/implicit/callback. The user will be redirected back to this URI after authenticating. Click Done, and you will see a screen with your settings and client ID.
In your IDE, open src/auth.js again and replace {yourOktaDomain} with the Okta domain and {yourClientId} with the client ID.
NOTE: If you copy/paste the domain from your browser, be sure to remove “-admin” from the value.
You are now ready to start up your hangman server! In the terminal, navigate to the server project directory and run the following command.
node src/index.jsBuild Your Application Client With Angular
You’ll use the latest version of Angular to build the client, combined with the ngx-bootstrap library for the CSS framework. Open the terminal and install the current (as of this article’s publication) version of the Angular CLI tool by running the following command.
npm install -g @angular/[email protected]Now, navigate into a directory of your choice and create the hangman-client project.
ng new hangman-client --routingThis will start the wizard and prompt you with a choice of stylesheet technology. Here, simply choose the default CSS option. Once the wizard has completed, navigate into the project directory and install the packages you need for this project.
npm install --save-exact [email protected] @okta/[email protected]Now, open src/index.html and add the following lines inside the <head> tags.
<link href="https://maxcdn.bootstrapcdn.com/bootstrap/4.0.0/css/bootstrap.min.css" rel="stylesheet">
<link rel="stylesheet" href="https://maxcdn.icons8.com/fonts/line-awesome/1.1/css/line-awesome-font-awesome.min.css">
The first line imports the stylesheet for the bootstrap responsive CSS framework. The second line imports the CSS for the Line Awesome icon set, a beautiful alternative to the Font Awesome icons by Icons8. More information about these icons can be found at https://icons8.com/line-awesome.
Next open src/app/app.module.ts and add some imports to the imports array.
import { BrowserModule } from '@angular/platform-browser';
import { NgModule } from '@angular/core';

import { AppRoutingModule } from './app-routing.module';
import { AppComponent } from './app.component';
import { HttpClientModule } from '@angular/common/http';
import { FormsModule, ReactiveFormsModule } from '@angular/forms';
import { OktaAuthModule } from '@okta/okta-angular';

@NgModule({
  declarations: [
    AppComponent
  ],
  imports: [
    BrowserModule,
    AppRoutingModule,
    HttpClientModule,
    FormsModule,
    ReactiveFormsModule,
    OktaAuthModule.initAuth({
      issuer: 'https://{yourOktaDomain}/oauth2/default',
      redirectUri: 'http://localhost:4200/implicit/callback',
      clientId: '{yourClientId}'
    })
  ],
  providers: [],
  bootstrap: [AppComponent]
})
export class AppModule { }
Just like above, replace {yourOktaDomain} with your Okta domain and {yourClientId} with the client ID for your application. The HTML template for the main application component is located in src/app/app.component.html.
Open this file and replace the contents with the HTML below.
<nav class="navbar navbar-expand navbar-light bg-light">
  <a class="navbar-brand" [routerLink]="['']">
    <i class="fa fa-clock-o"></i>
  </a>
  <ul class="navbar-nav mr-auto">
    <li class="nav-item">
      <a class="nav-link" [routerLink]="['']">
        Home
      </a>
    </li>
    <li class="nav-item">
      <a class="nav-link" [routerLink]="['profile']">
        Profile
      </a>
    </li>
    <li class="nav-item">
      <a class="nav-link" [routerLink]="['game']">
        Game
      </a>
    </li>
    <li class="nav-item">
      <a class="nav-link" [routerLink]="['leaderboard']">
        Leaderboard
      </a>
    </li>
  </ul>
  <span>
    <button class="btn btn-primary" *ngIf="!isAuthenticated" (click)="login()"> Login </button>
    <button class="btn btn-primary" *ngIf="isAuthenticated" (click)="logout()"> Logout </button>
  </span>
</nav>
<router-outlet></router-outlet>
The application component makes the authentication state available and manages the user login and logout. Open src/app/app.component.ts and change to contents to match the following.
import { Component } from '@angular/core';
import { OktaAuthService } from '@okta/okta-angular';

@Component({
  selector: 'app-root',
  templateUrl: './app.component.html',
  styleUrls: ['./app.component.css']
})
export class AppComponent {
  title = 'hangman-client';
  isAuthenticated: boolean;

  constructor(public oktaAuth: OktaAuthService) {
    this.oktaAuth.$authenticationState.subscribe(
      (isAuthenticated: boolean) => this.isAuthenticated = isAuthenticated
    );
  }

  ngOnInit() {
    this.oktaAuth.isAuthenticated().then((auth) => {this.isAuthenticated = auth});
  }

  login() {
    this.oktaAuth.loginRedirect();
  }

  logout() {
    this.oktaAuth.logout('/');
  }
}
Before you start implementing the front end components of the game, it is useful to create a service to create an abstraction layer for the server requests. Run the following command in a terminal.
ng generate service hangmanThis creates a new file src/app/hangman.service.ts. Open this file and replace its contents with the code below.
import { Injectable } from '@angular/core';
import { HttpClient } from '@angular/common/http';
import { OktaAuthService } from '@okta/okta-angular';
import { environment } from '../environments/environment';

@Injectable({
  providedIn: 'root'
})
export class HangmanService {

    constructor(private http: HttpClient, public oktaAuth: OktaAuthService) {}

    private async request(method: string, url: string, data?: any) {
      const token = await this.oktaAuth.getAccessToken();

      const result = this.http.request(method, url, {
        body: data,
        responseType: 'json',
        observe: 'body',
        headers: {
          Authorization: `Bearer ${token}`
        }
      });
      return new Promise<any>((resolve, reject) => {
        result.subscribe(resolve, reject);
      });
    }

    getGame() {
      return this.request('GET', `${environment.hangmanServer}/game`);
    }

    guessGame(guess: string) {
      return this.request('PUT', `${environment.hangmanServer}/game`, {guess});
    }

    getProfile() {
      return this.request('GET', `${environment.hangmanServer}/profile`);
    }

    updateUser(username) {
      return this.request('PUT', `${environment.hangmanServer}/profile`, {username});
    }

    getLeaderboard() {
      return this.request('GET', `${environment.hangmanServer}/leaderboard`);
    }
}
The request() method provides a general interface to the server that issues an HTTP request and returns a Promise. Note how the code obtains a token from the OktaAuthService and attaches it to the request via the Authorization header. The remaining methods provide a convenient interface to the different routes on the hangman server.
You can see that I have used the environment variable to define the exact URL. Open src/environments/environment.ts and add the following property to the environment object.
hangmanServer: 'http://localhost:8080'It is now time to create the home page. Open the terminal and create the home component to start.
ng generate component homeThen open src/app/home/home.component.html and paste the following code.
<div class="container">
  <div class="row">
    <div class="col-sm">
      <h1>Hangman Game</h1>
      <h2>Using Angular and MongoDB</h2>
    </div>
  </div>
</div>
The styling for this page lives in src/app/home/home.component.css. Make sure it looks like this.
h1 {
  margin-top: 50px;
}

h1, h2 {
  text-align: center;
}
The home component only shows the splash screen and provides no further functionality. This means you can move right on to the profile component that lets the user view and modify their profile.
Open the terminal again and run the following command.
ng generate component profileNow open src/app/profile/profile.component.html and paste the following code into it.
<div class="container">
  <div class="row">
    <div class="col-sm loading" *ngIf="loading">
      <i class="fa fa-spinner fa-spin"></i>
    </div>

    <div class="col-sm" *ngIf="!loading && !profile">
      <h2>You have not set your username</h2>
      <form [formGroup]="form" (ngSubmit)="onSubmitUsername()">
        <div class="form-group full-width-input">
          <p><input class="form-control" placeholder="Username" formControlName="username" required></p>
          <p><button type="submit" class="btn btn-primary">Submit</button></p>
        </div>
      </form>
    </div>
    <div class="col-sm" *ngIf="!loading && profile">
      <h2>Your Profile</h2>
      <p><strong>Email:</strong>{{profile.email}}</p>
      <p><strong>Username:</strong>{{profile.username}}</p>
      <p><strong>Score:</strong>{{profile.score}}</p>
    </div>
  </div>
</div>
The template contains a row with three divs, only one of which will show at any time.
- The spinner signals that the page is loading
- The form inside the second div lets the user set their username
- If the username has been set and the user profile is available, the third div will show the user’s data
Add a few styles to the stylesheet in src/app/profile/profile.component.css.
.loading {
  text-align: center;
  font-size: 100px;
  margin-top: 40%;
}

h2 {
  margin-top: 16px;
}
The profile component in src/app/profile/profile.component.ts is responsible for loading the profile data and saving any changes to the server.
import { Component, OnInit } from '@angular/core';
import { FormGroup, FormBuilder, Validators } from '@angular/forms';
import { HangmanService } from '../hangman.service';

interface Profile {
  email: string;
  username: string;
  score: number;
}

@Component({
  selector: 'app-profile',
  templateUrl: './profile.component.html',
  styleUrls: ['./profile.component.css']
})
export class ProfileComponent implements OnInit {
  form: FormGroup;

  loading = true;
  profile?: Profile;

  constructor(private fb: FormBuilder,
              private hangman: HangmanService) { }

  async ngOnInit() {
    this.form = this.fb.group({
      username: ['', Validators.required],
    });

    try {
      this.profile = await this.hangman.getProfile();
    } catch (err) {}
    this.loading = false;
  }

  async onSubmitUsername() {
    await this.hangman.updateUser(this.form.get('username').value);
    this.profile = await this.hangman.getProfile();
  }
}
Note how the call to HangmanService.getProfile() is surrounded in a try-catch block. The call is expected to fail when a user opens this page for the very first time because they have not yet set their username on the server. In this case, the profile property remains unset, and the user will be presented the form to set their username.
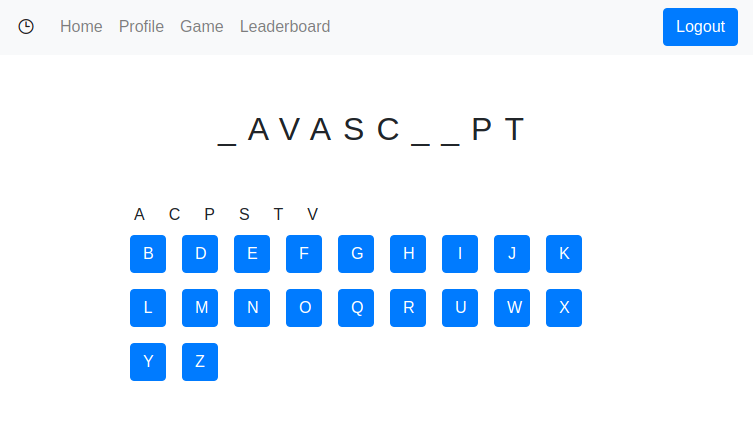
The game component contains the actual hangman game. For the sake of simplicity, there will be no graphical representation of the hangman. Instead, you’ll show the list of letters the user has guessed so far.
In the terminal, create the game component.
ng generate component gameNow paste the following into src/app/game/game.component.html.
<div class="container">
  <div class="row">
    <div class="col-sm loading" *ngIf="loading">
      <i class="fa fa-spinner fa-spin"></i>
    </div>

    <div class="col-sm" *ngIf="!loading">
      <p class="clue">{{game.clue}}</p>
      <div class="guesses">
        <span class="guessed" *ngFor="let c of getGuessed()">{{c}}</span>
      </div>
      <div class="guesses" *ngIf="game.status==='ok'">
        <button type="button" class="btn btn-primary" *ngFor="let c of getNotGuessed()" (click)="guess(c)">{{c}}</button>
      </div>
      <div class="game-result" *ngIf="game.status==='lost'">
        You Lost!
      </div>
      <div class="game-result" *ngIf="game.status==='won'">
        You Won!
      </div>
      <div class="game-result" *ngIf="game.status!=='ok'">
        <button type="button" class="btn btn-primary" (click)="newGame()">New Game</button>
      </div>
    </div>
  </div>
</div>
This component shows the clue above a row of letters that have already been guessed. Below is a grid of buttons, one for each letter that has not yet been guessed. To provide the styles for this component, open src/app/game/game.component.css and add the following code.
.clue {
  margin: 50px 0;
  text-align: center;
  font-size: 32px;
  letter-spacing: 12px;
}

.guessed {
  display: inline-block;
  margin-left: 12px;
  margin-right: 12px;
}

.guesses button {
  margin: 8px;
  width: 36px;
}

.game-result {
  text-align: center;
  margin-top: 20px;
}
Now, open src/app/game/game.component.ts and paste the implementation of the game component into the file.
import { Component, OnInit } from '@angular/core';
import { HangmanService } from '../hangman.service';

interface Game {
  status: string;
  clue: string;
  guesses: string;
}

@Component({
  selector: 'app-game',
  templateUrl: './game.component.html',
  styleUrls: ['./game.component.css']
})
export class GameComponent implements OnInit {
  game: Game;
  loading = true;

  constructor(private hangman: HangmanService) { }

  async ngOnInit() {
    this.game = await this.hangman.getGame();
    this.loading = false;
  }

  getGuessed() {
    return this.game.guesses.split('').sort();
  }

  getNotGuessed() {
    const guesses = this.game.guesses.split('');
    return 'ABCDEFGHIJKLMNOPQRSTUVWXYZ'.split('').filter(c => !guesses.includes(c));
  }

  async guess(c: string) {
    this.loading = true;
    this.game = await this.hangman.guessGame(c);
    this.loading = false;
  }

  async newGame() {
    this.loading = true;
    this.game = await this.hangman.getGame();
    this.loading = false;
  }
}
The functions guess() and newGame() issue asynchronous calls to the game server to submit a guess and start a new game. The functions getGuessed() and getNotGuessed() return arrays of letters that have already been guessed and those that have not been guessed so far. The final component will show the high score leaderboard. Open the shell again and run the command below.
ng generate component leaderboardThis component is relatively straightforward. The HTML template in src/app/leaderboard/leaderboard.component.html shows a list of usernames and their scores.
<div class="container">
  <div class="row">
    <div class="col-sm loading" *ngIf="loading">
      <i class="fa fa-spinner fa-spin"></i>
    </div>

    <div class="col-sm leaderboard" *ngIf="!loading">
      <h2>Leaderboard</h2>
      <table class="leaderboard-table">
        <tr *ngFor="let entry of leaderboard">
          <td>{{entry.username}}</td>
          <td>{{entry.score}}</td>
        </tr>
      </table>
    </div>
  </div>
</div>
Add styles in the file src/app/leaderboard/leaderboard.component.css:
.leaderboard {
  text-align: center;
}

.leaderboard-table {
  margin-left: auto;
  margin-right: auto;
}

.leaderboard-table td {
  padding: 4px 24px;
}
The implementation simply calls the HangmanService to load the leaderboard. Open src/app/leaderboard/leaderboard.component.ts and paste the code below.
import { Component, OnInit } from '@angular/core';
import { HangmanService } from '../hangman.service';

interface UserScore {
  username: string;
  score: number;
}

@Component({
  selector: 'app-leaderboard',
  templateUrl: './leaderboard.component.html',
  styleUrls: ['./leaderboard.component.css']
})
export class LeaderboardComponent implements OnInit {
  leaderboard: UserScore[];
  loading = true;

  constructor(private hangman: HangmanService) { }

  async ngOnInit() {
    this.leaderboard = await this.hangman.getLeaderboard();
    this.loading = false;
  }
}
Now that you have implemented all the components of the game client, there is one more step to complete the application. Open src/app/app-routing.module.ts and replace the routes array with the following content.
const routes: Routes = [
  {
    path: '',
    component: HomeComponent
  },
  {
    path: 'profile',
    component: ProfileComponent
  },
  {
    path: 'game',
    component: GameComponent
  },
  {
    path: 'leaderboard',
    component: LeaderboardComponent
  },
  {
    path: 'implicit/callback',
    component: OktaCallbackComponent
  }
];
You’ll need the following imports at the top of this file:
import { HomeComponent } from './home/home.component';
import { ProfileComponent } from './profile/profile.component';
import { GameComponent } from './game/game.component';
import { LeaderboardComponent } from './leaderboard/leaderboard.component';
import { OktaCallbackComponent } from '@okta/okta-angular';
You can now test your application. Open the terminal again and run the command below.
ng serve -oThis will open your browser and navigate directly to http://localhost:4200. After logging in, set your username on the profile page, head to the game page, and play hangman!
Learn More About Angular and MongoDB
In this tutorial, you learned how to build a simple web application using Angular and MongoDB. The advantage of MongoDB over a more classical SQL database is the high scalability when working with large amounts of data and high load for database queries. This makes MongoDB a good choice for social media websites.
You can find the source code for this example on GitHub at oktadeveloper/okta-angular-mongodb-hangman-example.
Are you a developer with a keen eye for security? Follow @oktadev and subscribe to our YouTube channel.
How to Connect Angular and MongoDB to Build a Secure App was originally published on the Okta Developer Blog on September 11, 2019.
Further Reading
Deployment Setup for Spring Boot Apps With MongoDB and Kubernetes
Published at DZone with permission of Holger Schmitz. See the original article here.
Opinions expressed by DZone contributors are their own.
Comments