Use OceanBase in Node.js: Build a CRM With Sequelize and Express
Explore how to use OceanBase, a distributed database, in a real-world project that uses Sequelize as the ORM and Express as the server.
Join the DZone community and get the full member experience.
Join For FreeWelcome to the latest episode in our series of articles designed to help you get started with OceanBase, a next-generation distributed relational database. Building on our previous guides, where we connected OceanBase to a Sveltekit app and built an e-commerce app with Flask and OceanBase, we now turn our attention to integrating OceanBase into a Node.js project using the popular Sequelize ORM and the Express server.
Sequelize is a promise-based Node ORM that supports the dialects for PostgreSQL, MySQL, MariaDB, SQLite, and of course, OceanBase. It offers a robust set of features for model querying and manipulation. Express, on the other hand, is a minimal and flexible Node web application framework that provides a powerful set of features for web and mobile applications.
But why use Sequelize and Express with OceanBase, you may ask? Sequelize will help us interact with OceanBase, which is compatible with MySQL, in a more JavaScript-friendly way, abstracting away much of the SQL syntax. Express, being a fast, unopinionated, and minimalist web framework for Node, will allow us to build our application's backend with ease and efficiency.
What We Are Going to Build: A Mini-CRM System
In this article, I’m going to build a mini Customer Relationship Management (CRM) system. CRM systems are integral to managing customer data, interactions, and business information. They are crucial for businesses of all sizes to maintain effective customer relationships and to ensure smooth operations.
The mini CRM system will leverage the power of OceanBase, a next-generation distributed relational database that excels in handling massive amounts of data with high availability and strong consistency. OceanBase's scalability and distributed nature make it a perfect fit for businesses of all sizes. As businesses grow and the volume of their data increases, they can effortlessly scale their database with OceanBase, making it an ideal choice for a CRM system and other enterprise resource planning applications.
The mini CRM system will be a simple yet powerful application that will allow us to perform Create, Read, Update, and Delete (CRUD) operations on contacts in our database. These operations form the backbone of any data-driven application and are essential for managing records in a database.
The CRM system will have the following features:
- Create Contacts: We will be able to add new contacts to our database. Each contact will have basic information such as name, email, company, and owner.
- Read Contacts: We will be able to view all the contacts stored in our database. This feature will display a list of all the contacts with their respective information. We will also be able to read the record of one specific contact.
- Update Contacts: This feature will allow us to modify the details of a specific contact. We can update any information related to a contact, such as changing their email or company.
- Delete Contacts: If we no longer need to keep contact in our database, we can delete it. This feature will remove the contact and all its related information from our database.
By building this mini CRM system, we will learn how to effectively use OceanBase in a Node.js project with Sequelize as the ORM and Express as the server. We will understand how to perform CRUD operations using Sequelize and how to structure our Express application to handle these operations. Most importantly, we will see how OceanBase can effortlessly manage our data, providing us with a reliable and scalable solution for our application's database needs.
Setting up the Database
To set up the project, you first need a running OceanBase cluster. You have several options for doing so. You can install OceanBase in your local environment, spin up a virtual machine in the cloud to run it or use OceanBase Cloud in the AWS marketplace to set up your cluster in just a few clicks.
In this tutorial, I will simply set up a demo OceanBase cluster on an AWS EC2 instance. You can read my previous article on how to install OceanBase in AWS.
After installing OceanBase and spinning up the demo cluster, I’m going to set up a demo user for the development rather than using the root user, which is considered not secure.
We can create a new user called demo that only has access to the database we are using. Before this, I also created a database in OceanBase called app, which will be the main database we will interact with within this article.
To create a new user, we will use the following command:
CREATE USER 'demo'@'localhost' IDENTIFIED BY 'password';Next, we will grant the user permission to access the app database.
GRANT ALL PRIVILEGES ON app.* TO 'demo'@'localhost';Now we can connect to the OceanBase instance from our project using the demo user credentials.
Host: YOUR_EC2_PUBLIC_IP_ADDRESS
Port: 2881
User: demo
Password: password
Setting up the Project
Now, we need to set up our Node.js project. I’ll assume you have Node.js and npm installed. If not, you can download and install them from the official Node.js website. Once you're ready, create a new directory for your project and initialize it with npm:
mkdir oceanbase-sequelize && cd oceanbase-sequelize
npm init -y
Next, install Express, Sequelize, and the mysql2 driver. (Since there is no direct Sequelize support of OceanBase, and OceanBase is compatible with MySQL, I will use the MySQL driver to connect to OceanBase in Sequelize, which works perfectly fine in all my tests.)
npm install express sequelize mysql2Configuring Sequelize
Sequelize is a powerful ORM tool that provides a high-level abstraction for managing database operations. It supports a wide range of databases, including OceanBase (via MySQL). Configuring Sequelize involves setting up the connection to the database and defining models that represent the tables in the database.
You can use a Command Line Interface (CLI) that simplifies the process of setting up and managing your project. One of the commands provided by the Sequelize CLI is sequelize init, which sets up a basic project structure for you.
Before you can use the Sequelize CLI, you need to install it. You can do this by running:
npm install --save-dev sequelize-cliOnce the Sequelize CLI is installed, you can initialize your project by running the following:
npx sequelize initThis command will create the following directories and files:
config/: This directory contains aconfig.jsonfile where you can specify your database configuration for different environments (development, test, and production).models/: This directory is for your Sequelize models. By default, it includes anindex.jsfile that sets up Sequelize and imports all models.migrations/: This directory is for your migration scripts.seeders/: This directory is for your seeder files.
Configuring the Database Connection
To connect to your OceanBase database, you need to update the config/config.json file with your database credentials. Here's my configuration for the credentials I created in the last section:
{
  "development": {
    "username": "demo",
    "password": "password",
    "database": "app",
    "host": "YOUR_EC2_PUBLIC_IP_ADDRESS",
        "port": 2881,
    "dialect": "mysql"
  },
  "test": {
    "username": "your_username",
    "password": "your_password",
    "database": "your_database",
    "host": "localhost",
    "dialect": "mysql"
  },
  "production": {
    "username": "your_username",
    "password": "your_password",
    "database": "your_database",
    "host": "localhost",
    "dialect": "mysql"
  }
}
Now, Sequelize is configured and ready to use in your project. You can start defining your models in the models/ directory and use Sequelize's features to interact with your OceanBase database.
Defining Data Models
Data models in Sequelize represent tables in your database. They are defined using the define method on your Sequelize instance. This method takes two arguments: the name of the model (which will be used as the table name) and an object that defines the model's attributes.
Let's define a Contact model for the CRM system. This model will have the following attributes: firstName, lastName, email, age, company, and owner.
Here's how we can define this model in the models/Contact.js file:
module.exports = (sequelize, DataTypes) => {
    const Contact = sequelize.define('Contact', {
        firstName: {
            type: DataTypes.STRING,
            allowNull: false,
            validate: {
                notEmpty: true,
            },
        },
        lastName: {
            type: DataTypes.STRING,
            allowNull: false,
            validate: {
                notEmpty: true,
            },
        },
        email: {
            type: DataTypes.STRING,
            allowNull: false,
            validate: {
                notEmpty: true,
            },
        },
        age: {
            type: DataTypes.INTEGER,
            allowNull: true,
            validate: {
                notEmpty: true,
            },
        },
        company: {
            type: DataTypes.STRING,
            allowNull: true,
            validate: {
                notEmpty: true,
            },
        },
        owner: {
            type: DataTypes.STRING,
            allowNull: true,
            validate: {
                notEmpty: true,
            },
        },
    });
    return Contact;
};
In this code, we're defining a Contact model with six attributes. Each attribute is an object that specifies the data type and validation rules.
For example, the firstName, lastName, and email attributes are of type STRING and cannot be null or empty. The age, company, and owner attributes are also of type STRING but can be null, however, they cannot be empty if provided.
The validate property is used to specify validation rules. In this case, we're using the notEmpty rule, which ensures that the value is not an empty string.
The define method returns the model, which we then export so it can be used in other parts of our application. This Contact model now represents a Contact table in our OceanBase database. You can use this model to perform CRUD operations on the Contact table.
Building the Express Application
The Express application is the core of our project. It's where we define our routes and handle requests. In our case, we'll be creating routes to perform CRUD (Create, Read, Update, Delete) operations on our Contact model.
Setting Up Express
First, we import Express and create an instance of it. We also import our Contact model and the Sequelize instance from the models directory.
const express = require('express');
const app = express();

// Connect to the database
const db = require('./models');
const { Contact } = require('./models');
We also add a middleware to parse JSON bodies. This is necessary because we'll be receiving JSON data in our POST and PATCH requests.
app.use(express.json());Creating Routes
Get All Contacts
Our first route is a GET route to /contacts. This route retrieves all contacts from the database using the findAll method on the Contact model.
app.get('/contacts', async (req, res) => {
    const contacts = await Contact.findAll();
    res.json(contacts);
});
Get a Contact by ID
Next, we have a GET route to /contact/:id. This route retrieves a single contact by its ID using the findByPk method.
app.get('/contact/:id', async (req, res) => {
    const contact = await Contact.findByPk(req.params.id);
    if (contact) {
        res.json(contact);
    } else {
        res.status(404).send({
            status: 'failed',
            message: 'Contact not found',
        });
    }
});
Create a New Contact
We also have a POST route to /contact. This route creates a new contact using the create method.
app.post('/contact', async (req, res) => {
    const newContact = await Contact.create(req.body);
    res.json(newContact);
});
When making a POST request to this route, the request body should be a JSON object that represents a new contact. The structure of this object should match the structure of our Contact model.
Here's an example of how you can structure the request body:
{
    "firstName": "John",
    "lastName": "Doe",
    "email": "[email protected]",
    "age": 30,
    "company": "Tech Corp",
    "owner": "Jane Doe"
}
Delete a Contact
Our DELETE route to /contact/:id deletes a contact by its ID using the destroy method.
app.delete('/contact/:id', async (req, res) => {
    const result = await Contact.destroy({
        where: {
            id: req.params.id,
        },
    });
    if (result) {
        res.status(200).send({
            status: 'succeed',
            message: 'Contact deleted',
        });
    } else {
        res.status(404).send({
            status: 'failed',
            message: 'Contact not found',
        });
    }
});
In this route, :id is a route parameter that represents the ID of the contact you want to delete. When you make a DELETE request, you replace :id with the actual ID of the contact.
For example, if you want to delete the contact with an ID of 5, you would send a DELETE request to /contact/5.
The ID of a contact is typically assigned by OceanBase when the contact is created. You can find the ID of a contact by making a GET request to the /contacts route, which returns a list of all contacts. Each contact in the list includes an id property that you can use in the DELETE route.
Update a Contact
Finally, we have a PATCH route to /contact/:id that updates a contact by its ID using the update method.
app.patch('/contact/:id', async (req, res) => {
    const updatedContact = await Contact.update(req.body, {
        where: {
            id: req.params.id,
        },
    });
    if (updatedContact[0]) {
        res.status(200).send({
            status: 'Contact updated',
            data: await Contact.findByPk(req.params.id),
        });
    } else {
        res.status(404).send({
            status: 'failed',
            message: 'Contact not found',
        });
    }
});
When making a PATCH request to this route, the request body should be a JSON object that includes the properties you want to update. The structure of this object should match the structure of our Contact model, but you only need to include the properties you want to change.
Starting the Server
Finally, we synchronize our Sequelize models with our OceanBase database using db.sequelize.sync() and start our server.
db.sequelize.sync().then((req) => {
    app.listen(3000, () => {
        console.log('Server running at port 3000...');
    });
});
The sync method creates the necessary tables in the database if they don't exist. After the synchronization is complete, we start our server on port 3000.
And that's it! We now have a fully functional Express application that can perform CRUD operations on our Contact model using Sequelize and OceanBase.
Running the App
To run the application, simply navigate to the root directory of your project in your terminal and run the command:
node index.jsYou should see the message "Server running at port 3000..." in your terminal, indicating that your application is running and ready to accept requests.
To interact with your application, you can use a tool like Postman, which allows you to send HTTP requests to your server and view the responses. In this article, I will just use the Thunder Client plugin in VS Code to test the requests.
Here are some examples of how you can use Thunder Client to interact with your application:
Creating a New Contact
To create a new contact, you can send a POST request to http://127.0.0.1:3000/contact. In the body of the request, you would include a JSON object that represents the new contact.
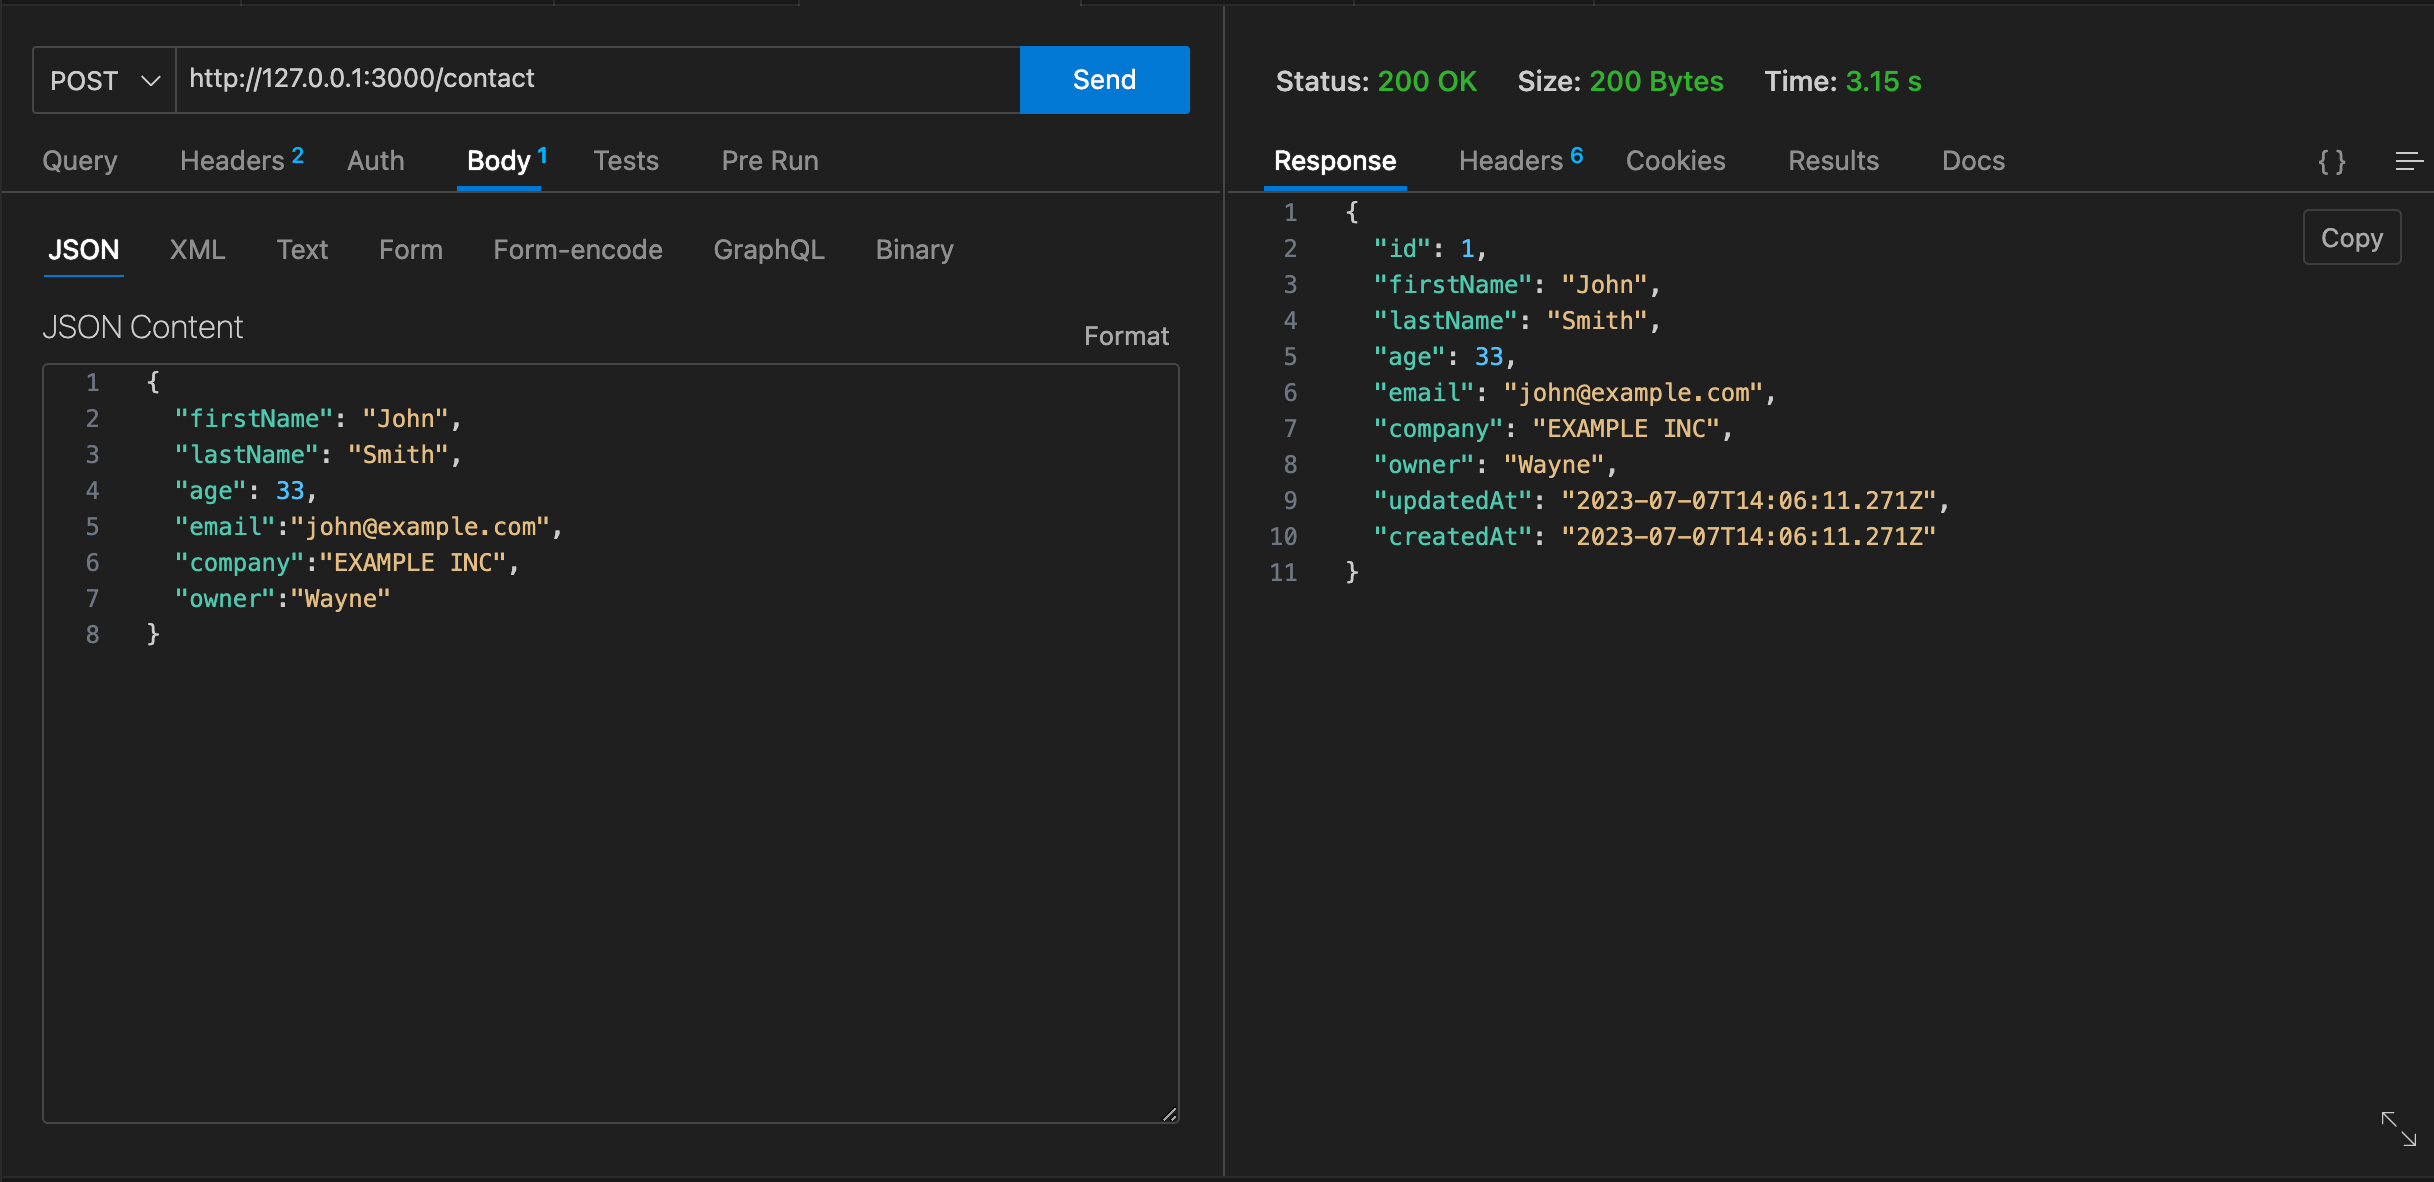
In this example, we're creating a new contact with the name "John Smith," email "[email protected]," age 33, company "EXAMPLE INC," and owner "Wayne." After sending the request, we receive a response that includes the new contact with an ID assigned by OceanBase.
Getting All Contacts
To get all contacts, you would send a GET request to http://127.0.0.1:3000/contacts.
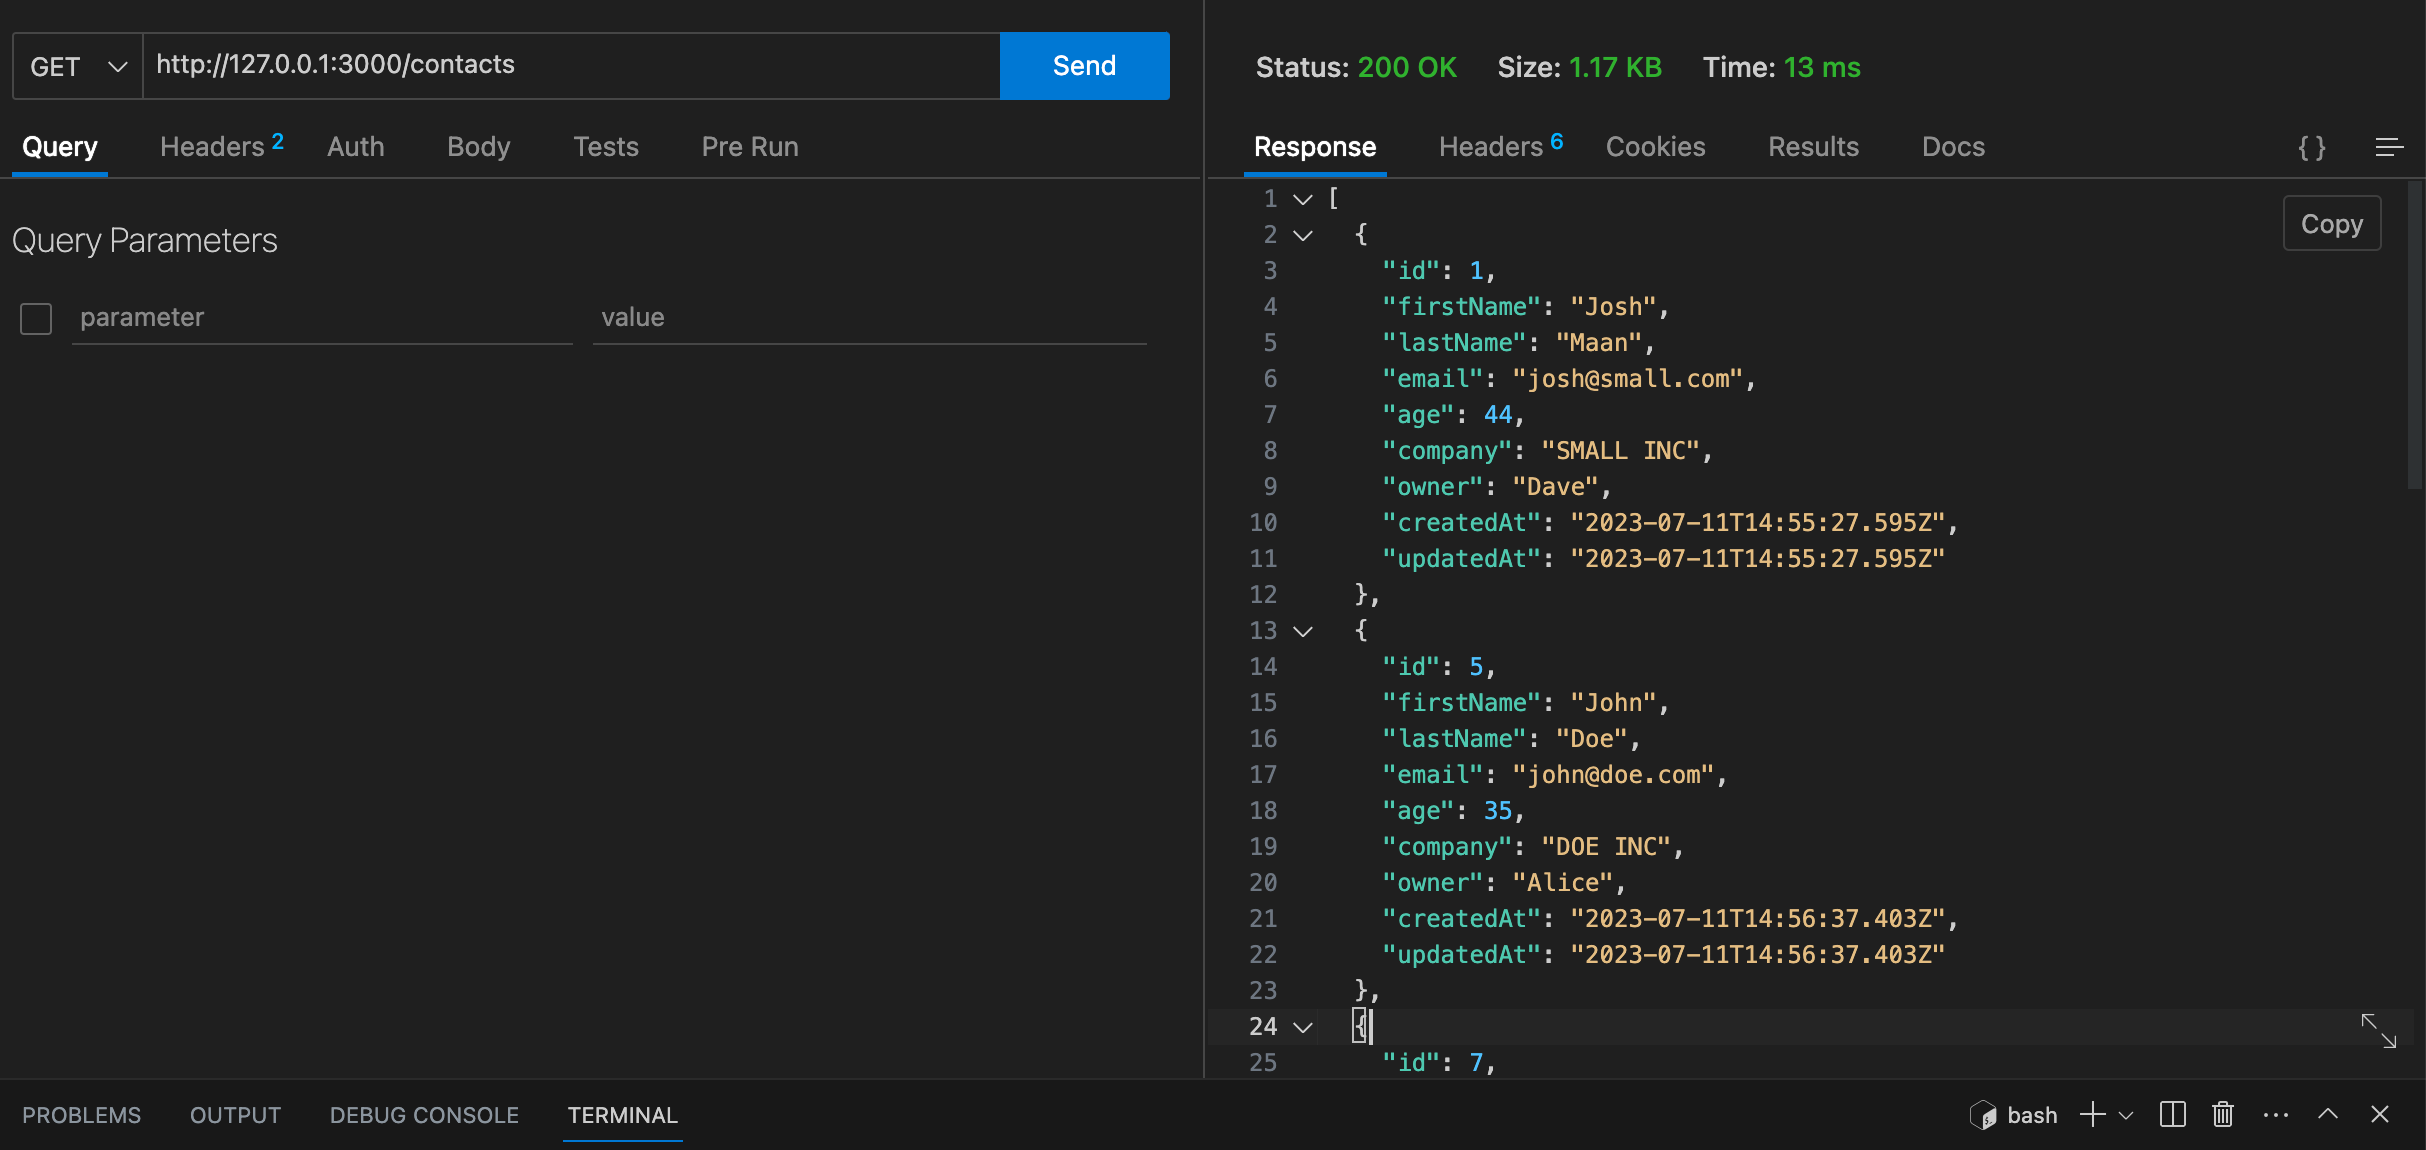
In this example, we're retrieving all contacts from the OceanBase database. The response is an array of contacts.
Getting a Contact by ID
To get a contact by ID, you would send a GET request to http://127.0.0.1:3000/contact/:id, replacing :id with the ID of the contact.

In this example, we're retrieving the contact with an ID of 7. The response is the contact with that ID.
Updating a Contact
To update a contact, you would send a PATCH request to http://127.0.0.1:3000/contact/:id, replacing :id with the ID of the contact. In the body of the request, you would include a JSON object that includes the properties you want to update.
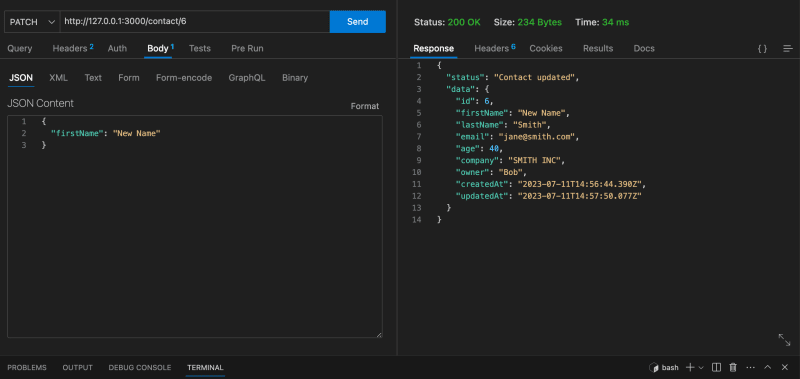
In this example, we're updating the first name of the contact with an ID of 6. The response is the updated contact.
Deleting a Contact
To delete a contact, you would send a DELETE request to http://127.0.0.1:3000/contact/:id, replacing :id with the ID of the contact.
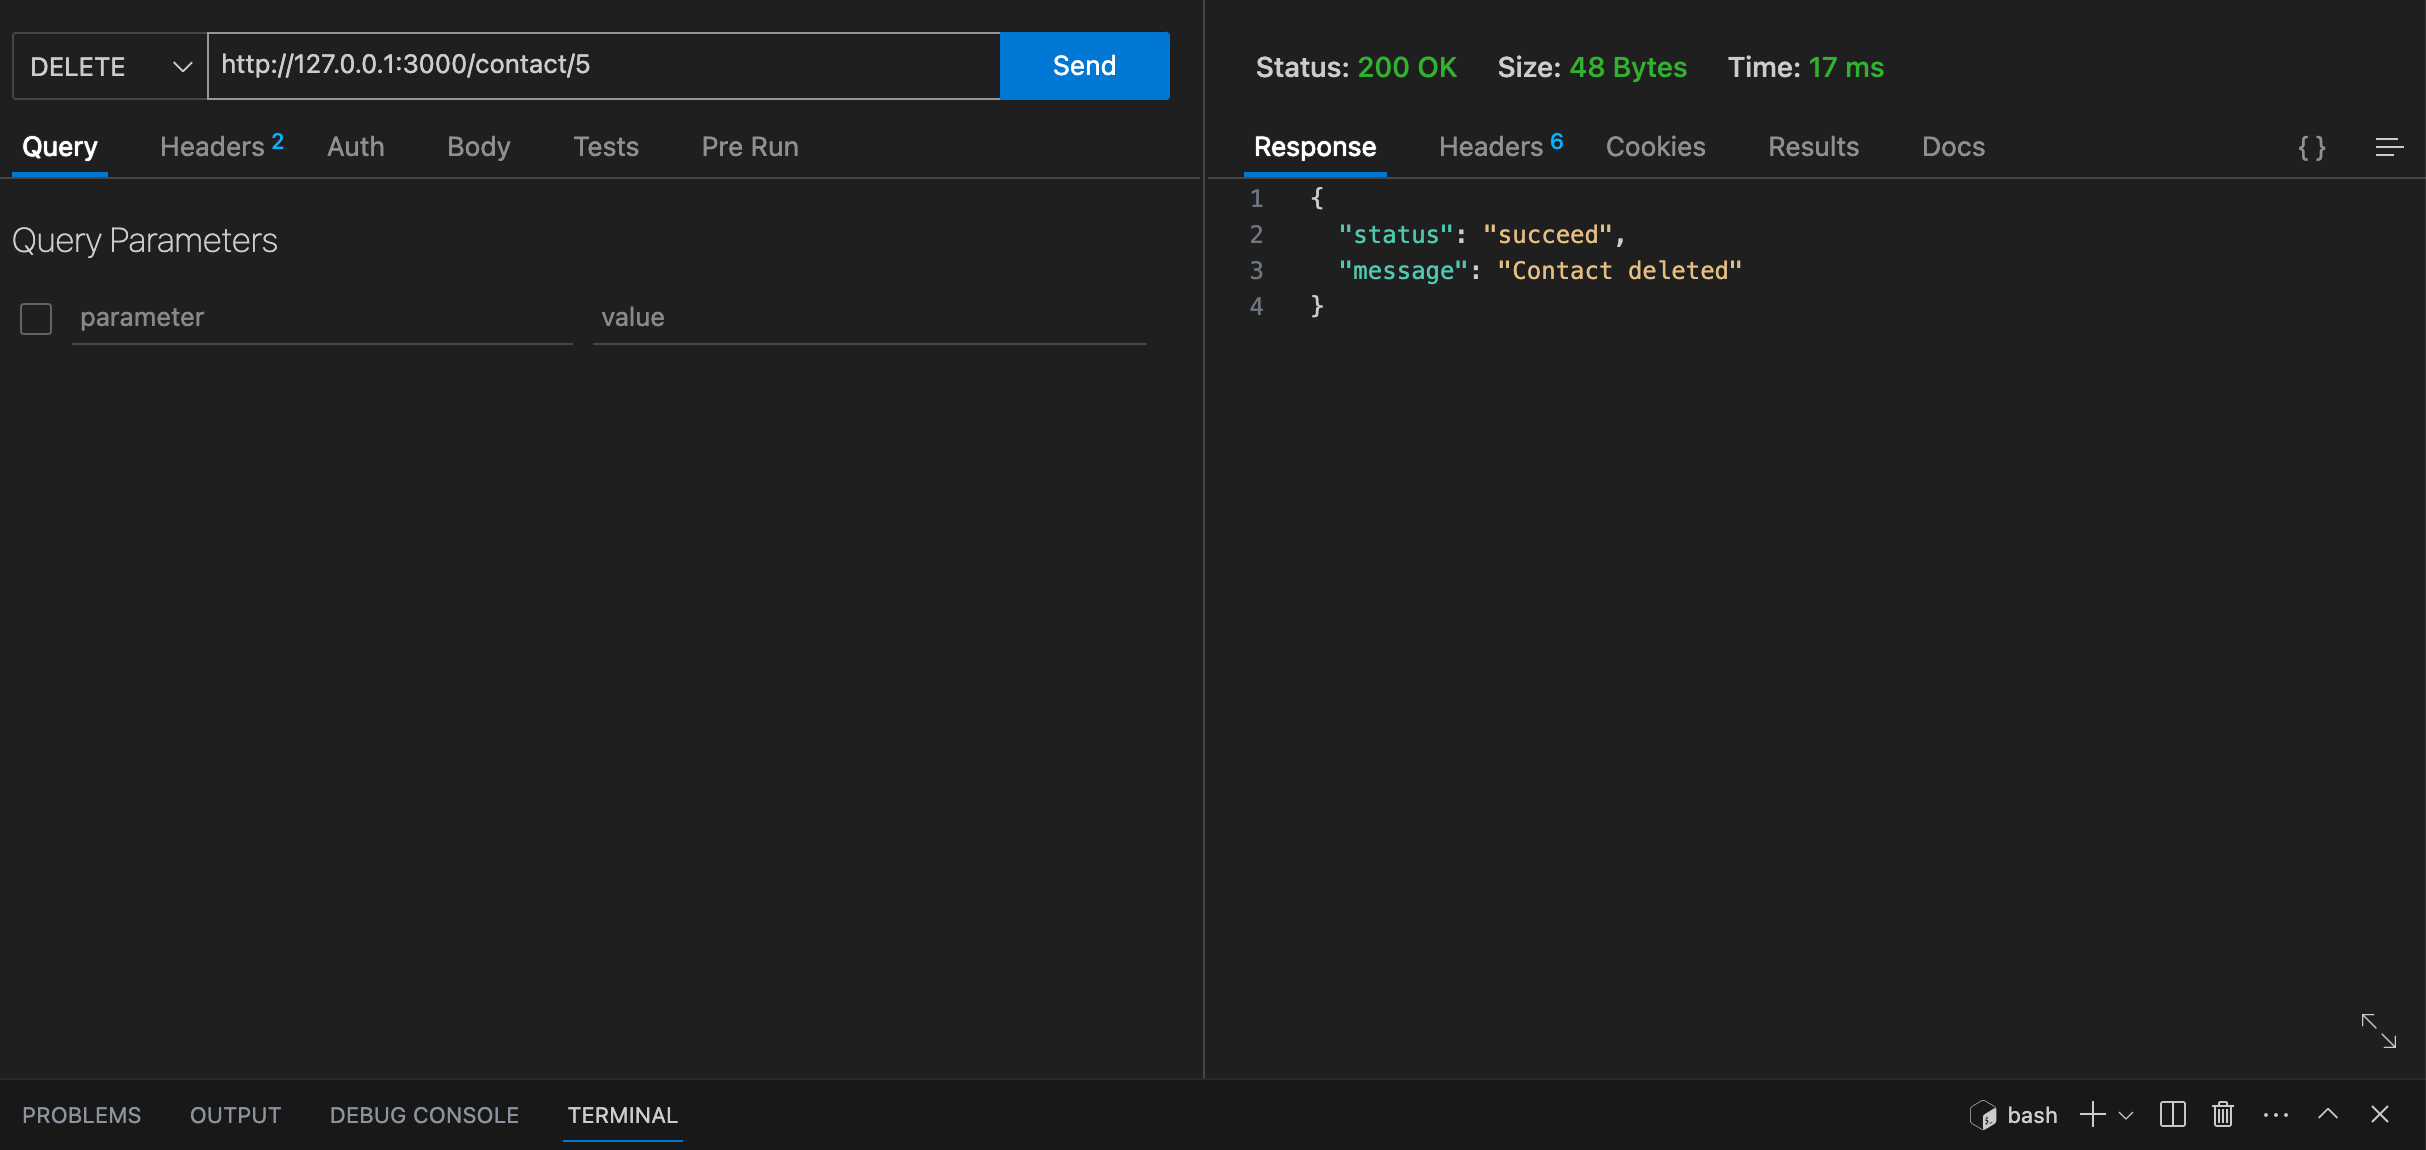
In this example, we're deleting the contact with an ID of 5. The response is a message indicating that the contact was successfully deleted.
Conclusion
In this article, we've walked through the process of integrating OceanBase into a Node project using Sequelize and Express. We've built a mini-CRM system that performs CRUD operations on a Contact model.
We've seen how Sequelize abstracts away much of the SQL syntax, allowing us to interact with our OceanBase database in a JavaScript-friendly way. We've also seen how Express allows us to build our application's backend with ease and efficiency. The mini-CRM system we've built is a simple yet powerful application that leverages the scalability and distributed nature of OceanBase, making it a perfect fit for businesses of all sizes.
If you want to explore the project further, you can clone the project from my GitLab repository and run it on your local machine.
Feel free to modify the project and experiment with different features of OceanBase. The possibilities are endless, and there's always something new to learn.
If you need any help installing or using OceanBase, you can reach out to the OceanBase team on Twitter (@OceanBaseDB) or ask a question on StackOverflow with the “OceanBase” tag.
Published at DZone with permission of Wayne S. See the original article here.
Opinions expressed by DZone contributors are their own.
Comments