Using Spring Beans in Mule
There are three main ways to demonstrate using Spring beans in Mule apps: simple XML bean configuration, annotation bean configuration, and Java Spring configuration.
Join the DZone community and get the full member experience.
Join For FreeMule has been paired with Spring since its creation in 2004. Both use a streamlined POJO model and XML schema to allow powerful integration. In this tutorial, I am going to show how easy it is to use Spring beans in Mule applications by creating three separate projects.
1. Simple XML Bean Configuration
In this project, I will try to show how to configure the Spring beans in an XML configuration file. You can find the entire source code of the project here.
The Spring Beans
In this project, I have two beans: User.java and UserSRVImpl.java. In UserSRVImpl.java, there is a dependency on the User.java class. See below.
User.java:
package com.anupam.bean;

public class User {
private String firstName;
private String lastName;
private String email;

public String getFirstName() {
return firstName;
}
public void setFirstName(String firstName) {
this.firstName = firstName;
}
public String getLastName() {
return lastName;
}
public void setLastName(String lastName) {
this.lastName = lastName;
}
public String getEmail() {
return email;
}
public void setEmail(String email) {
this.email = email;
}


}UserSRVImpl.java:
package com.anupam.service;
import com.anupam.bean.User;
public class UserSRVImpl implements UserSRV {
private User user;
@Override
public String sayHello() {
return "Hello from " + user.getFirstName();
}
public User getUser() {
return user;
}
public void setUser(User user) {
this.user = user;
}
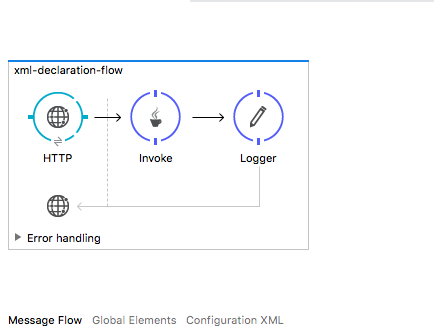
}The Mule Flow
The Mule flow is very simple. It just uses an Invoke component to call the Spring bean's function.
The most important part is the configuration of the Spring beans. Please take a look at the code snippet below:
<spring:beans>
<spring:bean id="userBean" class="com.anupam.bean.User">
<spring:property name="firstName" value="Mule" />
</spring:bean>
<spring:bean id="userService" class="com.anupam.service.UserSRVImpl">
<spring:property name="user" ref="userBean" />
</spring:bean>
</spring:beans>
In the code snippet above, I am setting the firstName property of the User bean. You can see that the UserSRVImpl is being injected with a dependency of the User bean.
In the Invoke component in the Mule application, we are simply calling the sayHello() method of the UserSRVImpl. Here is the screen shot of the configuration of the Invoke component:
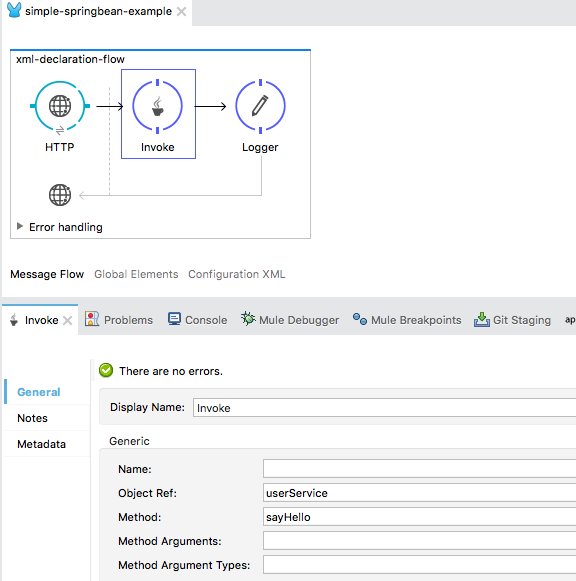
And that's it. Upon executing the Mule application and accessing the endpoint at http://localhost:8081/spring, you will get the desired result.
2. Annotation Bean Configuration
In this example, we are going to use Spring Annotation to declare the beans, use component scan to scan all the Spring stereotypes across some declared package(s), and intialize them. Here is the complete source code.
The Spring Beans
Like in the first approach, I have two simple Spring beans: User.java and UserSRVImpl.java.
User.java:
package com.anupam.bean;

import org.springframework.beans.factory.annotation.Value;
import org.springframework.stereotype.Component;

@Component
public class User {

@Value("${user.firstname}")
private String firstName;

private String lastName;

private String email;

public String getFirstName() {
return firstName;
}
public void setFirstName(String firstName) {
this.firstName = firstName;
}
public String getLastName() {
return lastName;
}
public void setLastName(String lastName) {
this.lastName = lastName;
}
public String getEmail() {
return email;
}
public void setEmail(String email) {
this.email = email;
}
}
The property value @Value("${user.firstname}") is coming from a property file init.properties.
package com.anupam.service;

import javax.inject.Inject;

import org.springframework.stereotype.Service;

import com.anupam.bean.User;

@Service(value="userService")
public class UserSRVImpl implements UserSRV {

@Inject
private User user;

@Override
public String sayHello() {

return "Hello from "+user.getFirstName();
}

public User getUser() {
return user;
}

public void setUser(User user) {
this.user = user;
}


}
From the above code snippets, it is easy to visualize that I am using the Spring stereotypes to annotate the beans.
The Mule Flow
The Mule flow is almost the same as the first approach. Here is that main configuration file:
<?xml version="1.0" encoding="UTF-8"?>

<mule xmlns:tracking="http://www.mulesoft.org/schema/mule/ee/tracking"
xmlns:http="http://www.mulesoft.org/schema/mule/http" xmlns="http://www.mulesoft.org/schema/mule/core"
xmlns:doc="http://www.mulesoft.org/schema/mule/documentation"
xmlns:spring="http://www.springframework.org/schema/beans"
xmlns:context="http://www.springframework.org/schema/context"
xmlns:xsi="http://www.w3.org/2001/XMLSchema-instance"
xsi:schemaLocation="http://www.springframework.org/schema/beans http://www.springframework.org/schema/beans/spring-beans-current.xsd
http://www.mulesoft.org/schema/mule/core http://www.mulesoft.org/schema/mule/core/current/mule.xsd
http://www.mulesoft.org/schema/mule/http http://www.mulesoft.org/schema/mule/http/current/mule-http.xsd
http://www.springframework.org/schema/context http://www.springframework.org/schema/context/spring-context-current.xsd
http://www.mulesoft.org/schema/mule/ee/tracking http://www.mulesoft.org/schema/mule/ee/tracking/current/mule-tracking-ee.xsd">


<context:property-placeholder location="classpath:init.properties" />
<spring:beans>
<context:component-scan base-package="com.anupam.*" />
</spring:beans>


<flow name="component-scan-flow">
<http:listener config-ref="HTTP_Listener_8081" path="/cs/"
doc:name="HTTP" />
<invoke object-ref="userService" method="sayHello" doc:name="Invoke" />
<logger level="INFO" doc:name="Logger" message="#[payload]" />
</flow>
</mule>
In the code snippet above, I have declared the namespace for Spring context. And the most important point is the following configuration,
<context:property-placeholder location="classpath:init.properties" />
<spring:beans>
<context:component-scan base-package="com.anupam.*" />
</spring:beans>
In the first line, I am just importing the init.properties and then I am scanning the Spring stereotypes under the package com.anupam.*.
And that's it. Upon executing the Mule application and accessing the endpoint at http://localhost:8081/cs, you will get the desired result.
3. Java Spring Configuration
This is the last approach I am going to present. In this example, I will create the Spring beans in Java code (Java Spring Configuration). Here is the complete source code of the project.
The Spring Beans
As in the other approaches, I have two simple Spring beans: User.java and UserSRVImpl.java. Most importantly, I have the Java Spring configuration class MySpringConfig.class.
User.java:
package com.anupam.bean;

public class User {

private String firstName;

private String lastName;

private String email;

public String getFirstName() {
return firstName;
}

public void setFirstName(String firstName) {
this.firstName = firstName;
}

public String getLastName() {
return lastName;
}

public void setLastName(String lastName) {
this.lastName = lastName;
}

public String getEmail() {
return email;
}

public void setEmail(String email) {
this.email = email;
}

}UserSRVImpl.java:
package com.anupam.service;

import com.anupam.bean.User;

public class UserSRVImpl implements UserSRV {

private User user;

@Override
public String sayHello() {

return "Hello from " + user.getFirstName();
}

public User getUser() {
return user;
}

public void setUser(User user) {
this.user = user;
}

}
Please note that the above two classes are totally annotation-free. Now, let's look at the configuration class:
package com.anupam.config;

import org.springframework.context.annotation.Bean;

import com.anupam.bean.User;
import com.anupam.service.UserSRVImpl;

//@Configuration
public class MySpringConfig {

@Bean(name = "userBean")
public User userBean() {
User user = new User();
user.setFirstName("Java Configuration");
return user;
}

@Bean(name = "userService")
public UserSRVImpl userService() {
UserSRVImpl userService = new UserSRVImpl();
userService.setUser(userBean());
return userService;
}

}
Here, I am creating and initializing the Spring Beans.
The Mule Flow
The Mule application is same as in the above two approaches. The only difference is this:
<spring:beans>
<spring:bean id="config" class="com.anupam.config.MySpringConfig"/>
</spring:beans>
Here, I am declaring the MySpringConfig class as Spring bean so that the Spring container can initialize it and then, in turn, the configuration class will initialize the other beans.
And that's it. Upon executing the Mule application and accessing the endpoint at http://localhost:8081/java, you will get the desired result.
Opinions expressed by DZone contributors are their own.
Comments