Using the JMeter Flexible File Writer Plugin
Learn how to set up and use JMeter's Flexible File Writer plugin for customized logging.
Join the DZone community and get the full member experience.
Join For FreeThis blog post is about the Apache JMeter™ Flexible File Writer plugin. This plugin extends JMeter's functionality with an element called the Flexible File Writer listener. The Flexible File Writer listener is designed for customized logging, and it can be useful when we need to collect customized information about each sample, or when we need to write JMeter variables' values to a file.
In addition and as a complementing feature, the plugin enables the user to write test results in a flexible format, without restricting to just XML or CSV. The format of the log file can be easily changed via the JMeter GUI. Of course, you can find many other reasons to use this cool listener.
To download the Flexible File Writer plugin we can head on over to its official page, found here. Note that this plugin can be installed as a part of the "jpgc - Standard Set" plugin as well.
To start using the Flexible File Writer follow these steps after installing the plugin:
Test Plan -> Add -> Listener -> jp@gc - Flexible File Writer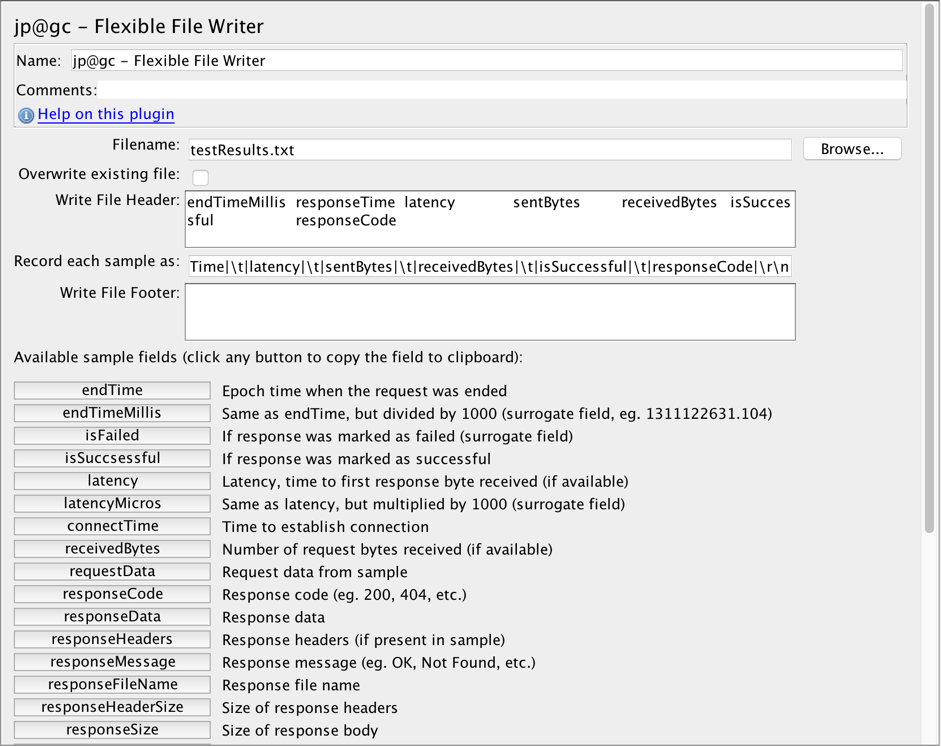
The Flexible File Writer listener has the following fields:
- Filename defines the location, name, and extension of the log file.
- Overwrite existing file replaces the existing file with the new logs if True, or adds new logs to the existing file if False.
- Write File Header defines the content and format of the log header. The Flexible File Writer listener writes the header before the log content.
- Record each sample as defines the content and format of the log itself. The log can also contain a number of fields for each sample. We'll take a look at them in the next section.
- Write File Footer defines the content and format of the log footer. The Flexible File Writer listener writes the footer right after log content.
Available Sample Fields:
- endTime - UNIX Epoch time when the request ended;
- endTimeMillis - UNIX Epoch time when the request ended divided by 1000;
- isFailed - 1 if the request failed and 0 if successful;
- isSuccsessful (typo in JMeter) - 1 if the request was successful and 0 if it failed;
- latency - the difference between the time the request was sent and the time the response started to be received;
- latencyMicros - the difference between the time the request was sent and the time the response started to be received multiplied by 1000;
- connectTime - the time taken to establish the connection, including SSL handshake;
- receivedBytes - the amount of received bytes from the request;
- requestData - the request data from the sample;
- responseCode - the response code from the sample;
- responseData - the response data from the sample;
- responseHeaders - the response headers from the sample;
- responseMessage - the response message from the sample;
- responseFileName - this should return the response file name, but I wasn't able to make it work;
- responseHeaderSize - the response headers size in bytes;
- responseSize - the response body size in bytes;
- responseTime - the difference between the time the request was sent and the time the response was fully received;
- responseTimeMicros - the difference between the time the request was sent and the time the response was fully received multiplied by 1000;
- sampleLabel - the sampler name that made the request;
- sentBytes - the number of request bytes sent;
- startTime - UNIX Epoch time when the request was started;
- startTimeMillis - UNIX Epoch time when the request was started divided by 1000;
- threadName - the name of thread that made the request;
- threadsCount - the total number of active threads in all groups;
- grpThreads - the number of active threads in the current group;
- sampleCount - the number of samples (usually 1);
- errorCount - the number of failed samples (usually 0 or 1);
- URL - the sample URL;
- variable#<N> - the sample variable with index N; Will be described in detail below.
Great! Now that we know the basics of the Flexible File Writer listener, it's time to try it in action.
We need a simple JMeter script for demo purposes. Let's create it below. I have chosen the BlazeDemo website to run a performance test on. This website is available for anyone who wants to try out running load scripts.
1. Add a Thread Group to the Test plan.
Test plan -> Add -> Thread (Users) -> Thread Group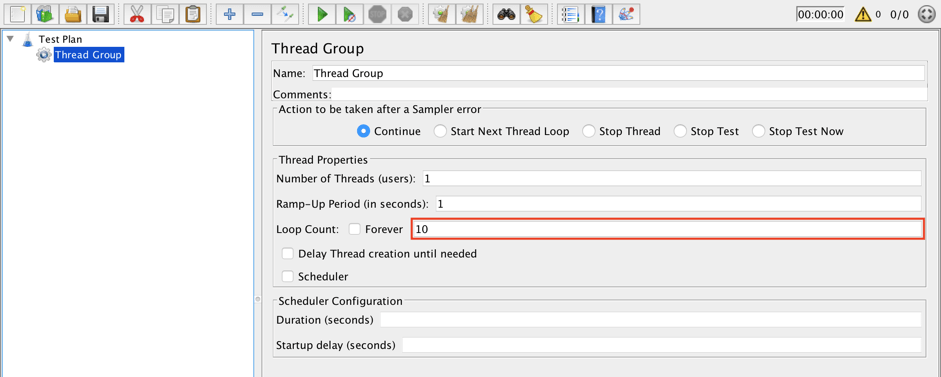
Update the loop count to 10. Our script will be run 10 times for one virtual user in each test run.
2. Add an HTTP Request that will open the BlazeDemo website.
Thread Group -> Add -> Sampler -> HTTP Request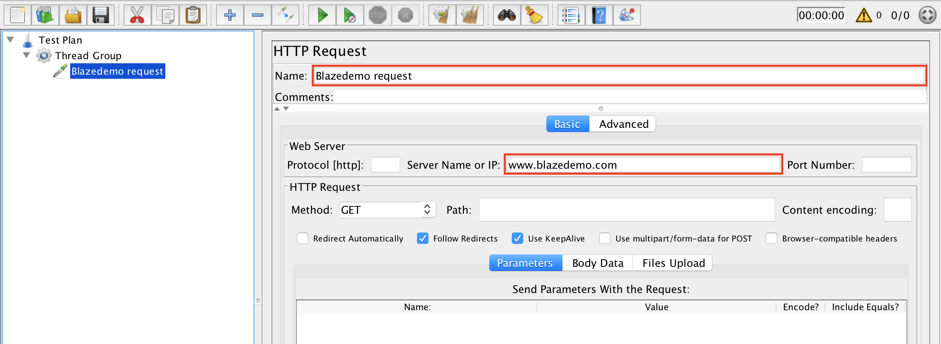
Fill in the following values:
- Name: Blazedemo request
- Server name or IP: www.blazedemo.com
This request will send a request to the landing page of the BlazeDemo website.
3. Add the Flexible File Writer.
Thread Group -> Add -> Listener -> jp@gc - Flexible File Writer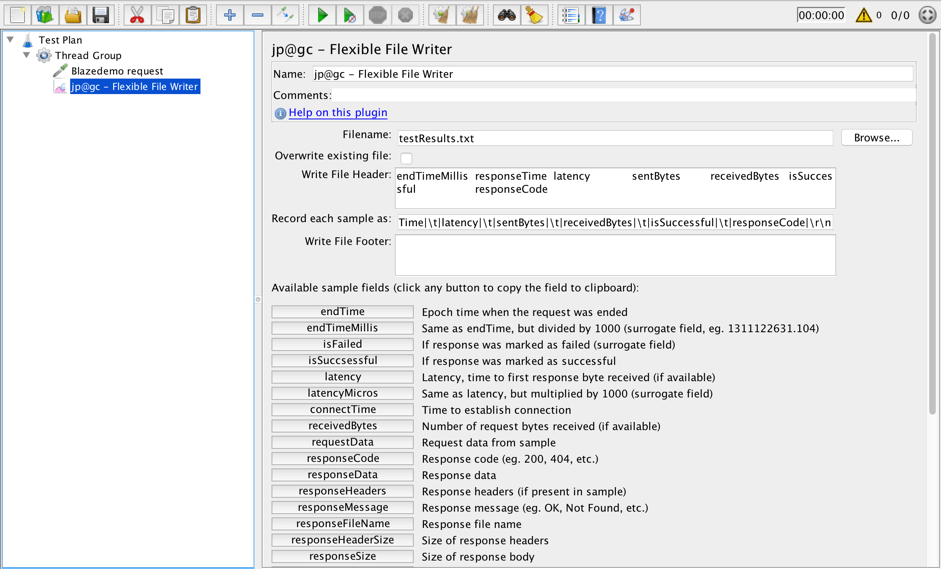
As you can see, the default filename has the value "testResults.txt". This file is of TXT format and not XML or CSV, which is one of this plugin's greatest strengths.
There is no need to change anything in this listener for now. It already has some default values. This listener will write endTimeMillis, responseTime, latency, sentBytes, receivedBytes, isSuccessful and responseCode fields for each sample to the log file.
4. Add a View Results Tree listener to see the results of the tests.
Test Plan -> Add -> Listener -> View Results Tree5. Run the script.

The content of the log file looks as expected. We see 10 requests with the proper values. This format is unique because we can change the structure and values saved to the log file.
Until now, we have considered the default way of using the Flexible File Writer listener: there are about 30 predefined sample fields that we are able to add to the log.
But what about customizing the fields, which is where this plugin is so powerful? By this I mean JMeter variables. Are we able to store their values to the log file? The answer is yes. Let's learn how.
Here are two advanced approaches for using the Flexible File Writer listener. First is the Sample Variables Approach, the second is the Fake Sampler Approach. Let's consider them below. To demonstrate them, we will need to get random variables. We will do so with an XPath Extractor.
6. Add an XPath Extractor to grab a random departure city.
Blazedemo request -> Add -> Post Processors -> XPath Extractor
Enter the following values:
- Name: Departure XPath Extractor
- Use Tidy: Yes
- Quiet: Yes
- Name of created variable: blazedemo_departure
- XPath query: //select[@name='fromPort']/option
- Match No.: 0
- Default Value: ERROR
This XPath Extractor will extract a departure city from the selector on the Landing page and save it to the blazedemo_departure variable. This variable will be stored in the log file later.
7. Add an XPath Extractor to grab a random destination city.
Blazedemo request -> Add -> Post Processors -> XPath Extractor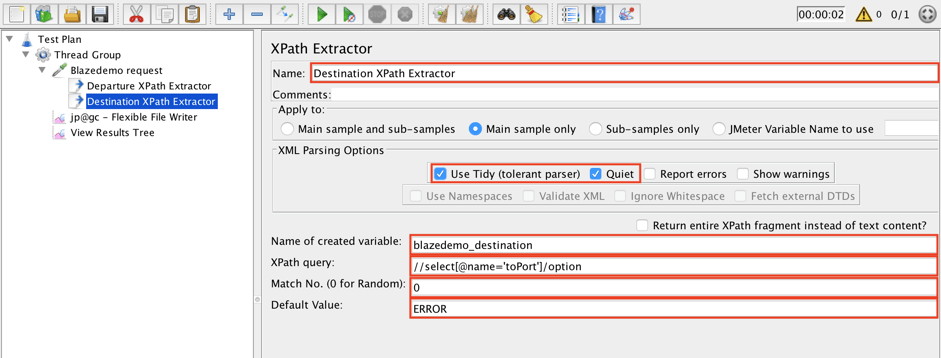
Enter the following values:
- Name: Destination XPath Extractor
- Use Tidy: Yes
- Quiet: Yes
- Name of created variable: blazedemo_destination
- XPath query: //select[@name='toPort']/option
- Match No.: 0
- Default Value: ERROR
This XPath Extractor will extract a destination city from the selector on the Landing page and save it to the blazedemo_departure variable. This variable also will be stored in the log file later.
The purpose of this approach is to use the sample_variables JMeter property to pass values from the JMeter variables to the log file. The sample_variables property can be used with the command line property setting -Jsample_variables=var1,var2, or in the user.properties file. I have chosen to use the user.properties file. The main flaw of this approach is that we can't change those variables very easily and we have to reconfigure and restart JMeter. Let's see how it's done.
8. Add a sample_variables property to the user.properties file. This file is located in JMeter's bin folder.
sample_variables=blazedemo_departure,blazedemo_destination

Save the file and restart JMeter to apply the changes.
9. Let's go back to the script in JMeter and change some fields in the Flexible File Writer listener, so we can demonstrate passing values.
Update the following values:
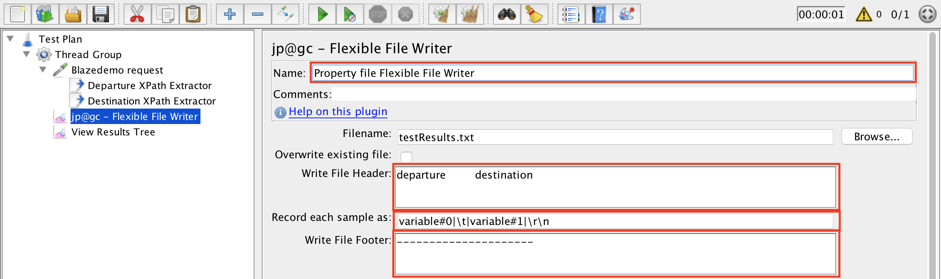
- Name: Property file Flexible File Writer
- Write File Header: departure destination
- Record each sample as: variable#0|\t|variable#1|\r\n
- Write File Footer: -------------------------
variable#0 will match the blazedemo_departure variable, variable#1 will match the blazedemo_destination variable.
NOTE: Don't forget to press the Enter key after the header content to make sure the content of the log file wraps to the next line.
10. Run the test and check the log file.
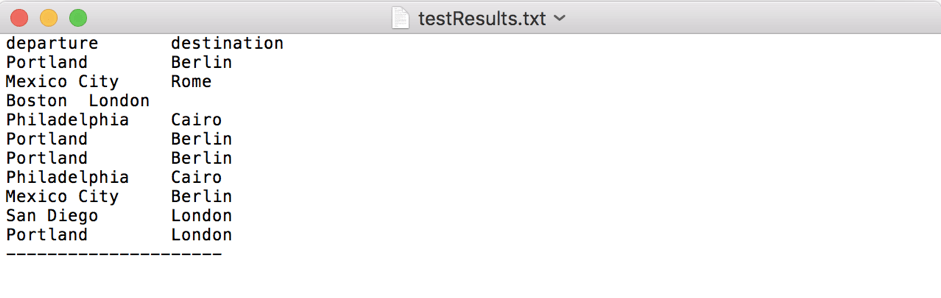
The log contains 2 columns with departure cities in the first column and destination cities in the second column. We have achieved our goal. The custom variables were written to the log.
11. Comment or remove the sample_variables property from the user.properties file, so we can try out the second approach.
#sample_variables=blazedemo_departure,blazedemo_destination

Restart JMeter.
This approach uses the Request Data and Response Data fields of the Dummy Sampler to store custom information to the log file. The flaw of this approach is the appearance of Dummy Sampler results in other listeners. This problem can be bypassed using scoping rules. It is possible to arrange the elements of the script in a way that the listeners collect only useful information.
12. Add a Dummy Sampler.
Thread Group -> Add -> Sampler -> jp@gc - Dummy Sampler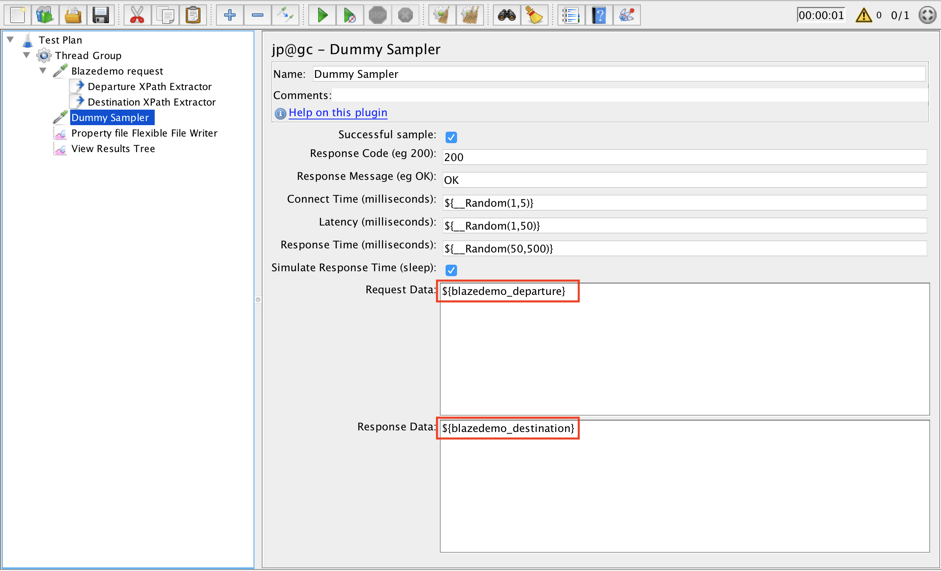
Fill in the following values:
- Request Data: ${blazedemo_departure}
- Response Data: ${blazedemo_destination}
Request Data will contain value of the blazedemo_departure variable and Response Data will contain value of the blazedemo_destination variable.
13. Add the Flexible File Writer to the Dummy Sampler.
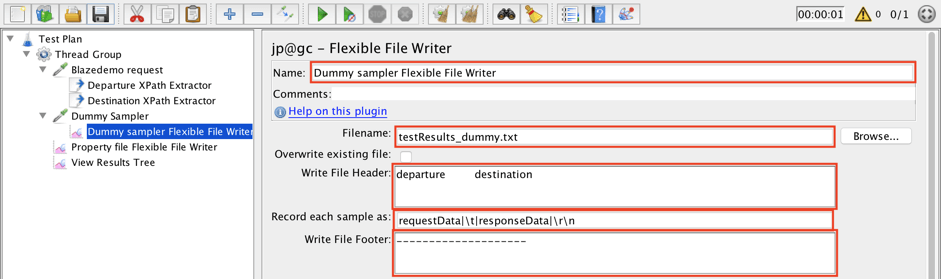
Enter the following values:
- Name: Dummy sampler Flexible File Writer
- Filename: testResults_dummy.txt
- Write File Header: departure destination
- Record each sample as: requestData|\t|responseData|\r\n
- Write File Footer: -------------------------
This listener will add information about each execution of the current Dummy Sampler to the log file. requestData will have information from the blazedemo_departure variable. responseData will collect information from the blazedemo_destination variable.
14. Run the script one final time.
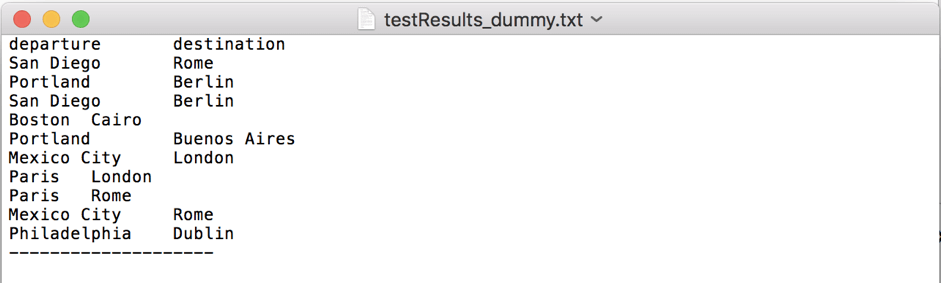
Our log file looks similar to the file from the Sample Variables Approach. It looks like everything is correct!
We have considered the most common ways of using the Flexible File Writer listener. I hope you now have a better understanding of how to apply it for your purposes!
After creating your JMeter script, upload it to BlazeMeter and run it in the cloud or from behind a firewall. You will be able to get more flexibility in sharing your tests, results from multiple geo-locations and advanced insights in colorful results.
Published at DZone with permission of George Maksimenko. See the original article here.
Opinions expressed by DZone contributors are their own.
Comments