Centralized vLLM on Kubernetes for Scalable LLM Infrastructure
This article demonstrates how we can run vLLM on Kubernetes for a centralized LLM serving engine that is production-ready and can be used by multiple applications.
Join the DZone community and get the full member experience.
Join For FreeIn the previous article, we learned how vLLM can yield dramatic performance gains by delivering 14x throughput as compared to traditional LLM serving systems. vLLM is important for efficient GPU utilization. But how can companies manage their vLLM instances across all of their production services? This would require a system that can manage the vLLM engine lifecycle and provide a way for applications to communicate with vLLM, and that can monitor, scale, and manage this setup in a production environment.
This is where Kubernetes comes into the picture. Rather than treating vLLM as an individual component, companies can benefit by managing a central vLLM deployment and having the application services interact with that. In this article, we are going to explore how combining efficient GPU utilization of vLLM with a scalable and reliable orchestration platform like Kubernetes will lead to truly production-ready LLM infrastructure.
Benefits of Centralized vLLM
Imagine a company that wants to run an AI-powered chat service, search service, and customer support chatbot. A naive approach would entail running separate vLLM instances per service. However, running and managing a separate vLLM deployment per service has the following disadvantages:
- Impacted scaling: Due to the tight coupling of vLLM and an application service, the application service cannot be scaled independently
- Inefficient resource utilization: Deploying vLLM per application means allocating a GPU per application, whereas vLLM can utilize all available GPUs in the cluster for all applications
- Increased cost: In periods when some applications experience low traffic, the GPU allocated to them would sit idle and incur costs while unused
- Operational overhead: Managing separate vLLM deployments per application leads to operational overhead
Instead, what would be beneficial is running a centralized vLLM service that all the separate application services can use for their functions.
Benefits of Running vLLM on Kubernetes
Kubernetes provides several key capabilities that are ideal for centralized vLLM infrastructure. Some of these capabilities that address our production requirements are:
- Resource management: We can leverage Kubernetes concepts of node selectors, taints and tolerations, and affinity labels, to ensure that only the vLLM pods get scheduled on the GPU-enabled nodes. The same concepts will also help us ensure that the application pods land on the CPU-only nodes. This way, we don't waste expensive GPU resources on applications that don't need them.
- Device plugins: Device plugins let you configure your cluster with support for devices or resources that require vendor-specific setup, such as GPUs. We can use device plugins to advertise which nodes have GPU enabled to ensure vLLM pods get scheduled on those.
- Service lifecycle management: Through periodic health checks and readiness checks at short intervals, Kubernetes ensures that the application is running and able to serve requests. If a pod for an application stops or dies, the Kubernetes deployment controller schedules another pod to replace it, ensuring the service continues to serve at the desired scale.
- Load balancing: We can deploy multiple replicas of vLLM pods, set up a load balancer, and configure this load balancer endpoint to be used by all the application services. This allows us to utilize various instances of vLLM across multiple applications in a balanced way.
Deploying vLLM on Kubernetes
For testing and demonstration purposes, I created a 5-node Kubernetes cluster with two nodepools. The first node pool has three CPU-only nodes. The second has two nodes enabled with NVIDIA H100 GPUs.
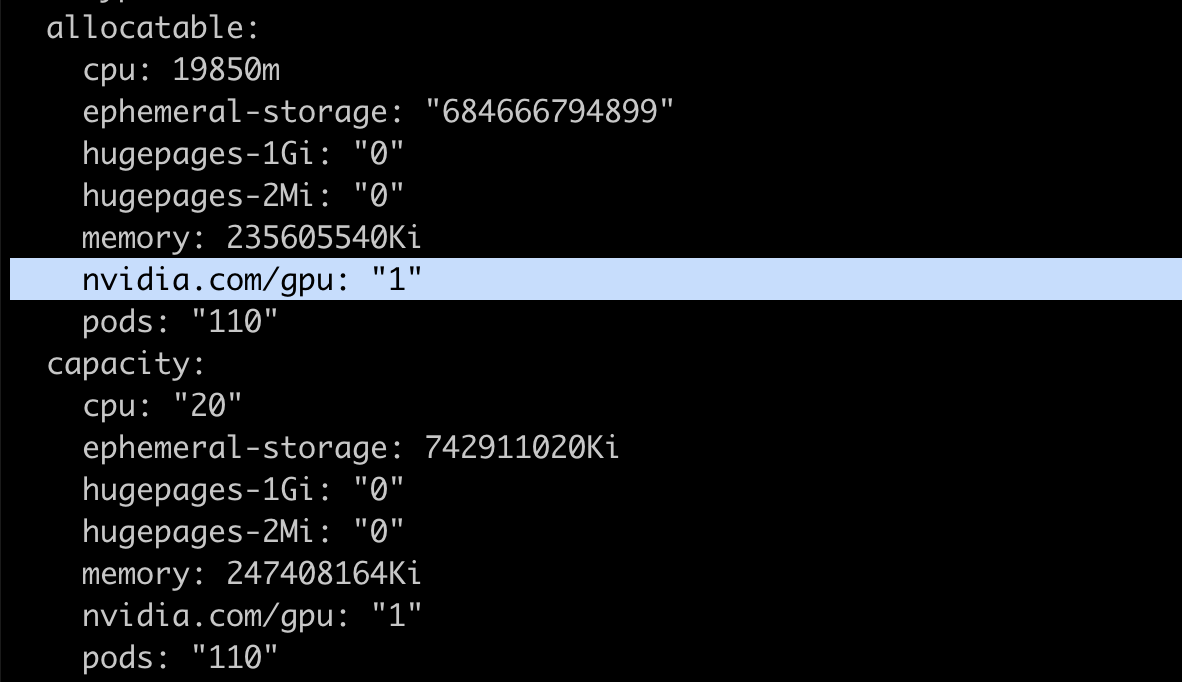
Kubernetes nodes advertise the available resources and maximum capacity for resources in the node status section. For custom or vendor-specific resources, such as the NVIDIA GPUs in our case, we need to install and launch a device plugin to advertise real-time availability of GPU resources for nodes. This is crucial because the Kubernetes scheduler verifies the availability of the requested resource before scheduling pods, and device plugins do the job of keeping the node status updated with this information.
I used DigitalOcean to create my Kubernetes cluster, and it came pre-installed with the required device plugin. For other clusters, refer to this guide for installing and running the Nvidia device plugin
Once running, verify that your GPU-enabled nodes are advertising the availability of the GPU resource by running the following command:
kubectl describe node <node-name>
Deploying vLLM
In the deployment manifest, we can specify the exact model we want to use with vLLM, along with requests for CPU, memory, and GPU. Large language models can require substantial memory for downloading model weights into GPU memory. Configure memory requests and limits based on your model size.
For this article, I chose the "meta-llama/Llama-3.1-8B" model, which requires approximately 16GB for model weights plus additional memory for operations. It is a gated model requiring a Hugging Face token for usage. For such models, we can create a Kubernetes secret object as follows:
apiVersion: v1
kind: Secret
metadata:
  name: hf-token-secret
  namespace: default
type: Opaque
stringData:
  token: "<REPLACE WITH HF-TOKEN>"
We can then provide a reference to this secret in the deployment spec. With two GPU-enabled nodes available, we can deploy two replicas to effectively utilize both GPUs. Each replica will be scheduled on a separate GPU node, providing both load distribution and high availability. This is the deployment spec:
apiVersion: apps/v1
kind: Deployment
metadata:
  name: llama-3
  namespace: default
  labels:
    app: llama-3
spec:
  replicas: 2
  selector:
    matchLabels:
      app: llama-3
  template:
    metadata:
      labels:
        app: llama-3
    spec:
      tolerations:
      - key: "nvidia.com/gpu"
        operator: "Exists"
        effect: "NoSchedule"
      nodeSelector:
        doks.digitalocean.com/gpu-brand: "nvidia"   # targets the GPU node pool
      volumes:
      # vLLM needs to access the host's shared memory for tensor parallel inference.
      - name: shm
        emptyDir:
          medium: Memory
          sizeLimit: "10Gi"
      containers:
      - name: llama-3
        image: vllm/vllm-openai:latest
        command: ["/bin/sh", "-c"]
        args: [
          "vllm serve meta-llama/Llama-3.1-8B --trust-remote-code --enable-chunked-prefill --max_num_batched_tokens 1024"
        ]
        env:
        - name: HUGGING_FACE_HUB_TOKEN
          valueFrom:
            secretKeyRef:
              name: hf-token-secret
              key: token
        ports:
        - containerPort: 8000
        resources:
          limits:
            cpu: "10"
            memory: 32G
            nvidia.com/gpu: "1"
          requests:
            cpu: "2"
            memory: 24G
            nvidia.com/gpu: "1"
        volumeMounts:
        - name: shm
          mountPath: /dev/shm
        livenessProbe:
          httpGet:
            path: /health
            port: 8000
          initialDelaySeconds: 300
          periodSeconds: 10
        readinessProbe:
          httpGet:
            path: /health
            port: 8000
          initialDelaySeconds: 300
          periodSeconds: 5
It is important to note the tolerations and nodeSelector sections. The tolerations and nodeSelector configurations are critical for proper pod scheduling. The GPU-enabled nodes that had the Nvidia device plugin running had the following taint and label:
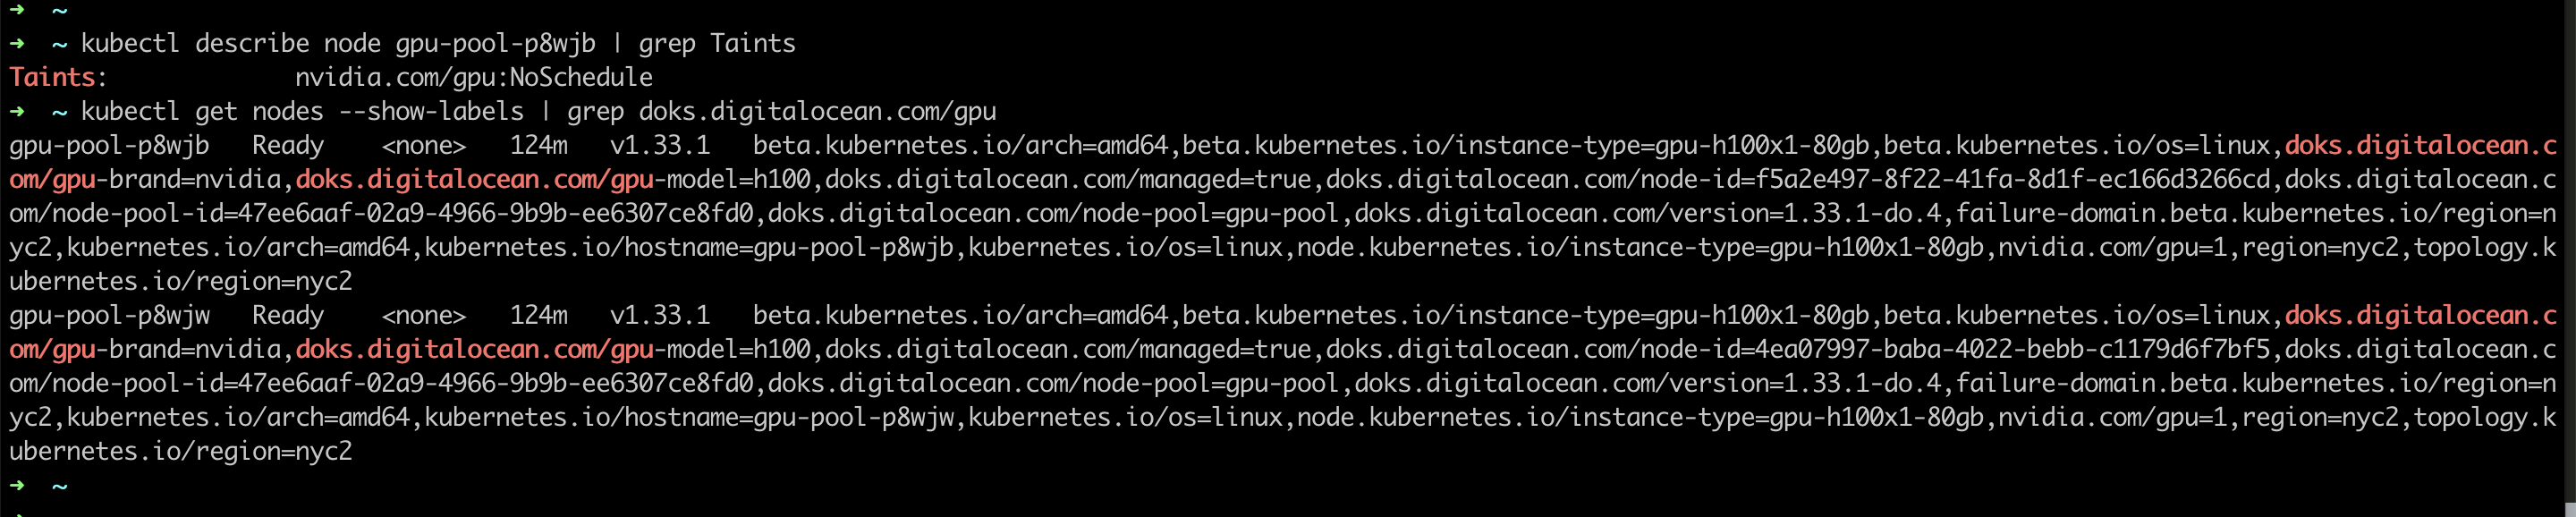
The toleration allows pods to be scheduled on GPU nodes despite the taint, while nodeSelector ensures they land only on nodes with the specified GPU label.
Next, we create a service to direct traffic to the pods:
apiVersion: v1
kind: Service
metadata:
  name: llama-3
  namespace: default
spec:
  ports:
  - name: http-llama-3
    port: 80
    protocol: TCP
    targetPort: 8000
  # The label selector should match the deployment labels & it is useful for prefix caching feature
  selector:
    app: llama-3
  sessionAffinity: None
  type: ClusterIP
We can add the above snippets in a file called `manifests.yaml`, and create all resources by running:
kubectl apply -f manifests.yaml
The Kubernetes scheduler will ensure that both pods get scheduled on the GPU-enabled nodes, due to the tolerations and nodeSelector from the deployment spec. And after about a minute, the pods will be ready.
Once vLLM has successfully started in the pods, this is what the pod logs will look like:

We don't have an endpoint for accessing this deployment from outside the cluster. But we can port-forward the service we created to ensure that vLLM is deployed and working correctly:
kubectl port-forward service/llama-3 8080:80
Now we can query vLLM by running this command:
 curl http://localhost:8080/v1/completions \
 -H "Content-Type: application/json" \
 -d '{
        "model": "meta-llama/Llama-3.1-8B",
        "prompt": "San Francisco is a",
        "temperature": 0
      }'
Once the vLLM deployment is running successfully, the response will look like:

Accessing the Centralized vLLM Service
With the vLLM deployment running successfully, any application in your Kubernetes cluster can now access the inference service through the internal endpoint:
http://llama-3.default.svc.cluster.local/v1/completions
Applications can send standard OpenAI-compatible requests to this endpoint, leveraging the centralized GPU resources without needing their own vLLM instances. This architecture allows multiple services, such as chat applications, search systems, and content generators, to share the same high-performance inference infrastructure.
Conclusion
By deploying vLLM on Kubernetes with proper GPU scheduling and resource management, we've transformed isolated inference instances into a centralized, scalable infrastructure. This approach maximizes expensive GPU utilization while providing reliable, load-balanced access for multiple applications across your organization.
Opinions expressed by DZone contributors are their own.
Comments