

What To Do After Installing VirtualBox
Congratulations, you've finished downloading and installing VirtualBox. This article will take you a step further with an extension pack.
Join the DZone community and get the full member experience.
Join For FreeThis post is part 2 of the 3-part series on creating a virtual machine using VirtualBox hosted on a Debian machine. Part 1 focuses on the installation of VirtualBox and the guest OS (FreeBSD). Part 2 addresses things that you should do after installing VirtualBox. The upcoming part 3 deals specifically with accessing USB flash drives from the guest OS.
Install Extension Pack
The base VirtualBox package is missing some important functionalities: support for virtual USB 2.0 and 3.0 devices, host webcam passthrough, Intel PXE boot, and disk image encryption. To obtain those functionalities, you need to download and install the VirtualBox extension pack. Note that the extension pack operates under a much stricter license than the GPLv2 of the base VirtualBox package. Specifically, the VirtualBox Extension Pack Personal Use and Evaluation License (PUEL) "is a free license for personal, educational or evaluation use." For commercial use, you do have to pay a fee to Oracle. The procedure to install the extension pack is as follows:
- Download the VirtualBox extension pack to your host machine.
The extension pack is available from the VirtualBox website. The package is universal for all host and guest OSes. However, you should use the same version for both the base and extension pack. In other words, when you upgrade your base, you should also upgrade the extension pack. - Run
VirtualBox Manager.

- Add extension pack.
From theFilemenu, clickPreferences. Then, selectExtensionsin the side panel.
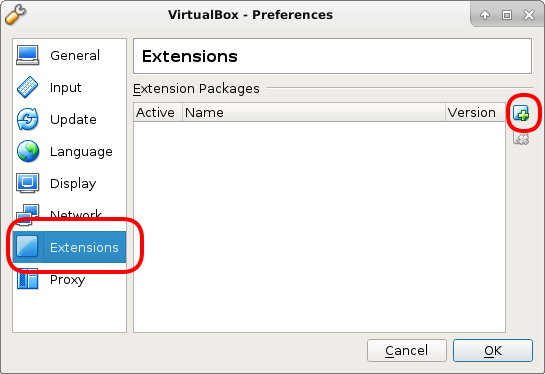
Click the + icon to specify the location of the extension pack file (Oracle_VM_VirtualBox_Extension_Pack-5.2.4-119785.vbox-extpack).

At the end, click Install. Before it begins installation, you will be prompted to accept the software license, and to enter the administrative password.
Bridge Host & Guest Networks
By default, the virtual machine is NATed (not bridged) to your host network. Consequently, the FreeBSD guest is on a different subnet than the host. For example, my FreeBSD guest has a 10.0.0.2 IP address while my Linux host has a 192.168.1.49IP address. Practically, it means that I cannot ssh to the guest OS from anywhere in my host network. To make that possible, I need to bridge the host network and the guest. The procedure is below (the VM does not have to be powered off for you to change networking).
- Open the
VirtualBox Manager, and clickSettings. - Click
Networkin the side menu.

- Select
Bridged Adapterin theAttached todropdown menu.
Enable Copy & Paste Between Host & Guest
I administer the FreeBSD guest extensively from its virtual system console running on the Linux host. By default, the clipboard is not shared between the host and the guest systems. That means I often need to manually re-enter commands on the guest OS rather than copy and paste from the host. To share the system clipboard (and save yourself plenty of laborious typing), follow the steps below:
- Open the
VirtualBox Manager, and clickSettings. - Select
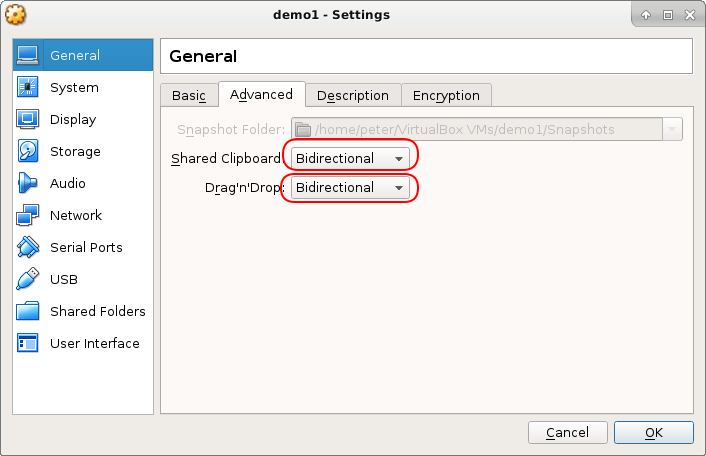
General, and click theAdvancedtab.
- Select
bidirectionalfor bothShared ClipboardandDrag and Drop.
Note that, to share the clipboard, the FreeBSD-specific guest additions package emulators/virtualbox-ose-additions must also be installed. The instruction for that is already detailed in the Post-installation section of part 1 of this series.
Related Posts
- Part 1 of VirtualBox series.
- Forthcoming part 3.
Opinions expressed by DZone contributors are their own.
Comments