Why Tailwind CSS Can Be Used Instead of Bootstrap CSS
Compare Tailwind CSS and Bootstrap for UI development. Learn setup methods, pros, and integration tips for React, Next.js, and more.
Join the DZone community and get the full member experience.
Join For FreeWhile Bootstrap has been a component-based approach for quick UI development, Tailwind CSS has emerged as a more zero-runtime, flexible, and utility-based approach, helping us to give more freedom for website development.
Tailwind CSS vs. Bootstrap Comparison
|
Feature |
Tailwind CSS |
Bootstrap |
|---|---|---|
|
Approach |
Utility-first CSS framework |
Component-based CSS framework |
|
Learning Curve |
Steeper (requires learning utility classes) |
Easier (pre-built components) |
|
Customization |
Highly customizable (design anything) |
Limited by pre-defined components |
|
File Size |
Smaller (when purged) ~10-30KB |
Larger ~25-50KB (with JS) |
|
Performance |
Excellent (only what you use) |
Good (but includes unused styles) |
|
Design Freedom |
Complete freedom (no design opinions) |
Constrained by Bootstrap's look |
|
Components |
None included (build your own) |
Many pre-built components are included |
|
JavaScript |
None included |
Includes jQuery-based JS components |
|
Responsiveness |
Utility classes (e.g., md:text-lg) |
Predefined responsive classes |
|
Popularity |
Growing rapidly (modern projects) |
Very popular (established) |
|
Community |
315 GitHub contributors, ~3k online discord support community |
1405 Github contributors, ~200 online Discord support community |
|
Documentation |
Excellent documentation with a playground |
Excellent documentation |
|
When to Use |
When you need custom designs |
When you need rapid prototyping |
|
CSS Output |
Only what you use (with purging) |
Includes all styles, whether used or not |
|
Design Consistency |
You create the system |
Comes with a consistent design system |
|
Setup Complexity |
Requires a build process |
Just include CSS/JS files |
|
Theming |
Easy through configuration |
Theming is possible but more complex |
|
Browser Support |
Modern browsers |
Wide browser support |
|
Popular Users |
GitHub, Shopify, Netflix |
Twitter, Spotify, LinkedIn |
Tailwind CSS Installation Methods and Integration Guides
1. Using Tailwind CLI (For Simple Projects)
Best for: Beginners, static websites, HTML/CSS-only projects.
# Step 1: Create project folder and init npm

mkdir my-tailwind-app

cd my-tailwind-app

npm init -y


# Step 2: Install Tailwind

npm install -D tailwindcss

npx tailwindcss init
2. Create a CSS file:
/* src/input.css */

@tailwind base;

@tailwind components;

@tailwind utilities;
3. Build with CLI:
npx tailwindcss -i ./src/input.css -o ./dist/output.css --watch2. Using PostCSS (Recommended for Production)
Best for: Production-ready static sites, frameworks like Eleventy, Hugo
npm install -D tailwindcss postcss autoprefixer

npx tailwindcss init -p
PostCSS processes your CSS and adds browser prefixes with autoprefixer. You also get:
- postcss.config.js
- tailwind.config.js
3. Using Tailwind With React (Vite, CRA, Next.js)
With Vite
npm create vite@latest my-vite-app --template react

cd my-vite-app

npm install

npm install -D tailwindcss postcss autoprefixer

npx tailwindcss init -p
Update tailwind.config.js:
content: ["./index.html", "./src/**/*.{js,ts,jsx,tsx}"],Create src/index.css:
@tailwind base;

@tailwind components;

@tailwind utilities;
With Create React App (CRA)
npx create-react-app my-app

cd my-app

npm install -D tailwindcss postcss autoprefixer

npx tailwindcss init -p
Configure tailwind.config.js:
content: ["./src/**/*.{js,jsx,ts,tsx}"],Create and import src/index.css like in the Vite setup.
With Next.js
npx create-next-app@latest my-app

cd my-app

npm install -D tailwindcss postcss autoprefixer

npx tailwindcss init -p
Configure tailwind.config.js:
content: ["./pages/**/*.{js,ts,jsx,tsx}", "./components/**/*.{js,ts,jsx,tsx}"],Create styles/globals.css and import it in _app.js.
4. Using CDN (Quick Prototyping Only)
Not recommended for production (very large file size)
Add in <head>:
<link href="https://cdn.jsdelivr.net/npm/[email protected]/dist/tailwind.min.css" rel="stylesheet">This lets you start using utility classes immediately in your HTML. No build step needed.
5. Using Framework Plugins
Tailwind CSS integrates well with:
Laravel (With Laravel Mix)
composer require laravel/ui

php artisan ui vue

npm install

npm install -D tailwindcss

npx tailwindcss init
Then include Tailwind in resources/css/app.css and compile via Mix.
Nuxt.js
npx nuxi init my-nuxt-app

cd my-nuxt-app

npm install

npm install -D @nuxtjs/tailwindcss
Add module to nuxt.config.ts:
export default defineNuxtConfig({

  modules: ['@nuxtjs/tailwindcss']

})
How to Set Up Tailwind CSS in Your Project
Tailwind is easy to set up, whether you're working on a basic HTML project or using a modern frontend framework like React, Vue, or Next.js.
1. Initialize Your Project
mkdir tailwind-demo

cd tailwind-demo

npm init -y
This sets up your project with a basic package.json file.
2. Install Tailwind CSS
If you're using Node.js, install Tailwind via npm:
npm install -D tailwindcss postcss autoprefixernpx tailwindcss init -pThis usually creates:
- tailwind.config.js – for customizing Tailwind
- postcss.config.js – for PostCSS plugins
However, in most cases, the following issue arises when trying to initialize Tailwind CSS.
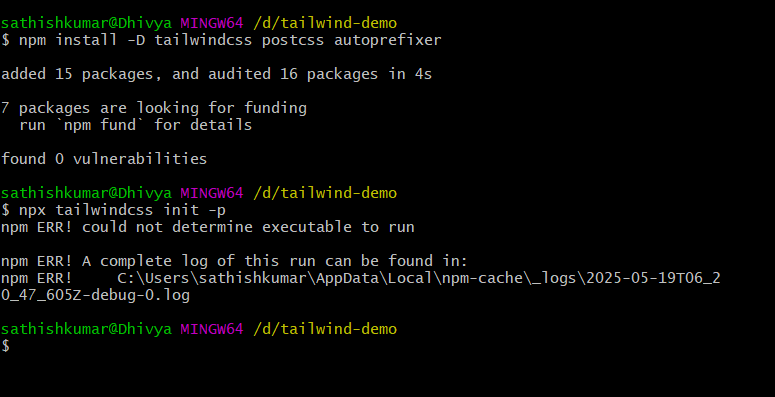
This error typically occurs when:
- You don't have Node.js/npm properly installed
- You're running the command in the wrong directory
- There's a permission issue
Step-by-Step Fix
1. First, verify Node.js and npm are installed correctly:
node -v

npm -v
You should see version numbers (e.g., v18.x.x and 9.x.x). If not, install Node.js from nodejs.org
2. Clear npm cache:
npm cache clean --force3. Reinstall dependencies:
rm -rf node_modules package-lock.json

npm install
If still issues persist, try these specific steps:
1. Install Tailwind CSS v3 explicitly instead of the default v4:
npm i -D tailwindcss@3 postcss autoprefixer2. Initialize Tailwind CSS after successful installation:
npx tailwindcss init -p3. Expected successful outcome:
-
A tailwind.config.js configuration file will be created. In the tailwind config, copy the below configuration to the tailwind.config.js file.
/** @type {import('tailwindcss').Config} */
module.exports = {
  content: [
     "./index.html",
    "./src/**/*.{js,ts,jsx,tsx}",
  ],
  theme: {
    extend: {},
  },
  plugins: [],
}
- A postcss.config.js file will be generated
- A node_modules folder will appear in your project directory
This method specifically uses Tailwind CSS version 3 (a more stable version for many setups) rather than version 4, which currently causes initialization issues for many users. The v3 installation typically resolves the "could not determine executable" error and properly sets up all required configuration files.
Add Tailwind to Your CSS
Inside your main CSS file (index.css or styles.css), add:
@tailwind base;

@tailwind components;

@tailwind utilities;
This imports Tailwind’s core styles into your project.
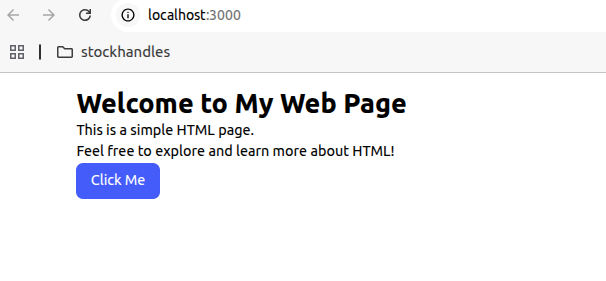
Start Using Tailwind Classes
Now, you can use Tailwind classes in your HTML or JSX files:
<button className="px-4 py-2 bg-blue-500 text-white rounded-lg hover:bg-blue-600">Click Me

</button>
The above button was created with a CSS class name available for the button creation:
px-4: Adds horizontal padding (left and right) of 1rem (16px) to the button.py-2: Adds vertical padding (top and bottom) of 0.5rem (8px).bg-blue-500: Sets the background color to a medium blue shade from Tailwind’s color palette.text-white: Sets the text color to white.rounded-lg: Applies large rounded corners to the button.hover:bg-blue-600: Changes the background color to a slightly darker blue (blue-600) when the user hovers over the button.
Having the text color set to white, setting a blue background with a particular shade, and having different blue on hover are done using direct utility classes, which will be difficult to achieve in Bootstrap. It is zero run downtime, and output will look like:
npm startThe output will come like this:
The source code is available on GitHub.
Opinions expressed by DZone contributors are their own.
Comments