Writing a Modern HTTP(S) Tunnel in Rust
This article teaches readers how to write apps in Rust and will show readers how to design and implement an HTTP tunnel and the basics of creating apps.
Join the DZone community and get the full member experience.
Join For FreeLearn how to write performant and safe apps quickly in Rust. This post guides you through designing and implementing an HTTP Tunnel, and covers the basics of creating robust, scalable, and observable applications.
Rust: Performance, Reliability, Productivity
About a year ago, I started to learn Rust. The first two weeks were quite painful. Nothing compiled; I didn’t know how to do basic operations; I couldn’t make a simple program run. But step by step, I started to understand what the compiler wanted. Even more, I realized that it forces the right thinking and correct behavior.
Yes, sometimes, you have to write seemingly redundant constructs. But it’s better not to compile a correct program than to compile an incorrect one. This makes making mistakes more difficult.
Soon after, I became more or less productive and finally could do what I wanted. Well, most of the time.
Out of curiosity, I decided to take on a slightly more complex challenge: implement an HTTP Tunnel in Rust. It turned out to be surprisingly easy to do and took about a day, which is quite impressive. I stitched together tokio, clap, serde, and several other very useful crates. Let me share the knowledge I gained during this exciting challenge and elaborate on why I organized the app this way. I hope you’ll enjoy it.
What Is an HTTP Tunnel?
Simply put, it’s a lightweight VPN that you can set up with your browser so your internet provider cannot block or track your activity, and web servers won’t see your IP address.
If you’d like, you can test it with your browser locally, e.g., with Firefox, (otherwise, just skip this section for now).
Tutorial
1. Install the App Using Cargo
$ cargo install http-tunnel2. Start
$ http-tunnel --bind 0.0.0.0:8080 httpYou can also check the HTTP-tunnel GitHub repository for the build/installation instructions.
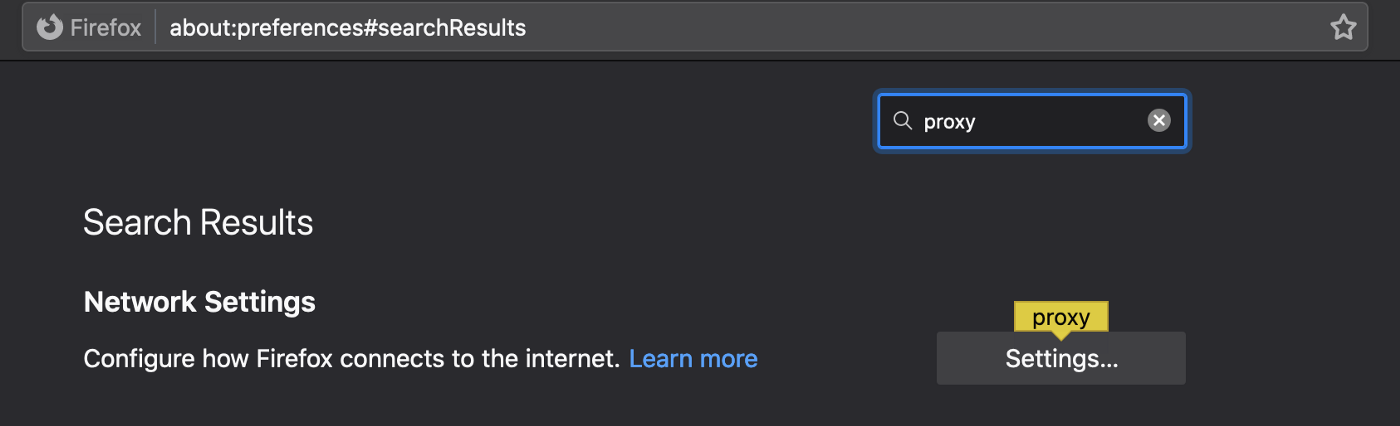
Now, you can go to your browser and set the HTTP Proxy to localhost:8080. For instance, in Firefox, search for proxy in the preferences section:
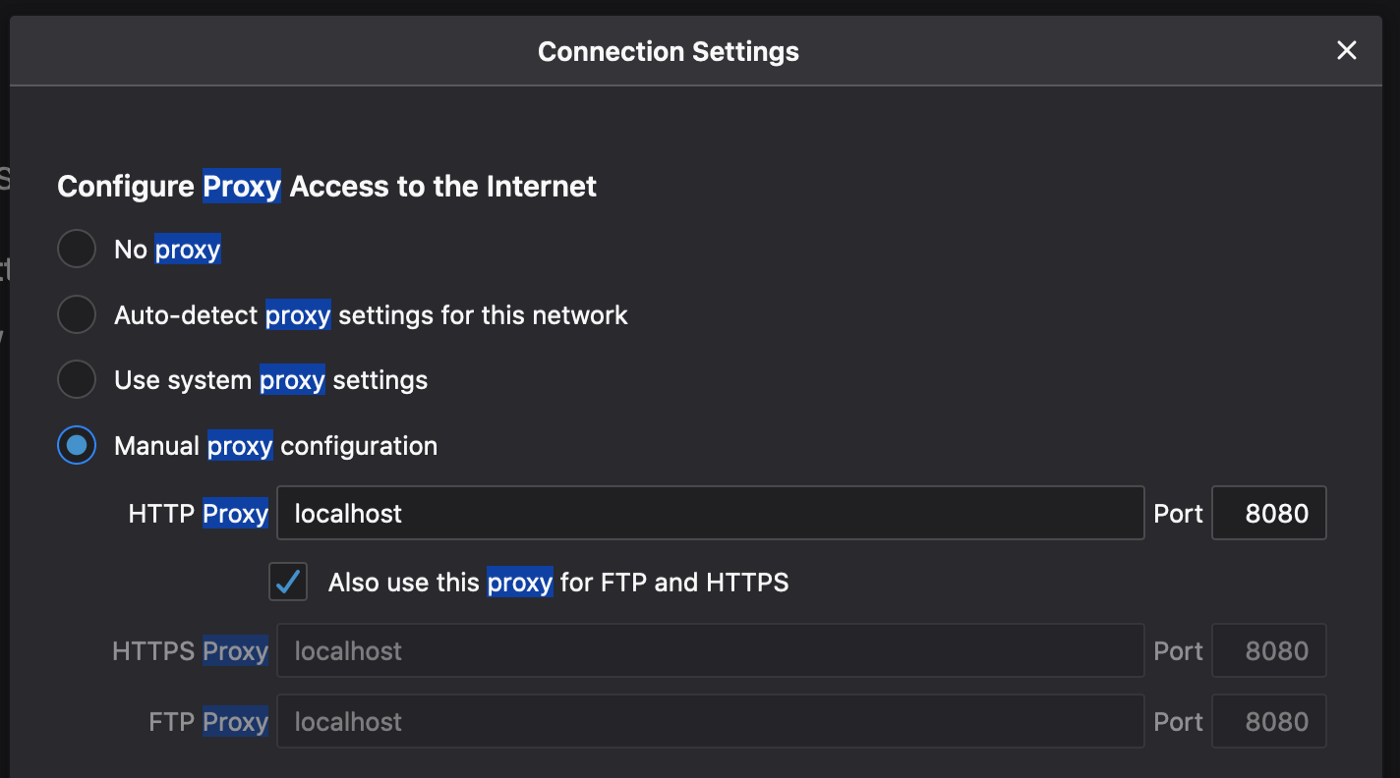
Find the proxy settings, specify it for HTTP Proxy, and check it for HTTPS:
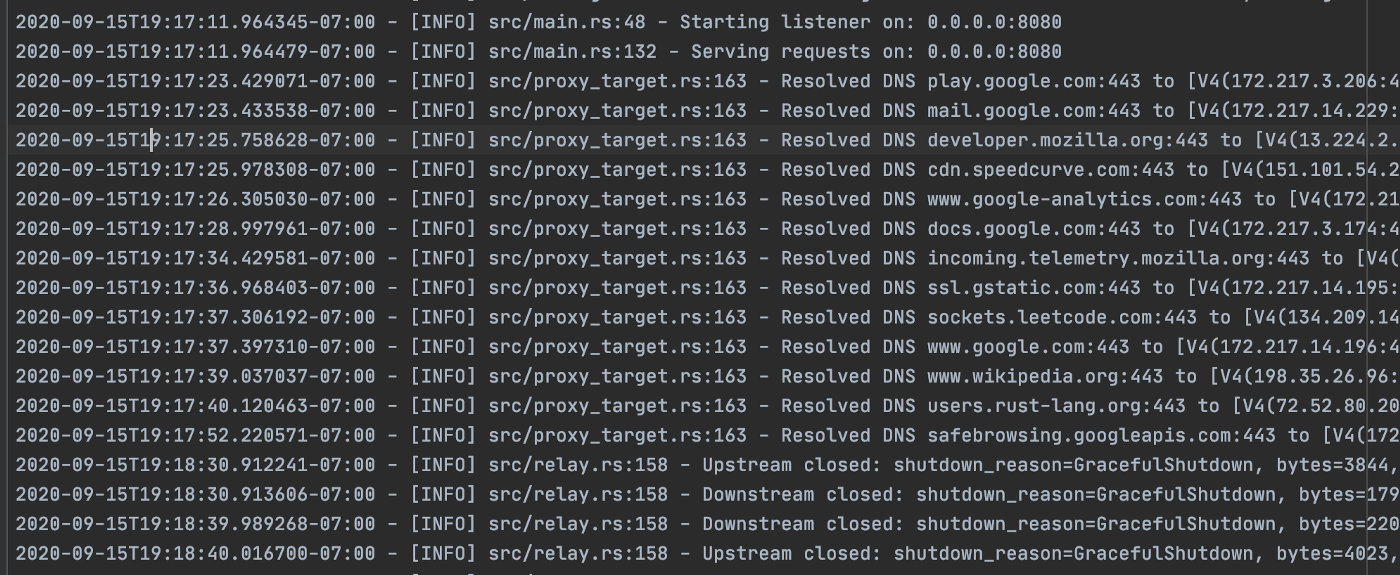
Set the proxy to just built http_tunnel. You can visit several web pages and check the ./logs/application.log file—all your traffic was going via the tunnel. For example:
Now, let’s walk through the process from the beginning.
Design the App
Each application starts with a design, which means we need to define the following:
- Functional requirements.
- Non-functional requirements.
- Application abstractions and components.
Functional Requirements
We need to follow the specification outlined in the here:
Negotiate a target with an HTTP CONNECT request. For example, if the client wants to create a tunnel to Wikipedia’s website, the request will look like this:
CONNECT www.wikipedia.org:443 HTTP/1.1
...
Followed by a response like below:
HTTP/1.1 200 OKAfter this point, just relay TCP traffic both ways until one of the sides closes it or an I/O error happens.
The HTTP Tunnel should work for both HTTP and HTTPS.
We also should be able to manage access/block targets (e.g., to block-list trackers).
Non-Functional Requirements
The service shouldn’t log any information that identifies users.
It should have high throughput and low latency (it should be unnoticeable for users and relatively cheap to run).
Ideally, we want it to be resilient to traffic spikes, provide noisy neighbor isolation, and resist basic DDoS attacks.
Error messaging should be developer-friendly. We want the system to be observable to troubleshoot and tune it in production at a massive scale.
Components
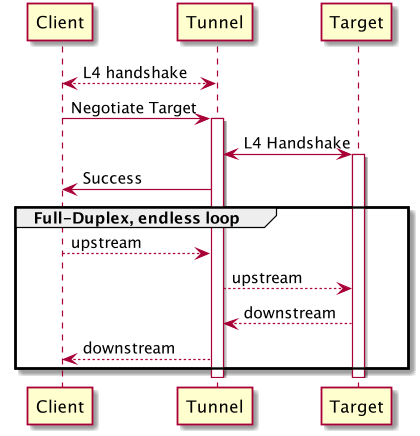
When designing components, we need to break down the app into a set of responsibilities. First, let’s see what our flow diagram looks like:

To implement this, we can introduce the following four main components:
- TCP/TLS acceptor
HTTP CONNECTnegotiator- Target connector
- Full-duplex relay
Implementation
TCP/TLS acceptor
When we roughly know how to organize the app, it’s time to decide which dependencies we should use. For Rust, the best I/O library I know is tokio. In the tokio family, there are many libraries including tokio-tls, which makes things much simpler. So the TCP acceptor code would look like this:
   let mut tcp_listener = TcpListener::bind(&proxy_configuration.bind_address)
        .await
        .map_err(|e| {
            error!(
                "Error binding address {}: {}",
                &proxy_configuration.bind_address, e
            );
            e
        })?;
And then the whole acceptor loop + launching asynchronous connection handlers would be:
    loop {
        // Asynchronously wait for an inbound socket.
        let socket = tcp_listener.accept().await;

        let dns_resolver_ref = dns_resolver.clone();

        match socket {
            Ok((stream, _)) => {
                let config = config.clone();
                // handle accepted connections asynchronously
                tokio::spawn(async move { tunnel_stream(&config, stream, dns_resolver_ref).await });
            }
            Err(e) => error!("Failed TCP handshake {}", e),
        }
    }
Let’s break down what’s happening here. We accept a connection. If the operation was successful, use tokio::spawn to create a new task that will handle that connection. Memory/thread-safety management happens behind the scenes. Handling futures is hidden by the async/await syntax sugar.
However, there is one question. TcpStream and TlsStream are different objects, but handling both is precisely the same. Can we reuse the same code? In Rust, abstraction is achieved via Traits, which are super handy:
/// Tunnel via a client connection.
async fn tunnel_stream<C: AsyncRead + AsyncWrite + Send + Unpin + 'static>(
    config: &ProxyConfiguration,
    client_connection: C,
    dns_resolver: DnsResolver,
) -> io::Result<()> {...}
The stream must implement:
AsyncRead /Write: Allows us to read/write it asynchronously.Send: To be able to send between threads.Unpin: To be moveable (otherwise, we won’t be able to doasync moveandtokio::spawnto create anasynctask).'static: To denote that it may live until the application shutdown and doesn’t depend on any other object’s destruction.
Which our TCP/TLS streams exactly are. However, now we can see that it doesn’t have to be TCP/TLS streams. This code would work for UDP, QUIC, or ICMP. For example, it can wrap any protocol within any other protocol or itself.
In other words, this code is reusable, extendable, and ready for migration, which happens sooner or later.
HTTP connect negotiator and target connector
Let’s pause for a second and think at a higher level. What if we can abstract from HTTP Tunnel, and need to implement a generic tunnel?
- We need to establish some transport-level connections (L4).
- Negotiate a target (doesn’t really matter how: HTTP, PPv2, etc.).
- Establish an L4 connection to the target.
- Report success and start relaying data.
A target could be, for instance, another tunnel. Also, we can support different protocols. The core would stay the same.
We already saw that the tunnel_stream method already works with any L4 Client<->Tunnel connection.
#[async_trait]
pub trait TunnelTarget {
    type Addr;
    fn addr(&self) -> Self::Addr;
}

#[async_trait]
pub trait TargetConnector {
    type Target: TunnelTarget + Send + Sync + Sized;
    type Stream: AsyncRead + AsyncWrite + Send + Sized + 'static;

    async fn connect(&mut self, target: &Self::Target) -> io::Result<Self::Stream>;
}Here, we specify two abstractions:
TunnelTargetis just something that has anAddr— whatever it is.TargetConnector— can connect to thatAddrand needs to return a stream that supports async I/O.
Okay, but what about the target negotiation? The tokio-utils crate already has an abstraction for that, named Framed streams (with corresponding Encoder/Decoder traits). We need to implement them for HTTP CONNECT (or any other proxy protocol). You can find the implementation here.
Relay
We only have one major component remaining — that relays data after the tunnel negotiation is done. tokio provides a method to split a stream into two halves: ReadHalf and WriteHalf. We can split client and target connections and relay them in both directions:
        let (client_recv, client_send) = io::split(client);
        let (target_recv, target_send) = io::split(target);

        let upstream_task =
            tokio::spawn(
                async move {
                    upstream_relay.relay_data(client_recv, target_send).await
                });

        let downstream_task =
            tokio::spawn(
                async move {
                    downstream_relay.relay_data(target_recv, client_send).await
                });
Where the relay_data(…) definition requires nothing more than implementing the abstractions mentioned above. For example, it can connect any two halves of a stream:
/// Relays data in a single direction. E.g.
pub async fn relay_data<R: AsyncReadExt + Sized, W: AsyncWriteExt + Sized>(
        self,
        mut source: ReadHalf<R>,
        mut dest: WriteHalf<W>,
    ) -> io::Result<RelayStats> {...}
And finally, instead of a simple HTTP Tunnel, we have an engine that can be used to build any type of tunnels or a chain of tunnels (e.g., for onion routing) over any transport and proxy protocols:
/// A connection tunnel.
///
/// # Parameters
/// * `<H>` - proxy handshake codec for initiating a tunnel.
///    It extracts the request message, which contains the target, and, potentially policies.
///    It also takes care of encoding a response.
/// * `<C>` - a connection from from client.
/// * `<T>` - target connector. It takes result produced by the codec and establishes a connection
///           to a target.
///
/// Once the target connection is established, it relays data until any connection is closed or an
/// error happens.
impl<H, C, T> ConnectionTunnel<H, C, T>
where
    H: Decoder<Error = EstablishTunnelResult> + Encoder<EstablishTunnelResult>,
    H::Item: TunnelTarget + Sized + Display + Send + Sync,
    C: AsyncRead + AsyncWrite + Sized + Send + Unpin + 'static,
    T: TargetConnector<Target = H::Item>,
{...}
The implementation is almost trivial in basic cases, but we want our app to handle failures, and that’s the focus of the next section.
Dealing With Failures
The amount of time engineers deal with failures is proportional to the scale of a system. It’s easy to write happy-case code. Still, if it enters an irrecoverable state on the very first error, it’s painful to use. Besides that, your app will be used by other engineers, and there are very few things more irritating than cryptic/misleading error messages. If your code runs as a part of a large service, some people need to monitor and support it (e.g., SREs or DevOps), and it should be a pleasure for them to deal with your service.
What kind of failures may an HTTP Tunnel encounter?
It’s a good idea to enumerate all error codes that your app returns to the client. So it’s clear why a request failed if the operation can be tried again (or shouldn’t) if it’s an integration bug, or just network noise:
pub enum EstablishTunnelResult {
    /// Successfully connected to target.
    Ok,
    /// Malformed request
    BadRequest,
    /// Target is not allowed
    Forbidden,
    /// Unsupported operation, however valid for the protocol.
    OperationNotAllowed,
    /// The client failed to send a tunnel request timely.
    RequestTimeout,
    /// Cannot connect to target.
    BadGateway,
    /// Connection attempt timed out.
    GatewayTimeout,
    /// Busy. Try again later.
    TooManyRequests,
    /// Any other error. E.g. an abrupt I/O error.
    ServerError,
}
Dealing with delays is crucial for a network app. If your operations don’t have timeouts, it’s a matter of time until all of your threads will be “Waiting for Godot,” or your app will exhaust all available resources and become unavailable. Here we delegate the timeout definition to RelayPolicy:
 let read_result = self
      .relay_policy
      .timed_operation(source.read(&mut buffer))
      .await;

  if read_result.is_err() {
      shutdown_reason = RelayShutdownReasons::ReaderTimeout;
      break;
  }

  let n = match read_result.unwrap() {
      Ok(n) if n == 0 => {
          shutdown_reason = RelayShutdownReasons::GracefulShutdown;
          break;
      }
      Ok(n) => n,
      Err(e) => {
          error!(
              "{} failed to read. Err = {:?}, CTX={}",
              self.name, e, self.tunnel_ctx
          );
          shutdown_reason = RelayShutdownReasons::ReadError;
          break;
      }
};relay_policy:
idle_timeout: 10s
min_rate_bpm: 1000
max_rate_bps: 10000
max_lifetime: 100s
max_total_payload: 100mbSo we can limit activity per connection with max_rate_bps and detect idle clients with min_rate_bpm (so they don’t consume system resources than can be utilized more productively). A connection lifetime and total traffic may be bounded as well.
It goes without saying that each failure mode needs to be tested. It’s straightforward to do that in Rust, in general, and with tokio-test in particular:
    #[tokio::test]
    async fn test_timed_operation_timeout() {
        let time_duration = 1;
        let data = b"data on the wire";
        let mut mock_connection: Mock = Builder::new()
            .wait(Duration::from_secs(time_duration * 2))
            .read(data)
            .build();

        let relay_policy: RelayPolicy = RelayPolicyBuilder::default()
            .min_rate_bpm(1000)
            .max_rate_bps(100_000)
            .idle_timeout(Duration::from_secs(time_duration))
            .build()
            .unwrap();

        let mut buf = [0; 1024];
        let timed_future = relay_policy
            .timed_operation(mock_connection.read(&mut buf))
            .await;
        assert!(timed_future.is_err());
    }
The same goes for I/O errors:
 #[tokio::test]
    async fn test_timed_operation_failed_io() {
        let mut mock_connection: Mock = Builder::new()
            .read_error(Error::from(ErrorKind::BrokenPipe))
            .build();

        let relay_policy: RelayPolicy = RelayPolicyBuilder::default()
            .min_rate_bpm(1000)
            .max_rate_bps(100_000)
            .idle_timeout(Duration::from_secs(5))
            .build()
            .unwrap();

        let mut buf = [0; 1024];
        let timed_future = relay_policy
            .timed_operation(mock_connection.read(&mut buf))
            .await;
        assert!(timed_future.is_ok()); // no timeout
        assert!(timed_future.unwrap().is_err()); // but io-error
    }
Logging and Metrics
I haven’t seen an application that failed only in ways anticipated by its developers. I’m not saying there are no such applications. Still, chances are, your app is going to encounter something you didn’t expect: data races, specific traffic patterns, dealing with traffic bursts, and legacy clients.
But, one of the most common types of failures is human failures, such as pushing bad code or configuration, which are inevitable in large projects. Anyway, we need to be able to deal with something we didn’t foresee. So we emit enough information that would allow us to detect failures and troubleshoot.
So we’d better log every error and important event with meaningful information and relevant context as well as statistics:
/// Stats after the relay is closed. Can be used for telemetry/monitoring.
#[derive(Builder, Clone, Debug, Serialize)]
pub struct RelayStats {
    pub shutdown_reason: RelayShutdownReasons,
    pub total_bytes: usize,
    pub event_count: usize,
    pub duration: Duration,
}

/// Statistics. No sensitive information.
#[derive(Serialize)]
pub struct TunnelStats {
    tunnel_ctx: TunnelCtx,
    result: EstablishTunnelResult,
    upstream_stats: Option<RelayStats>,
    downstream_stats: Option<RelayStats>,
}Note: the tunnel_ctx: TunnelCtx field, which can be used to correlate metric records with log messages:
error!(
    "{} failed to write {} bytes. Err = {:?}, CTX={}",
    self.name, n, e, self.tunnel_ctx
);
Configuration and Parameters
Last but not least, we’d like to be able to run our tunnel in different modes with different parameters. Here’s where serde and clap become handy:
#[derive(Parser, Debug)]
#[clap(author, version, about, long_about = None)]
#[clap(propagate_version = true)]
struct Cli {
    /// Configuration file.
    #[clap(long)]
    config: Option<String>,
    /// Bind address, e.g. 0.0.0.0:8443.
    #[clap(long)]
    bind: String,
    #[clap(subcommand)]
    command: Commands,
}

#[derive(Subcommand, Debug)]
enum Commands {
    Http(HttpOptions),
    Https(HttpsOptions),
    Tcp(TcpOptions),
}
In my opinion, clap makes dealing with command line parameters pleasant. Extraordinarily expressive and easy to maintain.
Configuration files can be easily handled with serde-yaml:
target_connection:
  dns_cache_ttl: 60s
  allowed_targets: "(?i)(wikipedia|rust-lang)\\.org:443$"
  connect_timeout: 10s
  relay_policy:
    idle_timeout: 10s
    min_rate_bpm: 1000
    max_rate_bps: 10000
Which corresponds to Rust structs:
#[derive(Deserialize, Clone)]
pub struct TargetConnectionConfig {
    #[serde(with = "humantime_serde")]
    pub dns_cache_ttl: Duration,
    #[serde(with = "serde_regex")]
    pub allowed_targets: Regex,
    #[serde(with = "humantime_serde")]
    pub connect_timeout: Duration,
    pub relay_policy: RelayPolicy,
}

#[derive(Builder, Deserialize, Clone)]
pub struct RelayPolicy {
    #[serde(with = "humantime_serde")]
    pub idle_timeout: Duration,
    /// Min bytes-per-minute (bpm)
    pub min_rate_bpm: u64,
    // Max bytes-per-second (bps)
    pub max_rate_bps: u64,
}
It doesn’t need any additional comments to make it readable and maintainable, which is beautiful.
Conclusion
As you can see from this quick overview, the Rust ecosystem already provides many building blocks, so you can focus on what you need to do rather than how. You didn’t see any memory/resources management or explicit thread safety (which often comes at the expense of concurrency) with impressive performance. Abstraction mechanisms are fantastic, so your code can be highly reusable. This task was a lot of fun, so I’ll try to take on the next challenge.
Published at DZone with permission of Eugene Retunsky. See the original article here.
Opinions expressed by DZone contributors are their own.
Comments