For the latest release of the free Windows Phone developer tools, go to
http://create.msdn.com/. A complete guide to building and deploying a simple MVVM-based WP7 application for the marketplace is available -
http://bit.ly/WP7Die.
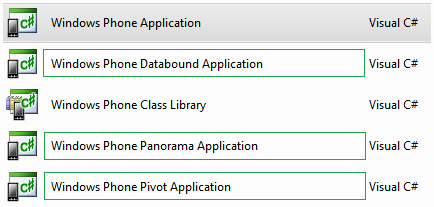
To start creating a Windows Phone application based on the MVVM pattern, select File->New Project in Visual Studio, select “Silverlight for Windows Phone” from the Installed Templates and then select one of the template types. To build from scratch, select “Windows Phone Application” or see the section below about MVVM support in other templates.
Model
The Model is based on a CLR type from a simple value type as a property…
…to a more complex set of nested classes, e.g., Contact…
A Model may be placed in a separate class file or project/assembly, or (as is often the case for simple cases) it may be incorporated into the ViewModel.
ViewModel
The ViewModel is a CLR class (typically in a separate class file and sometimes in a separate assembly) that encapsulates the Model or incorporates it. If the Model includes nested objects or collections of objects, then a corresponding ViewModel class hierarchy may be created. The primary goal is to expose the Model data and actions on the model data to the View for binding.
If the View only takes values from the ViewModel once at initialization, there would be nothing more to do. But typically, the UI updates to reflect value and collection changes in the ViewModel data (and possibly vice versa, e.g., for TextBox changes).
The built-in UI controls for single values on Windows Phone (e.g. TextBlock, TextBox, etc.) used in the View are amongst the controls that look for the INotifyPropertyChanged interface on classes to which they are bound; therefore, the interface should be implemented on the ViewModel. It consists of just one event, and it is standard practice to create a helper method to fire the event, which is then called by the setter method of the properties as they are changed.
Using INotifyPropertyChanged in a class requires this statement.
A ViewModel incorporating a simple Model with non-nested/collection properties may look like this:
Remember that the integer named Value is the Model data in this class. When the property setter method for Value is called, it checks to see if there is a change. If so, calls the helper method that will inform the View (if bound to that object and property) that something has changed.
If a Model contains a collection of items that can change and the UI must update to reflect those changes, the collection must implement the INotifyCollectionChanged interface. Alternatively, use the Generic ObservableCollection<T> class to do the work, which requires this include statement:
A ViewModel called MyValuesVM (note the ‘s’) containing Model data that is a Collection of objects of type MyValueVM would then look like this:
In this case, the following changes would be notified to the View:
- The whole collection is set
- Membership of the collection changes
- The Value property on individual MyValueVM items change

If a Model has nested/collection objects and the UI needs to bind to changes in the properties of those objects and there is access to the Model code, then it be may easier to incorporate the model/classes into a hierarchy of ViewModel classes. Otherwise (if the Model is not editable), then access to data change events from the Model is needed to fire the PropertyChanged event. To help catch otherwise silent runtime binding notification errors, the helper function could be augmented with a reflection-based check to ensure the PropName passed in matches an actual property.
View - DataContext
The View layer in Silverlight applications can be implemented in code or declaratively using XAML (where, simply put, at initialization, elements become objects and attributes becomes properties). For Windows Phone, the View is a typically a PhoneApplicationPage or a UserControl.
Any object used in the View that inherits from FrameworkElement (i.e., the visual controls) has a DataContext property which can be set to a .NET object. Any descendent FrameworkElement in the visual tree of the XAML page will also have the same value for its DataContext unless explicitly overridden (in which case its nested XAML descendants have that new value, and so on).
The DataContext is typically created and set in one of 4 ways:
- Per View/page creation in the page/UserControl constructor (the xaml.cs file), for example:
Per View/page creation in the page/UserControl XAML, for example with this XML namespace at the top of the View page:
… and this resource XAML inside the page root element…
… and the DataContext set on a FrameworkElement item.
- Per Application instance – in this case, the ViewModel (and possibly a hierarchy of nested ViewModels) is created in the App.xaml XAML as a resource (as above), and then parts of it are bound as the DataContext at the root of different Views. This makes sense when the Model data must be available throughout the application’s lifetime.
- Using a ViewModel locator in the XAML. The DataContext of each view is bound to properties of an application-instance-bound object using the Path syntax. When the property of the root ViewModel is retrieved (following the View-specific Path) for binding, the getter method can dynamically hand out an instance of the appropriate ViewModel. Combine this with dependency injection and mock encapsulated Models (when the application-instance-bound object is created) for a powerful way to dynamically assign real or mock ViewModels and Models, thus providing support for ViewModel testing, web-service-based Model integration testing and design-time visual designer editing.

Keep Models encapsulated rather than incorporated into ViewModels to enable clean dependency injection testing using mock Models.
View - Binding
With the DataContext property correctly set on the FrameworkElement-derived visual element, various properties can be ‘bound’ to properties (or descendent properties) of the DataContext object. This can be done programmatically or declaratively.
Given a set of ViewModels like this (with notification helpers and calls omitted for brevity)…
The declarative XAML excerpt may look like this…
… which shows how to use inherited and explicit descendent DataContext and the basic binding syntax.
The example also shows different data binding options (below) with TwoWay being applicable to a TextBox where the updated should be transferred back to the ViewModel to set the Model data.
| Mode |
Effect in MVVM |
| OneTime |
ViewModel property value copied to View element upon initialization. Seldom used, but could help performance. |
| OneWay (default) |
ViewModel property value copied to View element upon initialization and when ProperyChanged event called. |
| TwoWay |
Same as one way, plus value copied back from View element to ViewModel property – triggering event various by visual element type. |
View – Collection Binding
When the ViewModel exposes model data as a collection, use a control in the View that derives from ItemsControl (e.g., ListBox) and set the ItemsSource to the collection. The control creates a sub-visual tree for each object in the collection and automatically sets its DataContext to the item object. ItemsControls have an ItemTemplate property, which can be set in XAML to a collection of XAML visual elements (including the bindings) to represent visually each object in the collection, for example:

Overall, using data binding and other View model coupling (shown later) reduces or eliminates UI code that can otherwise be hard to test when driven by user actions.
View - Converters
When Model types don’t match View types (e.g., Enumeration type to String), the ViewModel can do the conversation or a converter can be used. To create a converter, create a class derived from System.Windows.Data.IValueConverter and implement Convert() and ConvertBack(), declare an instance of the class in the page (or application) resource (as with ViewModel creation case 2 above) and then add the converter to the binding syntax, for example.

Use Converts (vs. conversion in ViewModel) if they are reusable and relate to UI on one end, not for transforming business data.


