ActiveMQ - Network of Brokers Explained
By
 ·
·
Interview
·
·
Interview
Likes
(2)
Likes
There are no likes...yet! 👀
Be the first to like this post!
It looks like you're not logged in.
Sign in to see who liked this post!
Comment
Save
40.1K Views
Join the DZone community and get the full member experience.
Join For FreeObjective
This 7 part blog series is to share about how to create network of ActiveMQ brokers in order to achieve high availability and scalability.
Why network of brokers?
ActiveMQ message broker is a core component of messaging infrastructure in an enterprise. It needs to be highly available and dynamically scalable to facilitate communication between dynamic heterogeneous distributed applications which have varying capacity needs.
Scaling enterprise applications on commodity hardware is a rage nowadays. ActiveMQ caters to that very well by being able to create a network of brokers to share the load.
Many times applications running across geographically distributed data centers need to coordinate messages. Running message producers and consumers across geographic regions/data centers can be architected better using network of brokers.
The name can be arbitrary although I prefer to specify the [type]:[source broker]->[destination broker].
The URI attribute specifies how to connect to broker-2


Scaling enterprise applications on commodity hardware is a rage nowadays. ActiveMQ caters to that very well by being able to create a network of brokers to share the load.
Many times applications running across geographically distributed data centers need to coordinate messages. Running message producers and consumers across geographic regions/data centers can be architected better using network of brokers.
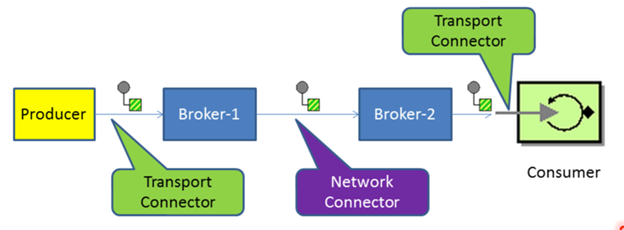
ActiveMQ uses transport connectors over which it communicates with message producers and consumers. However, in order to facilitate broker to broker communication, ActiveMQ uses network connectors.
A network connector is a bridge between two brokers which allows on-demand message forwarding.
In other words, if Broker B1 initiates a network connector to Broker B2 then the messages on a channel (queue/topic) on B1 get forwarded to B2 if there is at least one consumer on B2 for the same channel. If the network connector was configured to be duplex, the messages get forwarded from B2 to B1 on demand.
This is very interesting because it is now possible for brokers to communicate with each other dynamically.
In this 7 part blog series, we will look into the following topics to gain understanding of this very powerful ActiveMQ feature:
In this 7 part blog series, we will look into the following topics to gain understanding of this very powerful ActiveMQ feature:
- Network Connector Basics - Part 1
- Duplex network connectors - Part 2
- Load balancing consumers on local/remote brokers - Part 3
- Load-balance consumers/subscribers on remote brokers
- Queue: Load balance remote concurrent consumers - Part 4
- Topic: Load Balance Durable Subscriptions on Remote Brokers - Part 5
- Store/Forward messages and consumer failover - Part 6
- How to prevent stuckmessages
- Virtual Destinations - Part 7
To give credit where it is due, the following URLs have helped me in creating this blog post series.
- Advanced Messaging with ActiveMQ by Dejan Bosanac [Slides 32-36]
- Understanding ActiveMQ Broker Networks by Jakub Korab
Prerequisites
- ActiveMQ 5.8.0 – To create broker instances
- Apache Ant – To run ActiveMQ sample producer and consumers for demo.
Network Connector Basics - Part 1
The following diagram shows how a network connector functions. It bridges two brokers and is used to forward messages from Broker-1 to Broker-2 on demand if established by Broker-1 to Broker-2.
A network connector can be duplex so messages could be forwarded in the opposite direction; from Broker-2 to Broker-1, once there is a consumer on Broker-1 for a channel which exists in Broker-2. More on this in Part 2
Setup network connector between broker-1 and broker-2
- Create two broker instances, say broker-1 and broker-2
Ashwinis-MacBook-Pro:bin akuntamukkala$ pwd
/Users/akuntamukkala/apache-activemq-5.8.0/bin
Ashwinis-MacBook-Pro:bin akuntamukkala$ ./activemq-admin create ../bridge-demo/broker-1

Ashwinis-MacBook-Pro:bin akuntamukkala$ ./activemq-admin create ../bridge-demo/broker-2
Since we will be running both brokers on the same machine, let's configure broker-2 such that there are no port conflicts.
- Edit /Users/akuntamukkala/apache-activemq-5.8.0/bridge-demo/broker-2/conf/activemq.xml
- Change transport connector to 61626 from 61616
- Change AMQP port from 5672 to 6672 (won't be using it for this blog)
- Edit /Users/akuntamukkala/apache-activemq-5.8.0/bridge-demo/broker-2/conf/jetty.xml
- Change web console port to 9161 from 8161
- Configure Network Connector from broker-1 to broker-2
Add the following XML snippet to/Users/akuntamukkala/apache-activemq-5.8.0/bridge-demo/broker-1/conf/activemq.xml
     <networkConnectors>
         <networkConnector
            name="T:broker1->broker2"
            uri="static:(tcp://localhost:61626)"
            duplex="false"
            decreaseNetworkConsumerPriority="true"
            networkTTL="2"
            dynamicOnly="true">
            <excludedDestinations>
                  <queue physicalName=">" />
            </excludedDestinations>
         </networkConnector>
         <networkConnector
            name="Q:broker1->broker2"
            uri="static:(tcp://localhost:61626)"
            duplex="false"
            decreaseNetworkConsumerPriority="true"
            networkTTL="2"
            dynamicOnly="true">
            <excludedDestinations>
                  <topic physicalName=">" />
            </excludedDestinations>
         </networkConnector>
     </networkConnectors>
The above XML snippet configures two network connectors "T:broker1->broker2" (only topics as queues are excluded) and "Q:broker1->broker2" (only queues as topics are excluded). This allows for nice separation between network connectors used for topics and queues. The name can be arbitrary although I prefer to specify the [type]:[source broker]->[destination broker].
The URI attribute specifies how to connect to broker-2
- Start broker-2
Ashwinis-MacBook-Pro:bin akuntamukkala$ pwd
/Users/akuntamukkala/apache-activemq-5.8.0/bridge-demo/broker-2/bin

Ashwinis-MacBook-Pro:bin akuntamukkala$ ./broker-2 console
- Start broker-1
Ashwinis-MacBook-Pro:bin akuntamukkala$ pwd
/Users/akuntamukkala/apache-activemq-5.8.0/bridge-demo/broker-1/bin

Ashwinis-MacBook-Pro:bin akuntamukkala$ ./broker-1 console
Logs on broker-1 show 2 network connectors being established with broker-2
 INFO | Establishing network connection from vm://broker-1?async=false&network=true to tcp://localhost:61626
 INFO | Connector vm://broker-1 Started
 INFO | Establishing network connection from vm://broker-1?async=false&network=true to tcp://localhost:61626
 INFO | Network connection between vm://broker-1#24 and tcp://localhost/127.0.0.1:61626@52132(broker-2) has been established.
 INFO | Network connection between vm://broker-1#26 and tcp://localhost/127.0.0.1:61626@52133(broker-2) has been established.
Web Console on broker-1 @ http://localhost:8161/admin/connections.jsp shows the two network connectors established to broker-2
The same on broker-2 does not show any network connectors since no network connectors were initiated by broker-2
Let's see this in action
Let's produce 100 persistent messages on a queue called "foo.bar" on broker-1.Ashwinis-MacBook-Pro:example akuntamukkala$ pwd /Users/akuntamukkala/apache-activemq-5.8.0/example Ashwinis-MacBook-Pro:example akuntamukkala$ ant producer -Durl=tcp://localhost:61616 -Dtopic=false -Ddurable=true -Dsubject=foo.bar -Dmax=100
broker-1 web console shows that 100 messages have been enqueued in queue "foo.bar"
Let's start a consumer on a queue called "foo.bar" on broker-2. The important thing to note here is that the destination name "foo.bar" should match exactly.
Ashwinis-MacBook-Pro:example akuntamukkala$ ant consumer -Durl=tcp://localhost:61626 -Dtopic=false -Dsubject=foo.bar
We find that all the 100 messages from broker-1's foo.bar queue get forwarded to broker-2's foo.bar queue consumer.
broker-1 admin console at http://localhost:8161/admin/queues.jsp
broker-2 admin console @ http://localhost:9161/admin/queues.jspshows that the consumer we had started has consumed all 100 messages which were forwarded on-demand from broker-1
broker-2 consumer details on foo.bar queue
broker-1 admin console shows that all 100 messages have been dequeued [forwarded to broker-2 via the network connector].
broker-1 consumer details on "foo.bar" queue shows that the consumer is created on demand: [name of connector]_[destination broker]_inbound_[source broker]
Thus we have seen the basics of network connector in ActiveMQ.
As always, please feel to comment about anything that can be improved. Your inputs are welcome!
Stay tuned for Part 2.
Network
Connector (mathematics)
consumer
Published at DZone with permission of Ashwini Kuntamukkala. See the original article here.
Opinions expressed by DZone contributors are their own.
Comments