Apache Ranger and AWS EMR Automated Installation and Integration Series (3): Windows AD + EMR-Native Ranger
This article of the series will allow readers to understand EMR and Ranger integration solutions against “Scenario 2: Windows AD + EMR-Native Ranger.”
Join the DZone community and get the full member experience.
Join For FreeIn this article, we will introduce the solution against “Scenario 2: Windows AD + EMR-Native Ranger.” Just like in the previous article, we will introduce the solution architecture, give detailed installation step descriptions, and verify the installed environment.
1. Solution Overview
1.1 Solution Architecture
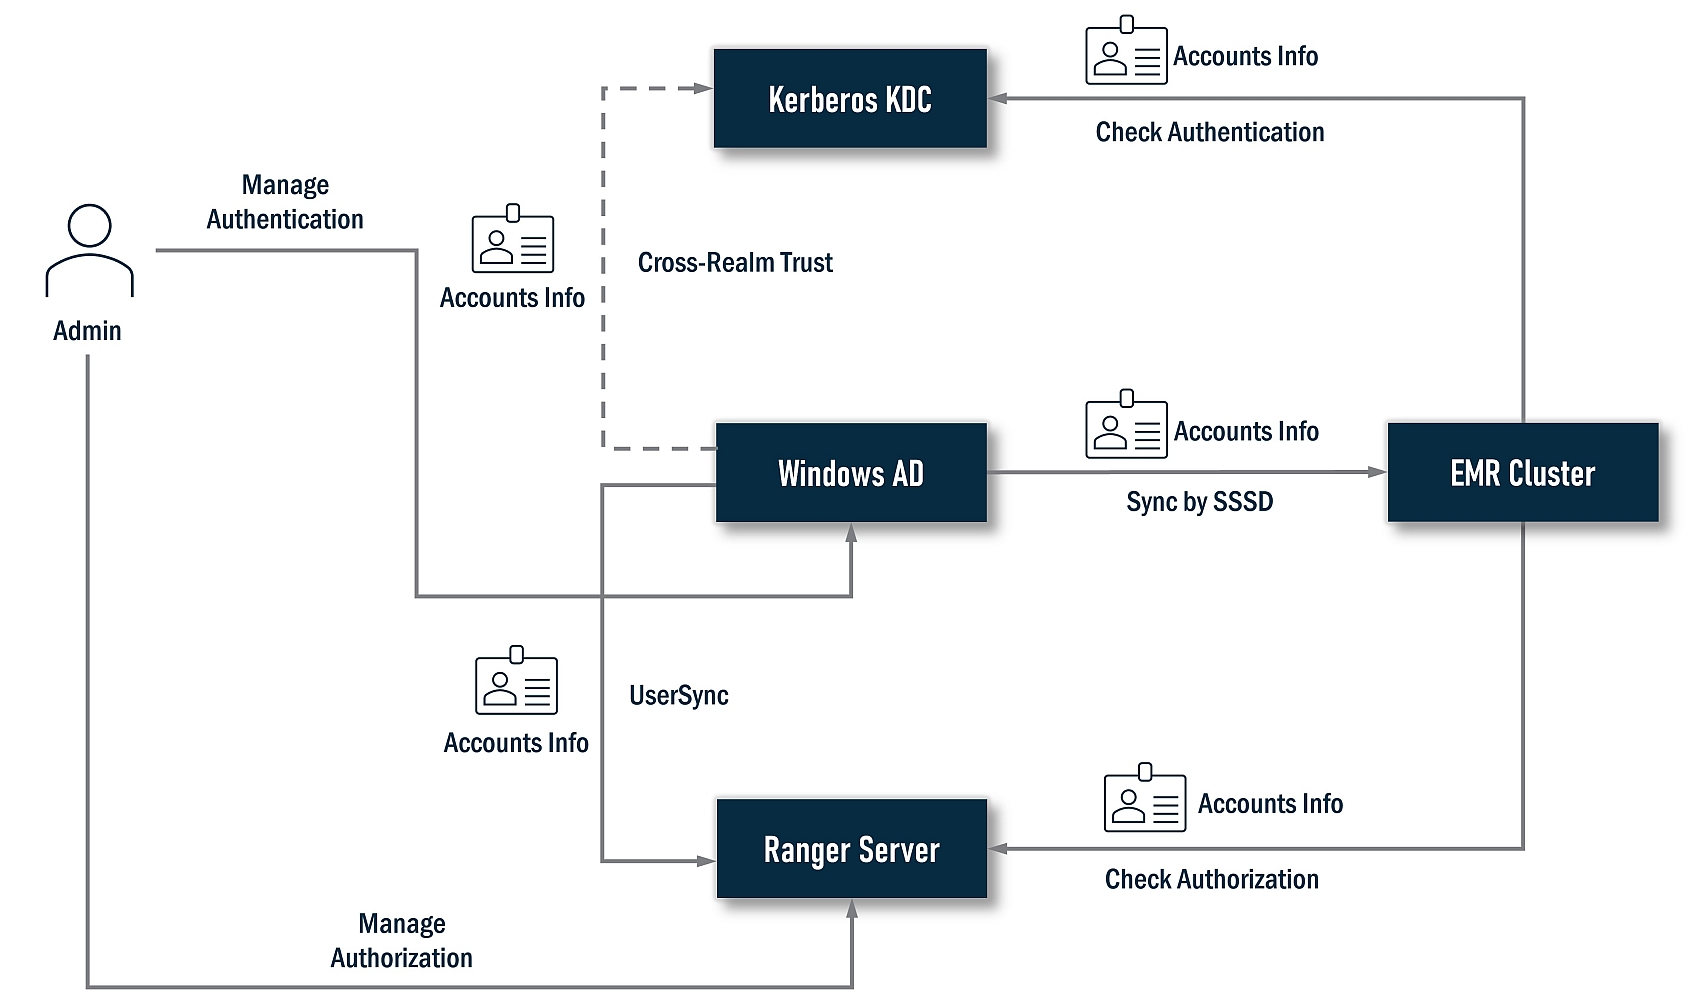
In this solution, Windows AD plays the authentication provider, all user accounts data are stored on it, and Ranger plays the authorization controller. Because we selected an EMR-native Ranger solution that strongly depends on Kerberos, a Kerberos KDC is required. In this solution, we recommend choosing a cluster-dedicated KDC created by EMR instead of an external KDC; this can help us save the job of installing Kerberos. If you have an existing KDC, this solution also supports it.
To unify the user accounts data, Windows AD and Kerberos must be integrated. The best integration is a one-way cross-realm trust (Windows AD realm trusts Kerberos KDC realm); this is also a built-in feature of EMR. For Ranger, it will sync accounts data from Windows AD to grant privileges against user accounts from Windows AD. Meanwhile, the EMR cluster needs to install a series of Ranger plugins. These plugins will check with the Ranger server to assure the current user has permission to perform an action. An EMR cluster will also sync accounts data from Windows AD via SSSD so a user can log in nodes of the EMR cluster and submit jobs.
1.2 Authentication in Detail
Let’s deep dive into the authentication part. Generally, we will finish the following jobs. Some are done by the installer, and some are an EMR built-in feature with no manual operations.
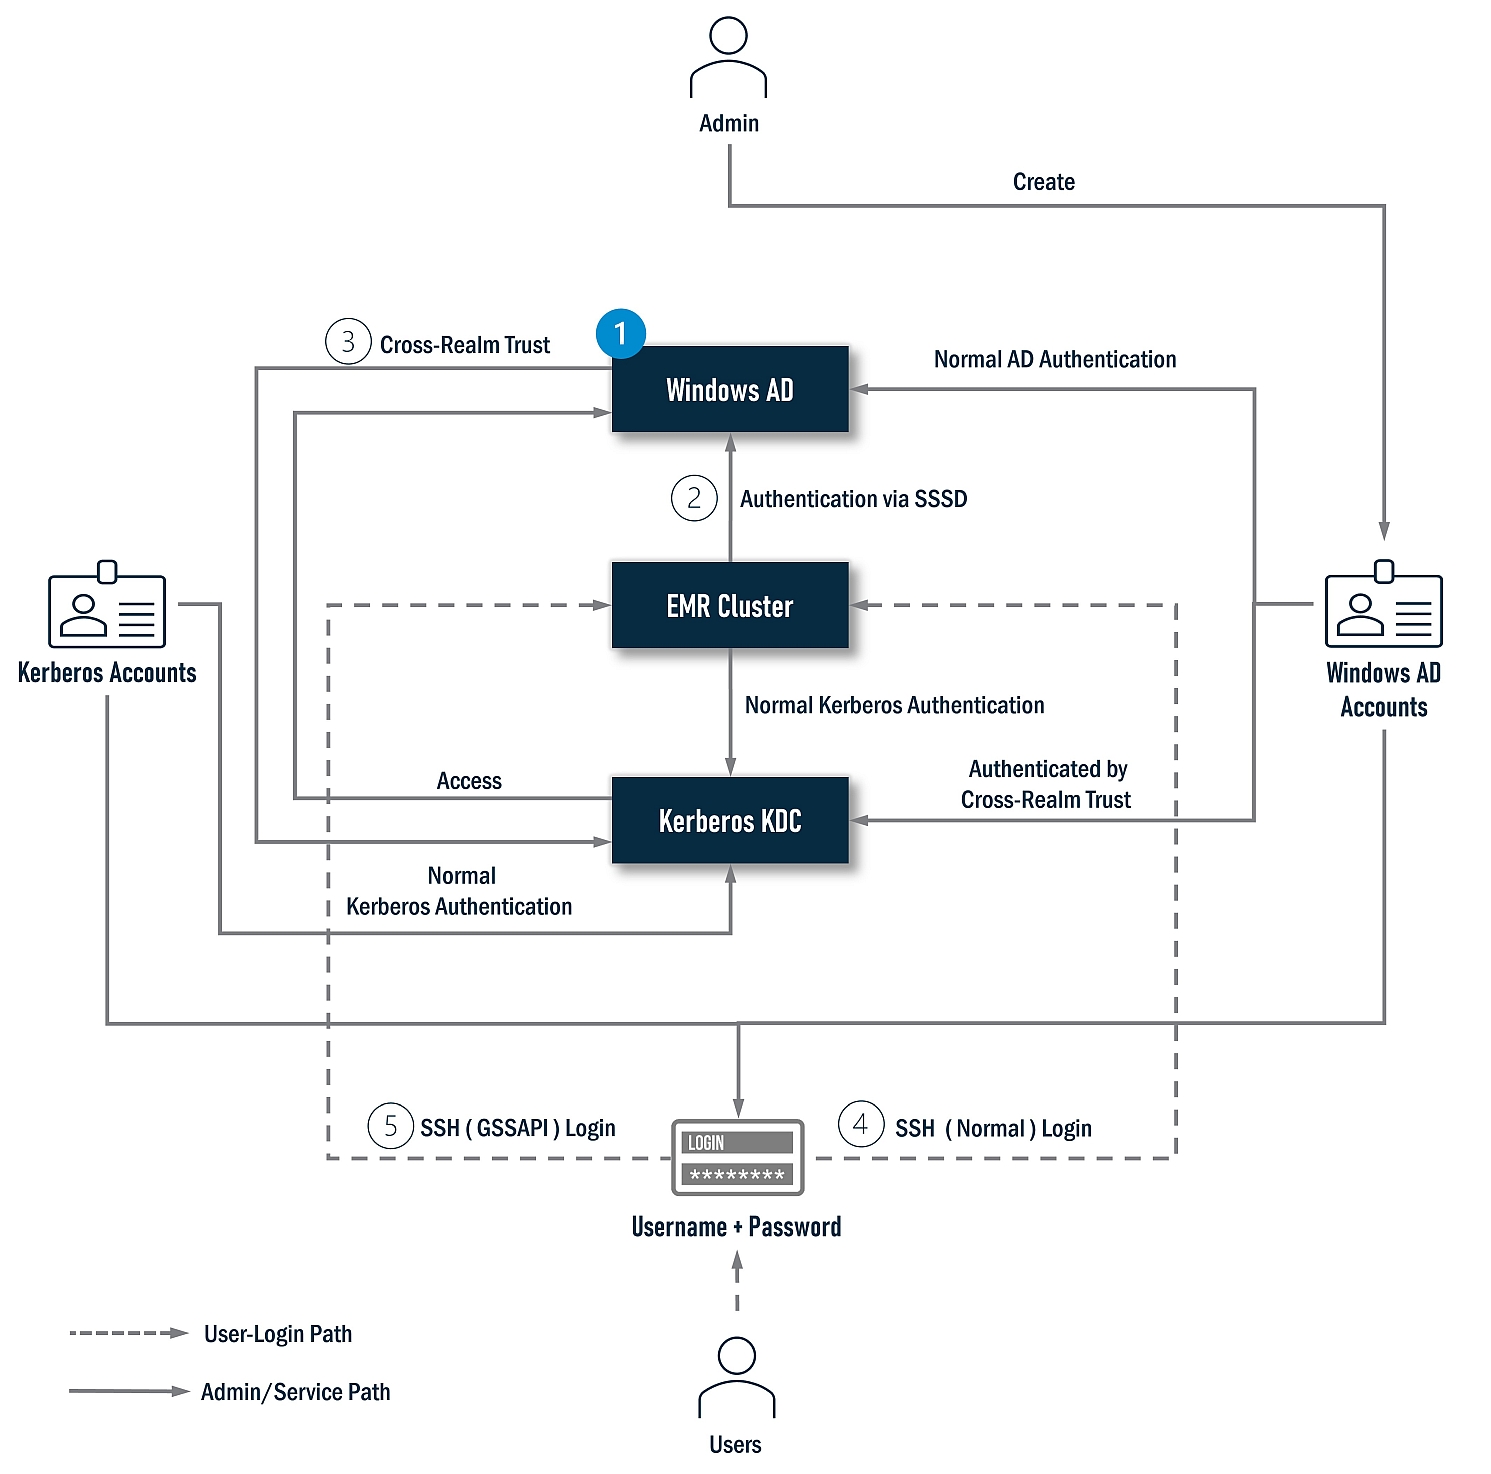
- Install Windows AD.
- Install SSSD on all nodes of the EMR cluster (If you enable the cross-realm trust, no manual operations are required).
- Enable the cross-realm trust (some jobs will be done by the
as.ps1file when installing Windows AD. Other jobs will be done when the EMR cluster is created if the cross-realm trust is enabled). - Configure SSH, and enable users to log in with a Windows AD account (If you enable the cross-realm trust, no manual operations are required).
- Configure SSH, and enable users to log in with a Kerberos account via GSSAPI (If you enable the cross-realm trust, no manual operations are required).
1.3 Authorization in Detail
For authorization, Ranger is absolutely the leading role. If we deep dive into it, its architecture looks as follows:

The installer will finish the following jobs:
- Install MySQL as a Policy DB for Ranger.
- Install Solr as an Audit Store for Ranger.
- Install Ranger Admin.
- Install Ranger UserSync.
- Install the EMRFS(S3) Ranger plugin.
- Install the Spark Ranger plugin.
- Install the Hive Ranger plugin.
- Install the Trino Ranger plugin (Not available yet at the time of writing).
2. Installation and Integration
Generally, the installation and integration process can be divided into three stages:
- Prerequisites
- All-In-One Install
- Create the EMR Cluster
The following diagram illustrates the progress in detail:
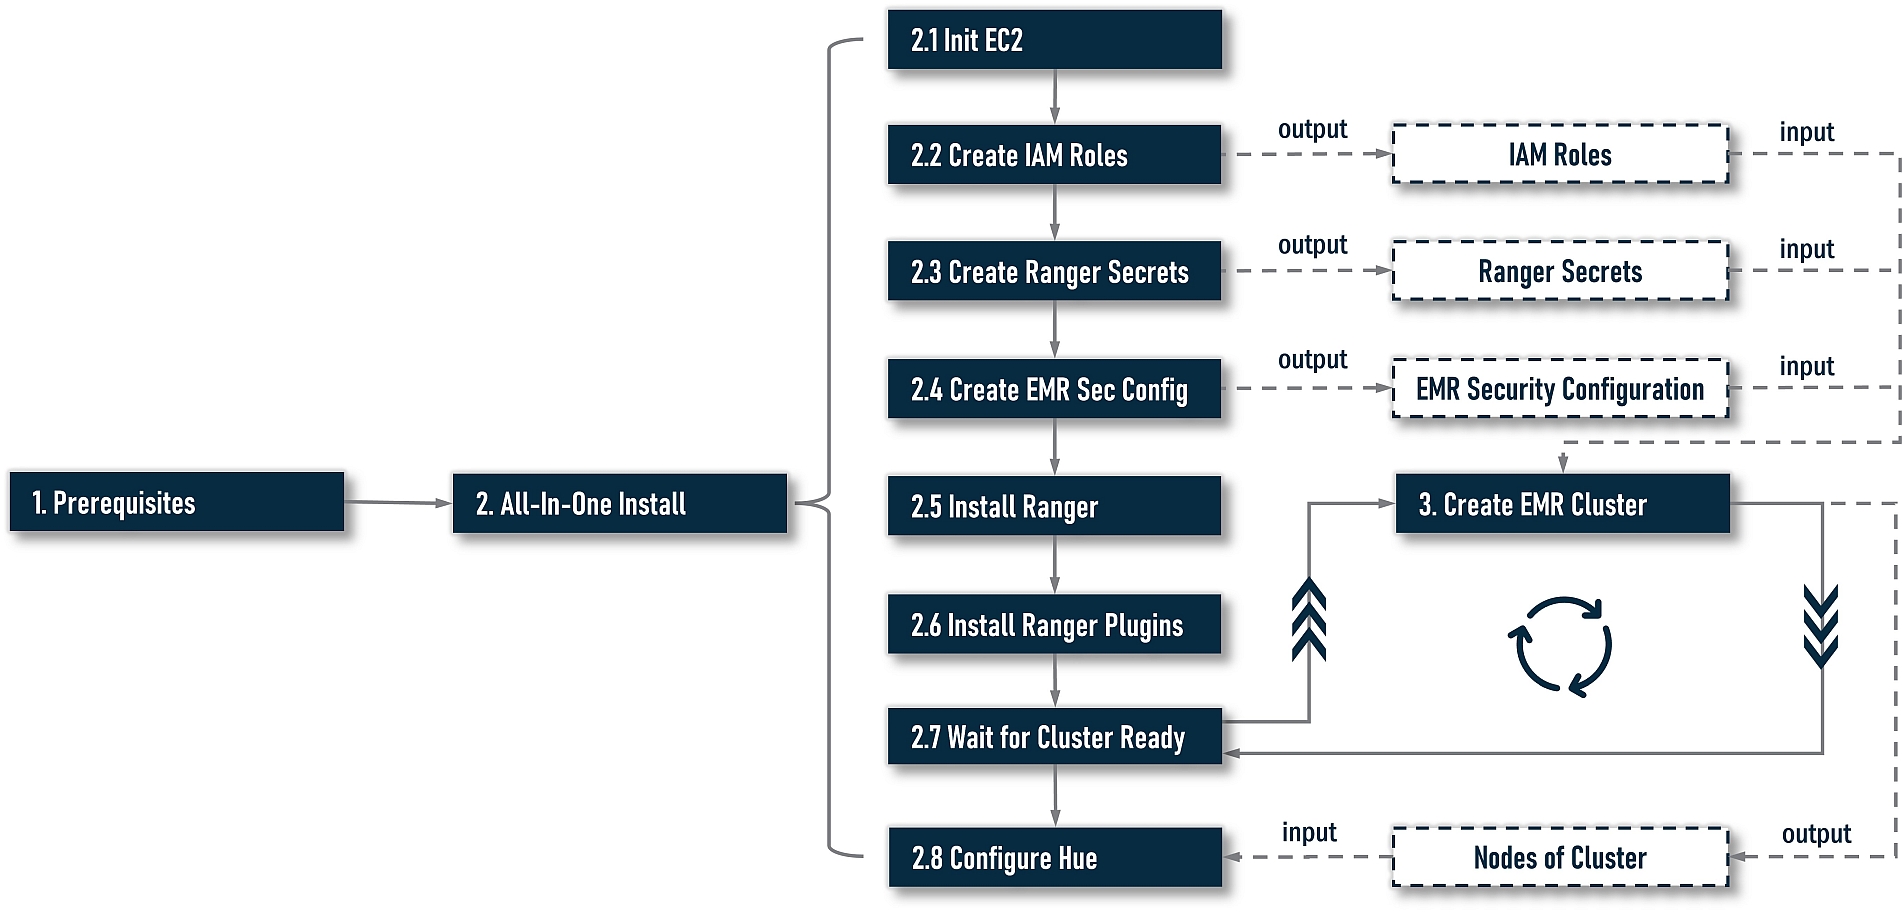
At stage 1, we need to do some preparatory work. At stage 2, we will start to install and integrate. There are two options at this stage: one is an all-in-one installation driven by a command-line-based workflow. The other is a step-by-step installation. For most cases, an all-in-one installation is always the best choice; however, your installation workflow may be interrupted by unforeseen errors. If you want to continue installing from the last failed step, please try the step-by-step installation. Or sometimes, you want to re-try a step with different argument values to find the right one, step-by-step is also a better choice. At stage 3, we need to create an EMR cluster by ourselves with output artifacts in stage 2, i.e., IAM roles and EMR security configuration.
As a design principle, the installer does not include any actions to create an EMR cluster. You should always create your cluster yourself because an EMR cluster could have any unpredictable complex settings, i.e., application-specific (HDFS, Yarn, etc.) configuration, step scripts, bootstrap scripts, and so on; it is unadvised to couple Ranger’s installation with EMR cluster's creation.
However, there is a little overlap in the execution sequence between stages 2 and 3. When creating an EMR cluster based on the EMR-native Ranger, it is required to provide a copy of the security configuration and Ranger-specific IAM roles. They must be available before creating an EMR cluster, and while creating the cluster, it also needs to interact with the Ranger server (the server address is assigned in the security configuration). On the other hand, some operations in an all-in-one installation need to perform on all nodes of the cluster or KDC; this requires an EMR cluster to be ready. To solve this circular dependency, the installer will output some artifacts dependent on the cluster. Next, it will indicate the users to create their own cluster with these artifacts. Meanwhile, the installation progress will be pending, and continue monitoring the target cluster’s status. Once it’s ready, the installation progress will resume and continue to perform REST actions.
Notes:
- The installer will treat the local host as a Ranger server to install everything on Ranger. For non-Ranger operations, it will initiate remote operations via SSH. So, you can stay on the Ranger server to execute command lines. No need to switch among multiple hosts.
- For the sake of Kerberos, all host addresses must use FQDN. Both IPs and hostnames without a domain name are unaccepted.
2.1 Prerequisites
2.1.1 VPC Constraints
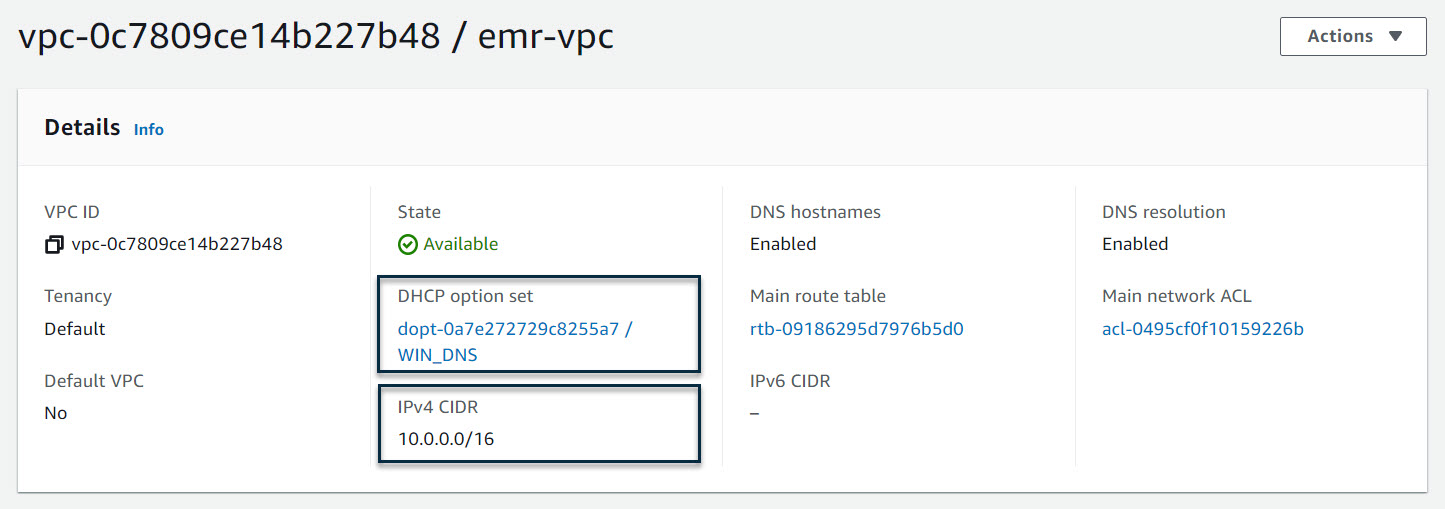
To enable cross-realm trust, a series of constraints are imposed on the VPC. Before installing, please ensure the hostname of the EC2 instance is no more than fifteen characters. This is a limitation from Windows AD; however, as AWS assigns DNS hostnames based on the IPv4 address, this limitation propagates to the VPC. If the CIDR of the VPC can constrain the IPv4 address is no more than nine characters. The assigned DNS hostnames can be limited to fifteen characters. With the limitation, a recommended CIDR setting of the VPC is 10.0.0.0/16.
Although we can change the default hostname after the EC2 instances are available, the hostname will be used when the computers join the Windows AD directory. This happens during the creation of the EMR cluster. A post modification on the hostname does not work. Technically, a possible workaround is to put modifying hostname actions into bootstrap scripts, but we didn’t try it. To change the hostname, please refer to the Amazon documentation titled: Change the hostname of your Amazon Linux instance.
For other cautions, please refer to the EMR official document titled: Tutorial: Configure a cross-realm trust with an Active Directory domain.
2.1.2 Create Windows AD Server
In this section, we will create a Windows AD server with PowerShell scripts. First, create an EC2 instance with the Windows Server 2019 Base image (2016 is also tested and supported). Next, log in with an Administrator account, download the Windows AD installation scripts file from this link, and save it to your desktop.
Next, press “Win + R” to open a run dialog, copy the following command line, and replace the parameter values with your own settings:
Powershell.exe -NoExit -ExecutionPolicy Bypass -File %USERPROFILE%\Desktop\ad.ps1 -DomainName <replace-with-your-domain> -Password <replace-with-your-password> -TrustedRealm <replace-with-your-realm>The ad.ps1 has pre-defined default parameter values: the domain name is example.com, the password is Admin1234!, and the trusted realm is COMPUTE.INTERNAL. As a quick-start, you can right-click the ad.ps1 file and select Run with PowerShell to execute it. (Note: You can not run the PowerShell scripts by right-clicking “Run with PowerShell” on us-east-1 because its default trusted realm is EC2.INTERNAL, so you should set -TrustedRealm EC2.INTERNAL explicitly via the above command line).
After the scripts are executed, the computer will ask to restart, which is forced by Windows. We should wait for the computer to restart and then re-login as an Administrator so that subsequent commands in the scripts file continue executing. Be sure to log in again; otherwise, a part of the scripts have no chance to execute.
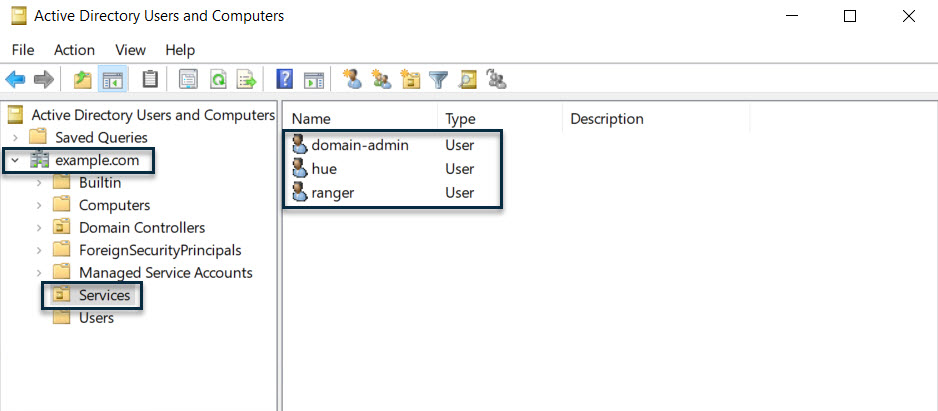
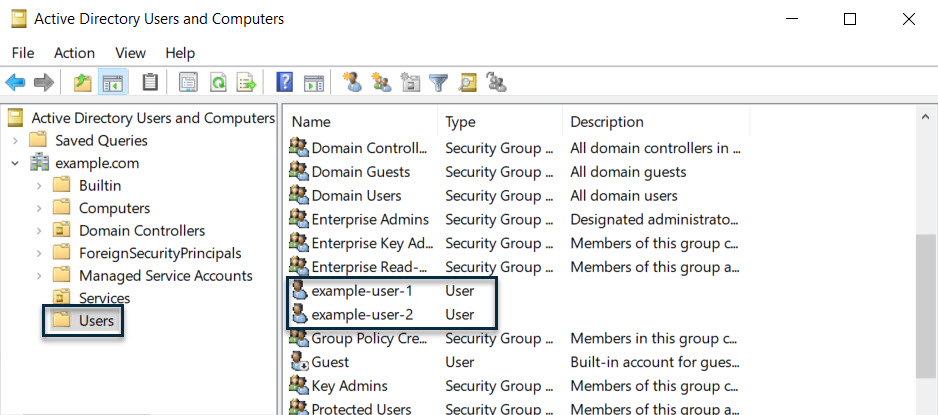
After logging in again, we can open “Active Directory Users and Computers” from the Start Menu -> Windows Administrative Tools -> Active Directory Users and Computers or enter dsa.msc from the “Run” dialog to see the created AD. If everything goes well, we will get the following AD directory:
Next, we need to check the DNS setting, an invalid DNS setting will result in installation failure. A common error when running scripts is “Ranger Server can’t solve DNS of Cluster Nodes.” This problem is usually caused by an incorrect DNS forwarder setting. We can open the DNS Manager from the Start Menu -> Windows Administrative Tools -> DNS or enter dnsmgmt.msc from the “Run” dialog, then open the “Forwarders” tab. Normally, there is a record where the IP address should be 10.0.0.2:
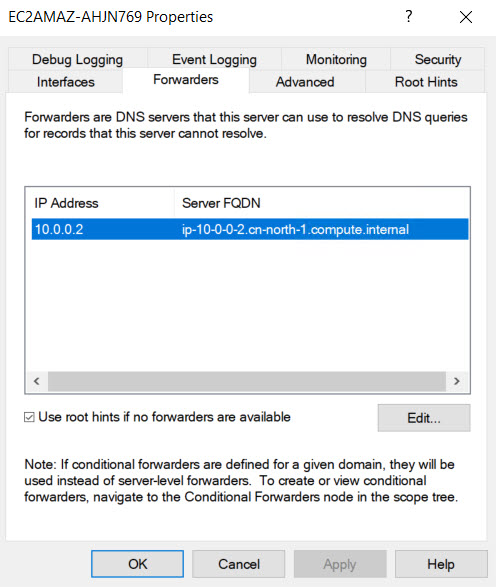
10.0.0.2 is the default DNS server address for the 10.0.0.0/16 network in VPC. According to the VPC document:
The Amazon DNS server does not reside within a specific subnet or Availability Zone in a VPC. It’s located at the address 169.254.169.253 (and the reserved IP address at the base of the VPC IPv4 network range, plus two) and fd00:ec2::253. For example, the Amazon DNS Server on a 10.0.0.0/16 network is located at 10.0.0.2. For VPCs with multiple IPv4 CIDR blocks, the DNS server IP address is located in the primary CIDR block.
The forwarder’s IP address usually comes from the “Domain name servers” of your VPC’s “DHCP Options Set,” its default value is AmazonProvidedDNS. If you changed it, when creating Windows AD, the forwarder’s IP will become your changed value. It probably happens when you re-install Windows AD in a VPC. If you didn’t recover the “Domain name servers” to AmazonProvidedDNS before re-installing, the forwarder’s IP is always the address of the previous Windows AD server, it may not exist anymore, which is why the Ranger server or cluster nodes can’t solve DNS. So, we can simply change the forwarder IP to the default value, i.e., 10.0.0.2 in 10.0.0.0/16 network.
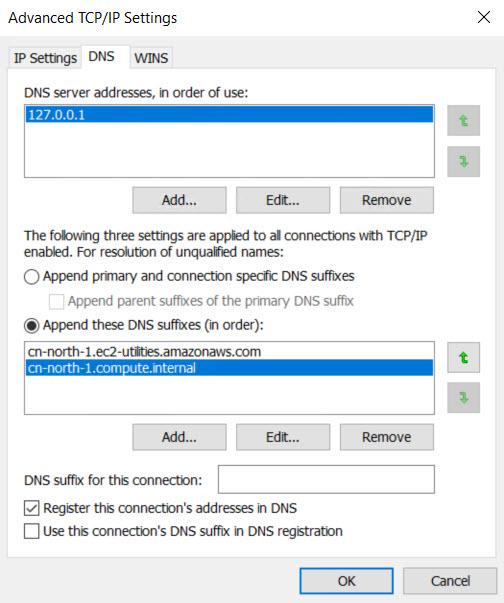
The other DNS related configuration is the IPv4 DNS setting. Usually, its default setting is okay, just attach it, as referenced below (in cn-north-1 region):
2.1.3 Create DHCP Options Set and Attach To VPC
A cross-realm trust requires that the KDCs can reach one another over the network and resolve each other’s domain names. So the user is required to set the Windows AD as a DNS server in the “DHCP Options Sets” of the VPC. The following command line will complete this job (run the following scripts on a Linux host which has AWS CLI installed).
# run on a host which has installed aws cli
export REGION='<change-to-your-region>'
export VPC_ID='<change-to-your-vpc-id>'
export DNS_IP='<change-to-your-dns-ip>'

# solve domain name based on region
if [ "$REGION" = "us-east-1" ]; then
    export DOMAIN_NAME="ec2.internal"
else
    export DOMAIN_NAME="$REGION.compute.internal"
fi

# create dhcp options and return id
dhcpOptionsId=$(aws ec2 create-dhcp-options \
    --region $REGION \
    --dhcp-configurations '{"Key":"domain-name","Values":["'"$DOMAIN_NAME"'"]}' '{"Key":"domain-name-servers","Values":["'"$DNS_IP"'"]}' \
    --tag-specifications "ResourceType=dhcp-options,Tags=[{Key=Name,Value=WIN_DNS}]" \
    --no-cli-pager \
    --query 'DhcpOptions.DhcpOptionsId' \
    --output text)


# attach the dhcp options to target vpc
aws ec2 associate-dhcp-options \
    --dhcp-options-id $dhcpOptionsId \
    --vpc-id $VPC_ID
The following is a snapshot of the created DHCP options from the AWS web console:
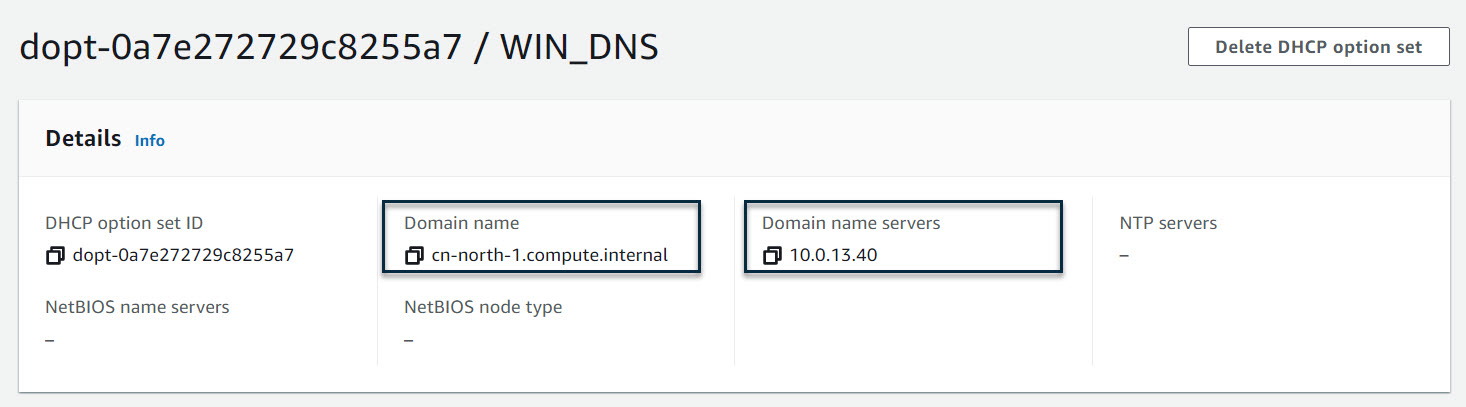
The “Domain name:” cn-north-1.compute.internal will be the “domain name” part of the long hostname (FQDN). Usually, for the us-east-1 region, please specify ec2.internal. For other regions, specify <region>.compute.internal.
Note: Do not set the domain name of Windows AD to it, i.e., example.com.
In our example, they are two different things; otherwise, the cross-realm trust will fail. The “Domain name server:” 10.0.13.40 is the private IP of the Windows AD server. And the following is a snapshot of the VPC which has attached to this DHCP options set:
2.1.4 Create EC2 Instances as Ranger Server
Next, we need to prepare an EC2 instance as the server of Ranger. Please select Amazon Linux 2 image and guarantee network connections among instances and the cluster to be created are reachable.
As a best practice, it’s recommended to add the Ranger server to the ElasticMapReduce-master security group. Because Ranger is very close to the EMR cluster, it can be regarded as a non-EMR-build-in master service. For Windows AD, we have to make sure its port 389 is reachable from Ranger and all nodes of the EMR cluster to be created. To be simple, you can also add Windows AD into the ElasticMapReduce-master security group.
2.1.5 Download Installer
After EC2 instances are ready, pick the Ranger server, log in via SSH, and run the following commands to download the installer package:
sudo yum -y install git
git clone https://github.com/bluishglc/ranger-emr-cli-installer.git
2.1.6 Upload SSH Key File
As mentioned before, the installer is based on the local host (Ranger server). To perform remote installing actions on the EMR cluster, an SSH private key is required. We should upload it to the Ranger server and keep the file path; it will be the value of the variable SSH_KEY.
2.1.7 Export Environment-Specific Variables
During the installation, the following environment-specific arguments will be passed more than once. It’s recommended to export them first; then, all command lines will refer to these variables instead of literals.
export REGION='TO_BE_REPLACED'
export ACCESS_KEY_ID='TO_BE_REPLACED'
export SECRET_ACCESS_KEY='TO_BE_REPLACED'
export SSH_KEY='TO_BE_REPLACED'
export AD_HOST='TO_BE_REPLACED'
The following are comments of the above variables:
REGION: The AWS Region, i.e.,cn-north-1,us-east-1, and so on.ACCESS_KEY_ID: The AWS access key id of your IAM account. Be sure your account has enough privileges; it’s better having admin permissions.SECRET_ACCESS_KEY: The AWS secret access key of your IAM account.SSH_KEY: The SSH private key file path on the local host you just uploaded.AD_HOST: The FQDN of the AD server.VPC_ID: The id of the VPC.
Please carefully replace the above variables’ value according to your environment and remember to use the FQDN as the hostname. The following is a copy of the example:
export REGION='cn-north-1'
export ACCESS_KEY_ID='<change-to-your-access-key-id>'
export SECRET_ACCESS_KEY='<change-to-your-secret-access-key>'
export SSH_KEY='/home/ec2-user/key.pem'
export AD_HOST='example.com'
2.2 All-In-One Installation
2.2.1 Quick Start
Now, let’s start an all-in-one installation. Execute this command line:
sudo sh ./ranger-emr-cli-installer/bin/setup.sh install \
    --region "$REGION" \
    --access-key-id "$ACCESS_KEY_ID" \
    --secret-access-key "$SECRET_ACCESS_KEY" \
    --ssh-key "$SSH_KEY" \
    --solution 'emr-native' \
    --auth-provider 'ad' \
    --ad-host "$AD_HOST" \
    --ad-domain 'example.com' \
    --ad-base-dn 'cn=users,dc=example,dc=com' \
    --ad-user-object-class 'person' \
    --enable-cross-realm-trust 'true' \
    --trusting-realm 'EXAMPLE.COM' \
    --trusting-domain 'example.com' \
    --trusting-host 'example.com' \
    --ranger-plugins 'emr-native-emrfs,emr-native-spark,emr-native-hive'
For the parameters specification of the above command line, please refer to the appendix. If everything goes well, the command line will execute steps 2.1 to 2.6 in the workflow diagram. This may take ten minutes or more, depending on the bandwidth of your network. Next, it will suspend and indicate the user to create an EMR cluster with these two artifacts:
- An EC2 instance profile named
EMR_EC2_RangerRole. - An EMR security configuration named
Ranger@<YOUR—RANGER—HOST—FQDN>.
They are created by the command line in steps 2.2 and 2.4. You can find them in the EMR web console when creating the cluster. The following is a snapshot of the command line for this moment:

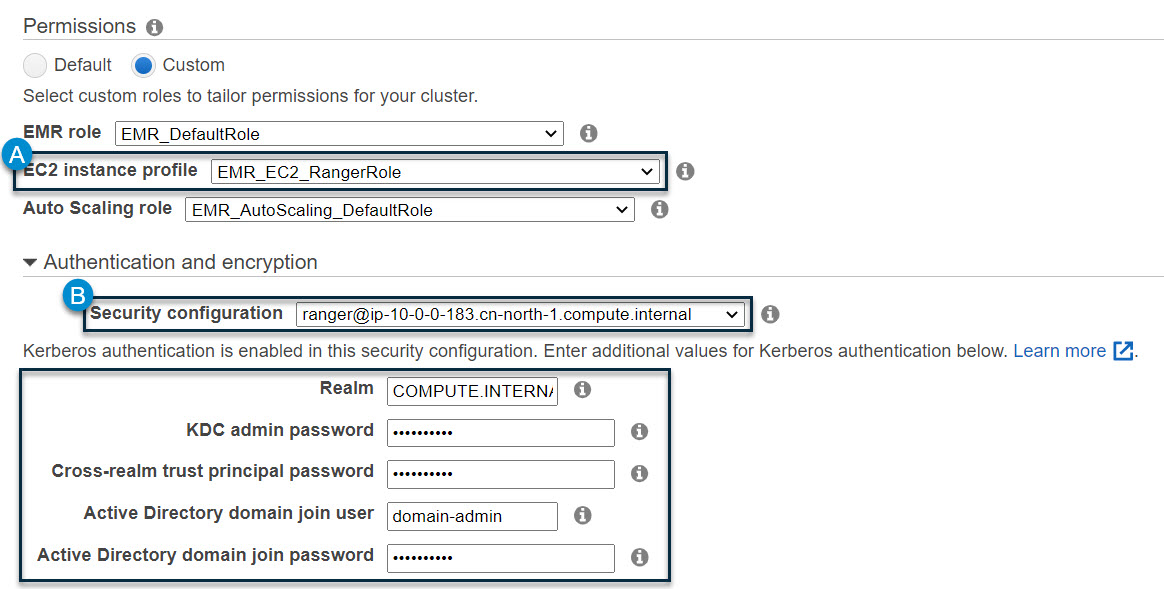
Next, we should switch to the EMR web console to create a cluster. Be sure to select the EC2 instance profile and security configuration prompted in the command line console. As for the Kerberos and cross-realm trust, please fill in and make a note of the following items:
- Realm: the realm of Kerberos. Note: For the region
us-east-1, the default realm isEC2.INTERNAL. For other regions, the default realm isCOMPUTE.INTERNAL. You can assign another realm name, but be sure the entered realm name and the trusted realm name passed toad.ps1as the parameter are the same value.
- KDC admin password: the password of the kadmin.
- Active Directory domain join user: this is an AD account with enough privileges that can add cluster nodes into the Windows domain. This is a required action to enable cross-realm trust. EMR relies on this account to finish this job. If the Windows AD is installed by
ad.ps1, an account nameddomain-adminwill be automatically created for this purpose, so we fill in the “domain-admin” here. You can also assign another account, but be sure it is existing and has enough privileges. - Active Directory domain join password: the password of the “Active Directory domain join user.”
The following is a snapshot of the EMR web console for this moment:
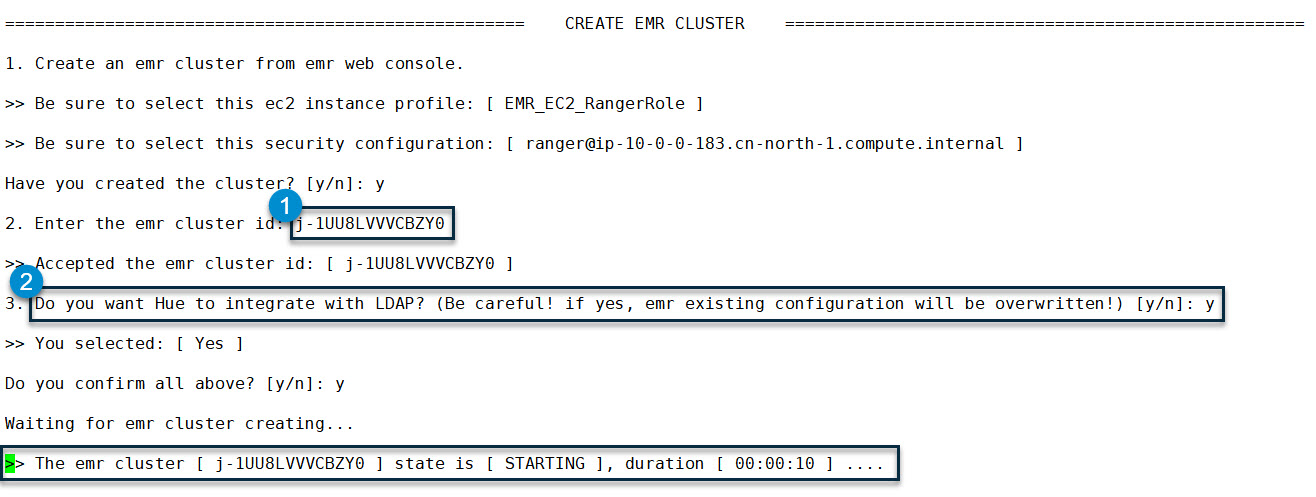
Once the EMR cluster starts to create, the cluster id will be certain. We need to copy the id and go back to the command line terminal. Enter “y” for the CLI prompt “Have you created the cluster? [y/n]:” (you don’t need a wart for the cluster to become completely ready). Next, the command line will ask you to do two things:
- Enter the cluster id.
- Confirm that Hue has integrated with LDAP. If it has been integrated, after the cluster is ready, the installer will update the EMR configuration with a Hue-specific setting. Be careful that this action will overwrite the EMR existing configuration.
Finally, enter “y” to confirm all inputs. The installation process will resume, and if the assigned EMR cluster is not ready yet, the command line will keep monitoring it until it goes into the “WAITING” status. The following is a snapshot for this moment of the command line:
When the cluster is ready (status is “WAITING”), the command line will continue to execute step 2.8 of the workflow and end with an “ALL DONE!!” message.
2.2.2 Customization
Now, that the all-in-one installation is done, we will introduce more about customization. Generally, this installer follows the principle of “Convention over Configuration.” Most parameters are preset by default values. An equivalent version with the full parameter list of the above command line is as follows:
sudo sh ./ranger-emr-cli-installer/bin/setup.sh install \
    --region "$REGION" \
    --access-key-id "$ACCESS_KEY_ID" \
    --secret-access-key "$SECRET_ACCESS_KEY" \
    --ssh-key "$SSH_KEY" \
    --solution 'emr-native' \
    --auth-provider 'ad' \
    --ad-host "$AD_HOST" \
    --ad-domain 'example.com' \
    --ad-base-dn 'cn=users,dc=example,dc=com' \
    --ad-user-object-class 'person' \
    --enable-cross-realm-trust 'true' \
    --trusting-realm 'EXAMPLE.COM' \
    --trusting-domain 'example.com' \
    --trusting-host 'example.com' \
    --ranger-plugins 'emr-native-emrfs,emr-native-spark,emr-native-hive' \
    --java-home '/usr/lib/jvm/java' \
    --skip-install-mysql 'false' \
    --skip-install-solr 'false' \
    --skip-configure-hue 'false' \
    --ranger-host $(hostname -f) \
    --ranger-version '2.1.0' \
    --mysql-host $(hostname -f) \
    --mysql-root-password 'Admin1234!' \
    --mysql-ranger-db-user-password 'Admin1234!' \
    --solr-host $(hostname -f) \
    --ranger-bind-dn 'cn=ranger,ou=services,dc=example,dc=com' \
    --ranger-bind-password 'Admin1234!' \
    --hue-bind-dn 'cn=hue,ou=services,dc=example,dc=com' \
    --hue-bind-password 'Admin1234!' \
    --sssd-bind-dn 'cn=sssd,ou=services,dc=example,dc=com' \
    --sssd-bind-password 'Admin1234!' \
    --restart-interval 30
The full-parameters version gives us a complete perspective of all custom options. In the following scenarios, you may change some of the options’ values:
- If you want to change the default organization name
dc=example,dc=com, or default passwordAdmin1234!, please run the full-parameters version and replace them with your own values. - If you need to integrate with external facilities, i.e., an existing MySQL or Solr, please add the corresponding
--skip-xxx-xxxoptions and set it totrue. - If you have another pre-defined Bind DN for Hue, Ranger, and SSSD, please add the corresponding
--xxx-bind-dnand--xxx-bind-passwordoptions to set them. Note: The Bind DN for Hue, Ranger, and SSSD will be created automatically when installing Windows AD, but they are fixed with the following naming pattern:cn=hue|ranger|sssd,ou=services,<your-base-dn>, not the given value of the “--xxx-bind-dn” option, so if you assign another DN with the “--xxx-bind-dn” option, you must create this DN by yourself in advance. The reason this install does not create the DN assigned by the “--xxx-bind-dn” option is that a DN is a tree path. To create it, we must create all nodes in the path, it is not cost-effective to implement such a small but complicated function. - The all-in-one installation will update the EMR configuration for Hue so users can log into Hue with Windows AD accounts. If you have another customized EMR configuration, please append
--skip-configure-hue 'true'in the command line to skip updating the configuration. Next, manually append the Hue configuration into your JSON; otherwise, your pre-defined configuration will be overwritten.
2.3 Step-By-Step Installation
As an alternative, you can also select the step-by-step installation instead of the all-in-one installation. We give the command line for each step. For the comments for each parameter, please refer to the appendix.
2.3.1 Init EC2
This step will finish some fundamental jobs, i.e., install AWS CLI, JDK, and so on.
sudo sh ./ranger-emr-cli-installer/bin/setup.sh init-ec2 \
    --region "$REGION" \
    --access-key-id "$ACCESS_KEY_ID" \
    --secret-access-key "$SECRET_ACCESS_KEY"
2.3.2 Create IAM Roles
This step will create three IAM roles which are required for EMR.
sudo sh ./ranger-emr-cli-installer/bin/setup.sh create-iam-roles \
    --region "$REGION"
2.3.3 Create Ranger Secrets
This step will create SSL/TLS-related keys, certificates, and keystores for Ranger because EMR-native Ranger requires SSL/TLS connections to the server. These artifacts will upload to the AWS secrets manager and are referred to by the EMR security configuration.
sudo sh ./ranger-emr-cli-installer/bin/setup.sh create-ranger-secrets \
    --region "$REGION"
2.3.4 Create EMR Security Configuration
This step will create a copy of the EMR security configuration. The configuration includes Kerberos and Ranger-related information. When creating a cluster, EMR will read them and get corresponding resources, i.e., secrets, and interact with the Ranger server whose address is assigned in the security configuration.
sudo sh ./ranger-emr-cli-installer/bin/setup.sh create-emr-security-configuration \
    --region "$REGION" \
    --solution 'emr-native' \
    --auth-provider 'ad' \
    --trusting-realm 'EXAMPLE.COM' \
    --trusting-domain 'example.com' \
    --trusting-host 'example.com'
2.3.5 Install Ranger
This step will install all server-side components of Ranger, including MySQL, Solr, Ranger Admin, and Ranger UserSync.
sudo sh ./ranger-emr-cli-installer/bin/setup.sh install-ranger \
    --region "$REGION" \
    --solution 'emr-native' \
    --auth-provider 'ad' \
    --ad-domain 'example.com' \
    --ad-host "$AD_HOST" \
    --ad-base-dn 'cn=users,dc=example,dc=com' \
    --ad-user-object-class 'person' \
    --ranger-bind-dn 'cn=ranger,ou=services,dc=example,dc=com' \
    --ranger-bind-password 'Admin1234!'
2.3.6 Install Ranger Plugins
This step will install EMRFS, Spark, and Hive plugins from the Ranger server side. There is the other half job that installs these plugins (actually they are EMR Secret Agent, EMR Record Server, and so on). On the agent side; however, it will be done automatically by EMR when creating the cluster.
sudo sh ./ranger-emr-cli-installer/bin/setup.sh install-ranger-plugins \
    --region "$REGION" \
    --solution 'emr-native' \
    --auth-provider 'ad' \
    --ranger-plugins 'emr-native-emrfs,emr-native-spark,emr-native-hive'
2.3.7 Create EMR Cluster
For a step-by-step installation, there is no interactive process for creating the EMR cluster, so feel free to create the cluster on the EMR web console. However, we must wait until the cluster is completely ready (in “WAITING” status), then export the EMR cluster id:
export EMR_CLUSTER_ID='TO_BE_REPLACED'The following is a copy of the example:
export EMR_CLUSTER_ID=' j-1UU8LVVVCBZY0'2.3.8 Update Hue Configuration
This step will update the Hue configuration of EMR. As highlighted in the all-in-one installation, if you have another customized EMR configuration, please skip this step, but you can still manually merge the generated JSON file for the Hue configuration by the command line into your own JSON.
sudo sh ./ranger-emr-cli-installer/bin/setup.sh update-hue-configuration \
    --region "$REGION" \
    --auth-provider 'ad' \
    --ad-host "$AD_HOST" \
    --ad-domain 'example.com' \
    --ad-base-dn 'dc=example,dc=com' \
    --ad-user-object-class 'person' \
    --hue-bind-dn 'cn=hue,ou=services,dc=example,dc=com' \
    --hue-bind-password 'Admin1234!' \
    --emr-cluster-id "$EMR_CLUSTER_ID"
3. Verification
After the installation and integration are completed, it’s time to see if Ranger works or not. The verification jobs are divided into three parts, which are against Hive, EMRFS (S3), and Spark.
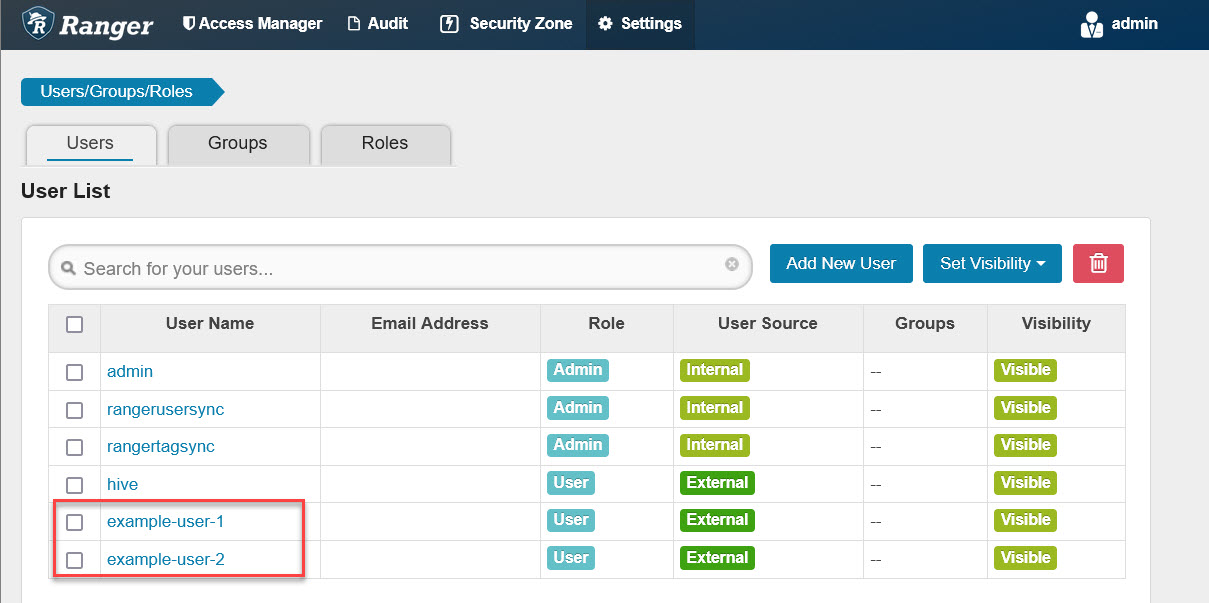
First, let’s open the Ranger web console, the address is: https://<YOUR-RANGER-HOST>:6182, the default admin account/password is: admin/admin. After logging in, we should open the “Users/Groups/Roles” page and see if the example users on Windows AD are synchronized to Ranger as follows:
3.1 Hive Access Control Verification
Usually, there are a set of pre-defined policies for the Hive plugin after installation. To eliminate interference, keep verification simple. Let’s remove them first:
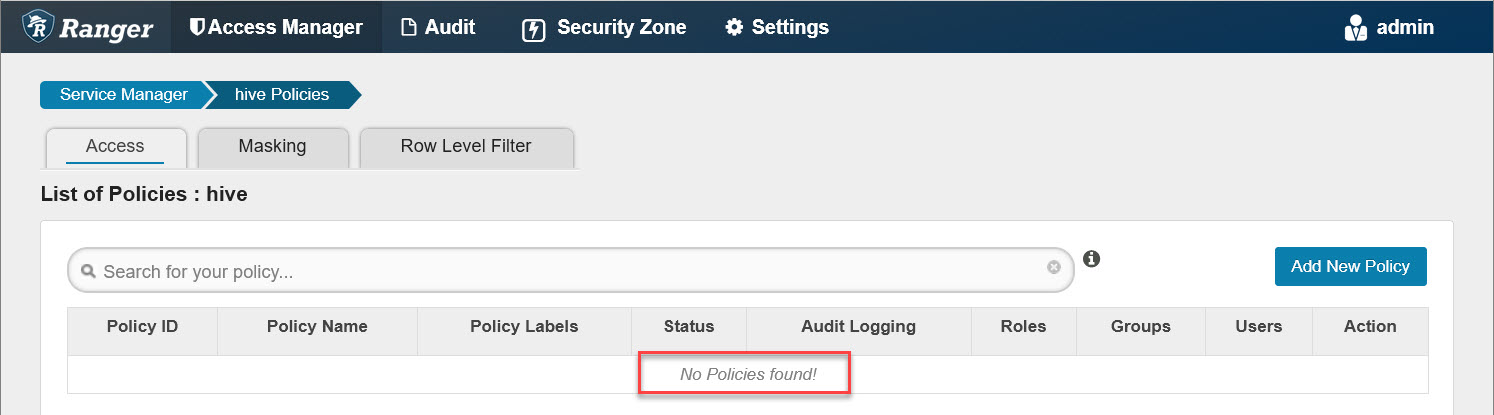
Any policy changes on the Ranger web console will sync to the agent side (EMR cluster nodes) within 30 seconds. We can run the following commands on the master node to see if the local policy file is updated:
# run on master node of emr cluster
for i in {1..10}; do
printf "\n%100s\n\n"|tr ' ' '='
sudo stat /etc/hive/ranger_policy_cache/hiveServer2_hive.json
sleep 3
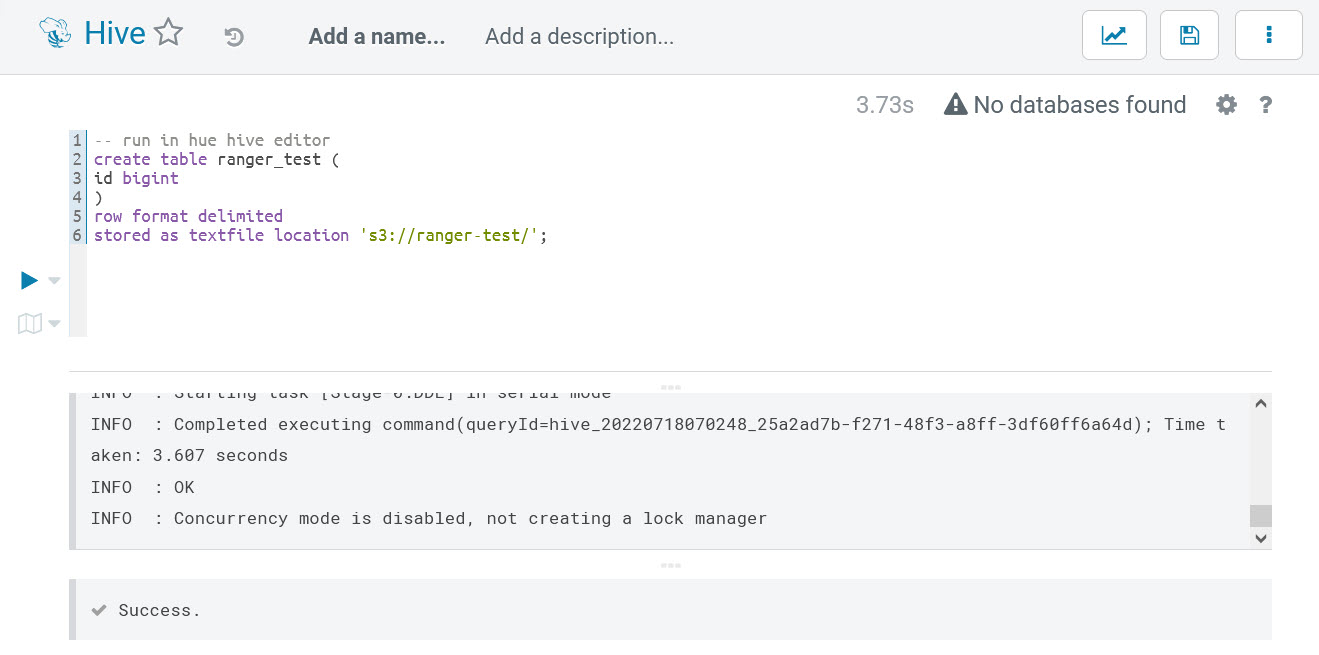
doneOnce the local policy file is up to date, the removing-all-policies action becomes effective. Next, log into Hue with the Windows AD account “example-user-1” created by the installer, open Hive editor, and enter the following SQL (remember to replace “ranger-test” with your own bucket) to create a test table (change “ranger-test” to your own bucket name):
-- run in hue hive editor
create table ranger_test (
  id bigint
)
row format delimited
stored as textfile location 's3://ranger-test/';
Next, run it and an error occurs:
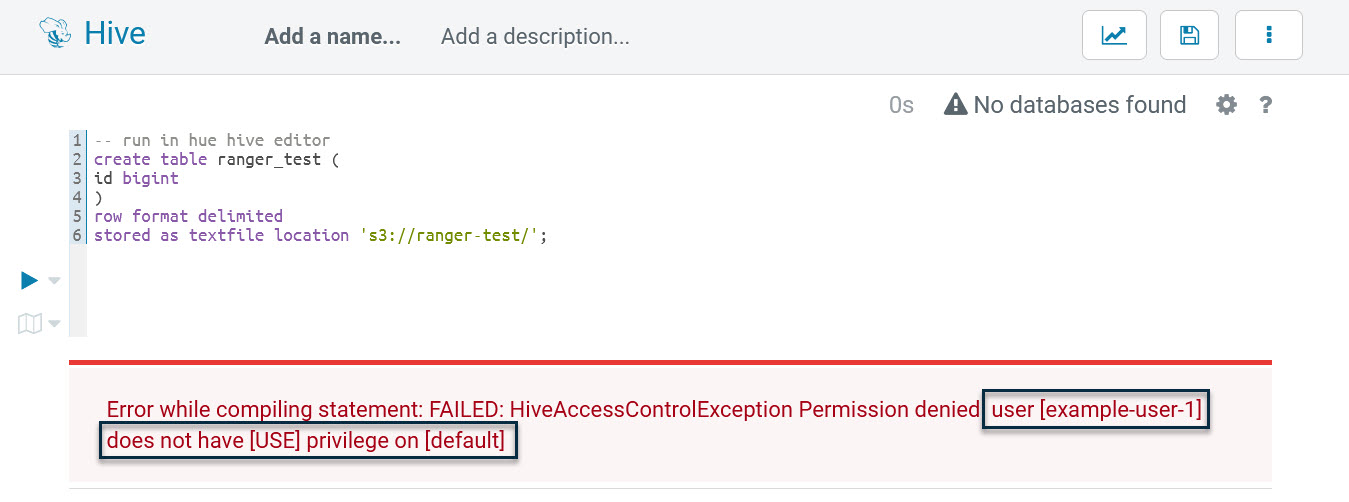
It shows that example-user-1 is blocked by database-related permissions. This proves the Hive plugin is working. Let’s go back to Ranger and add a Hive policy named “all - database, table, column” as follows:
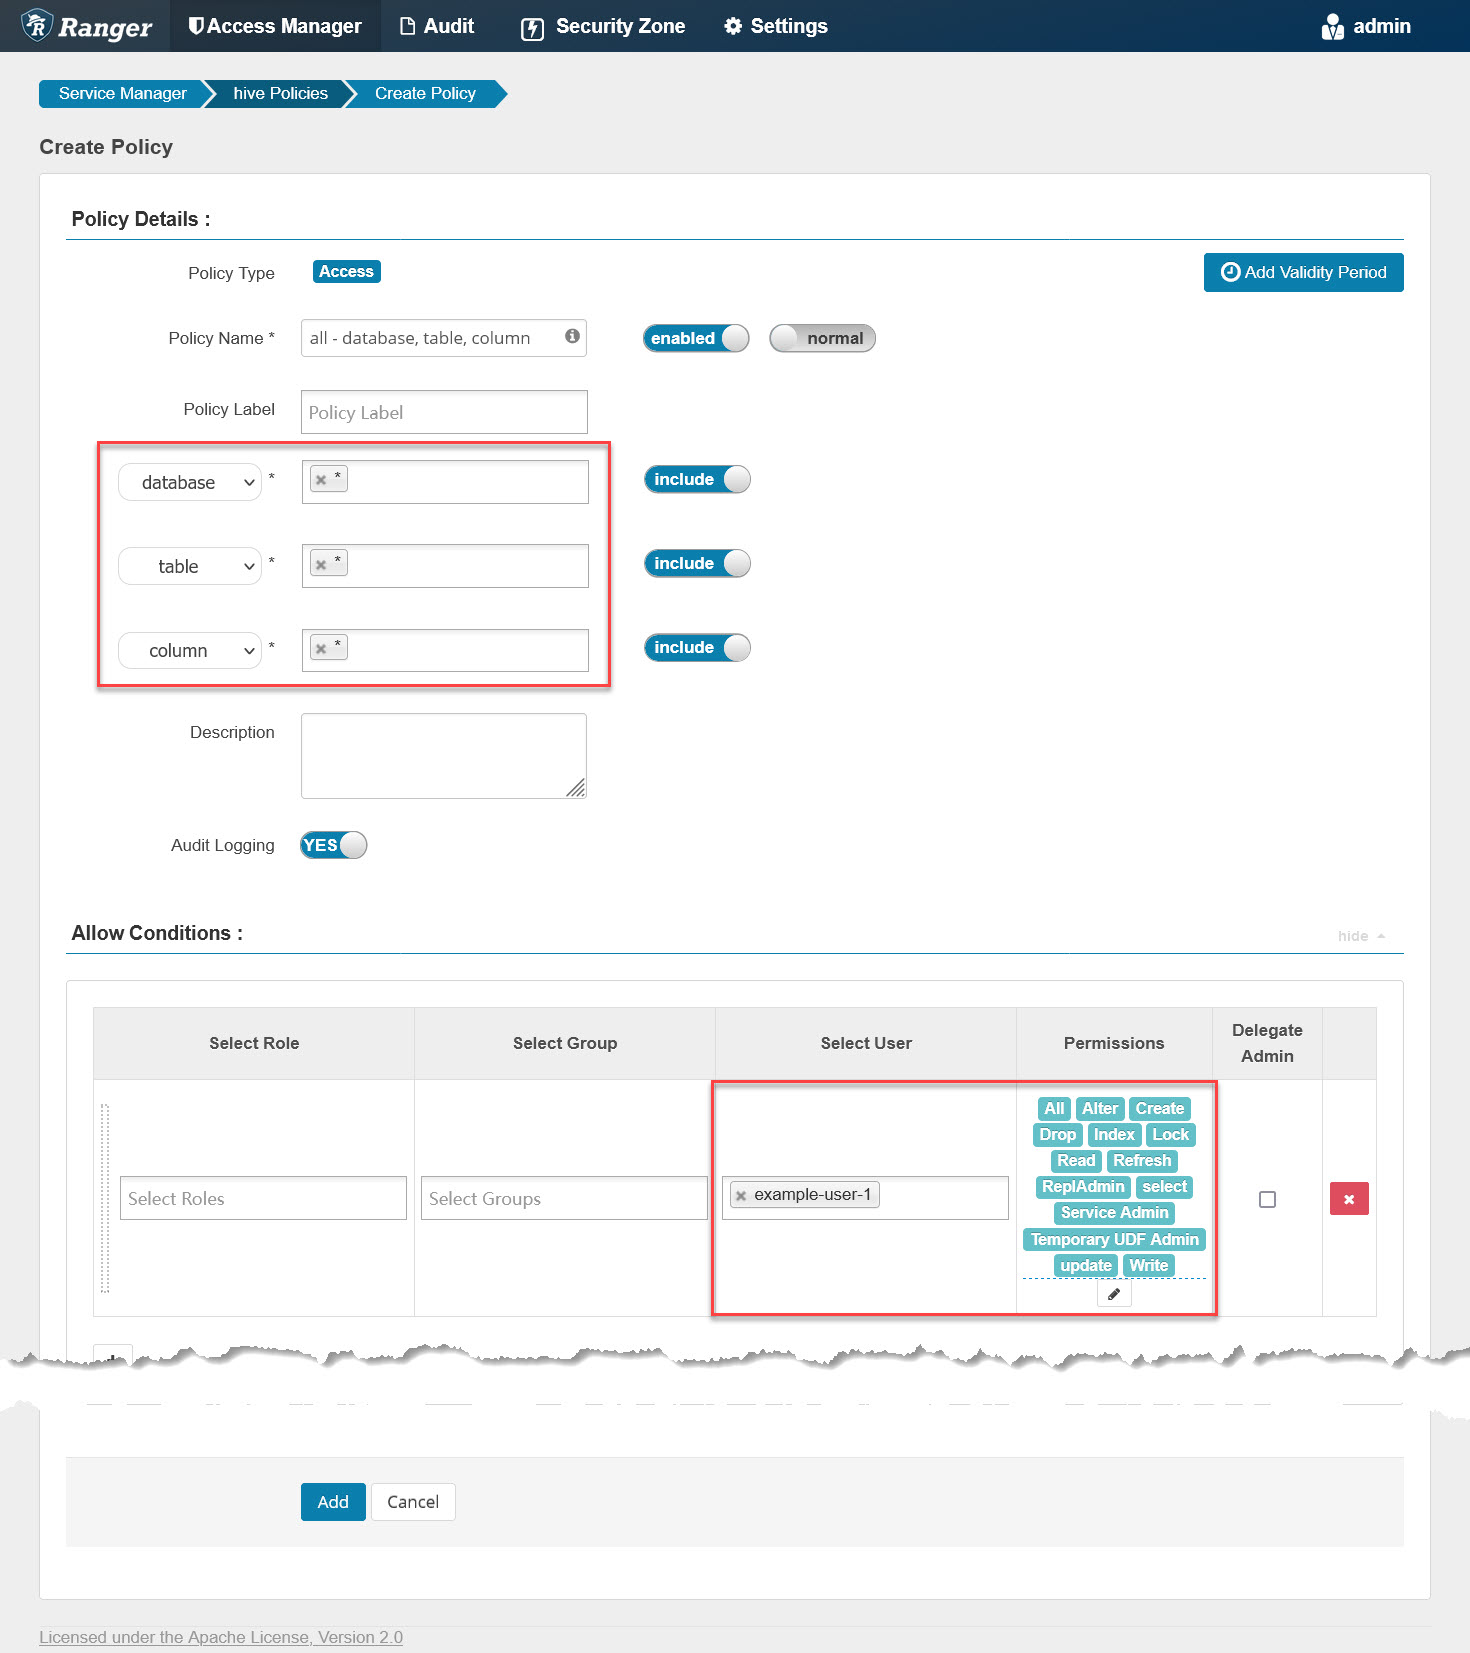
It grants example-user-1 all privileges on all databases, tables, and columns. Next, check the policy file again on the master node with the previous command line. Once updated, go back to Hue, re-run that SQL, and we will get another error at this time:
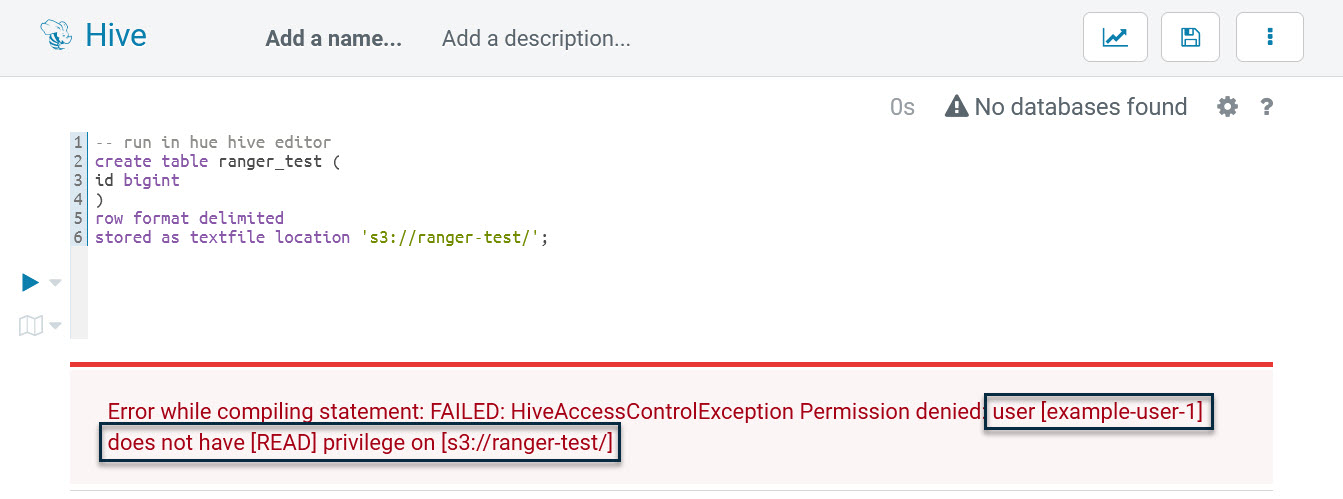
As shown, the SQL is blocked when reading “s3://ranger-test.” Actually, example-user-1 has no permissions to access any URL, including “s3://.” We need to grant url-related permissions to this user, so go back to Ranger again and add a Hive policy named “all - url” as follows:
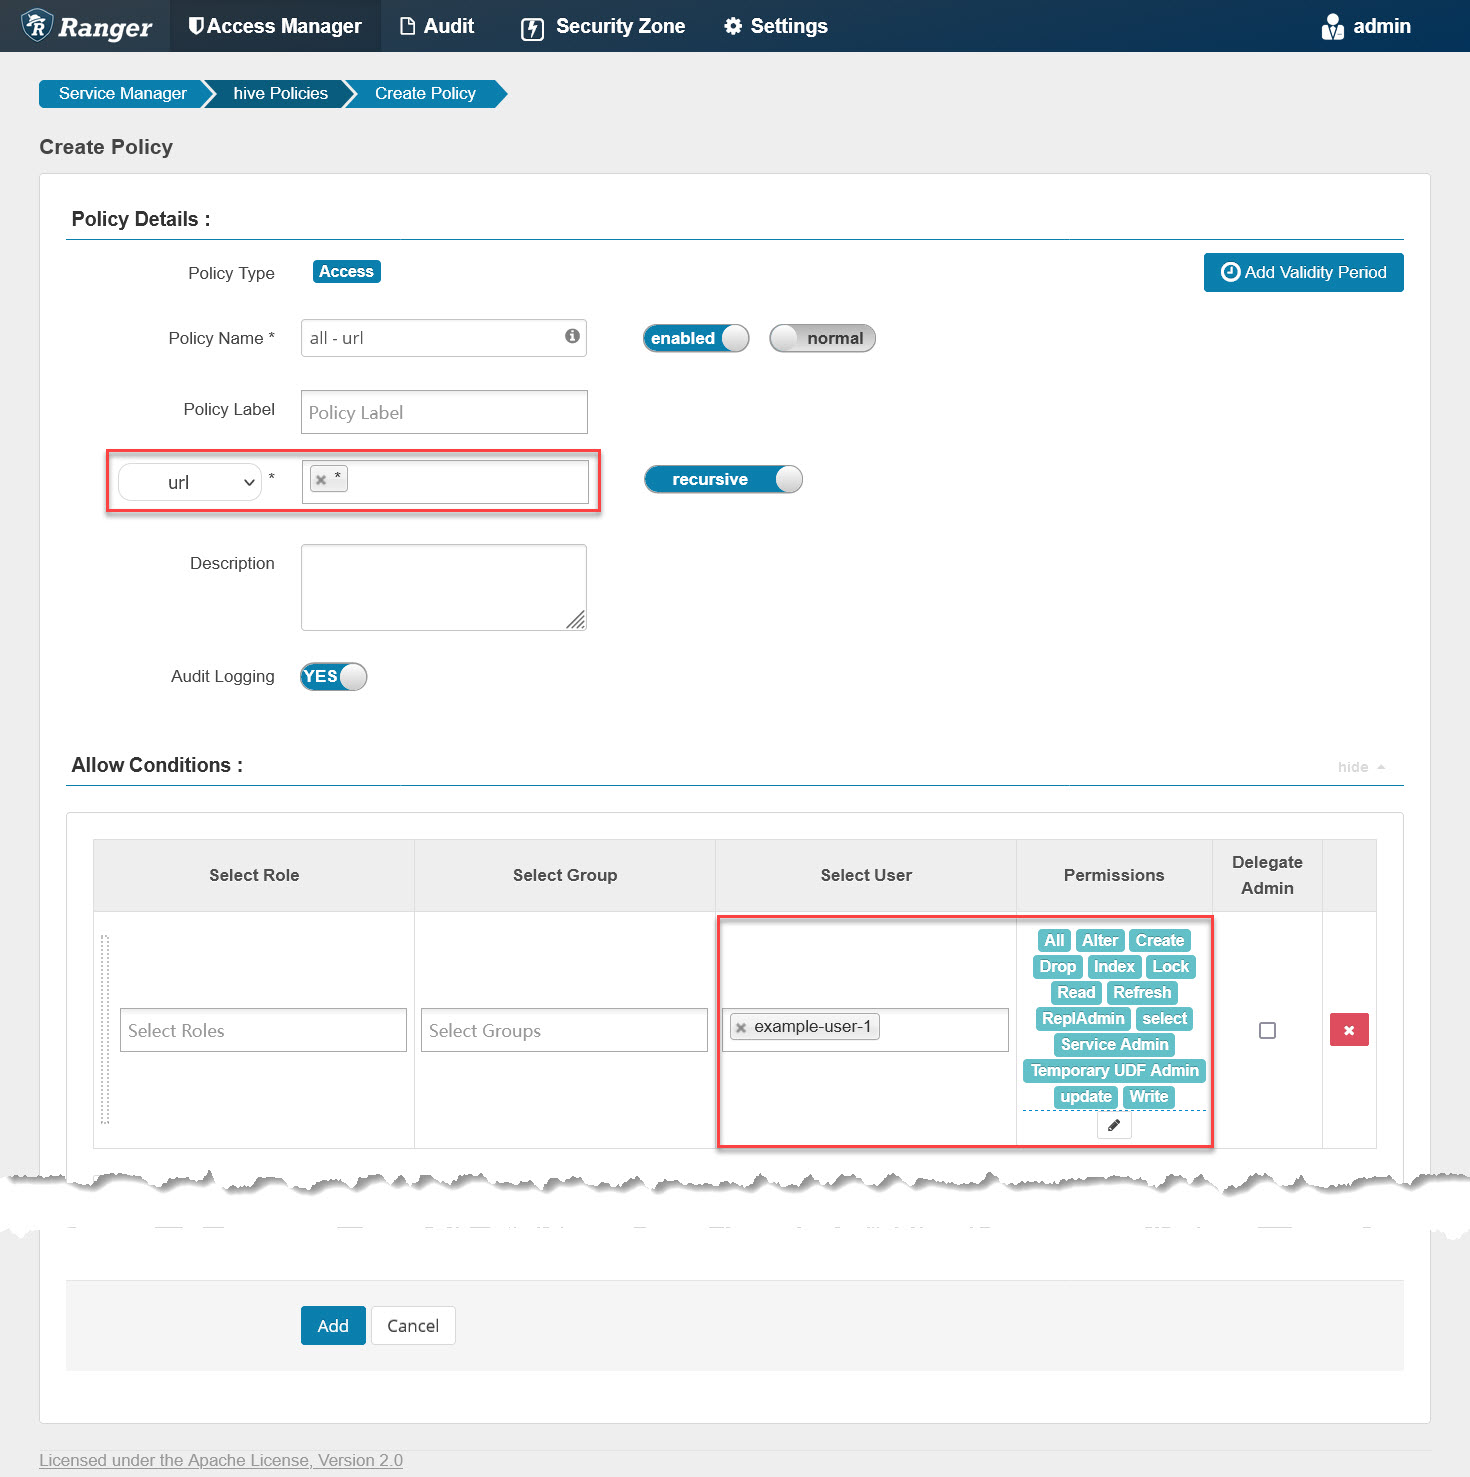
It grants example-user-1 all privileges on any URL, including “s3://.” Next, check the policy file again, switch to Hue, and run that SQL a third time; it will go well as follows:
At the end, to prepare for the next EMRFS/Spark verification, we need to insert some example data into the table and double-check if example-user-1 has full read and write permissions on the table:
insert into ranger_test(id) values(1);
insert into ranger_test(id) values(2);
insert into ranger_test(id) values(3);
select * from ranger_test;
The execution result is:
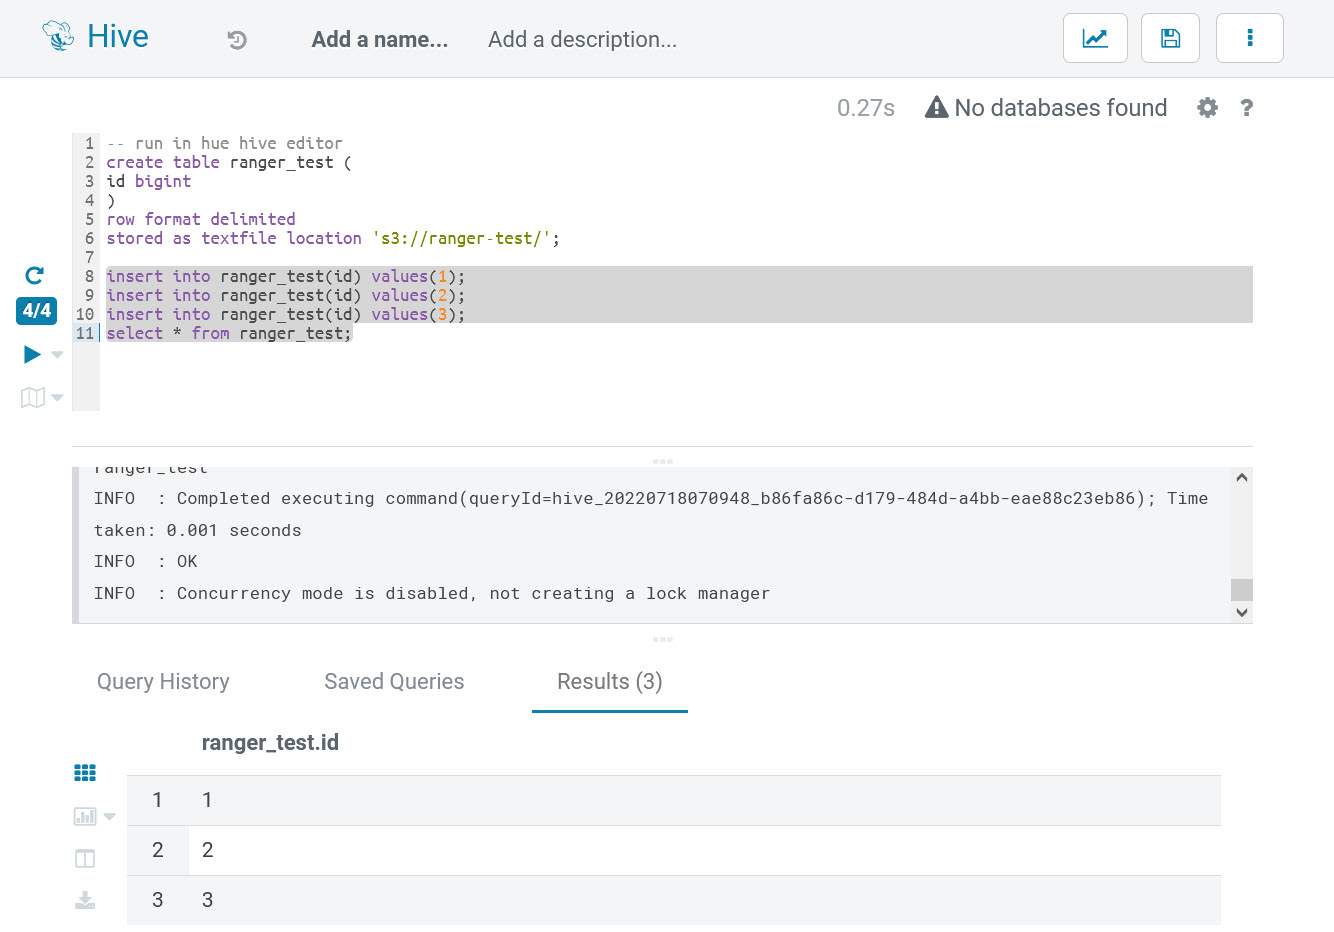
By now, Hive access control verifications have passed.
3.2 EMRFS (S3) Access Control Verification
Log into Hue with the account “example-user-1,” open Scala editor, and enter the following Spark codes:
# run in scala editor of hue
spark.read.csv("s3://ranger-test/").show;
This line of codes try to read the files on S3, but it will run into the following errors:
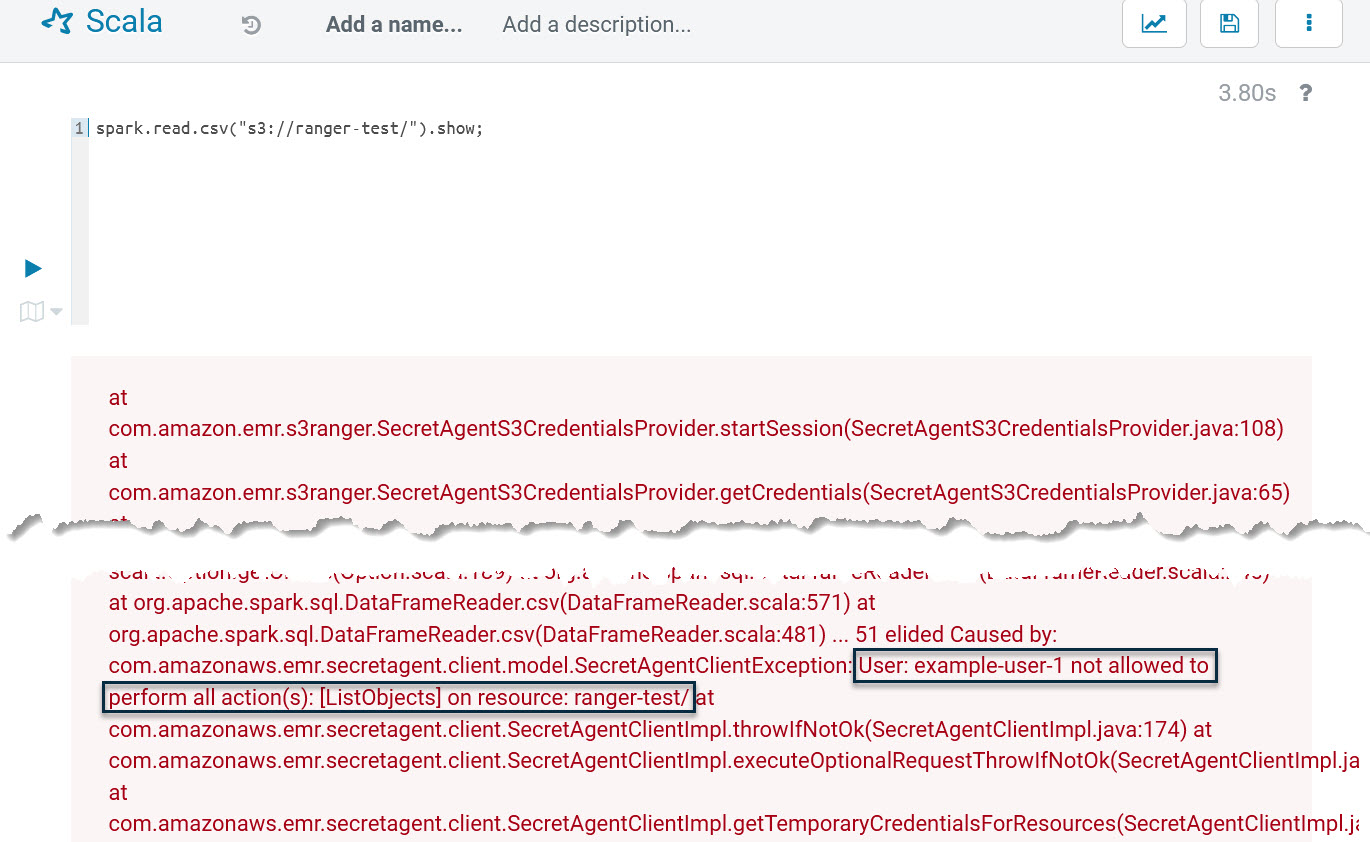
It shows that example-user-1 has no permission on the S3 bucket “ranger-test.” This proves EMRFS plugin is working. It successfully blocked unauthorized S3 access. Let’s log into Ranger and add an EMRFS policy named “all - ranger-test” as follows:
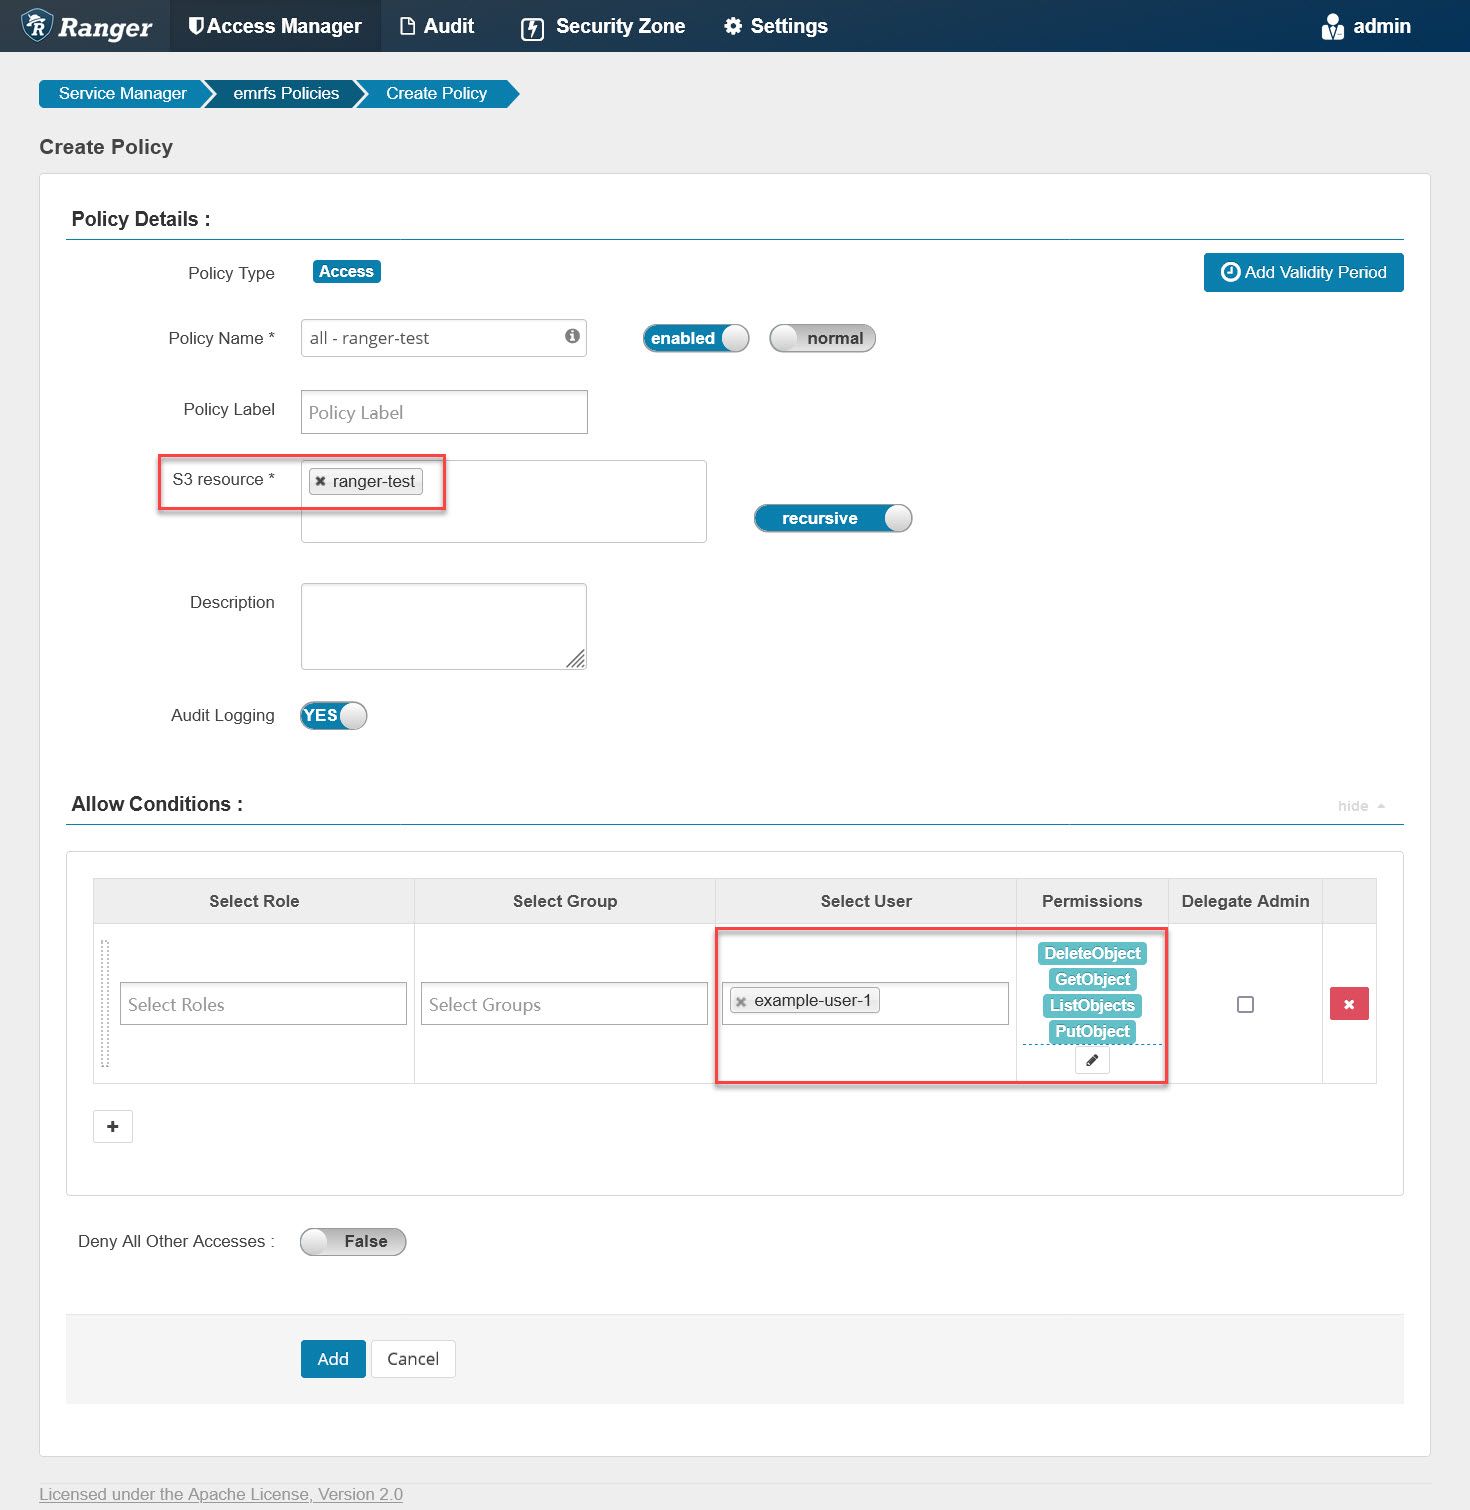
It will grant example-user-1 all privileges on the “ranger-test” bucket. Similar to checking the Hive policy file, we can also run the following command to see if the EMRFS policy file is updated:
# run on master node of emr cluster
for i in {1..10}; do
    printf "\n%100s\n\n"|tr ' ' '='
    sudo stat /emr/secretagent/ranger_policy_cache/emrS3RangerPlugin_emrfs.json
    sleep 3
done
After updated, go back to Hue, re-run the previous Spark codes, and it will succeed as follows:
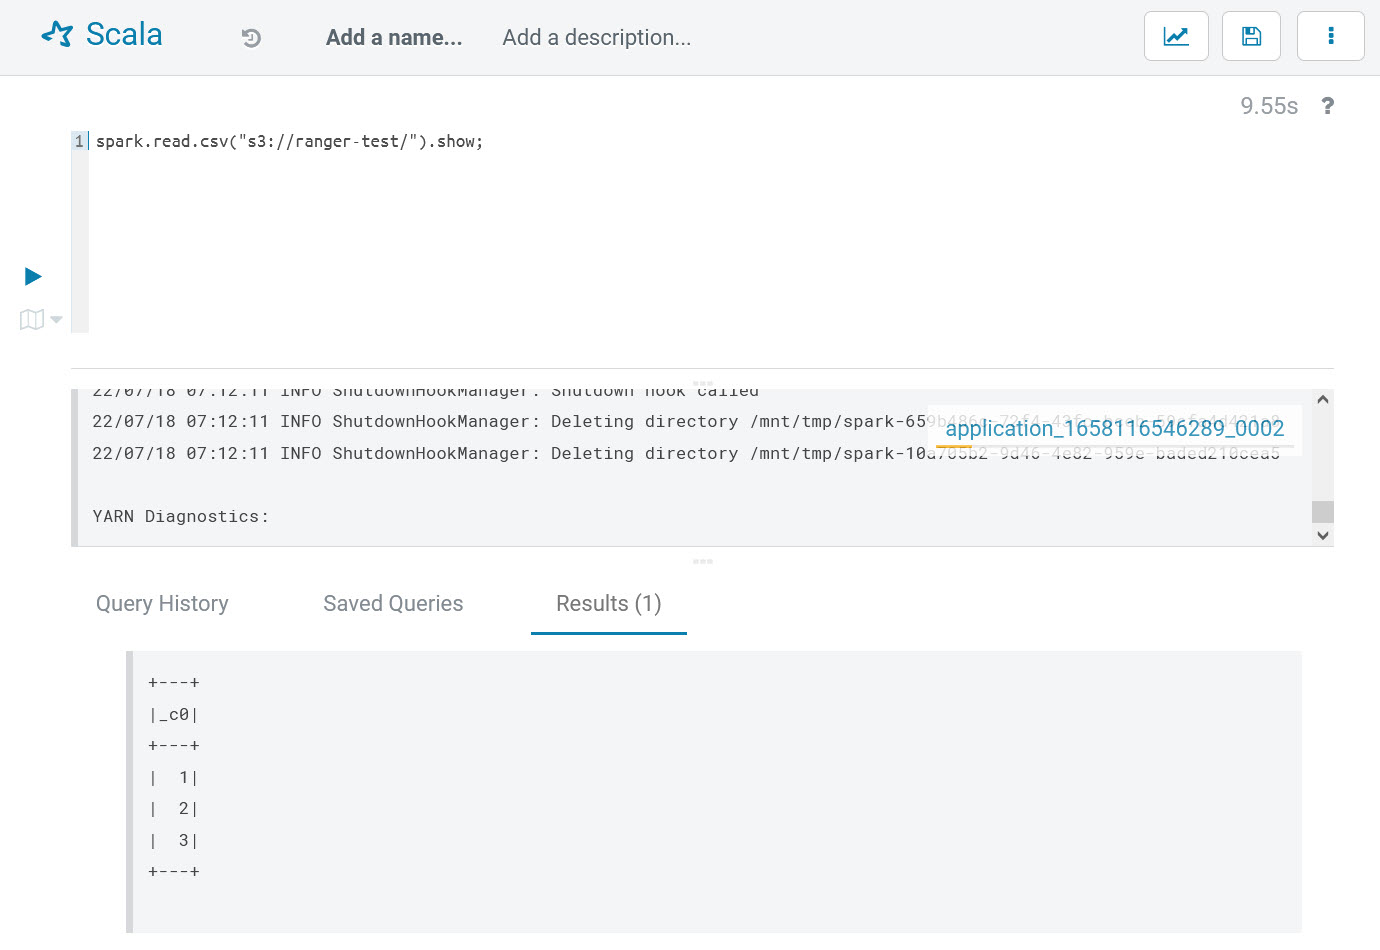
By now, the EMRFS access control verifications are passed.
3.3 Spark Access Control Verification
Log into Hue with the account “example-user-1,” open Scala editor, and enter the following Spark codes:
# run in scala editor of hue
spark.sql("select * from ranger_test").show
This line of code tries to run the ranger_test table via Spark SQL, but it will run into the following errors:

It shows that the current user has no permission on the default database. This proves the Spark plugin is working; it successfully blocked unauthorized database/tables access.
Let’s log into Ranger and add a Spark policy named “all - database, table, column” as follows:
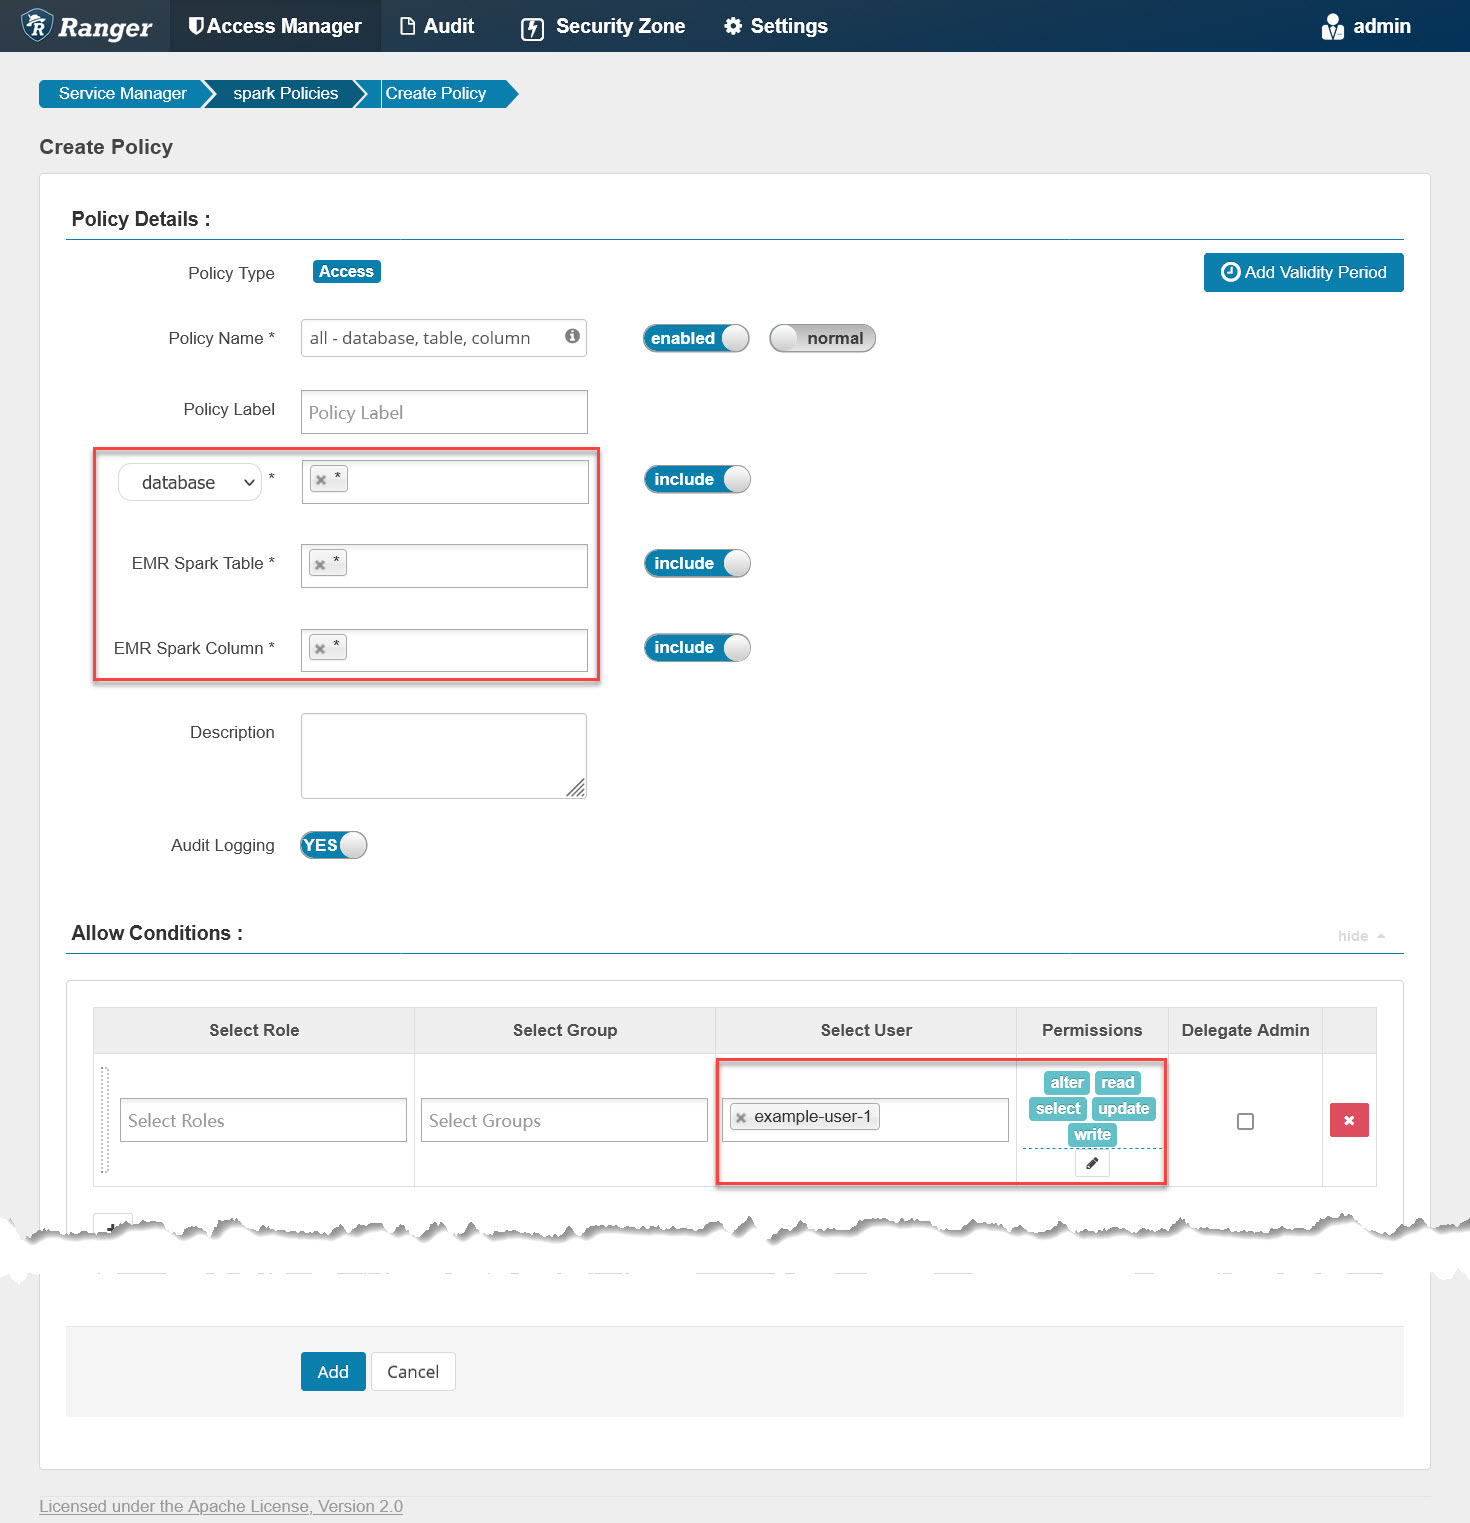
It will grant example-user-1 all privileges on all databases/tables/columns. Similar to checking the Hive policy file, we can also run the following command to see if the Spark policy file is updated:
# run on master node of emr cluster
for i in {1..10}; do
    printf "\n%100s\n\n"|tr ' ' '='
    sudo stat /etc/emr-record-server/ranger_policy_cache/emrSparkRangerPlugin_spark.json
    sleep 3
done
After updating, go back to Hue, re-run the previous Spark codes, and it will succeed as follows:
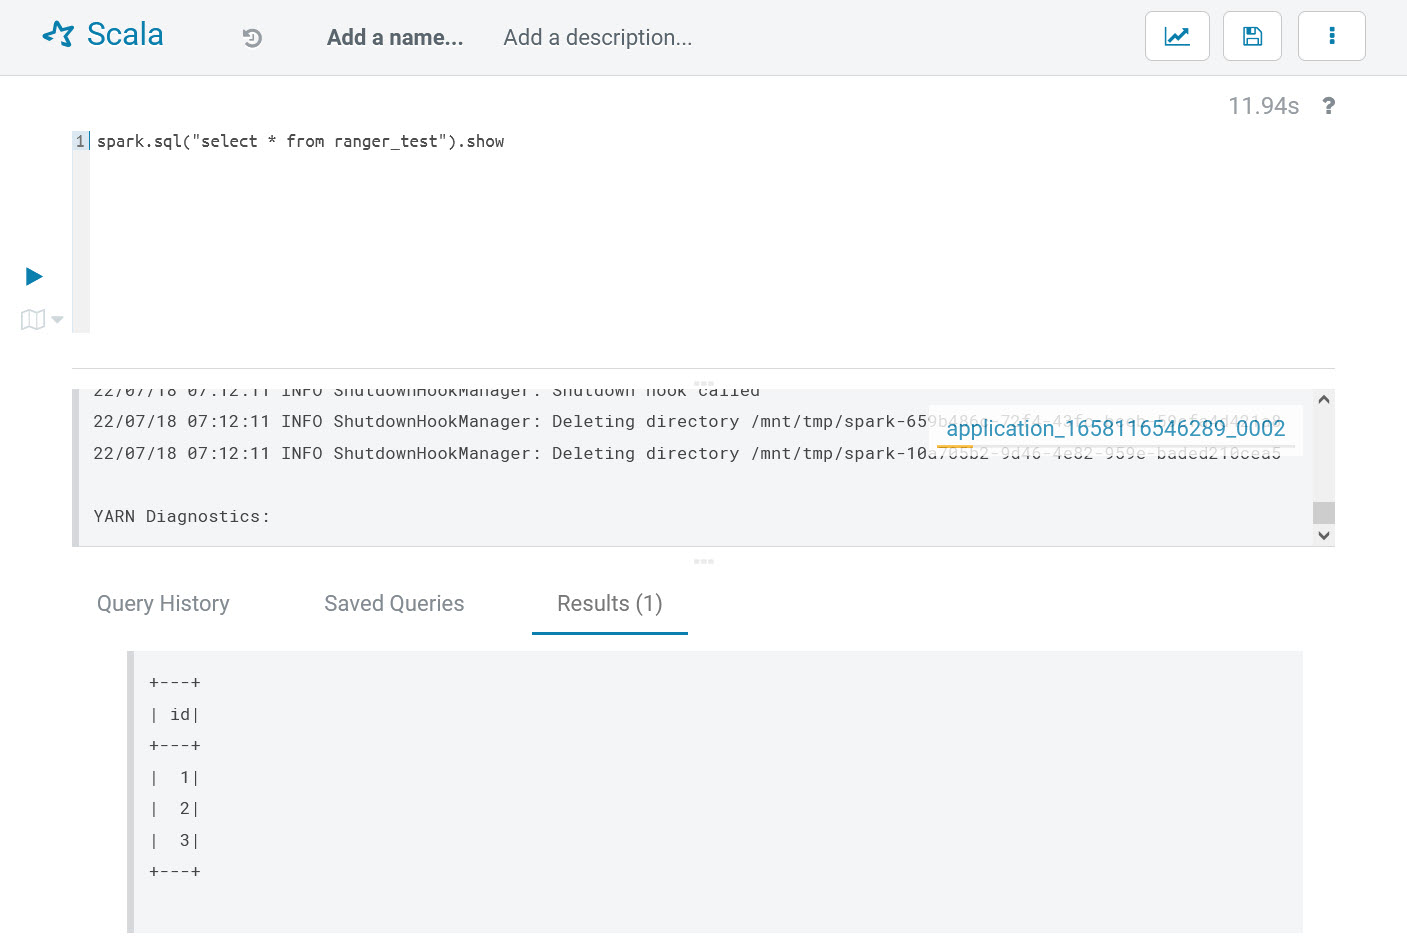
By now, the Spark access control verifications are passed.
4. Appendix
The following is parameter specification:
| Parameter | Comment |
|---|---|
| --region |
The AWS region.
|
| --access-key-id |
The AWS access key id of your IAM account.
|
| --secret-access-key |
The AWS secret access key of your IAM account.
|
| --ssh-key |
The SSH private key file path.
|
| --solution |
The solution name, accepted values ‘open-source’ or ‘EMR-native.’
|
| --auth-provider |
The authentication provider, accepted values ‘AD’ or ‘OpenLDAP.’
|
| --openldap-host |
The FQDN of the OpenLDAP host.
|
| --openldap-base-dn |
The Base DN of OpenLDAP, for example: ‘dc=example,dc=com,’ change it according to your env.
|
| --openldap-root-cn |
The cn of the root account, for example: ‘admin,’ change it according to your env.
|
| --openldap-root-password |
The password of the root account, for example: ‘Admin1234!,’ change it according to your env.
|
| --ranger-bind-dn |
The Bind DN for Ranger, for example: ‘cn=ranger,ou=services,dc=example,dc=com.’ This should be an existing DN on Windows AD/OpenLDAP. Change it according to your env.
|
| --ranger-bind-password |
The password of Ranger Bind DN, for example: ‘Admin1234!,’ change it according to your env.
|
| --openldap-user-dn-pattern |
The DN pattern for Ranger to search users on OpenLDAP, for example: ‘uid={0},ou=users,dc=example,dc=com,’ change it according to your env.
|
| --openldap-group-search-filter |
The filter for Ranger to search groups on OpenLDAP, for example: ‘(member=uid={0},ou=users,dc=example,dc=com),’ change it according to your env.
|
| --openldap-user-object-class |
The user object class for Ranger to search users, for example: ’inetOrgPerson,’ change it according to your env.
|
| --hue-bind-dn |
The Bind DN for Hue, for example: ‘cn=hue,ou=services,dc=example,dc=com.’ This should be an existing DN on Windows AD/OpenLDAP. Change it according to your env.
|
| --hue-bind-password |
The password of the Hue Bind DN, for example: ‘Admin1234!,’ change it according to your env.
|
| --example-users |
The example users to be created on OpenLDAP and Kerberos to demo Ranger’s feature. This parameter is optional, if omitted, no example users will be created.
|
| --ranger-bind-dn |
The Bind DN for Ranger, for example: ‘cn=ranger,ou=services,dc=example,dc=com.’ This should be an existing DN on Windows AD/OpenLDAP. Change it according to your env.
|
| --ranger-bind-password |
The password of Bind DN, for example: ‘Admin1234!.’ Change it according to your env.
|
| --hue-bind-dn |
The Bind DN for Hue, for example: ‘cn=hue,ou=services,dc=example,dc=com.’ This should be an existing DN on Windows AD/OpenLDAP. Change it according to your env.
|
| --hue-bind-password |
The password of Hue Bind DN, for example: ‘Admin1234!,’ change it according to your env.
|
| --sssd-bind-dn |
The Bind DN for SSSD, for example: ‘cn=sssd,ou=services,dc=example,dc=com,’ this should be an existing DN on Windows AD/OpenLDAP. Change it according to your env.
|
| --sssd-bind-password |
The password of SSSD Bind DN, for example: ‘Admin1234!.’ Change it according to your env.
|
| --ranger-plugins |
The Ranger plugins to be installed, comma separated for multiple values. For example: ‘emr-native-emrfs, emr-native-spark, emr-native-hive,’ change it according to your env.
|
| --skip-configure-hue |
Skip to configure Hue, accepted values ‘true’ or ‘false.” The default value is ‘false.’
|
| --skip-migrate-kerberos-db |
Skip to migrate the Kerberos database, accepted values ‘true’ or ‘false.’ The default value is ‘false.’
|
Opinions expressed by DZone contributors are their own.
Comments