AWS Basics: Bastion Hosts and NAT
In this post, we will set up Bastion Host and NAT instances in our VPC. We will learn why we need those and some of the options available to us.
Join the DZone community and get the full member experience.
Join For FreeIntroduction
In my previous post on AWS Elastic Compute Cloud (EC2) Basics, we launched two EC2 instances. One is a public subnet and one is a private subnet. With security groups configured, we were able to SSH to EC2 in a public subnet.
In this post, we will continue and set up Bastion Host and NAT instances in our VPC. We will learn why we need those and some of the options available to us.
Here is how our architecture is currently set up, for the reference:
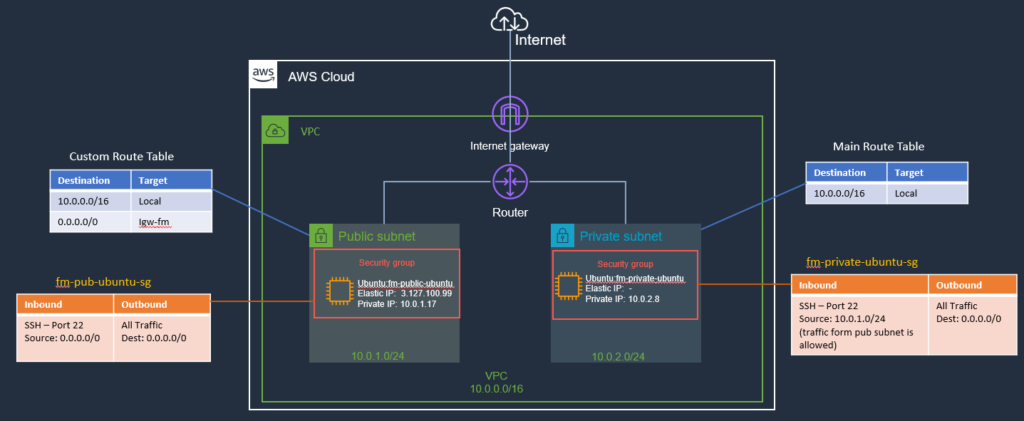
Now, if we want to SSH into EC2 instance on the private subnet from our home/office (or using a development machine), currently we can’t. Our instance has no public IP, it is in a Private Subnet (no direct route from the internet). This is where we can use a Bastion Server.
Bastion Host
Bastion servers are instances that sit within your public subnet and are typically accessed using SSH or RDP. The purpose of a bastion host is to restrict access to a private network from an external network.
Once remote connectivity has been established with the bastion host, it then acts as a ‘jump–server,’ allowing you to use SSH or RDP to login to other instances (within private subnets) deeper within your network.
In this post, we will set up a bastion server in our public subnet (so internet traffic is possible).
First, we will connect to this bastion server, from there, we can then connect to a private EC2 instance (remember the rule in the security group we configured in the previous post; we allowed traffic from within our VPC to port 22 on the private EC2 instance).
Setting Up a Bastion Host
It’s Agatha all along. We already have a bastion host.
Let me explain this, in the previous post, we launched an EC2 instance in a public subnet and we already have configured an Internet Gateway for VPC and configured route in route table to allow incoming traffic. Later, we launched an Ubuntu EC2 instance in a private subnet and configured its security group to allow incoming traffic on port SSH from the public subnet and that is all that was needed on the connection level. I just did not mention that in the previous post, to not get us distracted from those details. So our current EC2 instance in the public subnet can be used as a Bastion Host.
The idea is that we SSH to the bastion instance using its Elastic IP (or public IP). Then from the Bastion instance, SSH into the private instance using its Private IP.
SSH Into Bastion Host to Private EC2 Instance
Ok, let’s try this. First, we need to SSH into the EC2 public instance (we have seen previously, how to do that, please check that post if you need more info).
Once we are in the EC2 machine (bastion-host), from there, we can try to SSH into the EC2 instance on a private subnet, run the following SSH command:

Notice, that we still can not SSH into the private instance. The reason for that is that we also need a keypair file for connection, which is right now missing on the EC2 instance (Bastion Host) on our public subnet.
So, one thing we can do is to copy the keypair file on the bastion host using the following command:
scp -i ./fm-keypair.pem fm-keypair.pem ubuntu@3.127.100.99:/home/mykeysWe can check that the keypair file is now copied to EC2:

Now, if we try to SSH using this key file:
ssh -i ./fm-keypair.pem ubuntu@10.0.2.8
This may result in the following error message, ok it is trying, but still can’t SSH.

To fix this, we need to set permission on the key-pair file using chmod as shown below:
chmod 400 ./fm-keypair.pem
This command will change the permission of that file so it is only readable by us.
Ok, let’s try again to SSH to the private EC2 instance and this time we are in (notice the private IP changes in the prompt):
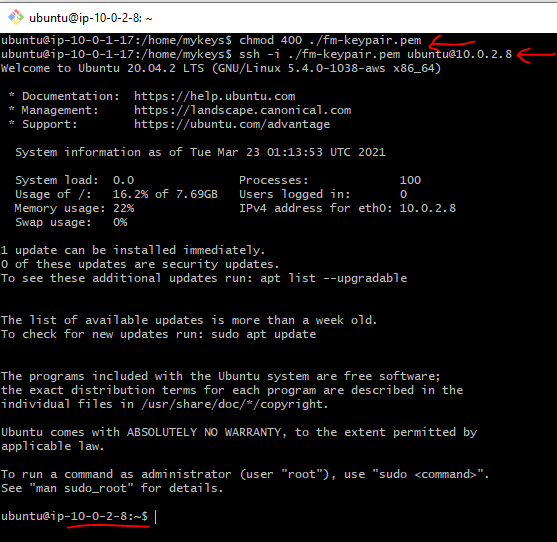
Ok, so, the bastion host allowed us to connect to the EC2 instance in a private subnet. We can now use it to jump to EC2 instances in the private subnet.
Outbound Internet Access From Private EC2 Instance
Ok, we are able to connect to private EC2 from the internet via bastion host. Incoming traffic is working as expected.
Now, I would like to install some software, e.g., PostgreSQL on this private EC2 instance from the internet (you may not have this requirement), meaning I want to access the internet from this instance. Can we do that? Let’s try this next:
I tried to curl google.com from a private EC2 instance (you can maybe try the apt-get update command instead):

As you can see, it just hangs there and nothing happens.
This is expected and is a good thing. If you remembered from previous posts, the whole point of the private subnet is that it shall not be connected to the internet directly (Inbound/Outbound) and this is what we are experiencing here.
Now, without the internet, we can’t do much on this instance. For example, I can not download the package from the internet. So we need a way to allow outbound internet traffic from this private EC2 instance.
Bastion host's job was to provide us a means to SSH into a private instance and we are able to do that. Now, if we want to go out to the internet from a private EC2 instance, we can use a NAT instance or NAT Gateway to give access to the internet without allowing inbound access to it.
What is a NAT Instance?
A NAT (Network Address Translation) instance is, as a bastion host, an instance that lives in your public subnet.
A NAT instance, however, allows your private instances outgoing connectivity to the Internet, while at the same time blocking inbound traffic from the Internet.
The main reason to configure NAT instances is to allow private instances to access the Internet for important operating system updates, It is used for purposes like patching your OS, etc.
Setting Up a NAT Instance
It is actually very simple to set up a NAT instance.
First, we will launch an EC2 instance in our public subnet. We also need to allocate an Elastic IP address and assign it to the NAT instance as well. This will allow that our instance is able to reach the internet. We will be using a special amazon image instead of ubuntu for our NAT instance.
Second, in order for our private EC2 instance to use the NAT instance to get to the internet, we need to configure a route in the Route table associated with our private subnet, pointing to the NAT instance as a target.
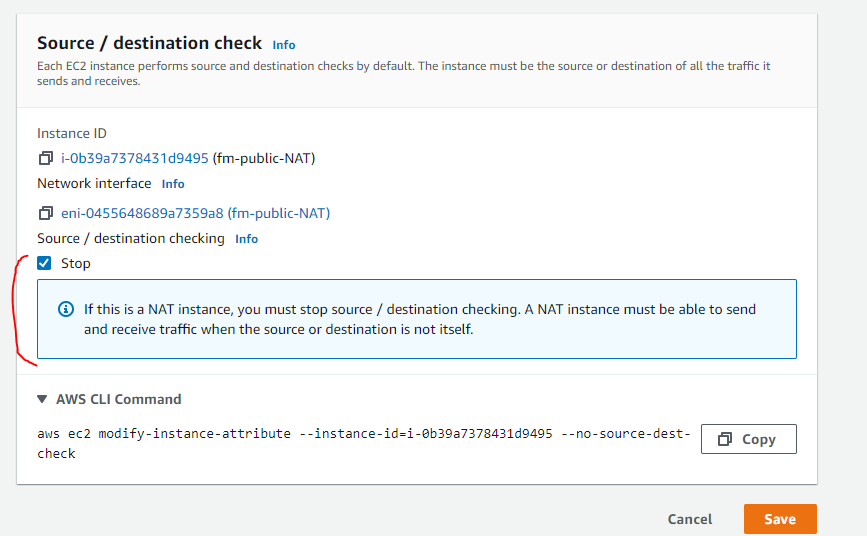
Third, we need to disable the IP source/destination check on the NAT instance.
So Traffic flow will be from private EC2 –> Route Table –> NAT instance –>Internet Gateway –> Internet.
Question:
Can we use our bastion-host as a NAT instance as well?
Answer:
Yes, that is totally fine. However, NAT instance also requires some IP table configurations to allow this behavior, and currently, I am using Ubuntu for the bastion server and it will require me to run some bash commands on it to set up the IP table entries and I really don’t wanna do this at this time.
Another easy option is that there are some pre-configured amazon images you can use as a base for NAT instance and I am going to use this option for NAT instance (Later, maybe I will use this instance as a bastion host and remove the ubuntu EC2 from the public subnet all together). For now, let’s keep things simple and use this pre-configured Amazon AMI-based EC2 instance.
Launch the EC2 Instance (NAT Instance)
So, launch the EC2 instance wizard from the web console. Use the following image for NAT instance (you can use ami id in the search field to search for this instance):

Select the right VPC and choose Public Subnet for our NAT instance (like our bastion-host) and launch the instance. If you like you can try to SSH into this instance:

So our instance is running and all the needed IP table stuff is already done for us.
Configure the Route for Private Subnet Route Table
Next, go to the route table for the Private subnet and add one more route (0.0.0.0/0) and for the target select the NAT Instance ENI we just created. This way we are configuring a catch-all route in our private subnet and sending traffic to NAT instance which is in the public subnet:

So, any time a private EC2 instance makes an internet request, it will go to ENI of NAT instance and NAT instance being in the public subnet and have a route configured to internet gateway will be able to reach out on the internet.
Now, if we launch more EC2 instances in the private subnet, they can all use this mechanism to reach out to the internet. So NAT instance will be providing a single public IP for all these private IPs.
Disable Source/Destination Checks for NAT instance
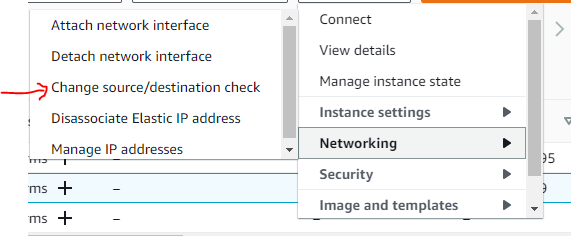
Select the NAT instance we created above from the EC2 web console dashboard and then from the Menu bar, choose the option to Change source/destination check as shown below:
Select the Stop checkbox if it is not selected and there is also some info about why this is needed.
Now, let's try the curl command again from private EC2 Instance and this time, it works:

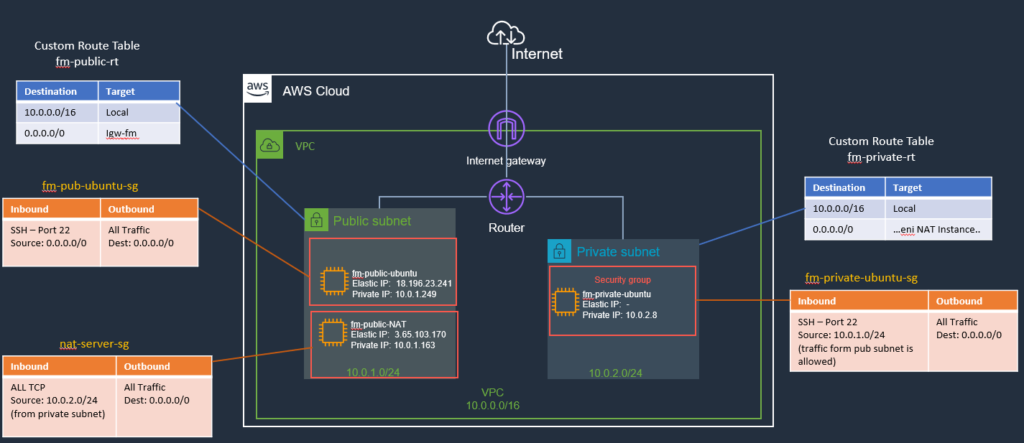
Cool, our NAT instance is also set up now. Let’s look at the updated architecture diagram next.
Architecture Diagram
I also updated some of the names, security groups, route tables, and Inbound/Outbound rules. I will cover Security Groups in detail in a later post. Here is how our architecture currently looks like:
Summary
Bastion Host and NAT instance both help secure your AWS infrastructure by disallowing/limiting access to your instances over Cloud. Feel free to ask if you have any questions or comments. Till next time, Happy Coding!
Published at DZone with permission of Jawad Hasan Shani. See the original article here.
Opinions expressed by DZone contributors are their own.

Comments