Configuring Database Connection Parameters Dynamically In WSO2 EI 7.1.0
Configuring database connection parameters dynamically in WSO2 EI 7.1.0, aimed at integration developers who are looking to integrate databases in WSO2 EI 7.X.
Join the DZone community and get the full member experience.
Join For FreeThis article shows how we can configure database connection parameters dynamically in WSO2 EI 7.1.0. This is useful when we promote the integration artifacts across environments so that the connection parameters are read dynamically for each environment.
This tutorial is aimed at integration developers who are looking to integrate databases in WSO2 EI 7.X. As there aren't many details anywhere on passing database connection parameters in a dynamic way, this article will benefit in developing database integrations in WSO2 EI 7.X.
Prerequisites
1. WSO2 EI 7.1.0.
2. WSO2 Integration Studio.
We can configure the parameters in 2 ways in EI – 1) using configuration files 2) using registry entries.
1) Using Configuration Files
Implementation Steps:
1. Create a folder named dev under the <EI_HOME>/conf.
2. Create a properties file named dev.properties and store it under <EI_HOME>/conf/dev.
3. Add the database connection parameters in the dev.properties file as shown below (MySQL DB is being used in this use-case).
MySQLUsername=root
MySQLPassword=password
MySQLConnectionUrl=jdbc:mysql://<DBHost_Name>:3306/<DBSchema_Name>
4. Update the below properties file path in the product startup script (micro-integrator.bat or micro-integrator.sh) available under <EI_HOME>/bin directory to point to the dev.properties file created in Step 2. By default, the value is “default,” which means the configuration parameters are read from the file.properties file present under <EI_HOME>/conf directory. After this update, the parameters will be read from the dev.properties file.
In micro-integrator.sh:
-Dproperties.file.path=<EI_HOME>/conf/dev/dev.propertiesIn micro-integrator.bat:
-Dproperties.file.path="<EI_HOME>\conf\dev\dev.properties”5. In WSO2 Integration Studio, we can now dynamically read the DB connection parameters from the properties file created above by adding the below connection configuration for DBReport, DBLookup mediators, and DSS (Data Services Server), respectively.
DB Report:
<dbreport>
  <connection>
    <pool>
      <driver>com.mysql.jdbc.Driver</driver>
      <url>$FILE:MySQLConnectionUrl</url>
      <user>$FILE:MySQLUsername</user>
      <password>$FILE:MySQLPassword</password>
    </pool>
  </connection>
</dbreport>
DB Lookup:
<dblookup>
  <connection>
    <pool>
      <driver>com.mysql.jdbc.Driver</driver>
      <url>$FILE:MySQLConnectionUrl</url>
      <user>$FILE:MySQLUsername</user>
      <password>$FILE:MySQLPassword</password>
    </pool>
  </connection>
</dblookup>
DSS:
<data transports="http https" name="DSSSample" serviceGroup="" serviceNamespace="">
  <config id="SampleDS">
    <property name="driverClassName">com.mysql.jdbc.Driver</property>
    <property name="url">$FILE:MySQLConnectionURL</property>
    <property name="username">$FILE:MySQLUsername</property>
    <property name="password">$FILE:MySQLPassword</property>
  </config>
  <query>
  -----------------
  </query>
  <resource>
  -----------------
  </resource>
</data>
6. Now, on deploying the integration CAR file on the EI server, the DB connection parameters are read dynamically from the configuration file created earlier.
NOTE: We can create different properties files for each environment, like qa.properties, prod.properties, and so on, and store the connection parameters for each environment separately. And then point the EI server to the corresponding environment's property file.
2) Using Registry Entries
Implementation Steps:
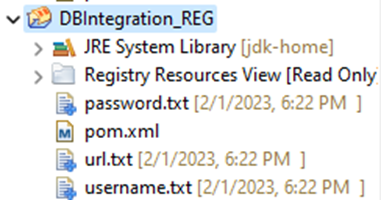
1. Create different text files and store values for each DB parameter, i.e., DB URL, username, password, etc., on the machine where WSO2 Integration studio resides.
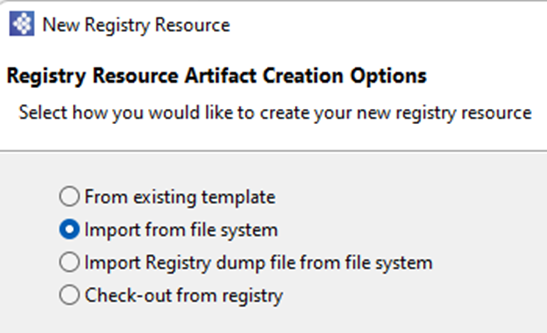
2. Create a registry project in Integration Studio and new registry resources under it for each DB parameter by importing the text files created in Step 1.


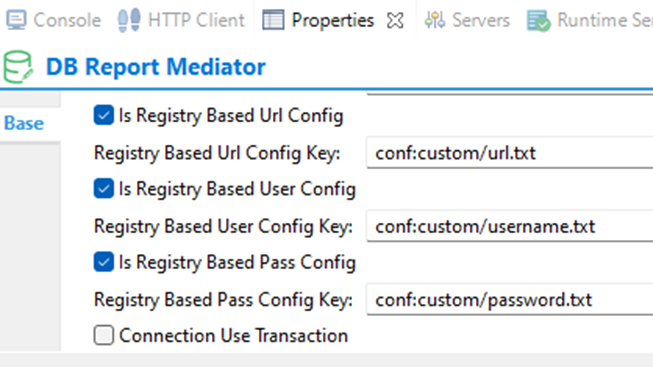
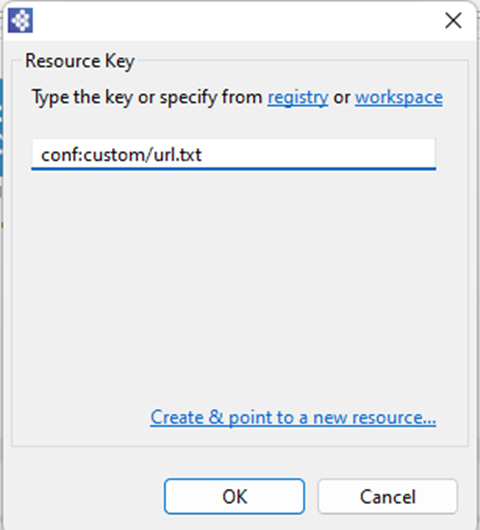
3. Now configure the DB Report/Lookup configuration to read DB parameter values from the registry as shown below.


Select the workspace in the above image.

4. In the source view, the DB Report configuration looks as below.
<dbreport>
  <connection>
    <pool>
      <driver>com.mysql.jdbc.Driver</driver>
      <url key="conf:custom/url.txt"></url>
      <user key="conf:custom/username.txt"></user>
      <password key="conf:custom/password.txt"></password>
    </pool>
  </connection>
</dbreport>
NOTE: From EI version 7.X.X onwards, there is no registry browser available in the micro-integrator dashboard as we had in EI 6.X.X versions in the management console. So, we must follow the above steps to configure the registry entries.
Opinions expressed by DZone contributors are their own.

Comments