Contextual Action Bar (CAB) in Android
Join the DZone community and get the full member experience.
Join For FreeBefore getting into the action bar and Contextual Action bar concept and the coding for it, let me take you through the concept of two ways to show contextual actions:
1. Floating Context Menu
2. Contextual Action Mode
1. Floating Context Menu
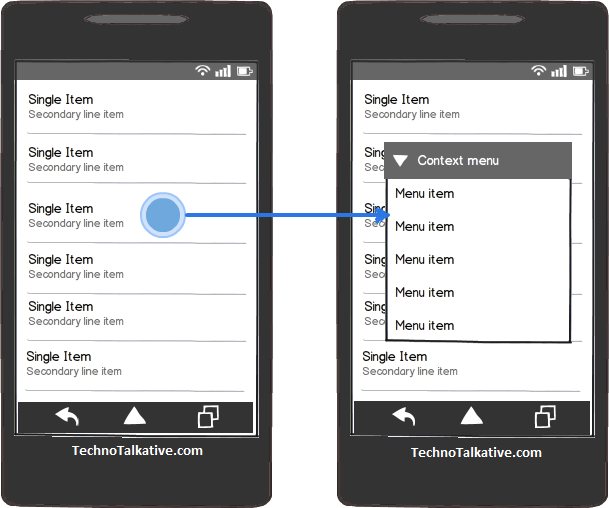
In earlier versions of Android, we were used to seeing almost all the apps having context menus ready for showing options (menu items) whenever the user performs a long press on any element. We can say long press gesture was universally used to display contextual actions in a context menu.
“Long press gesture – That is, a touch that’s held in the same position for a moment.”
Now, since Android 3.0, the purpose of Long press gesture has changed. It's now used to handle multi-select and contextual actions.
2. Contextual Action Mode
- The contextual action mode is a system implementation of ActionMode that focuses user interaction toward performing contextual actions.
- When a user enables this mode by selecting an item, a contextual action bar appears at the top of the screen to present actions the user can perform on the currently selected item(s).
ActionMode
Represents a contextual mode of the user interface. Action modes can be used to provide alternative interaction modes and replace parts of the normal UI until finished. Examples of good action modes include text selection and contextual actions.
Contextual Action Bar (CAB)
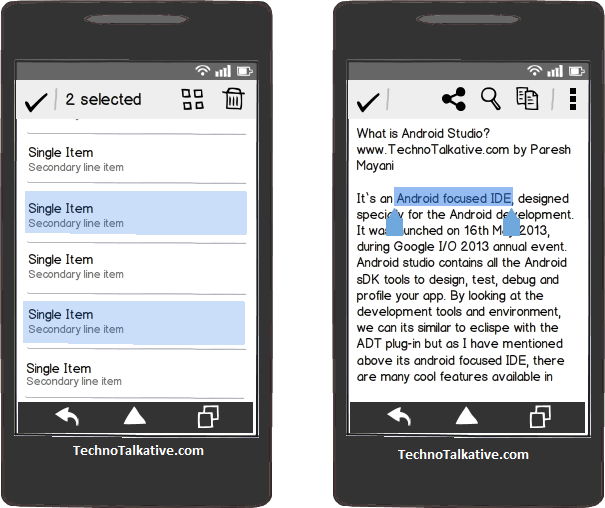
A Contextual action bar (CAB) is a temporary action bar that overlays the app’s action bar for the duration of a particular sub-task.
As I have mentioned earlier, CABs are used for tasks that involve acting on selected data or text. For example: Cut, Copy, Paste, Delete, or any other operations can be performed on single or batches of selected data.
As shown in snap-1 (left) above, the Contextual Action bar (Selection CAB) appears at the top bar as soon as the user performs the long press gesture. From here the user can:
- Select more items or deselect items by just touching them
- Select and trigger any actions displayed in the bar; the selected action triggers all the selected items. Then the action bar automatically dismiss itself.
- You can dismiss CAB in 3 ways:
- Deselect all the selected items
- Press the Back key from navigation bar
- Select the Check mark button (left) from the CAB. It doesn’t dismiss only the CAB, but also removes the selection on data which you have done.
When to Use Which? (Context Menu or CAB)
Now, I am sure there is no doubt regarding when to use Context Menu and when to CAB. As I have mentioned, if you are developing an app for android 3.0 or higher, you should use Contextual Action bar instead of displaying menu items in floating context menu.
And if you are providing compatibility to a lower Android version, you should fall back to a floating context menu on those devices.
Using Contextual Action Bar (CAB):
There are 2 designs by which you can implement Contextual Action bar:
- Enable CAB when the user selects a particular view
- Enable CAB whenever the user performs a long press gesture on particular view
1: Enable CAB When User Selects a Particular View
If you want to invoke the contextual action mode only when the user selects particular views, then follow the below steps:
- Implement the ActionMode.Callback interface. In its callback methods, you can specify the actions for the contextual action bar, respond to click events on action items, and handle other lifecycle events for the action mode.
- Call startActionMode() when you want to show the bar (such as when the user long-clicks the view).
Implement the ActionMode.Callback interface:
class ActionBarCallBack implements ActionMode.Callback {

        @Override
        public boolean onActionItemClicked(ActionMode mode, MenuItem item) {
            // TODO Auto-generated method stub
            return false;
        }

        @Override
        public boolean onCreateActionMode(ActionMode mode, Menu menu) {
            // TODO Auto-generated method stub
            mode.getMenuInflater().inflate(R.menu.contextual_menu, menu);
            return true;
        }

        @Override
        public void onDestroyActionMode(ActionMode mode) {
            // TODO Auto-generated method stub

        }

        @Override
        public boolean onPrepareActionMode(ActionMode mode, Menu menu) {
            // TODO Auto-generated method stub

            mode.setTitle("CheckBox is Checked");
            return false;
        }

    }
Call startActionMode()
MainActivity.this.startActionMode(new ActionBarCallBack());
For example:
Let’s build an example to enable Contextual action mode on the CheckBox selection.
package com.technotalkative.contextualactionbarsingle;

import android.app.Activity;
import android.os.Bundle;
import android.view.ActionMode;
import android.view.Menu;
import android.view.MenuItem;
import android.widget.CheckBox;
import android.widget.CompoundButton;
import android.widget.CompoundButton.OnCheckedChangeListener;

public class MainActivity extends Activity {

    private ActionMode mActionMode;
    private CheckBox checkBox1;

    @Override
    protected void onCreate(Bundle savedInstanceState) {
        super.onCreate(savedInstanceState);
        setContentView(R.layout.activity_main);

        getActionBar().setTitle("CAB demo - Individual view");
        checkBox1 = (CheckBox) findViewById(R.id.checkBox1);
        checkBox1.setOnCheckedChangeListener(new OnCheckedChangeListener() {

            @Override
            public void onCheckedChanged(CompoundButton buttonView, boolean isChecked) {
                // TODO Auto-generated method stub

                if(isChecked)
                    mActionMode = MainActivity.this.startActionMode(new ActionBarCallBack());
                else
                    mActionMode.finish();
            }
        });
    }

    class ActionBarCallBack implements ActionMode.Callback {

        @Override
        public boolean onActionItemClicked(ActionMode mode, MenuItem item) {
            // TODO Auto-generated method stub
            return false;
        }

        @Override
        public boolean onCreateActionMode(ActionMode mode, Menu menu) {
            // TODO Auto-generated method stub
            mode.getMenuInflater().inflate(R.menu.contextual_menu, menu);
            return true;
        }

        @Override
        public void onDestroyActionMode(ActionMode mode) {
            // TODO Auto-generated method stub

        }

        @Override
        public boolean onPrepareActionMode(ActionMode mode, Menu menu) {
            // TODO Auto-generated method stub

            mode.setTitle("CheckBox is Checked");
            return false;
        }

    }
}
2: Enable CAB When User Performs a Long Press Gesture on Particular View
If you want to invoke the contextual action mode only when the user performs a long press gesture on a view like ListView or GridView, and want to perform batch actions on multiple selected items, then you can implement this by following the below steps:
- Implement the AbsListView.MultiChoiceModeListener and set it to your ViewGroup (e.g. ListView). In its callback methods, you can specify the actions for the contextual action bar, respond to click events on action items, and handle its callback events (Which are actually inherited from ActionMode.Callback interface).
- Call setChoiceMode() with the CHOICE_MODE_MULTIPLE_MODAL argument.
AbsListView.MultiChoiceModeListener:
A MultiChoiceModeListener receives events for CHOICE_MODE_MULTIPLE_MODAL. It acts as the ActionMode.Callback for the selection mode and also receives onItemCheckedStateChanged(ActionMode, int, long, boolean) events when the user selects and deselects list items.
Implement the AbsListView.MultiChoiceModeListener:
getListView().setMultiChoiceModeListener(new MultiChoiceModeListener() {

            @Override
            public boolean onPrepareActionMode(ActionMode mode, Menu menu) {
                // TODO Auto-generated method stub
                return false;
            }

            @Override
            public void onDestroyActionMode(ActionMode mode) {
                // TODO Auto-generated method stub
            }

            @Override
            public boolean onCreateActionMode(ActionMode mode, Menu menu) {
                // TODO Auto-generated method stub

                MenuInflater inflater = getMenuInflater();
                inflater.inflate(R.menu.contextual_menu, menu);
                return true;
            }

            @Override
            public boolean onActionItemClicked(ActionMode mode, MenuItem item) {
                // TODO Auto-generated method stub
                return false;
            }

            @Override
            public void onItemCheckedStateChanged(ActionMode mode, int position,
                    long id, boolean checked) {
                // TODO Auto-generated method stub
            }
        });
Call setChoiceMode() with the CHOICE_MODE_MULTIPLE_MODAL argument:
getListView().setChoiceMode(ListView.CHOICE_MODE_MULTIPLE_MODAL);
Full example:
Have you used Gmail Android app? (stupid question ![]() ), but if you have used it, then I am sure you have tried to perform long gesture on mails to delete messages, so let’s develop a similar example. Here we will enable contextual action mode whenever the user performs long press gestures, and we will display number of items selected.
), but if you have used it, then I am sure you have tried to perform long gesture on mails to delete messages, so let’s develop a similar example. Here we will enable contextual action mode whenever the user performs long press gestures, and we will display number of items selected.
Step 1: Take ListView in activity_main.xml layout
<RelativeLayout xmlns:android="http://schemas.android.com/apk/res/android"
    xmlns:tools="http://schemas.android.com/tools"
    android:layout_width="match_parent"
    android:layout_height="match_parent"
    android:paddingBottom="@dimen/activity_vertical_margin"
    android:paddingLeft="@dimen/activity_horizontal_margin"
    android:paddingRight="@dimen/activity_horizontal_margin"
    android:paddingTop="@dimen/activity_vertical_margin"
    tools:context=".MainActivity"
    android:background="@android:color/background_light" >

    <ListView
        android:id="@android:id/list"
        android:layout_width="match_parent"
        android:layout_height="wrap_content"
        android:layout_centerVertical="true"
        android:choiceMode="multipleChoice">
    </ListView>

</RelativeLayout>
Step 2: Define row layout (row_list_item.xml) for ListView
<?xml version="1.0" encoding="utf-8"?>
<LinearLayout xmlns:android="http://schemas.android.com/apk/res/android"
    android:layout_width="match_parent"
    android:layout_height="match_parent"
    android:gravity="center"
    android:layout_gravity="center_vertical"
    android:padding="5dp"
    android:background="@android:color/background_light" >

    <ImageView
        android:id="@+id/imageView1"
        android:layout_width="wrap_content"
        android:layout_height="wrap_content"
        android:src="@drawable/ic_launcher" />

    <TextView
        android:id="@+id/textView1"
        android:layout_width="match_parent"
        android:layout_height="wrap_content"
        android:textSize="17sp"
        android:layout_marginLeft="10dp"
        android:text="Test"
        android:textStyle="bold" />

</LinearLayout>
Step 3: Create a contextual menu (contextual_menu.xml) in menu folder, this menu gets displayed as contextual action bar whenever user performs long press gesture
<?xml version="1.0" encoding="utf-8"?>
<menu xmlns:android="http://schemas.android.com/apk/res/android" >

    <item
        android:id="@+id/item_delete"
        android:icon="@android:drawable/ic_menu_delete"
        android:showAsAction="ifRoom|withText"
        android:title="Delete"
        android:titleCondensed="Delete">
    </item>

</menu>
Step 4: Implement MultiChoiceModeListener and call setChoiceMode() inside MainActivity
- Inside onCreateActionMode() – We will enable contextual action mode with menu we have defined.
- Inside onActionItemClicked() – We can perform contextual actions on the selected items.
- Inside onItemCheckedStateChanged() – we can decide which items are selected and which are not. Here we will prepare title for the action bar with particular no. of items are selected.
package com.technotalkative.contextualactionmultiple;

import java.util.HashMap;
import java.util.Set;

import android.app.ListActivity;
import android.content.Context;
import android.os.Bundle;
import android.view.ActionMode;
import android.view.Menu;
import android.view.MenuInflater;
import android.view.MenuItem;
import android.view.View;
import android.view.ViewGroup;
import android.widget.AbsListView.MultiChoiceModeListener;
import android.widget.AdapterView;
import android.widget.AdapterView.OnItemLongClickListener;
import android.widget.ArrayAdapter;
import android.widget.ListView;

public class MainActivity extends ListActivity {

    private String[] data = {"One", "Two", "Three", "Four", "Five", "Six", "Seven", "Eight", "Nine","Ten"};

    private SelectionAdapter mAdapter;

    @Override
    protected void onCreate(Bundle savedInstanceState) {
        super.onCreate(savedInstanceState);
        setContentView(R.layout.activity_main);

        mAdapter = new SelectionAdapter(this,
                    R.layout.row_list_item, R.id.textView1, data);
        setListAdapter(mAdapter);
        getListView().setChoiceMode(ListView.CHOICE_MODE_MULTIPLE_MODAL);

        getListView().setMultiChoiceModeListener(new MultiChoiceModeListener() {

            private int nr = 0;

            @Override
            public boolean onPrepareActionMode(ActionMode mode, Menu menu) {
                // TODO Auto-generated method stub
                return false;
            }

            @Override
            public void onDestroyActionMode(ActionMode mode) {
                // TODO Auto-generated method stub
                 mAdapter.clearSelection();
            }

            @Override
            public boolean onCreateActionMode(ActionMode mode, Menu menu) {
                // TODO Auto-generated method stub

                nr = 0;
                MenuInflater inflater = getMenuInflater();
                inflater.inflate(R.menu.contextual_menu, menu);
                return true;
            }

            @Override
            public boolean onActionItemClicked(ActionMode mode, MenuItem item) {
                // TODO Auto-generated method stub
                switch (item.getItemId()) {

                    case R.id.item_delete:
                        nr = 0;
                        mAdapter.clearSelection();
                        mode.finish();
                }
            }

            @Override
            public void onItemCheckedStateChanged(ActionMode mode, int position,
                    long id, boolean checked) {
                // TODO Auto-generated method stub
                 if (checked) {
                        nr++;
                        mAdapter.setNewSelection(position, checked);
                    } else {
                        nr--;
                        mAdapter.removeSelection(position);
                    }
                    mode.setTitle(nr + " selected");

            }
        });

        getListView().setOnItemLongClickListener(new OnItemLongClickListener() {

            @Override
            public boolean onItemLongClick(AdapterView<?> arg0, View arg1,
                    int position, long arg3) {
                // TODO Auto-generated method stub

                getListView().setItemChecked(position, !mAdapter.isPositionChecked(position));
                return false;
            }
        });
    }

    private class SelectionAdapter extends ArrayAdapter<String> {

        private HashMap<Integer, Boolean> mSelection = new HashMap<Integer, Boolean>();

        public SelectionAdapter(Context context, int resource,
                int textViewResourceId, String[] objects) {
            super(context, resource, textViewResourceId, objects);
        }

        public void setNewSelection(int position, boolean value) {
            mSelection.put(position, value);
            notifyDataSetChanged();
        }

        public boolean isPositionChecked(int position) {
            Boolean result = mSelection.get(position);
            return result == null ? false : result;
        }

        public Set<Integer> getCurrentCheckedPosition() {
            return mSelection.keySet();
        }

        public void removeSelection(int position) {
            mSelection.remove(position);
            notifyDataSetChanged();
        }

        public void clearSelection() {
            mSelection = new HashMap<Integer, Boolean>();
            notifyDataSetChanged();
        }

        @Override
        public View getView(int position, View convertView, ViewGroup parent) {
            View v = super.getView(position, convertView, parent);//let the adapter handle setting up the row views
            v.setBackgroundColor(getResources().getColor(android.R.color.background_light)); //default color

            if (mSelection.get(position) != null) {
                v.setBackgroundColor(getResources().getColor(android.R.color.holo_blue_light));// this is a selected position so make it red
            }
            return v;
        }
    }
}
Download Example:
https://github.com/PareshMayani/Contextual-Action-Bar
Published at DZone with permission of Paresh Mayani. See the original article here.
Opinions expressed by DZone contributors are their own.
Comments