Docker With Spring Boot and MySQL: Docker Swarm Part 3
Join the DZone community and get the full member experience.
Join For Free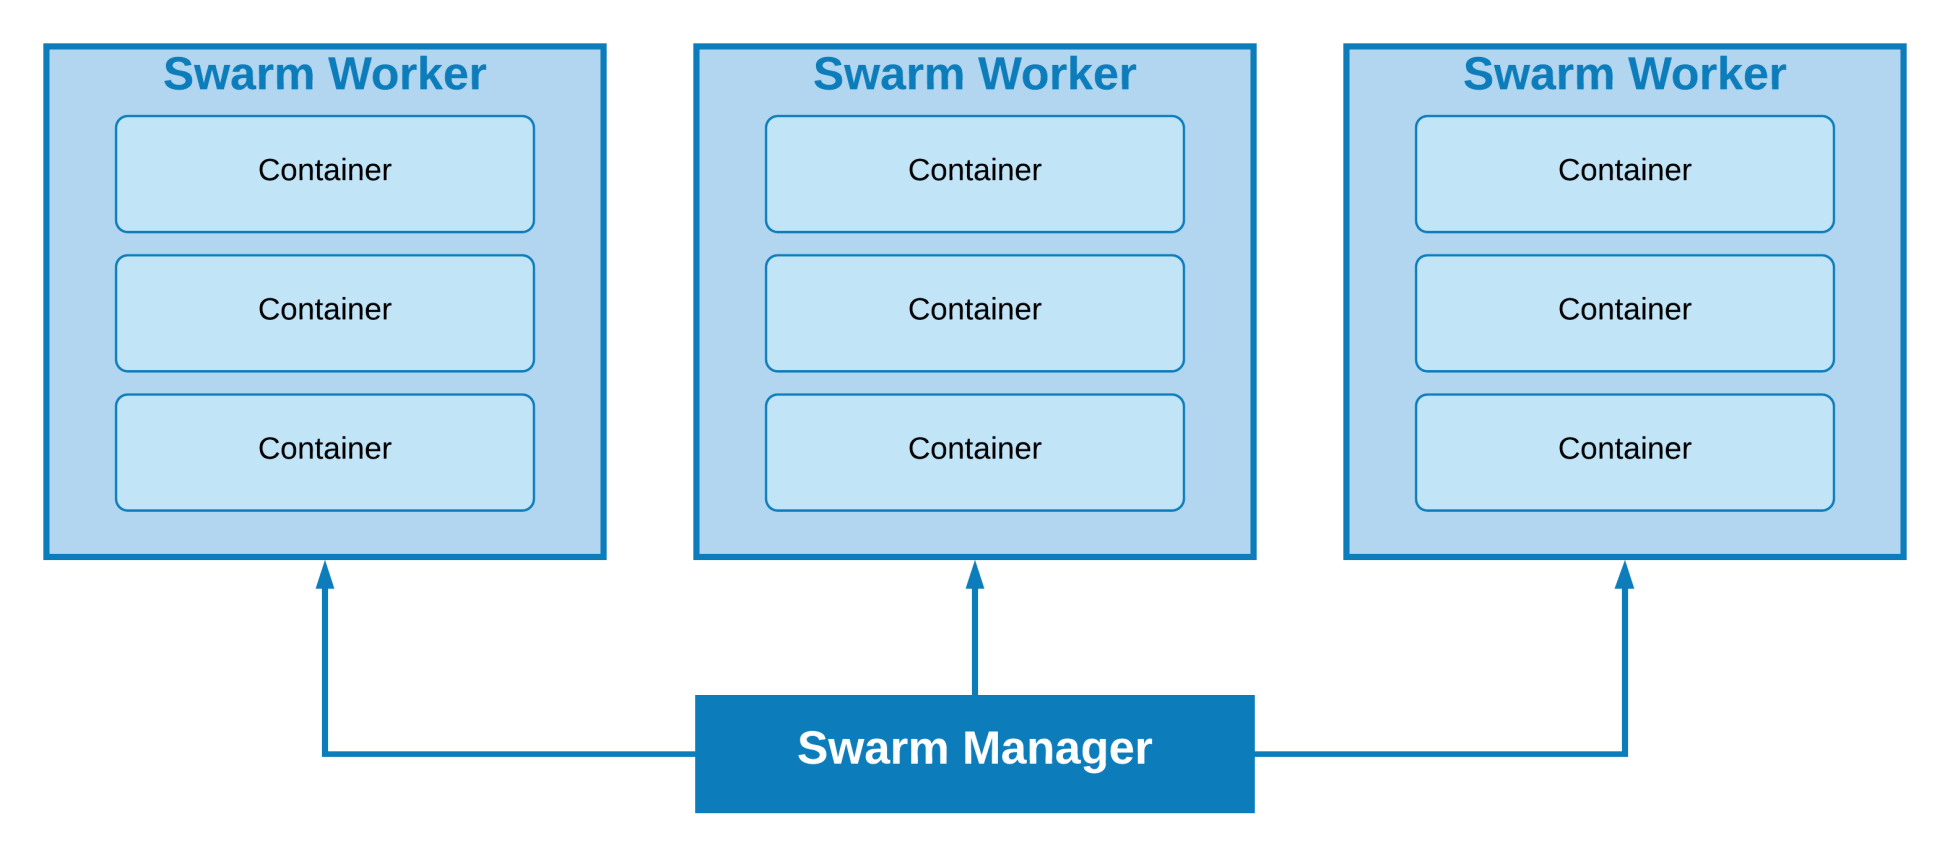
In my previous two articles, I wrote about docker basic and docker-compose where we deployed real applications to a Docker container with Docker CLI and docker-compose. In the first article, we used Dockerfile to set up our environment and deployed the application by running containers separately and then built a link between each of them.
In the second article, we ran multiple containers with the docker-compose tool. But for scaling and high-availability, we need to run our application on multiple host machines with cluster facilities. For orchestrating distributed systems at any scale to gain scalability and high availability, Docker has its own implementation called Swarm. Swarm uses the SwarmKit library for orchestration.
Overview of SwarmKit
SwarmKit is a node discovery, raft-based consensus, task scheduling, primitive-based orchestrating toolkit that can scale a distributed system. This toolkit uses Raft consensus algorithm to coordinate and decision making of a distributed system. SwarmKit is responsible for Orchestration, Scheduling and Cluster Management.
Important Terms
We have already learned some important terms about Docker, containers, images, etc. Now, we will try to deploy an application with scalability. In Docker terms, Swarm orchestrates a large number of hosts and maintains scalability and high availability.
Some key terms of Docker Swarm are listed below:
Node: In orchestration terms, a node is a host machine. A node can be multiple VMs in a single host machine.
Manager Node: This node is responsible for maintaining Swarm orchestration. It manages the cluster environment.
Worker Node: This node is responsible for executing tasks defined by the Manager Node. It will always notify its state to the Manager Node and provide services that is assigned to it.
Service: These are the tasks that execute on the Manager or Worker Node.
You may also like: Monitoring Docker Swarm.
Swarm Node Setup and Join With Example
We discussed Docker CLI and Docker-Compose in my previous two articles with real projects. Now, we will practice deploying an application in multiple hosts/VMs on a single machine using Docker Swarm. Before that, we will check Docker information with the command, docker info. In my case, it returns the following snapshot:
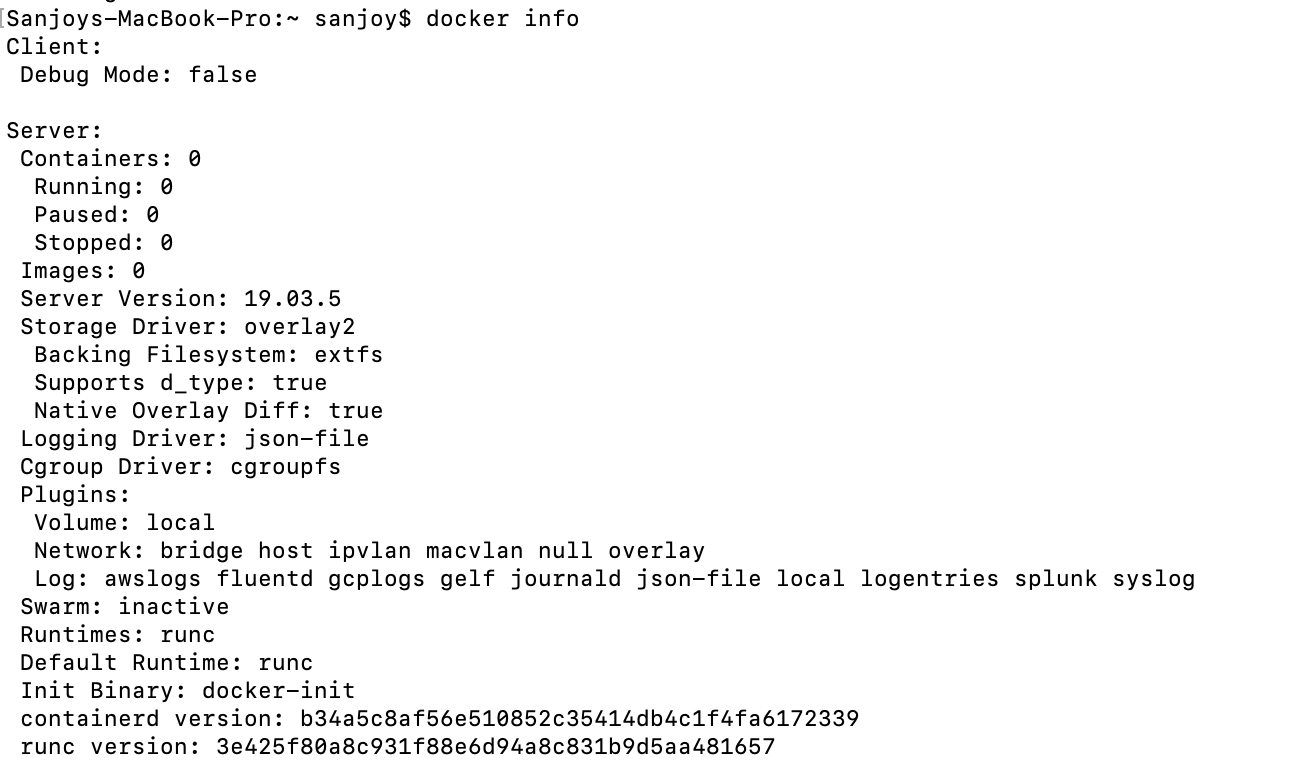
Here, we can see that Docker Swarm is in an inactive state. So, we have to initialize a Swarm. One of the most important things to remember is to make sure your machine has a virtual machine installed. If you don't have a virtual machine installed, please install virtual machine first and then go to the further steps.
Now, we will create three Docker machines. One is for the Manager Node, and the two others are for Worker Nodes. To do this, we will use the following commands:
docker-machine create --driver virtualbox manager
xxxxxxxxxx
Sanjoys-MacBook-Pro:~ sanjoy$ docker-machine create --driver virtualbox manager
Running pre-create checks...
Creating machine...
(manager) Copying /Users/sanjoy/.docker/machine/cache/boot2docker.iso to /Users/sanjoy/.docker/machine/machines/manager/boot2docker.iso...
(manager) Creating VirtualBox VM...
(manager) Creating SSH key...
(manager) Starting the VM...
(manager) Check network to re-create if needed...
(manager) Waiting for an IP...
Waiting for machine to be running, this may take a few minutes...
Detecting operating system of created instance...
Waiting for SSH to be available...
Detecting the provisioner...
Provisioning with boot2docker...
Copying certs to the local machine directory...
Copying certs to the remote machine...
Setting Docker configuration on the remote daemon...
Checking connection to Docker...
Docker is up and running!
To see how to connect your Docker Client to the Docker Engine running on this virtual machine, run: docker-machine env manager
Sanjoys-MacBook-Pro:~ sanjoy$
By executing the previous command, we have created a Manager Node. Similarly, we will create two worker nodes/machines.
The docker-machine env manager command will show the environment information for the Manager Node. In my case, it returns:
xxxxxxxxxx
Sanjoys-MacBook-Pro:book-manager sanjoy$ docker-machine env manager
export DOCKER_TLS_VERIFY="1"
export DOCKER_HOST="tcp://192.168.99.135:2376"
export DOCKER_CERT_PATH="/Users/sanjoy/.docker/machine/machines/manager"
export DOCKER_MACHINE_NAME="manager"
# Run this command to configure your shell:
# eval $(docker-machine env manager)
We should run the eval $(docker-machine env manager) command to configure our shell. Then, we can get our two Worker Nodes with the following commands:
docker-machine create --driver virtualbox worker1
docker-machine create --driver virtualbox worker2
After executing this command, we should check the created machines by executing the docker-machine ls command. In my case, the output from that command looks like this:
xxxxxxxxxx
Sanjoys-MacBook-Pro:book-manager sanjoy$ docker-machine ls
NAME ACTIVE DRIVER STATE URL SWARM DOCKER ERRORS
manager * virtualbox Running tcp://192.168.99.135:2376 v19.03.5
worker1 - virtualbox Running tcp://192.168.99.136:2376 v19.03.5
worker2 - virtualbox Running tcp://192.168.99.137:2376 v19.03.5
Now, if we run docker node ls, it will return the following message:
Error response from daemon: This node is not a swarm manager. Use "docker swarm init" or "docker swarm join" to connect this node to swarm and try again.
So, now, we will ssh to the manager machine using, docker-machine ssh manager. Once in the manager machine, we will initiate Swarm using:
docker swarm init --advertise-addr 192.168.99.135
In your case, the IP address will be the Manager Node IP address. In my case the command returns:
xxxxxxxxxx
docker@manager:~$ docker swarm init --advertise-addr 192.168.99.135
Swarm initialized: current node (ju6g0zh2me1a4hrws0yzvb30v) is now a manager.
To add a worker to this swarm, run the following command:
docker swarm join --token SWMTKN-1-5zsxl3dvxh4rneiq0b7j7zcb6fyd5i5e3l0fjzq8ecype9sa1a-eag36fosligj7iooh3xnndcmn 192.168.99.135:2377
To add a manager to this swarm, run 'docker swarm join-token manager' and follow the instructions.
Now, we should login to the other two worker machines using ssh and run the docker swarm join command that was returned as a swarm init command response instruction.
In both workers, we will execute:
docker swarm join --token SWMTKN-1-5zsxl3dvxh4rneiq0b7j7zcb6fyd5i5e3l0fjzq8ec ype9sa1a-eag36fosligj7iooh3xnndcmn 192.168.99.135:2377
Test Swarm Nodes
Now, we will again ssh to the manager machine and execute the docker node ls command. In my case, it returns:

Here, we can see that MANAGER STATUS is the Leader for the Manager Node. We can run and see any information on Docker from this node but not from our Worker Nodes.
MySQL Setup
We will only install MySQL in the Manager Node. We will skip database clustering. I think our shell, is using a manager environment. So, we can follow the Setup MySQL part of my first article and run the following command:
xxxxxxxxxx
docker run -d -p 6033:3306 --name=docker-mysql --env="MYSQL_ROOT_PASSWORD=root" --env="MYSQL_PASSWORD=root" --env="MYSQL_DATABASE=book_manager" mysql
After we run the container, we will import our SQL script by running the following command. We can get the script file from here.
xxxxxxxxxx
docker exec -i docker-mysql mysql -uroot -proot book_manager <book_manager.sql
If we want to test our MySQL setup or details of setup, please check the Setup MySQL part of this article.
Deploy Our Application
To deploy the application, we need to clone the project from here. Now, we will move to the project's root directory (book_manager) and then checkout to the branch, docker-swarm. After that, we need to update the datasource at application.properties. We will update the following IP with our Manager Node's IP.
xxxxxxxxxx
spring.datasource.url=jdbc:mysql://192.168.99.135:6033/book_manager
Now, we will run the gradle clean build command to build this project.
xxxxxxxxxx
version: '3'
services:
book-manager-app:
restart: always
build: ./
image: flopcoder/book-manager
networks:
- book_network
expose:
- "10222"
ports:
- 10222:10222
networks:
book_network:
driver: overlay
Here, we can see that I used flopcoder/book_manager as the image name. We have to update our own Docker Hub id. After build completion, we will run docker-compose build to build our Docker images.
I think if you had followed my all articles, you have an account on Docker Hub. After build completion, we will run docker-compose push to send out build images to Docker Hub. As we are using Docker Swarm mode, we will deploy our project using Docker Stack. Now, we will run the following command:
docker stack deploy --compose-file docker-compose.yml book_manager
In my case, it returned:
xxxxxxxxxx
Sanjoys-MacBook-Pro:book-manager sanjoy$ docker stack deploy --compose-file docker-compose.yml book_manager
Ignoring unsupported options: build, restart
Ignoring deprecated options:
expose: Exposing ports is unnecessary - services on the same network can access each other's containers on any port.
Creating network book_manager_book_network
Creating service book_manager_book-manager-app
It will take some time to deploy images to all Swarm nodes. You can check the log using the following command:
docker service logs book_manager_book-manager-app
We can also scale up our deployment with following command
docker service scale book_manager_book-manager-app=3
After that, we will check the running scaled containers on different nodes:
xxxxxxxxxx
Sanjoys-MacBook-Pro:book-manager sanjoy$ docker service ps book_manager_book-manager-app
ID NAME IMAGE NODE DESIRED STATE CURRENT STATE ERROR PORTS
jzoligqpevng book_manager_book-manager-app.1 flopcoder/book-manager:latest manager Running Running 6 minutes ago
s6ni8nm1e8c5 book_manager_book-manager-app.2 flopcoder/book-manager:latest worker2 Running Running 4 minutes ago
p1irtx2m64hq book_manager_book-manager-app.3 flopcoder/book-manager:latest worker1 Running Running about a minute ago
After waiting some time, you can hit the following URLs:
http://192.168.99.137:10222/author.
http://192.168.99.136:10222/author.
http://192.168.99.135:10222/author.
All three nodes will return the same author list.
Visualizer
We can configure a visualizer service using the following command:
xxxxxxxxxx
docker service create \
-p 8080:8080 \
--constraint=node.role==manager \
--mount=type=bind,src=/var/run/docker.sock,dst=/var/run/docker.sock \
dockersamples/visualizer
After the visualizer service is created, we can check the status of our clustered services at 8080 port(visualizer). In my case, after hitting http://192.168.99.135:8080/ from my browser, it looks like this:

Some Important Commands
- docker-machine start node_name; #Use to start a stopped node
- docker-machine stop node_name; #Use to stop a running node
- docker-machine ls; #Use to check docker nodes
- docker-machine ip node_name; #Use to check ip of a node
- docker node ls; #Use to check node list
- docker ps; #Use to check running services;
- docker service scale web=6; #Use to scale a application
- docker service logs -f service_name; #Use to see the log of a service
- docker node inspect self; #Use to check node information
- docker node inspect node_name #Use to check node information
- docker node ps node_name; #Use to check running services in a node
- docker node inspect — pretty node_name; #Use to check node information
- docker container ls #Use to check container list
- docker container rm container_name; # Use to remove a container
- docker image ls; # Use to check image list
- docker image rm image_name; #Use to remove image
- docker-compose build #Use to build images
- docker-compose up #Use to deploy images
- docker-compose up --build #Use to deploy images after build
- docker-compose down #Use to shutdown container
- docker exec -it docker-mysql bash; #Use to access mysql container
- docker stack services book_manager; # Use to check services under book_manager stack
- docker stack rm service_name #Use to remove a service from stack
- docker stack ls # Use to check stack list
I think that's all you need to get started with Docker Swarm with Spring Boot and MySQL. Thanks so much for reading!
NB: In this article, I have used IP of my host machines' VM. You have to change it to yours.
Happy Clustering!!!
Further Reading
Opinions expressed by DZone contributors are their own.
Comments