Fetching Data From One-to-One, One-to-Many, and Many-to-Many Relationships With jOOQ
In this article, you will learn how to fetch data from tables with jOOQ, which have a one-to-one, a one-to-many, or a many-to-many relationship.
Join the DZone community and get the full member experience.
Join For FreejOOQ uses a database-first approach and allows you to just write SQL including typesafety instead of using an Object Relation Mapper (ORM) framework. In a previous article, a setup is created using Spring Boot, Liquibase, jOOQ, and PostgreSQL. In this article, this setup is used as the basis in order to explore how to fetch data from your database when the data is spread over several tables.
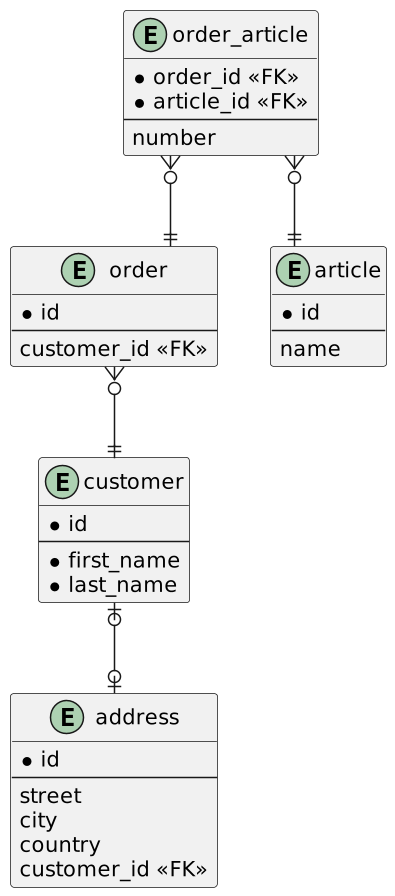
The database scheme is the following:
- A one-to-one association between
CustomerandAddress; - A one-to-many association between
CustomerandOrder; - A many-to-many association between
OrderandArticle.
The application is a Spring Boot backend application, which provides a Rest API in order to perform some CRUD (Create-Read-Update-Delete) operations. The following functionality is implemented:
- A customer needs to be created including the address of the customer;
- A customer needs to be able to order one or more articles;
- The order needs to be retrieved;
- All orders of a customer need to be retrieved.
Sources used in this blog are available at GitHub.
Some things to note about the design:
- No services are used in the code, the repositories are invoked straight from the controller;
- Separate DTO’s (Data Transfer Object) are used for incoming data and outgoing data;
- No transactions are used, but in production use, you should add transactions.
Prerequisites
- If you are unfamiliar with the setup, do read the previous article
- Basic knowledge of Java — Java 21 is used
- Basic knowledge of Spring Boot
- Basic jOOQ knowledge
- Basic knowledge of OpenAPI if you want to dive into the source code. Do know that the controllers implement a generated controller interface, which is based on the OpenAPI specification
Fetching One-to-One Data
Create Customer
Customer and address have a one-to-one association. When a customer is created via the CustomerRepository#addCustomer method, you need to know the ID of the customer in order to create the address: the address contains a reference to the customer. You can do so by defining a returningResult and map that to the correct type using Records.mapping. In this case, no specific mapping needs to be done, you just return the result.
public Integer addCustomer(CustomerIn customerIn) {
    return create
            .insertInto(CUSTOMER, CUSTOMER.FIRST_NAME, CUSTOMER.LAST_NAME)
            .values(customerIn.firstName(), customerIn.lastName())
            .returningResult(CUSTOMER.ID)
            .fetchOne(Records.mapping(value -> value));
}
The address itself is inserted via the AddressRepository#addAddress method using the address fields and the provided customerId.
public void addAddress(AddressIn addressIn, Integer customerId) {
    create
        .insertInto(ADDRESS, ADDRESS.STREET, ADDRESS.CITY, ADDRESS.COUNTRY, ADDRESS.CUSTOMER_ID)
        .values(addressIn.street(), addressIn.city(), addressIn.country(), customerId)
        .execute();
}
The CustomerController#createCustomer method is responsible for converting the data to the DTO and for invoking both repositories.
@Override
public ResponseEntity<Void> createCustomer(com.mydeveloperplanet.myjooqplanet.model.Customer apiCustomer) {
    CustomerIn customerIn = new CustomerIn(apiCustomer.getFirstName(), apiCustomer.getLastName());
    Integer customerId = customerRepository.addCustomer(customerIn);

    AddressIn addressIn = new AddressIn(apiCustomer.getStreet(), apiCustomer.getCity(), apiCustomer.getCountry());
    addressRepository.addAddress(addressIn, customerId);

    return ResponseEntity.ok().build();
}
Retrieve Customer
Retrieving the customer is quite straightforward. Based on the customerId, the data is retrieved from the database. As you can see here, the Records.mapping maps the result into a CustomerOut DTO. The CustomerRepository#getCustomer method is the following:
public CustomerOut getCustomer(int customerId) {
    return create
            .selectFrom(CUSTOMER)
            .where(CUSTOMER.ID.eq(customerId))
            .fetchOne(Records.mapping(CustomerOut::new));
}
In a similar way, the AddressRepository#getAddressByCustomer method is added:
public AddressOut getAddressByCustomer(int customerId) {
    return create
            .select(ADDRESS.STREET, ADDRESS.CITY, ADDRESS.COUNTRY)
            .from(ADDRESS)
            .where(ADDRESS.CUSTOMER_ID.eq(customerId))
            .fetchOne(Records.mapping(AddressOut::new));
}
The CustomerController#getCustomer merges the data in order to provide it into the API call.
@Override
public ResponseEntity<CustomerFullData> getCustomer(Long customerId) {
    CustomerOut customer = customerRepository.getCustomer(customerId.intValue());
    AddressOut address = addressRepository.getAddressByCustomer(customerId.intValue());
    return ResponseEntity.ok(repoToApi(customer, address));
}
The repoToApi method converts the DTO’s into the CustomerFullData object, which is the generated API model.
Note that this could have been implemented differently by retrieving the data in one query.
Test
Tests are available using Testcontainers in the GitHub repository. You can also test it manually. Start the Spring Boot application. Spring Boot Docker Compose is used, this will start automatically a PostgreSQL container when starting the Spring Boot application.
$ mvn spring-boot:runInsert a customer including address.
$ curl -X POST http://localhost:8080/customers  \
   -H 'Content-Type: application/json'        \
   -d '{"firstName": "John",
        "lastName": "Doe",
        "street": "John Doe Street",
        "city": "Brussels",
        "country": "Belgium"
       }'
Retrieve the customer.
$ curl http://localhost:8080/customers/1
{"firstName":"John","lastName":"Doe","street":"John Doe Street","city":"Brussels","country":"Belgium","customerId":1}
Fetching Many-to-Many Data
Create Order
Order and article have a many-to-many association. First, articles need to be created in the database. This is done via the ArticleRepository#addArticle method.
public void addArticle(ArticleIn articleIn) {
    create
        .insertInto(ARTICLE, ARTICLE.NAME)
        .values(articleIn.name())
        .execute();
}
The ArticleController allows you to insert the articles via an API call.
@Override
public ResponseEntity<Void> createArticle(com.mydeveloperplanet.myjooqplanet.model.Article apiArticle) {
    ArticleIn articleIn = new ArticleIn(apiArticle.getName());
    articleRepository.addArticle(articleIn);
    return ResponseEntity.ok().build();
}
After inserting an order into the database, you need to return the ID of the order, just like you did for the customer. You will need this ID to fill the order_article table. The OrderRepository#addOrder method is the following:
public Integer addOrder(OrderIn order) {
    return create
            .insertInto(ORDER, ORDER.CUSTOMER_ID)
            .values(order.customerId())
            .returningResult(ORDER.ID)
            .fetchOne(Records.mapping(value -> value));
}
The relationship between the order and the articles needs to be defined in the order_article table. This is done with the OrderRepository#addArticles method.
public void addArticles(Integer orderId, List<OrderArticleIn> articles) {
    for (OrderArticleIn orderArticle : articles) {
        create
            .insertInto(ORDER_ARTICLE, ORDER_ARTICLE.ORDER_ID, ORDER_ARTICLE.ARTICLE_ID, ORDER_ARTICLE.NUMBER)
            .values(orderId, orderArticle.articleId(), orderArticle.number())
            .execute();
    }
}
The OrderController#createOrder method is responsible for converting the data to the DTO and for invoking both repositories.
@Override
public ResponseEntity<Void> createOrder(com.mydeveloperplanet.myjooqplanet.model.Order apiOrder) {
    OrderIn orderIn = new OrderIn(apiOrder.getCustomerId());
    Integer orderId = orderRepository.addOrder(orderIn);

    List<OrderArticleIn> articles = new ArrayList<>();
    for (com.mydeveloperplanet.myjooqplanet.model.OrderArticle apiArticle : apiOrder.getArticles()) {
        articles.add(new OrderArticleIn(apiArticle.getArticleId(), apiArticle.getNumber()));
    }

    orderRepository.addArticles(orderId, articles);

    return ResponseEntity.ok().build();
}
Retrieve Order
For retrieving an order, you need to fetch data from two tables, the order table and the order_article table. You can do so by using a multiset where you can add a subquery for the OrderArticle data. You convert the OrderArticle data via a Records.mapping into an OrderArticleOut record. The complete query result is mapped to an OrderOut record which contains a list of OrderArticleOut records.
The OrderRepository#getOrder method:
public OrderOut getOrder(Integer orderId) {
    return create
            .select(
                ORDER.CUSTOMER_ID,
                multiset(
                        select(ORDER_ARTICLE.ARTICLE_ID, ORDER_ARTICLE.NUMBER)
                                .from(ORDER_ARTICLE)
                                .where(ORDER_ARTICLE.ORDER_ID.eq(ORDER.ID))
                ).convertFrom(r -> r.map(Records.mapping(OrderArticleOut::new)))
            )
            .from(ORDER)
            .where(ORDER.ID.eq(orderId))
            .fetchOne(Records.mapping(OrderOut::new));
}
The OrderOut record:
public record OrderOut(Integer customerId, List<OrderArticleOut> articles) {
}
The OrderArticleOut record:
public record OrderArticleOut(Integer articleId, Integer number) {
}
The OrderController#getOrder invokes the repository and converts the data for the API.
@Override
public ResponseEntity<OrderFullData> getOrder(Long orderId) {
    OrderOut orderOut = orderRepository.getOrder(orderId.intValue());
    return ResponseEntity.ok(repoToApi(orderId, orderOut));
}
Tests
Assuming you have added the customer, you first add some articles:
$ curl -X POST http://localhost:8080/articles  \
   -H 'Content-Type: application/json'        \
   -d '{
        "name": "article1"
       }'
$ curl -X POST http://localhost:8080/articles  \
   -H 'Content-Type: application/json'        \
   -d '{
        "name": "article2"
       }'
Create the order:
$ curl -X POST http://localhost:8080/orders  \
   -H 'Content-Type: application/json'        \
   -d '{
        "customerId": 1,
        "articles": [
          {
            "articleId": 1,
            "number": 10
          },
          {
            "articleId": 2,
            "number": 20
          }
        ]
      }'
Retrieve the order:
$ curl http://localhost:8080/orders/1
{"customerId":1,"articles":[{"articleId":1,"number":10},{"articleId":2,"number":20}],"orderId":1}
Fetching One-to-Many Data
Retrieve Orders From the Customer
The last thing to do is to retrieve the orders from a customer. A customer has a one-to-many association with the order. You will just retrieve the order IDs, but in a similar way as for the many-to-many association, you can retrieve more data using a multiset. The OrderRepository#getOrdersOfCustomer is:
public List<Integer> getOrdersOfCustomer(Integer customerId) {
    return create
            .select(ORDER.ID)
            .from(ORDER)
            .where(ORDER.CUSTOMER_ID.eq(customerId))
            .fetch(Records.mapping(value -> value));
}
The OrderController#getOrdersOfCustomer invokes the repository and converts the data appropriately.
@Override
public ResponseEntity<List<Long>> getOrdersOfCustomer(Long customerId) {
    List<Integer> orderIds = orderRepository.getOrdersOfCustomer(customerId.intValue());
    List<Long> apiOrderIds = orderIds.stream().map(Integer::longValue).toList();
    return ResponseEntity.ok(apiOrderIds);
}
Tests
Assuming the customer and order are created as shown in the other tests, you can retrieve the order IDs of the customer as follows:
$ curl http://localhost:8080/orders/customers/1
[1]
Conclusion
This article demonstrated how to use jOOQ to fetch data from tables with different types of relationships, including one-to-one, one-to-many, and many-to-many. By understanding the fundamentals of querying relational data with jOOQ, you can effectively manage complex database interactions in your Spring Boot applications and ensure a clean and efficient data access layer. As you work with more scenarios, you’ll find that these techniques can be adapted to a variety of cases that can simplify your data handling processes.
Published at DZone with permission of Gunter Rotsaert. See the original article here.
Opinions expressed by DZone contributors are their own.
Comments