Flask Web Application for Smart Honeypot Deployment Using Reinforcement Learning
Learn to integrate Flask web applications with Reinforcement Learning and human feedback loop for a honeypot deployment use case.
Join the DZone community and get the full member experience.
Join For FreeHoneypots are the digital traps used by cybersecurity professionals to lure in attackers. These traps imitate real systems and services, such as web servers or IoT devices, to appear as genuine targets. The goal of a honeypot is to deceive attackers into interacting with them, enabling security experts to observe and analyze their behavior.
Challenge and Proposed Solution
Traditional honeypots have limitations as they can be easily identified by skilled attackers and struggle to adapt to new threats. By applying RL, we can develop a smart honeypot deployment system that learns and adapts to emerging threats in real time. Imagine a cybersecurity team using a Reinforcement Learning-driven honeypot to combat phishing attacks. The honeypot monitors incoming emails and adjusts its responses based on the perceived threat level of each email. Over time, it learns to identify phishing attempts more effectively and assists the team in understanding how attackers alter their tactics.
This article introduces a prototype for a web application that demonstrates the use of Reinforcement Learning for smart honeypot deployment. The application utilizes the Flask framework in Python and leverages the scikit-learn, pandas, and NumPy libraries for the implementation. Flask is a lightweight web framework for constructing web applications and APIs in Python.
Reinforcement Learning and Q-Learning
Reinforcement learning is an Artificial Intelligence technique where an agent learns to make decisions by interacting with an environment and receiving rewards or penalties for its actions. In our application, the RL agent learns to deploy honeypots effectively based on the current network state and expected rewards.

Source: Reinforcement Learning
- St is the current state and St+1 is the next state of the agent.
- Rt is the current reward and Rt+1 is the next reward; i.e., feedback from the environment.
- At represents the current action taken by the agent.
Q-learning is a model-free RL algorithm that learns the optimal action-selection policy for any given environment. It estimates the value of taking a particular action in a given state, known as the Q-value. The agent uses these Q-values to decide which action to take in each state, aiming to maximize its cumulative reward over time.
Here’s the mathematical formula to update the Q values:

Source: Q-learning
Benefits of RL in Honeypot Deployment
- Adaptability: RL-based honeypots can adjust their tactics as threats evolve, enhancing their effectiveness over time.
- Harder to detect: By utilizing RL, honeypots can behave more like real systems, making them harder for attackers to detect.
- Efficiency: RL helps honeypots utilize resources more effectively, reducing false alarms and capturing more useful threat data.
- Real-time response: RL enables honeypots to respond promptly to threats as they occur, improving detection and mitigation.
- Insight generation: Analyzing RL-driven honeypots can provide valuable insights into attacker operations, enhancing overall cybersecurity.
Honeypot Deployment as a Reinforcement Learning
- Environment setup: Define how the honeypot environment will operate, including how attackers will interact with it and what actions it can take.
- Choosing an algorithm: Select an RL algorithm that suits the honeypot's requirements, such as Q-learning or Deep Q-Networks.
- State representation: Determine how the honeypot will perceive the world to make informed decisions.
- Action design: Define the actions the honeypot can take, such as mimicking different services or adjusting response times.
- Reward system: Create a system that rewards the honeypot for desirable behavior, like detecting attackers or utilizing resources efficiently.
- Training and evaluation: Train the honeypot using historical data or simulations, and evaluate its performance against various metrics.
Web Application
This web application demonstrates the use of Reinforcement Learning, specifically Q-learning, for smart honeypot deployment on a synthetic dataset.
Here's how it functions:
Network Configuration
The application loads a network configuration from a JSON file, defining the nodes in the network and their characteristics. This configuration serves as the environment for the RL agent. Here's the code of files used in the web application.
- network_config.json:
{
    "nodes": [
        {
            "id": 0,
            "name": "Node 0",
            "features": [0.1, 0.2, 0.3, 0.4],
            "type": "normal"
        },
        {
            "id": 1,
            "name": "Node 1",
            "features": [0.2, 0.3, 0.4, 0.5],
            "type": "normal"
        },
        {
            "id": 2,
            "name": "Node 2",
            "features": [0.3, 0.4, 0.5, 0.6],
            "type": "honeypot"
        },
        {
            "id": 3,
            "name": "Node 3",
            "features": [0.4, 0.5, 0.6, 0.7],
            "type": "normal"
        },
        {
            "id": 4,
            "name": "Node 4",
            "features": [0.5, 0.6, 0.7, 0.8],
            "type": "honeypot"
        },
        {
            "id": 5,
            "name": "Node 5",
            "features": [0.6, 0.7, 0.8, 0.9],
            "type": "normal"
        },
        {
            "id": 6,
            "name": "Node 6",
            "features": [0.7, 0.8, 0.9, 0.1],
            "type": "normal"
        },
        {
            "id": 7,
            "name": "Node 7",
            "features": [0.8, 0.9, 0.1, 0.2],
            "type": "normal"
        },
        {
            "id": 8,
            "name": "Node 8",
            "features": [0.9, 0.1, 0.2, 0.3],
            "type": "normal"
        },
        {
            "id": 9,
            "name": "Node 9",
            "features": [0.2, 0.3, 0.4, 0.5],
            "type": "honeypot"
        },
        {
            "id": 10,
            "name": "Node 10",
            "features": [0.3, 0.4, 0.5, 0.6],
            "type": "normal"
        },
        {
            "id": 11,
            "name": "Node 11",
            "features": [0.4, 0.5, 0.6, 0.7],
            "type": "normal"
        },
        {
            "id": 12,
            "name": "Node 12",
            "features": [0.5, 0.6, 0.7, 0.8],
            "type": "honeypot"
        },
        {
            "id": 13,
            "name": "Node 13",
            "features": [0.6, 0.7, 0.8, 0.9],
            "type": "normal"
        },
        {
            "id": 14,
            "name": "Node 14",
            "features": [0.7, 0.8, 0.9, 0.1],
            "type": "honeypot"
        }
    ]
}
- honeypot_data.py:
# honeypot_data.py
import numpy as np
import json

def load_network_config(file_path):
    """
    Load network configuration from a JSON file.

    Parameters:
    - file_path (str): Path to the JSON file containing the network configuration.

    Returns:
    - config (dict): Dictionary containing the network configuration.
    """
    with open(file_path, 'r') as file:
        config = json.load(file)
    return config

def generate_network_data_from_config(config):
    """
    Generates synthetic network data based on a network configuration.

    Parameters:
    - config (dict): Dictionary containing the network configuration.

    Returns:
    - features (numpy.ndarray): Array of shape (num_nodes, num_features) containing node features.
    - labels (numpy.ndarray): Array of shape (num_nodes,) containing labels for each node (0: normal, 1: attack).
    """
    num_nodes = len(config['nodes'])
    num_features = len(config['nodes'][0]['features'])
    np.random.seed(42)
    features = np.random.rand(num_nodes, num_features)
    # Simulate labels (0: normal, 1: attack) based on random values
    labels = np.random.randint(0, 2, num_nodes)
    return features, labels
Training the RL Agent
Users can train the RL agent by clicking the "Train Model" button. This initiates a series of training episodes where the agent learns which actions (deploy honeypot or not) are most effective based on the network's state and the rewards received.
- q_learning.py:
# q_learning.py
import numpy as np

class QLearningAgent:
    def __init__(self, state_space, action_space, alpha=0.1, gamma=0.6, epsilon=0.1):
        self.state_space = state_space
        self.action_space = action_space
        self.q_table = np.zeros((state_space, action_space))
        self.alpha = alpha
        self.gamma = gamma
        self.epsilon = epsilon

    def choose_action(self, state):
        if np.random.uniform(0, 1) < self.epsilon:
            return np.random.choice(self.action_space)
        else:
            return np.argmax(self.q_table[state, :])

    def learn(self, state, action, reward, next_state):
        predict = self.q_table[state, action]
        target = reward + self.gamma * np.max(self.q_table[next_state, :])
        self.q_table[state, action] = predict + self.alpha * (target - predict)

    def get_q_table(self):
        return self.q_table
- app.py:
# app.py
from flask import Flask, render_template, request, jsonify
from q_learning import QLearningAgent
from honeypot_data import load_network_config, generate_network_data_from_config
import numpy as np

app = Flask(__name__)

# Load the network configuration and initialize the RL agent
config = load_network_config('network_config.json')
features, targets = generate_network_data_from_config(config)
state_space = len(features)
action_space = 2  # Assume two actions: deploy or not deploy honeypot
agent = QLearningAgent(state_space, action_space)

@app.route('/')
def index():
    return render_template('index.html')

@app.route('/train', methods=['POST'])
def train():
    episodes = request.json.get('episodes', 1000)
    for _ in range(episodes):
        state = np.random.randint(0, state_space)
        action = agent.choose_action(state)
        reward = 1 if targets[state] == action else -1  # Simulate a reward
        next_state = (state + 1) % state_space
        agent.learn(state, action, reward, next_state)
    return jsonify({'status': 'training complete'})

@app.route('/predict', methods=['POST'])
def predict():
    state = request.json.get('state')
    if 0 <= state < state_space:
        action = agent.choose_action(state)
        return jsonify({'action': int(action)})
    else:
        return jsonify({'error': 'Invalid state. Please enter a number between 0 and ' + str(state_space - 1)}), 400

@app.route('/q_table')
def q_table():
    return jsonify(agent.get_q_table().tolist())

if __name__ == '__main__':
    app.run(debug=True)
- index.html:
<!-- templates/index.html -->
<!DOCTYPE html>
<html lang="en">
<head>
<meta charset="UTF-8">
<title>Smart Honeypot Deployment</title>
<link rel="stylesheet" href="/static/style.css">
</head>
<body>
<h1>Smart Honeypot Deployment</h1>
<button id="train-btn">Train Model</button>
<button id="predict-btn">Predict Deployment</button>
<div id="state-input" style="margin-top: 10px;">
<label for="state">Enter Node ID :</label>
<input type="number" id="state" name="state" min="0" max="14">
</div>
<div id="results" style="margin-top: 10px;"></div>
<script>
document.getElementById('train-btn').addEventListener('click', function() {
fetch('/train', {
method: 'POST',
headers: {
'Content-Type': 'application/json',
},
body: JSON.stringify({ episodes: 1000 }),
})
.then(response => response.json())
.then(data => {
alert(data.status);
});
});
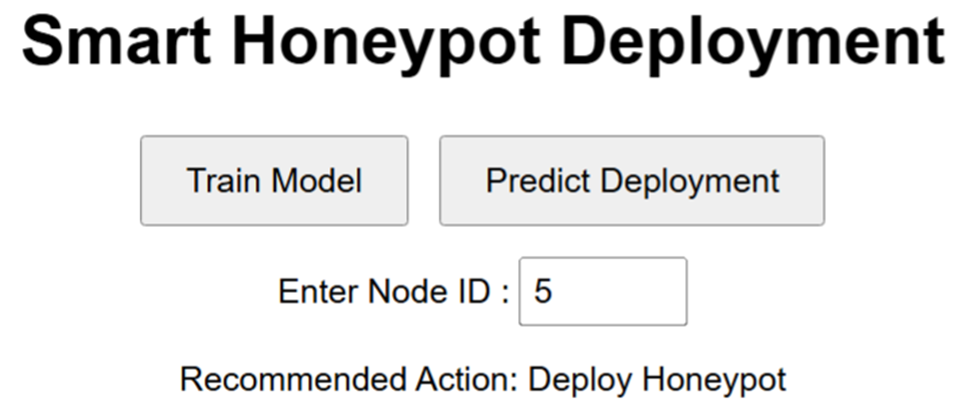
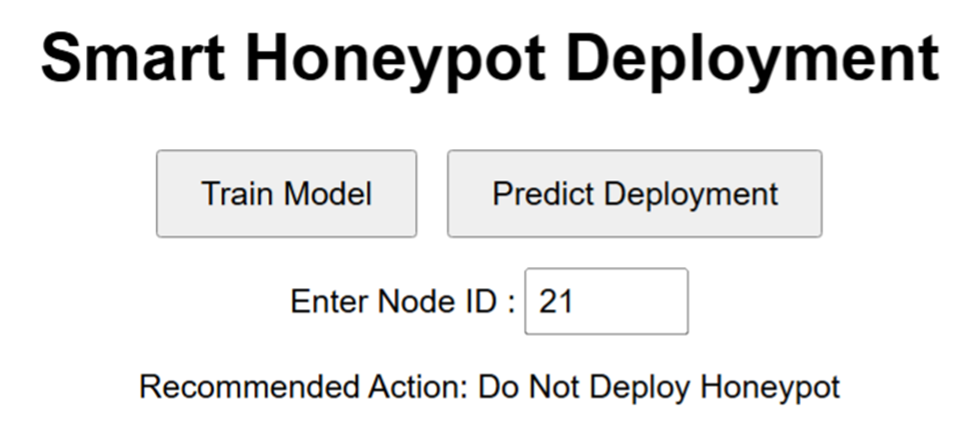
document.getElementById('predict-btn').addEventListener('click', function() {
const state = document.getElementById('state').value;
fetch('/predict', {
method: 'POST',
headers: {
'Content-Type': 'application/json',
},
body: JSON.stringify({ state: parseInt(state) }),
})
.then(response => response.json())
.then(data => {
const resultsDiv = document.getElementById('results');
resultsDiv.innerHTML = `<p>Recommended Action: ${data.action == 1 ? 'Deploy Honeypot' : 'Do Not Deploy Honeypot'}</p>`;
});
});
</script>
</body>
</html>
- style.css:
/* static/style.css */
body {
    font-family: Arial, sans-serif;
    text-align: center;
    padding: 50px;
}

button {
    padding: 10px 20px;
    font-size: 16px;
    margin: 5px;
}

input {
    padding: 5px;
    font-size: 16px;
}
Predicting Deployment
Conclusion
Using Reinforcement Learning for honeypot deployment is a unique approach to enhance cybersecurity. By learning from attackers and adapting to new threats, RL-driven honeypots can significantly improve our ability to defend against cyber attacks. As cyber threats evolve, incorporating RL into honeypot deployment will be essential to stay ahead of hackers and protect our digital assets. This web application demonstrates the potential of RL in enhancing cybersecurity practices, particularly in honeypot deployment.
By integrating adaptive and intelligent decision-making capabilities, we can create more effective defense mechanisms against cyber threats. As the threat landscape continues to evolve, embracing innovative approaches like RL will be critical to staying ahead of adversaries and protecting critical assets.
Opinions expressed by DZone contributors are their own.
Comments