GitHub Continuous Deployment to a Raspberry Pi
Instead of just using SCP to get files over to my device, I wanted to be able to have my Raspberry Pi update whenever there was an update to the master branch of the node project I was working on.
Join the DZone community and get the full member experience.
Join For Freeso, i'm still playing with the raspberry pi while working on the wackcoon project (more to come on that) and i have the need to work in a group. instead of just using scp to get files over to my device, i wanted to be able to have my raspberry pi update whenever there was an update to the master branch of the node project i was working on. this would facilitate being able to work with a remote team (where the pi is in my network) and, theoretically, if i had multiple wackcoon devices (although i have not thought about how to implement that yet.
to accomplish this, we will need the following.
- a github hook on the repository
- a node app on the pi listening for messages from github
- a way for the pi to be reached from the internet
github hook
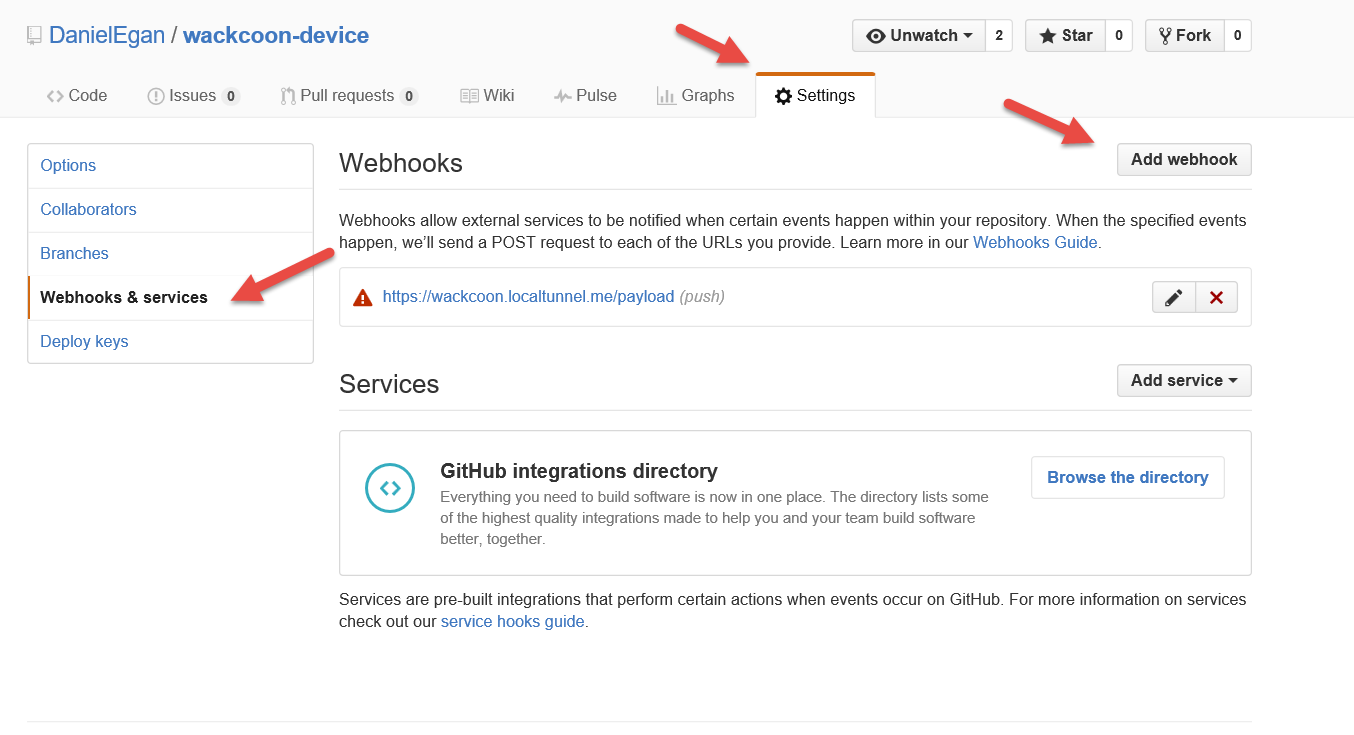
the first thing we want to do is set up a hook on our github repository. to do this, go to your github repository click on the settings tab –> webhooks & services –> add webhook

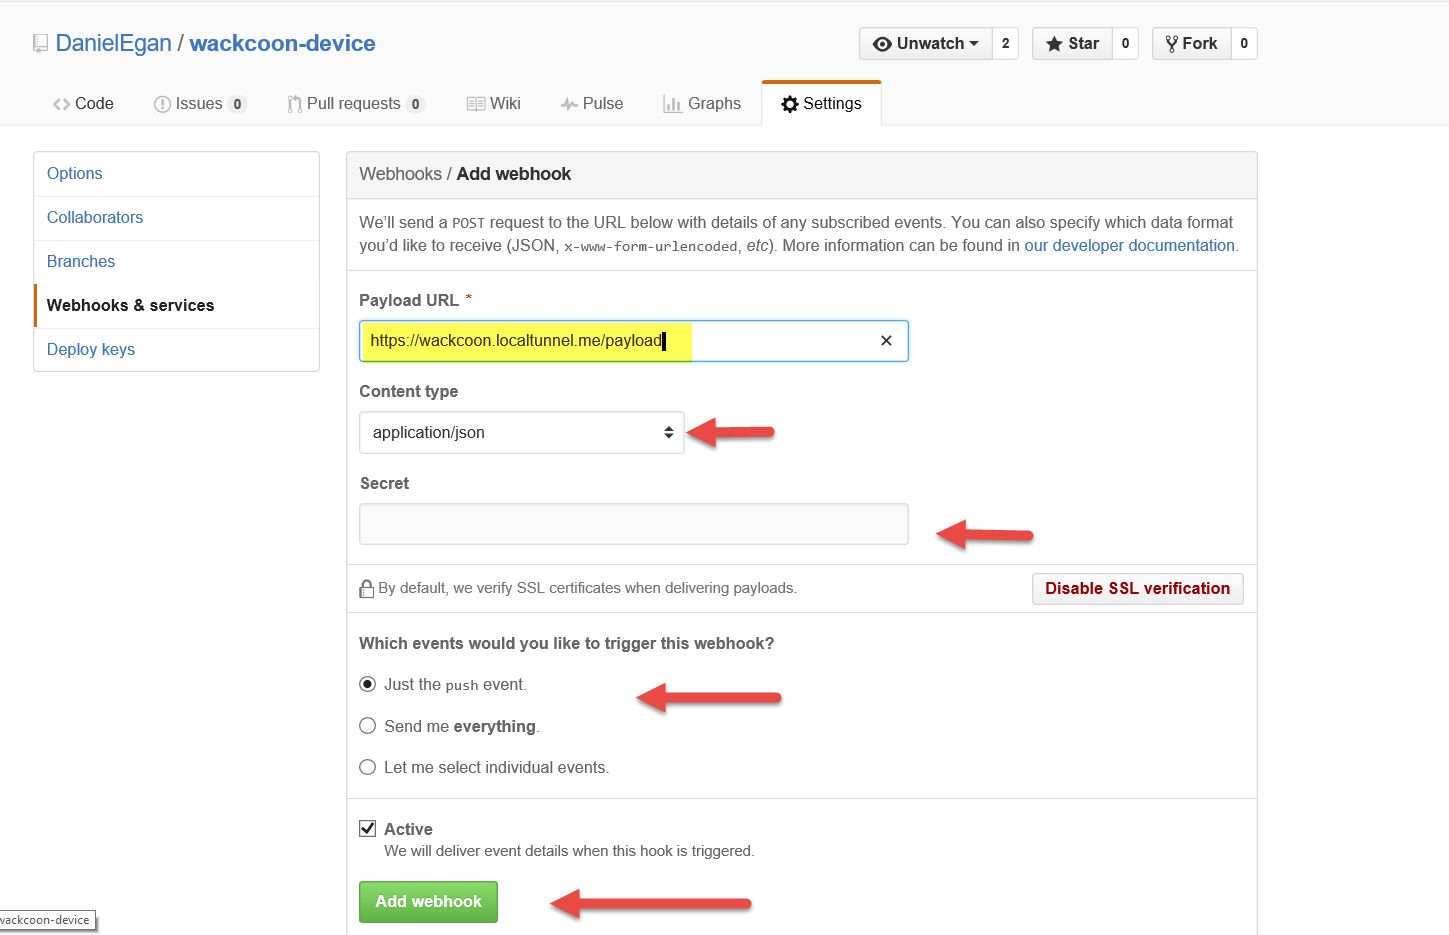
in the add webhook screen we need to add just a few things :
- payload url – this is where it will send the information to whenever events happen on your master branch. i will show you how i set this up in the next step.
- content type – you can select application/json (what i am using) or application/x-www-form-urlencoded
- secret (not required) – this is a secret you supply to verify on the sender
- events – which events you want to trigger this hook. the default is the push event and is what i am using for this example but there are many to choose from depending on your needs
note : to learn about webhooks in depth, check out the documentation .
fill out this information and click on add webhook.
a node app on the pi
the next step is to set up an application on the pi that will receive the event. you can see what i have set up by looking at the wackcoon-hook project . all of the code is in the app.js file (check project for full code). it is a node site using express that has a route for a post on /payload . so for instance, in this app, it will be listening on http://localhost:5000/payload (yes… localhost, we will get to that in a minute).
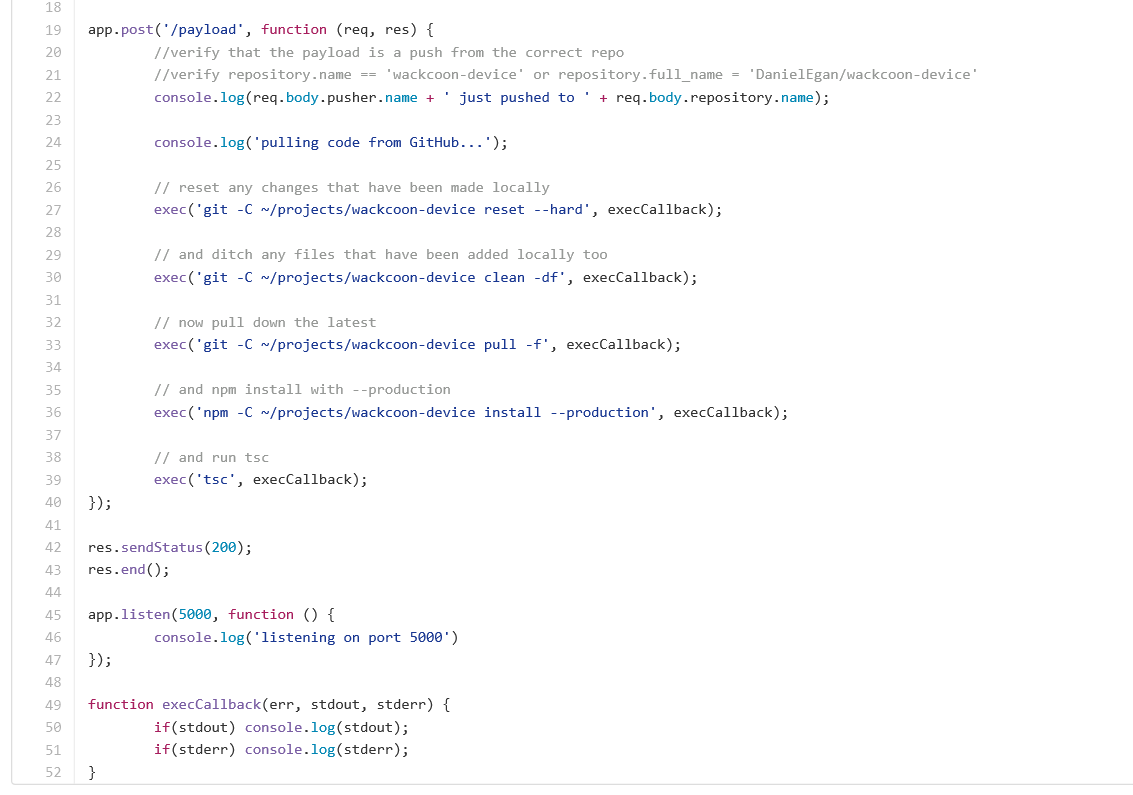
so let's look inside my express route for post.
the first thing i do is look through the json that the webhook sent me for a couple of pieces of information (there is a ton, i will post an example at the bottom of this post, or look in the docs) i am just pulling out who did the push, and what repository they pushed to.
next, after writing a simple message to the console, i am using a core node module called child_process that will allow me to run commands on the machine it is running on.
i call git, the folder i want to run it on, the command, and any flags i want. since i might be using scp to send files over the pi when testing, i hard reset it, clean it, pull, and then do an npm install in case any modules were added (an added step could be to look through the json to see if the package.json was modified before running that last one, but i am not doing that), and finally running tsc since we are using typescript in the project.
obviously, make sure you run this project on your pi using node app.js from the terminal.
again, you can see, the entire project looking at the wackcoon-hook project .
a way for the pi to be reached from the internet
since this site is running on localhost, we need a way for github to access this site. there are quite a number of ways for you to accomplish this. you could use port forwarding on your router to make it accessible to the outside world, or you could use one of two dev tools that i have used.
localtunnel – this is an npm module that will run on your pi (or other devices) that allows you to set up a “tunnel” from your local port to a mapped url that you can use point github to. this is an opensource free npm module. i have used it but it is a bit flaky, it will shut down periodically and you have to re-run it. if you need help setting this up, here is a great tutorial to help you.
ngrok – this is a free tier, paid tier serves that, in their words helps you create “secure tunnels to localhost” to answer the question ”i want to expose a local server behind a nat or firewall to the internet.” if you need help with this, you can check out this tutorial .
that’s it, that is all you need. now you can work as a team and have them push to your master branch on github and it will automatically push it to your pi. if you have any questions fell free to ask them in the comments.
as promised, here is the json that is sent from the webhook
headers
request url: https://wackcoon.localtunnel.me/payload
request method: post
content-type: application/json
expect:
user-agent: github-hookshot/0b0c52f
x-github-delivery: 7507b280-318c-11e6-9322-eaaef242aa6c
x-github-event: push
body
webhook – https://wackcoon.localtunnel.me/payloadPublished at DZone with permission of Daniel Egan, DZone MVB. See the original article here.
Opinions expressed by DZone contributors are their own.


Comments